Booking Form Templates


Why Elfsight Booking Forms are the Best?
If you’re on the hunt for a highly responsive and flexible form to improve engagement and get more potential clients, then the Booking Form from Elfsight is the best alternative to set your business apart. Our ready-to-use solutions can optimize the site’s user experience and boost sales in a couple of minutes. Save some time and money on employing a programmer since the installation process is quick and doesn’t require programming expertise!

Fulfill Business Needs with the Booking Form Templates Collection
Introduce yourself to a new selection of ready-to-use Booking Form templates from Elfsight with a revolutionizing feature — AI Form Builder Generator! They are designed to save time and effort, providing an easy and efficient way to manage online bookings and reservations on a website.
This time, you are the creator of a trendy online form that perfectly matches your business aesthetics and design style choice. Every hotel or service business can easily add or remove fields, change the layout, and add a personalized touch. Use it with guarantees of excellent functionality, visual appeal, and consistency with the brand image.
What equally matters is that these Booking Forms are in high demand by businesses across various industries, including hotels, restaurants, event management companies, healthcare providers, and many more, making them a permanent solution to evolving trustworthiness relationships with potential customers. Create a loyal bond and keep up with customer satisfaction levels!
And by the way, there is no more need to get worried about leaking any data or receiving massive amounts of spam. We took care of that too. This means that customers can trust the business with their personal details, which leads to brand devotion.
Do you feel like you blend with the rest? Elfsight can help you fix that by offering to generate the form for your website. The process is somewhat simple—perhaps because you have to type in a prompt and live-watch how AI creates the original form. See it yourself!
What are the examples of businesses that can use the Booking Form template on a website?
Booking form templates are significant for businesses that provide hospitality and online reservation services. The templates cover a large selection of industries, so let’s outline a few existing examples and discuss the beneficial sides of adding them to your website:
- Example 1: Hotels and Accommodation Providers
A hotel or another accommodation provider is the first example of a business that can use Booking Form templates. This is the most common industry that requires an efficient and user-friendly way for customers to book stays online.
So Booking Form templates can turn things around for you! They offer a seamless hotel booking experience to customers while ensuring to consider preferences, room types, and check-in and check-out dates without causing any issues.
- Example 2: Restaurants and Cafes
Restaurants and cafes happen to be the second example on a list that can also benefit from online Booking Form templates. By offering online website booking, these businesses can reduce the time spent on phone reservations and improve the overall customer experience.
The great value of Booking Form templates is gathering customer data and all the desirable preferences for booking a dream table. Plus, you can go the extra mile by collecting dietary requirements, allergies, and intolerances to avoid food poisoning or other consequences.
And by the way, the online form is the best alternative for getting your customers to know better to create targeted marketing campaigns and promotions.
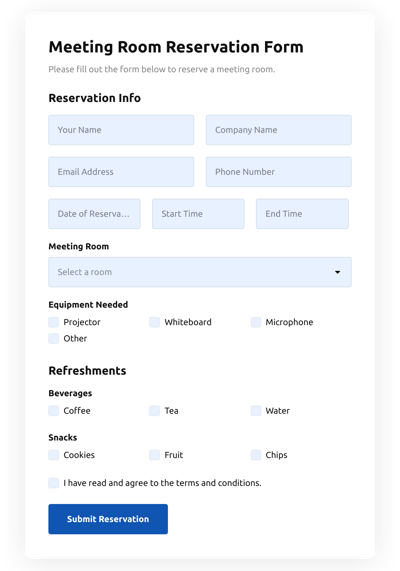
- Example 3: Event Management Companies
Event management service requires a reliable and efficient way to manage event bookings and ticket sales. And apparently, it’s much more convenient with the help of the Internet. Online booking takes a few taps and clicks on a website to replace physical queues and lots of paperwork.
By no argument, Booking Form templates allow companies and businesses to collect all the necessary information on their websites: personal contact details, snack preferences, timing, date, etc. But so you know, the template is fully customizable and can include various fields to match your event needs. Uplift and personalize the experience for attendees!
- Example 4: Healthcare Providers
Healthcare providers—medical clinics and dental practices—can also benefit from Booking Form templates. Booking appointments on a website help this service deal with unstructured methods of organizing data causing overbooking problems.
These templates allow patients to make appointments online, reducing the need for phone calls and improving the overall patient experience. The beneficial possibilities are ongoing for offering personalized service. For example, you can begin by obtaining contact information and finish by getting a glimpse of medical history via an online form.
- Example 5: Fitness and Wellness Centers
Fitness and wellness centers, such as gyms and spas, require an efficient way for customers to book a class, appointment, and service online. The website Booking Form lets you be the creator of this narrative.
Booking Form templates are customizable, and you can create various fields and elements, such as class schedules, trainer availability, and service options. This allows customers to book their preferred class or timing online, and you can prioritize more vital tasks.
- Example 6: Tour and Travel Companies
The last example here is tour and travel companies which can use Booking Form templates to offer customers buying tours and travel packages on the websites online. This is a step further for simplifying the process and keeping the service up to the bar.
Customizable templates can include fields for travel dates, package options, and payment details. This process saves time for customers and staff while allowing tour and travel companies to collect essential information about their clients.
With a wide range of benefits, such as improved customer experience, increased efficiency, and personalized services, your business is prepared to shine bright! Whether it’s a hotel, restaurant, event management company, healthcare provider, or fitness center, Booking Form templates can help you create a streamlined booking process on a website and enhance overall workflow.
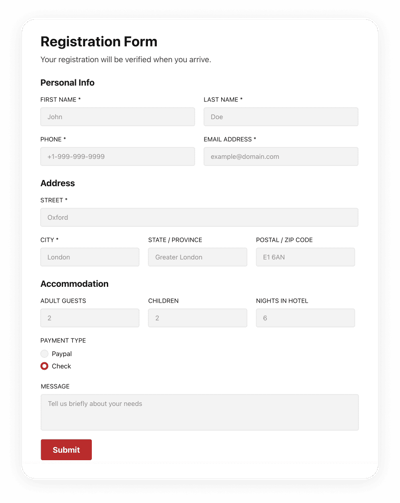
Can I use the online Booking Form template on a hotel business website?
Yes, of course! You can use the template on a hotel website. Typically, a hotel business heavily relies on estimated sales numbers, especially during peak seasons and high tourist activity. Travelers prefer booking online reservations before arriving at destinations and not taking chances upon arrival.
This rule speaks the truth: the more you sell, the more revenue you get. So if you want to generate more profit and keep the hotel business afloat, you need to think of positively impactful actions and methods.
The Booking Form template for a hotel website comes in handy for those occasions. Create seamless navigation with an online form so guests can pinpoint their preferences, needs, and desirable hotel services. Make it clear where they can input check-in and check-out dates, the number of people staying, and all the important contact information without taking them to a third-party website aggregator.
You can even automatically send confirmation emails at the exact moment of successful online form template completion. Ensure peace of mind knowing everything has been taken care of before the hotel arrival date/time scheduled!
Some key attributes you, as a creator, can add within the hotel-specific online form template include:
- Personal guest information. These form fields are dedicated to first and last names, home addresses, phone numbers, and email addresses.
- Dates. Request and confirm the check-in and check-out dates with your potential attendees.
- Number of guests. Make a notice of how many people are planning to visit your hotel.
- Room type. Let your guests pick a preferred room to stay in.
- Payment. Give people a choice to choose a payment method.
- Amenities. If your hotel provides special deals, like free Wi-Fi, gym, or breakfast, you can mention them in an online template on your website.
- Special requests. A blank space for special comments or needs, like an extra bed, crib, food preferences, etc.
What are the benefits of using the Booking Form template on a website?
There are numerous benefits of using a Booking Form on a website, no matter the business size. Mention nine of them to highlight the vital points:
- Saves Time. First and foremost, the online form can help you save time. You no longer need to create it from scratch, as it is known for being time-consuming. With pre-designed fields and added questions, you focus on other aspects of business, such as marketing, website design, and customer service.
- Easy Customization. Customize an online template by adding or removing fields as per your requirements without any technical or coding knowledge required. Have everything in one place and create a trendy form look!
- Improved Customer Experience. A well-designed and easy-to-use online booking system improves customer experience leading to a higher satisfaction rate. Plus, the clear instructions ensure that clients complete the form correctly without too many mistakes.
- Professional Look. Create trust between your brand and clients by choosing an appealing template.
- Consistency. Using standardized online forms delivers consistency across all bookings made by different people at different times on a website.
- Reduces Errors. Having predefined fields reduces errors caused due typos or missed information.
- Better Data Management. All data collected through the same format makes it easier for business owners/managers/employees to analyze the results and statistics.
- Increased Efficiency. Automating manual tasks frees up staff’s time and lets them focus on other things like providing excellent customer service.
- Cost-effective. Online bookings reduce costs associated with phone calls and paper-based systems while minimizing no-shows or cancellations.
What features of the Booking Form template should you definitely test out?
A well-designed Booking Form template can streamline the booking process and make it more efficient for the business and the customer at the same time. Here are six features of a top-notch Booking Form template that you should play around with:
- Elfsight AI Form Generator. You’re your own creator! Type in a prompt request and wait a few seconds until Elfsight AI generates a unique online form for your website.
- Customizable Fields. Create, add, remove, or adjust custom fields to meet the requirements of your business.
- Payment Gateways. If you need to receive payments for your service, the Booking Form can be integrated with a payment gateway, like PayPal or Stripe, via Zapier integration.
- Mobile Optimized. The template is optimized for mobile devices, providing a seamless booking experience for users on the go.
- Captcha. Turn on CAPTCHA verification to protect customer data and prevent spam.
- Integrations. Sync your online form with third-party integrations—Zapier, Mailchimp, and Google Sheets—to export and analyze data.
Booking form templates are an excellent tool that helps businesses save time, improve efficiency, and provide a better customer experience. So why not give it a try?
Booking Form Features and Integrations
How to Create Booking Form template for Website
In order to make the Booking Form, apply the steps from the brief tutorial below:
- Pick an Booking Form template from the catalog and click the “Use Template” button.
- Modify the template’s features to match your interest and apply all modifications.
- Sign in to your profile.
- Receive your individual HTML code to integrate the form on the webpage and the direct URL.
Do you face any challenges making your form template? Feel free to reach out to the Elfsight Support Team.
How to add Booking Form to Website
To integrate the Booking Form to your website, apply the step-by-step tutorial below:
- After personalizing the Booking Form template, sign in to your profile.
- Copy the individual form code.
- Add the form code into your site editor.
- Congrats! You have embedded the Booking Form to your webpage successfully.
Did you face any difficulties during the installation process? Don’t hesitate to reach out to Elfsight assistance service. We will be happy to help you.
FAQ
Which payment methods does the Booking Form accept?
The Booking Form allows several payment gateway integrations. For example, the most popular ones are PayPal and Stripe.
What date format is supported in the Booking Form?
The Booking Form supports several formats for dates, such as MM/DD/YY, DD/MM/YY, and YY/MM/DD.
What calendars can I sync to the Booking Form?
You can synchronize a variety of calendars to the Booking Form through the Zapier app integration, for example, Google Calendar.
Is the Booking Form template suitable for any website builder or CMS?
Certainly! The form template for Booking Form is absolutely suitable for all CMS and websites:
WordPress, Woocommerce, Wix, Weebly, Webflow, Squarespace, Shopify, Prestashop, Opencart, Mailchimp, Magento, jQuery, Joomla, HTML, Google Sites, Godaddy, Facebook Page, Elementor, Drupal, Divi, Bootstrap, Blogger, BigCommerce, Clickfunnels, Adobe Muse and many others.
What kind of integrations can I sync to the Booking Form?
You may sync Google Sheets, Zapier, and Mailchimp to the Booking Form in the online demo configurator after selecting the template.
Where can I share my Booking Form besides the website?
You can distribute the form across several marketing platforms, but we advise checking out these options to boost orders:
- Distribute the direct URL-link to the form.
- Add the form to your emails.
- Integrate the form to your landing page.
- Send the form URL-link throughout your social media channels.
What elements can I customize in the Booking Form template?
You’re able to customize all the elements of the Booking Form using the live demo editor, including the text fields to complete, heading, cover image, logo image, footer, alignment, layout, button icon, color scheme, post-submit message, and so on.
How do I export my form data?
In order to export the form data, it is necessary to sync the Booking Form with an integration application like Google Sheets, Zapier, or Mailchimp. To do so, view the guideline:
- Open the “Integrations” menu tab in the online demo configurator.
- Pick the integration service you would like to use.
- Link the Booking Form to the selected integrator by fulfilling the criteria for each app.
How do I set up notifications for my form?
To set up the form notifications and continuously get emails, complete these steps:
- Locate the “Email” menu tab in the demo configurator.
- Pick the “Notify Me” button.
- Activate “Email Notifications” to receive notifications when somebody fills out the form.
- Enter your email address and modify the text message notification.
- Go back to the “Email” menu and choose the “Notify Respondents” option to deliver an email response after somebody submits the form.
- Activate “Autoresponder Email” and add the message.
Are the Booking Form templates responsive?
Yes, the Booking Form are fully mobile-friendly and created to function efficiently with different screen resolutions, OS, and web browsers on every device.
Can I add the floating Booking Form to my website?
Yes, even if you’ve selected the embedded template initially. To adjust the layout and create the Booking Form floating, follow these points:
- Locate the “Layout” menu bar inside the demo.
- Hit the “Pane” layout button displayed on the screen.
- Modify the settings for the placement and floating button.
- Change the floating button in the “Appearance” tab and save the modifications.
- Sign in to your admin board and get the code to enter on the site.
How do I add a CAPTCHA to my form template?
In order to include the CAPTCHA security feature to your Booking Form template and stay protected from spam, use this brief instruction:
- Navigate to the “Settings” tab inside the online demo builder.
- Find “Spam Protection” and click on it.
- Toggle on “Enable reCAPTCHA”.
