Fun fact: 97% of consumers read online reviews before choosing a business, and Google remains the most-used review platform (by 71% of consumers) — BrightLocal, 2026
Great Google Reviews don’t help if visitors have to leave your website to find them. You can add Google Reviews to your website as a live, auto-updating feed that keeps social proof where it belongs — right next to your calls to action.
The Elfsight Google Reviews widget is one way to do this: it pulls verified reviews directly from your Google Business Profile, updates automatically, and gives you control over rating filters and display settings – all without writing code. This guide walks you through every available method, including the Google Places API, so you can pick what fits your setup.
- How to embed Google Reviews with and without code
- Your options compared: widget vs native embed vs API
- Where to display reviews on your website for best results
- Filtering, sorting, and review moderation settings
- Optimization tips for conversions and review generation
Quick Start: Add Google Reviews to Your Website
This is the fastest path from zero to live reviews on your website — the entire process takes about 5 minutes.
- Open the Google Reviews editor and select a template.
- Connect your Google Business Profile (enter business name or Google Place ID).
- Click “Add to Website” to get the embed code.
- Paste the code into your website’s HTML editor and publish.
Create your Google Reviews widget in the live editor below ↓
How to Add Google Reviews to a Website: Your Options
There are several ways to display Google Reviews on your website, each with different tradeoffs in customization, technical effort, and automatic updates. Here’s how they compare:
| Method | Difficulty | Customization | Auto-Updates | Filtering | Cost |
|---|---|---|---|---|---|
| Elfsight Google Reviews widget | No code | High (6 layouts, colors, fonts, badges, star filters, header) | Yes (72-hour cache) | By star rating, keyword, individual reviews | Free plan / paid from $5/mo |
| Google Maps embed (iframe) | Basic HTML | None (map pin with business info) | Yes (map data only) | None | Free |
| Google Places API | Developer required | Full (you build everything) | Yes (if coded) | Whatever you build | Free API + dev cost |
| Manual copy-paste / screenshots | None | None | No (instantly outdated) | Manual | Free |
Takeaway: The Elfsight widget is practical if you want layout control, filtering, and auto-updating reviews without code. Google Maps embeds are free, but only link visitors to your profile – they don’t display reviews inline. The Google Places API offers full control, but requires developer maintenance and returns only up to 5 reviews per request. Manual methods work temporarily.
In case you’re a visual learner, here’s a quick video tutorial on adding Google reviews to your website:
Google Reviews on Website Examples: Where and How to Display Them
Before jumping into configuration, think about where reviews will have the most impact. Placement affects both trust and conversions. A widget buried on a low-traffic page won’t do much good for you.
Homepage — above or below the fold
This is the highest-impact placement for most businesses. A review widget above the fold gives visitors a trust signal before they even start scrolling: they land on your page and immediately see that real customers rate you highly.
For service businesses and local shops, a slider or a carousel works well – it shows enough reviews to build trust without overwhelming the layout. E-commerce and SaaS sites usually benefit more from placing reviews below the fold, where they reinforce the product pitch as social proof.
Product and service pages
Keyword filtering lets you tailor reviews to the page. A wedding photographer’s pricing page can feature reviews that mention communication and turnaround time, while a gym’s personal training page can showcase training-specific feedback.
Use a list layout here — it’s clean, readable, and doesn’t compete with product images or service descriptions. If your business has review photos from customers, enable the “show only reviews with photos” filter to make the display more visual.
Dedicated testimonials page
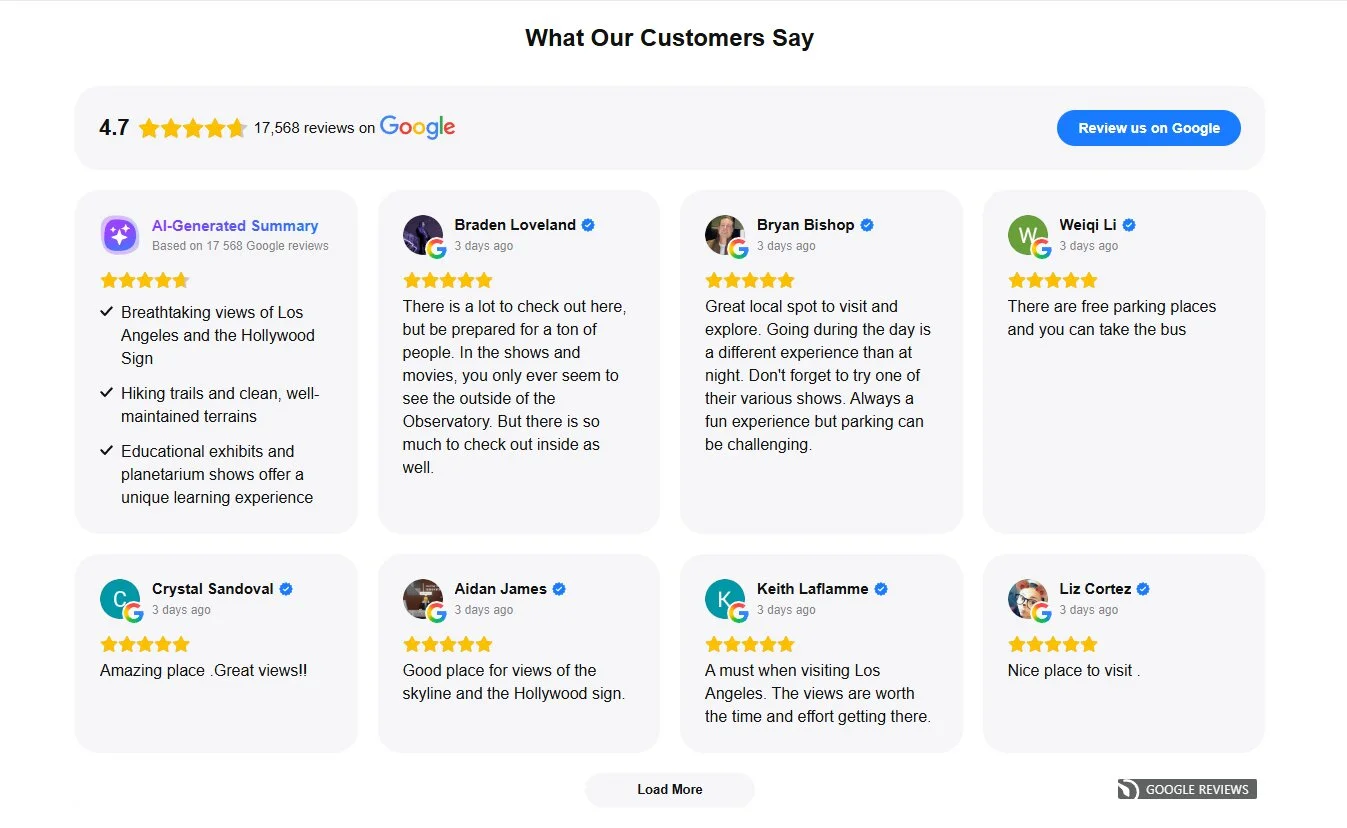
If you’re in professional services, B2B, consulting, or any comparison-heavy industry, a dedicated review page is worth creating. Use a grid or masonry layout to showcase review volume; visitors here are actively evaluating providers and want to see a broad range of experiences.
Don’t filter too heavily here – let the full picture speak for itself. Pin your strongest reviews to the top so they’re always the first thing visitors see, and enable review photos if you have them.
Floating badge — site-wide visibility
A floating badge keeps your star rating and review count visible as visitors scroll, without taking up page space. It works well in footers, sidebars, or as a corner element. Pair it with a full review widget on your homepage or testimonials page: the badge provides constant trust signals, while the full feed adds depth when visitors want details.
Sidebar — persistent reviews alongside content
If your website has a blog, resource center, or any content-heavy page with a sidebar column, that’s prime real estate for a compact review display. A badge, a sticker, or a short list (2–3 reviews) would work well here, staying visible while visitors read the main content.
Industry matters, too. Restaurants should highlight recent reviews because diners care about what happened last week, not last year. Medical practices may prefer to filter for 4+ star reviews and keep the display broad, while real estate agents benefit from dedicated testimonials pages.
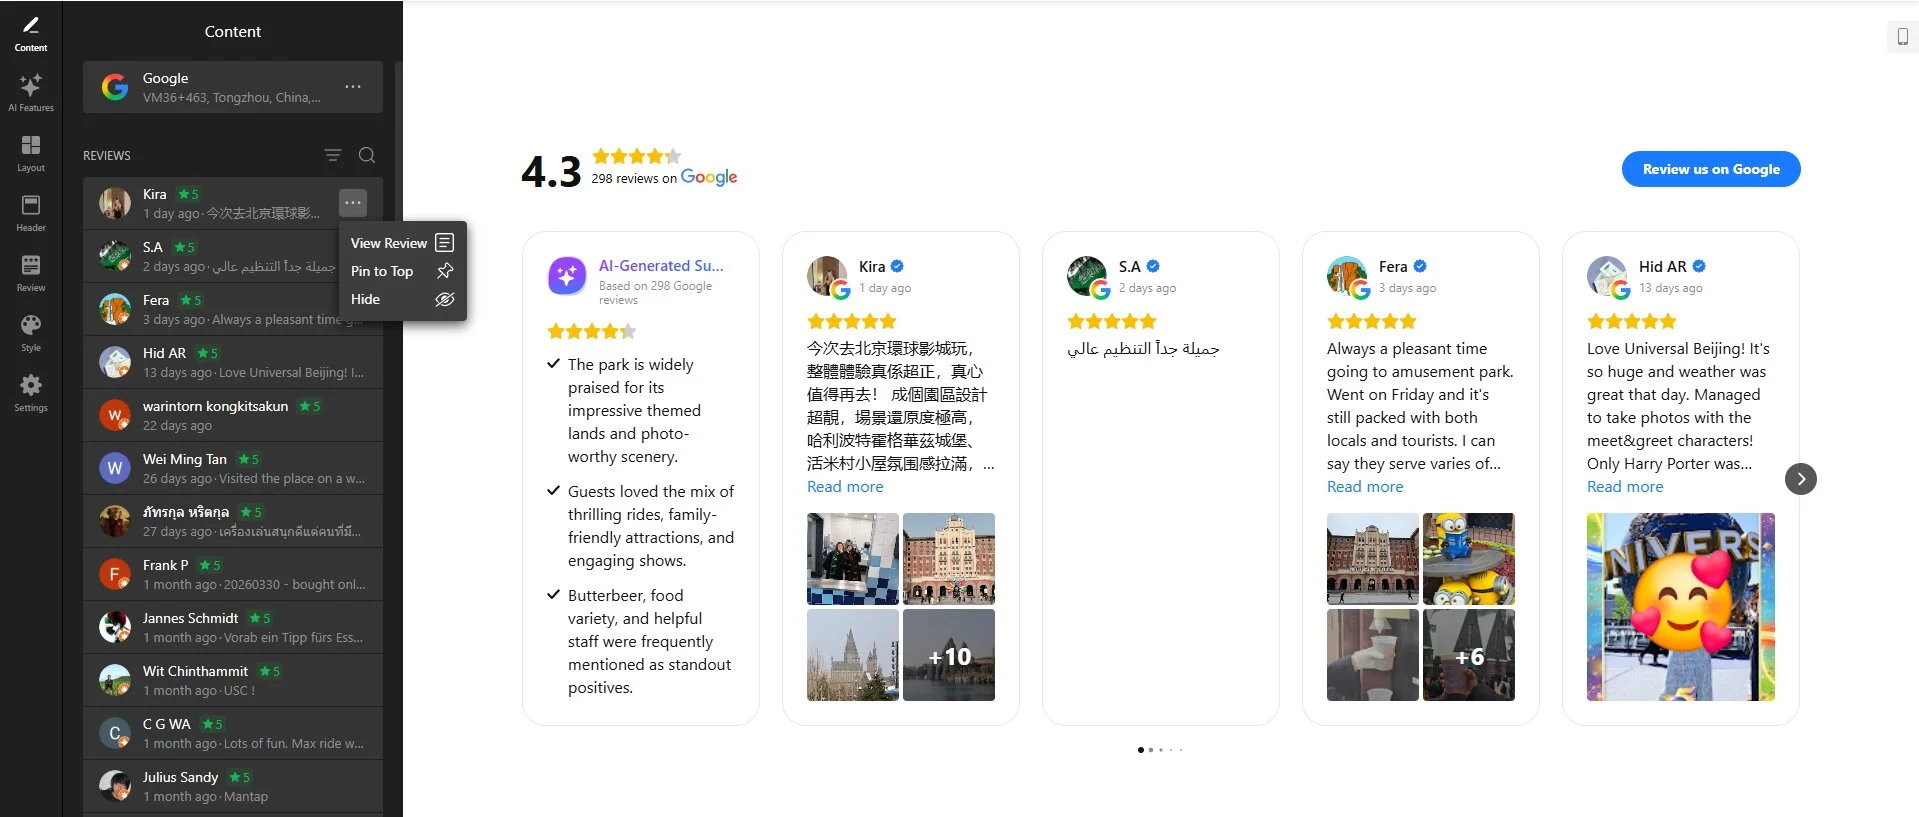
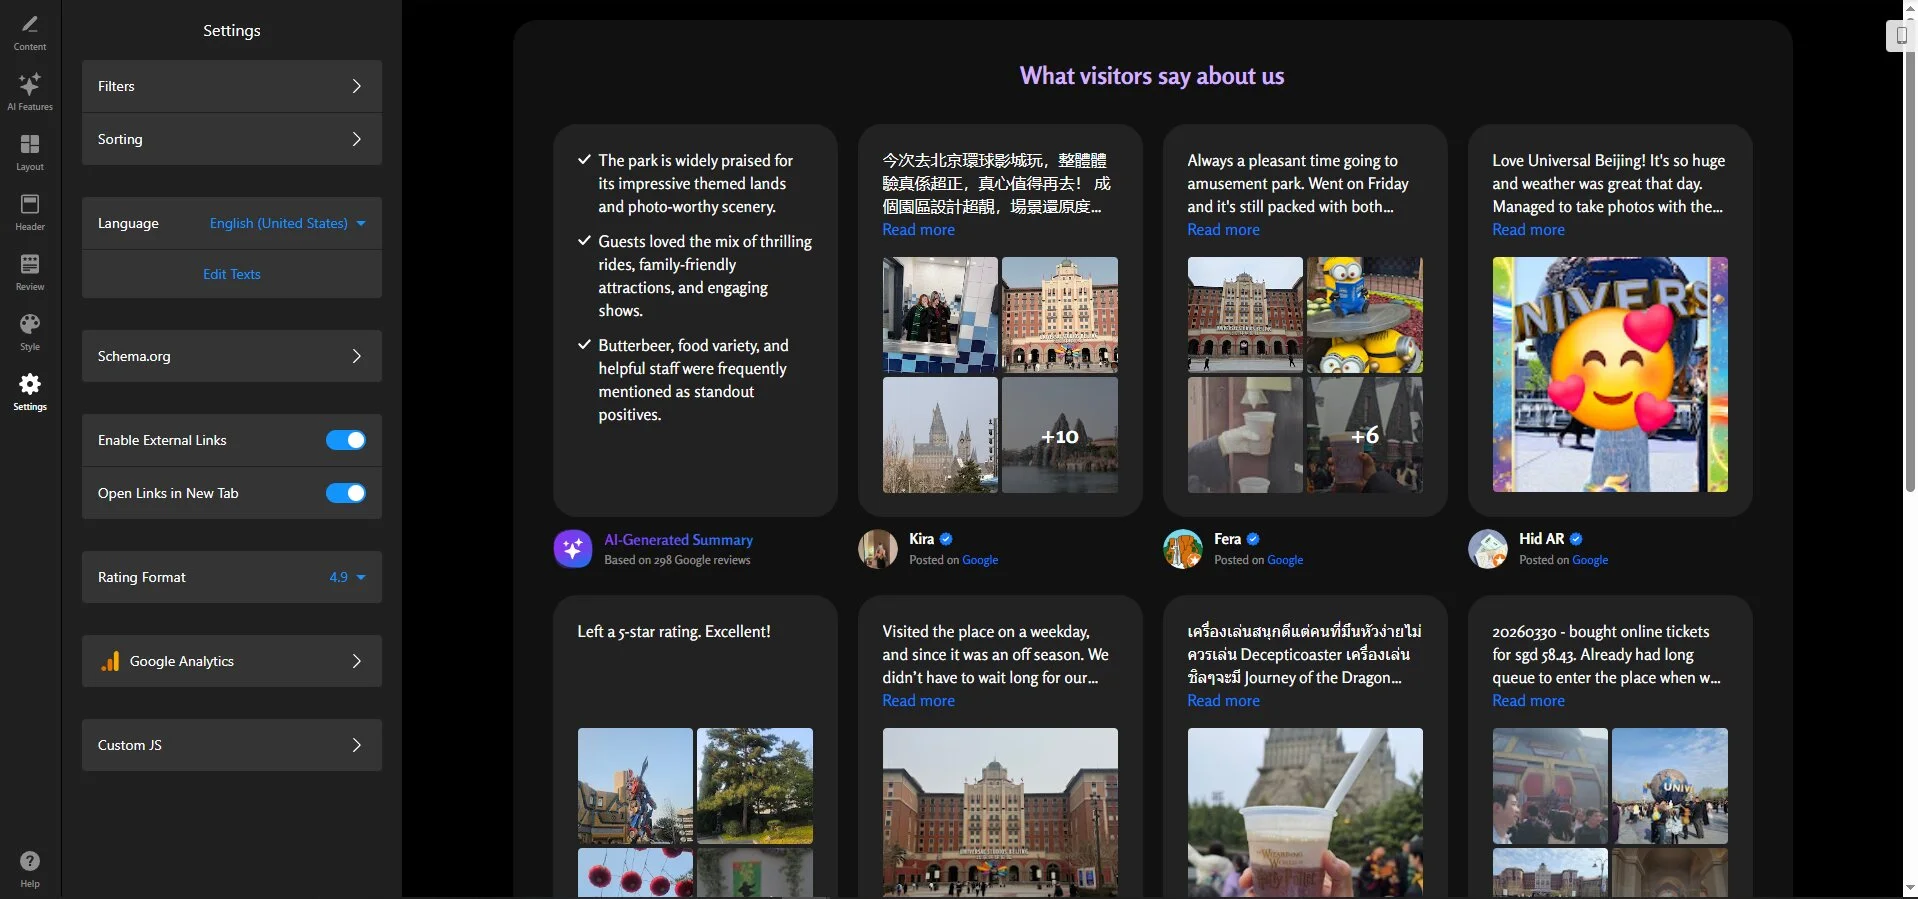
Step-by-Step: Setting Up Your Google Reviews Widget
Now that you know where you want your reviews to appear, here’s the full walkthrough with tips — from choosing a template to pasting the embed code on your website.
Step 1: Choose a template
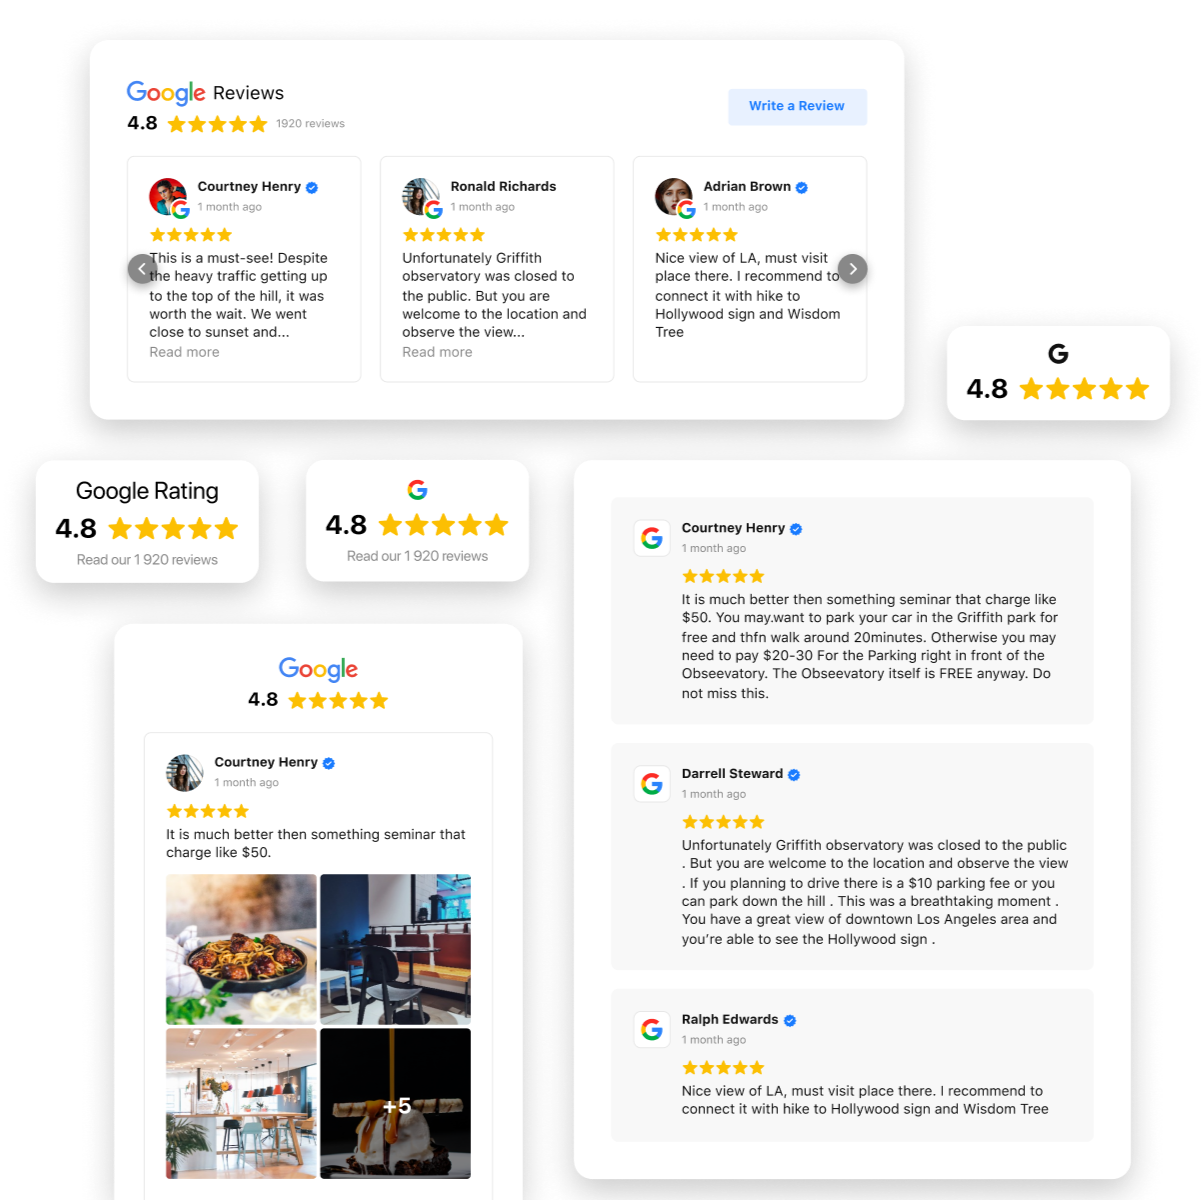
Open the editor, and you’ll see a selection of ready-made templates. Each one is pre-configured with a different layout and style: carousel, grid, list, masonry, slider, and badge variations. Pick the one closest to what you need and adjust from there.
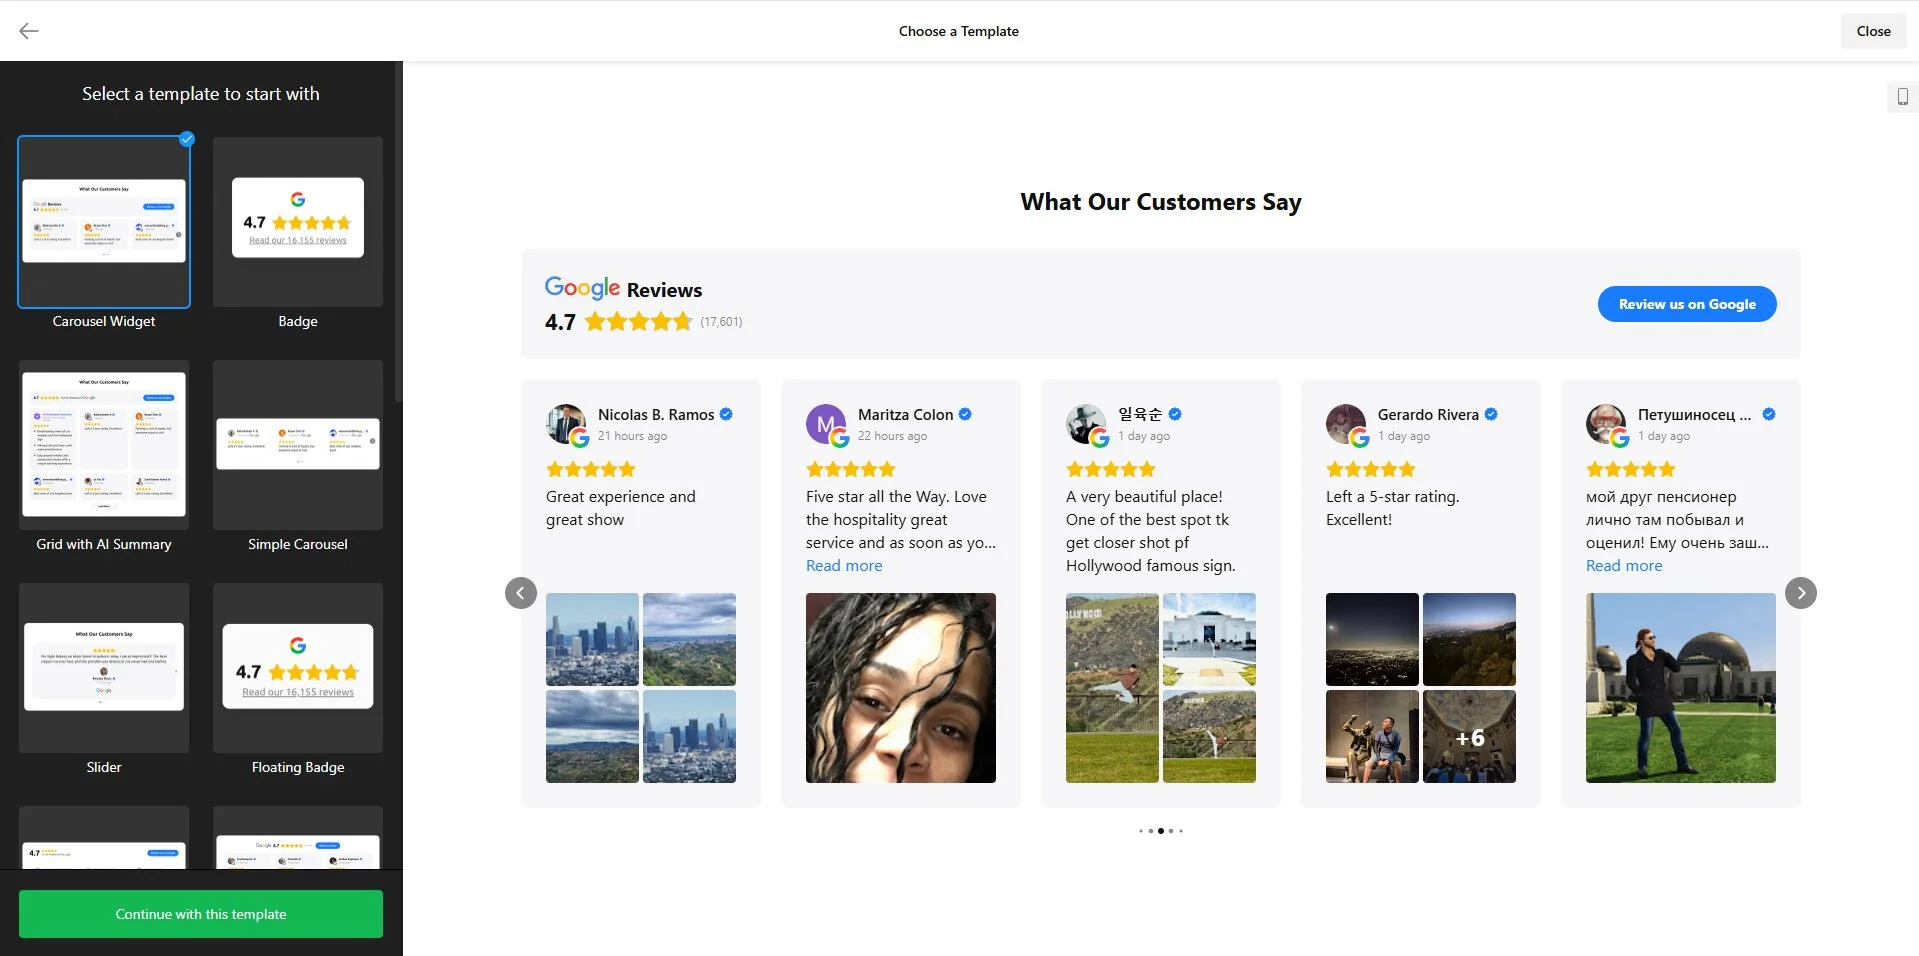
For most websites, the Carousel template is the safest starting point — it shows enough reviews to build trust without taking up too much vertical space on the page. If you need something compact for a sidebar or footer, choose a Badge template.
Step 2: Connect your Google Business Profile
This is where most people hit their first snag. In the Content tab, you’ll need to connect your Google Business Profile so the widget knows which reviews to pull. You have four connection options:
- Business name and address — type your business name and street address into the search field.
- Google Maps share link — find your business on Maps, share, and copy-paste it into the widget.
- Google Maps embed code — same as above, but copy the code from the “Embed a map” tab.
- Google Place ID — every business on Google has a unique Place ID. Use this as a fallback if your business doesn’t appear in the name search.
If your business doesn’t appear when you search by name, your GBP might not be verified yet — you’ll need to claim it through Google first. And if you have multiple locations, make sure you’re selecting the right one from the dropdown; each widget displays reviews from one Google location.
To display reviews from multiple platforms (Yelp, Tripadvisor, G2, etc.) or locations, you might want to try the All-in-One Reviews widget instead.
Step 3: Pick your layout
The Layout tab is where you decide how reviews look on the page. There are six primary options, and each suits a different placement:
- Carousel — reviews scroll horizontally with navigation arrows. Great for homepages.
- Grid — reviews arranged in configurable columns and rows. Use for dedicated testimonials pages.
- List — reviews stacked vertically, one after another. Perfect sidebar or narrow page option.
- Masonry — reviews positioned for optimal vertical space, with cards of different heights.
- Slider — full-width review slides with auto-rotation. Try for banners and hero sections.
- Badge — a compact star rating display in standard or floating mode.
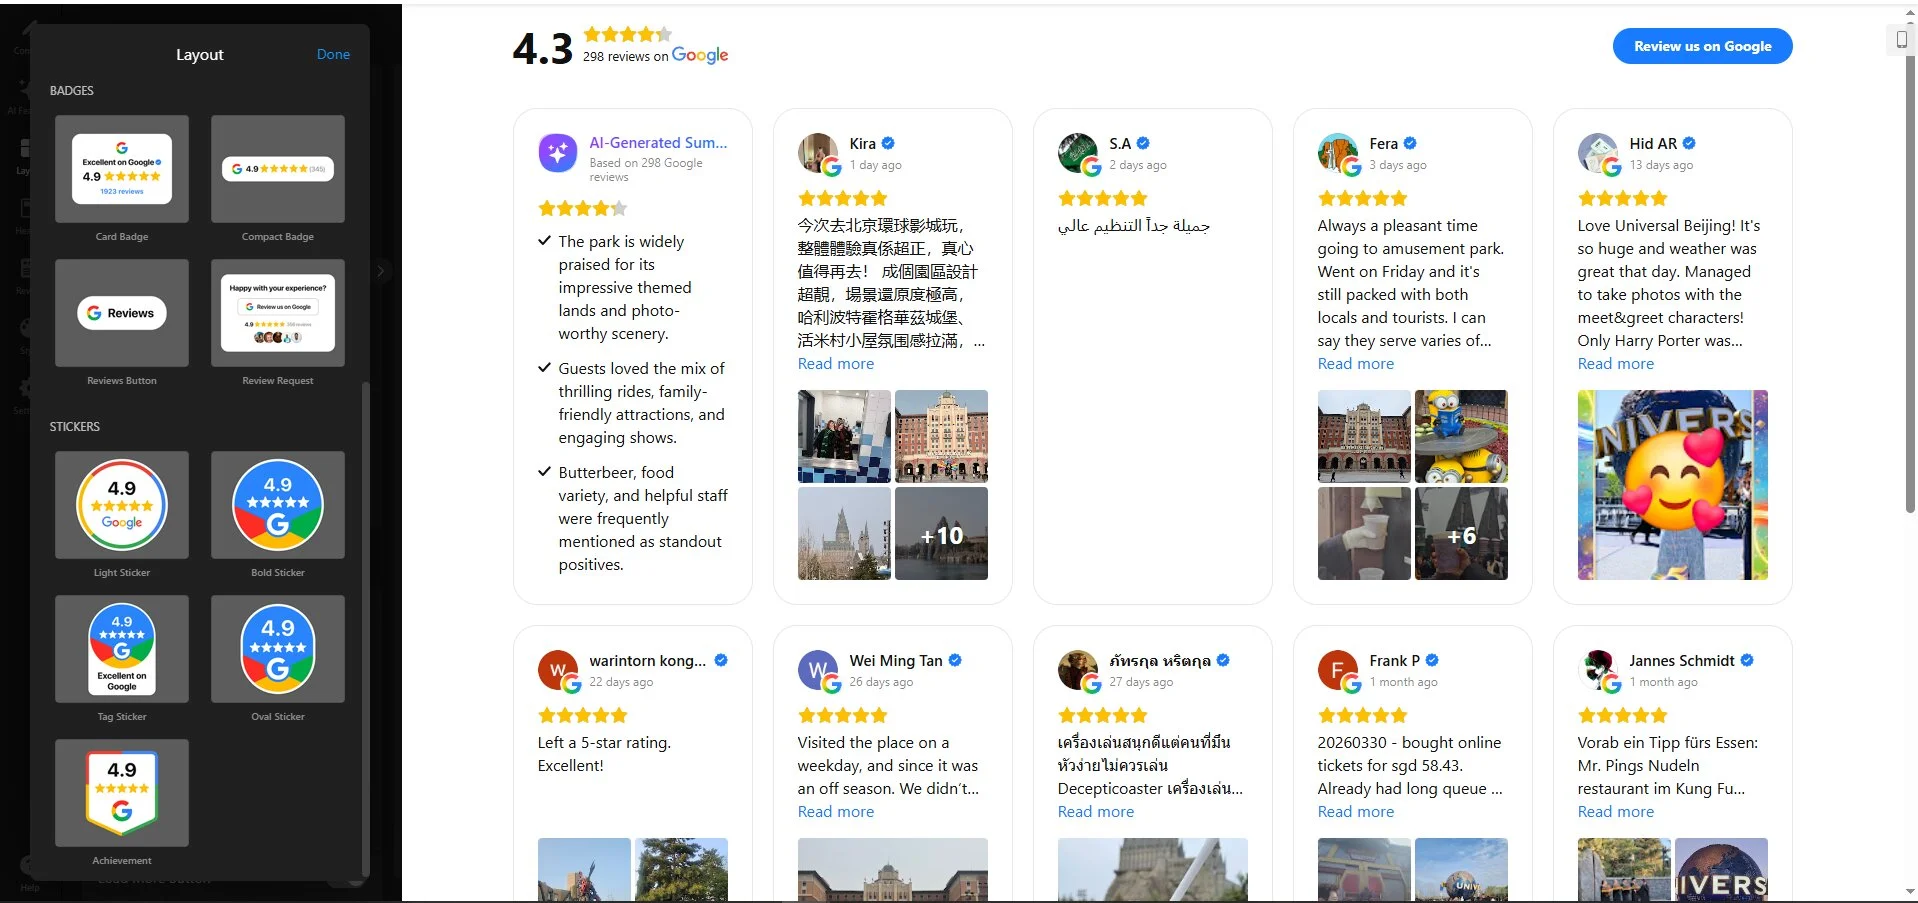
If you just want a trust signal that’s always visible, use the Floating Badge — it stays on screen no matter where the visitor scrolls. A bold Sticker is another compact but powerful option for minimal setups.
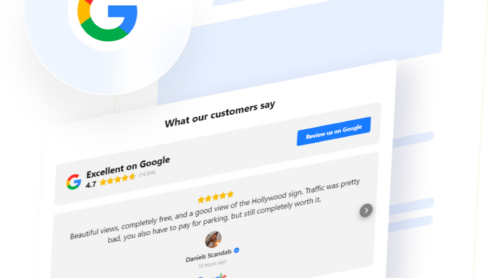
Step 4: Configure the header and “Write a Review” button
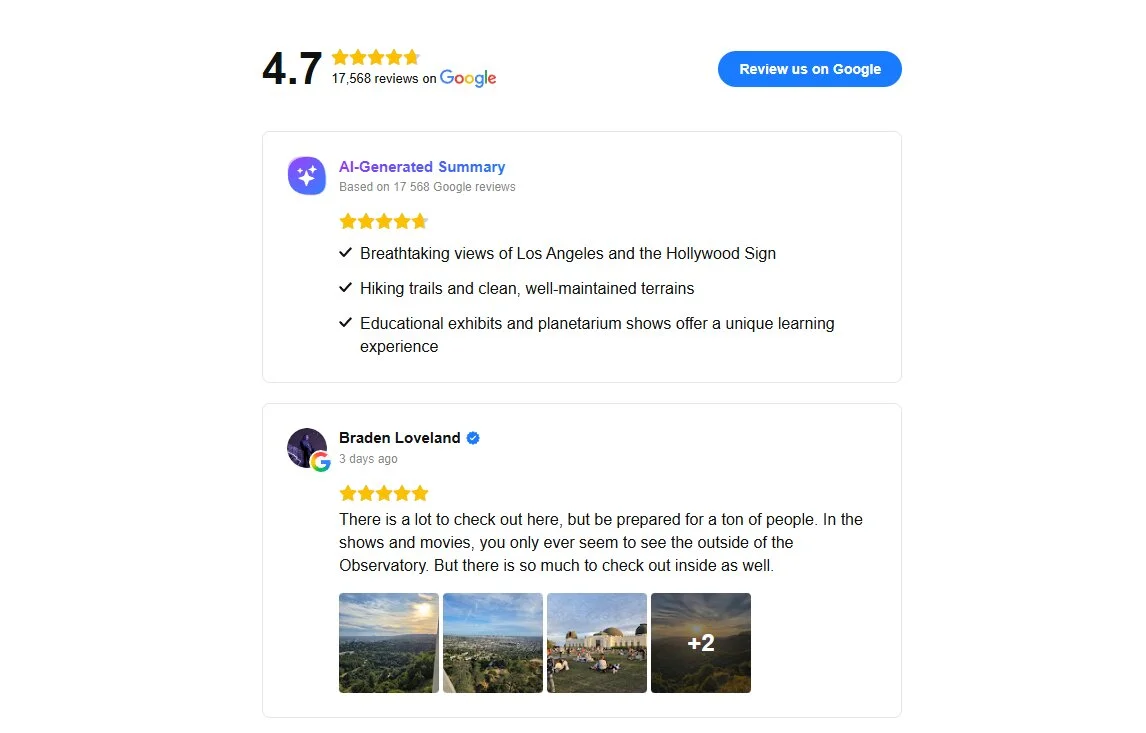
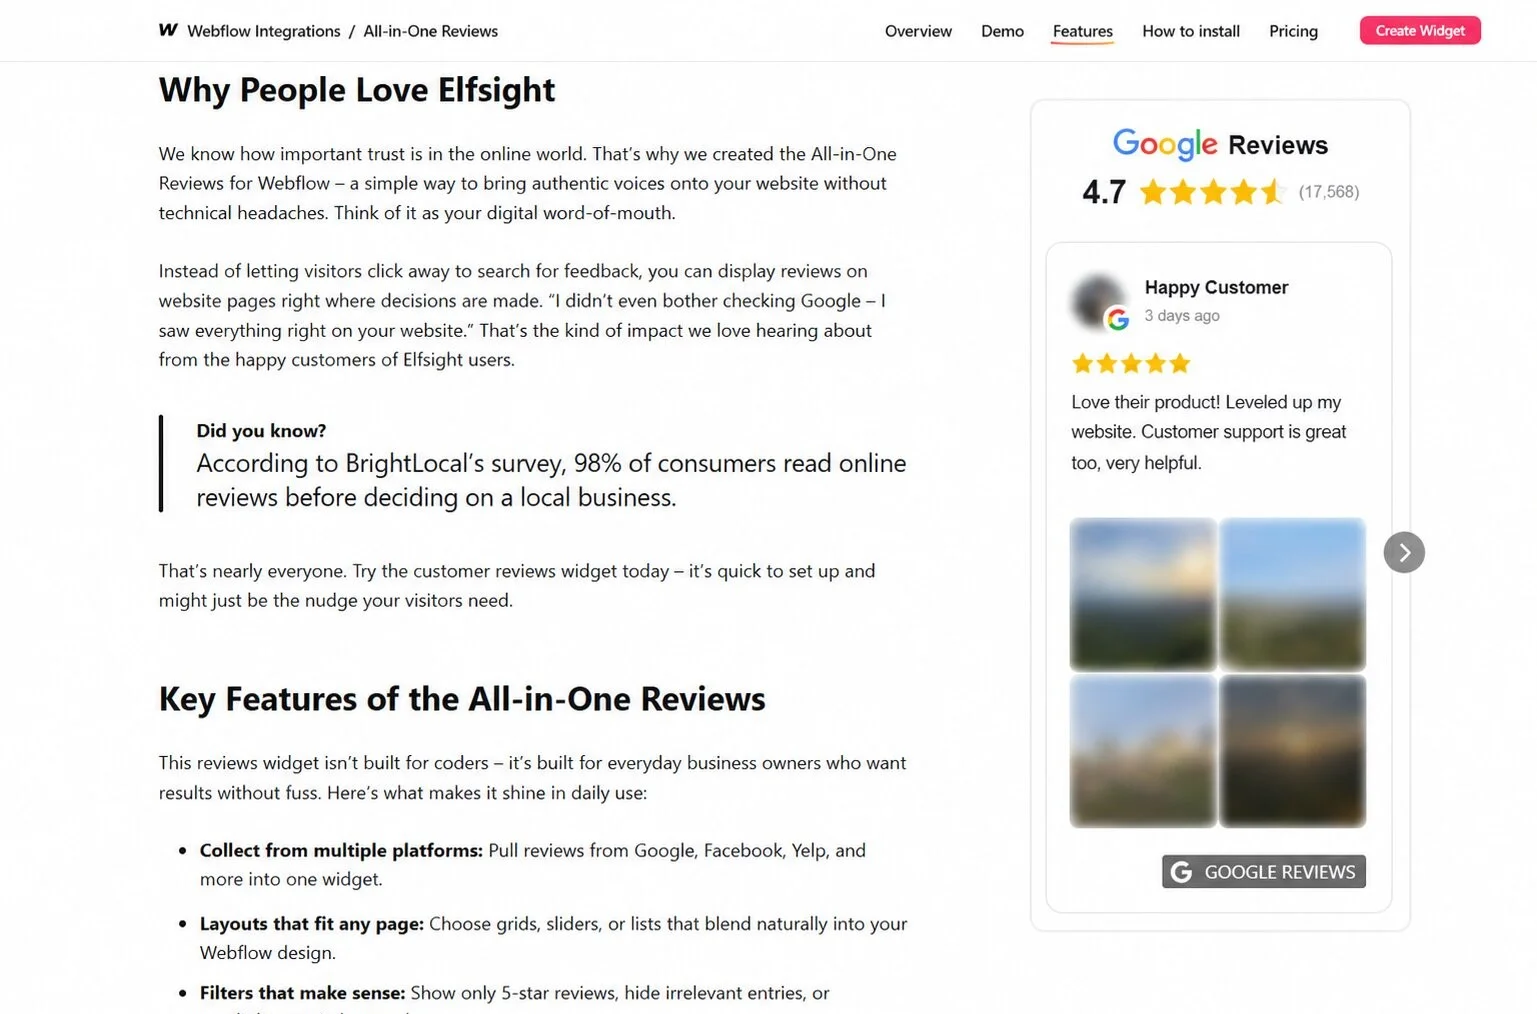
The Header tab controls the section above your reviews. It can display your overall star rating, total review count, a widget title, photos of recent reviewers, and most importantly, a “Write a Review” button that redirects visitors directly to your Google Business Profile to leave a new review.
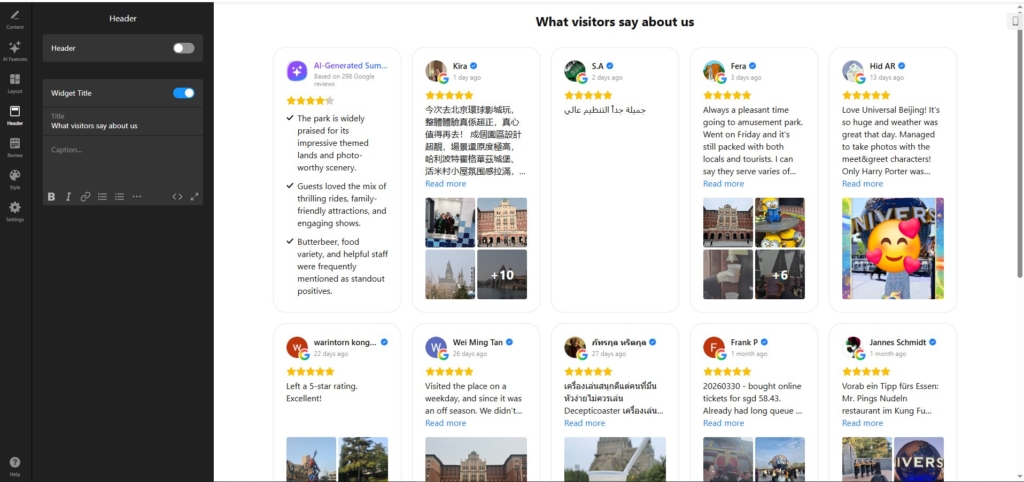
This is one of the most underused features in the widget. Every visitor who sees your reviews is a potential reviewer themselves. The button turns your review display into a review generation tool — instead of just showing social proof, you’re actively collecting it.
Step 6: Customize the design
The Style and Review tabs let you match the widget to your website’s visual identity. Here are the key settings:
- Review card style — choose between Classic, Bubble, or Spotlight (centered, text-emphasized).
- Colors — set accent color, card background, text color, star rating color, and link colors individually.
- Font and size — pick a custom font and adjust text sizes for the widget title and review body.
- Theme — light or dark mode.
- Review text display — show full text or a preview with configurable length.
- Reviewer info — control name format, reviewer photo, verified badge, source icon, and review date.
- Highlight text — select specific phrases and apply a colored highlight to spotlight key feedback.
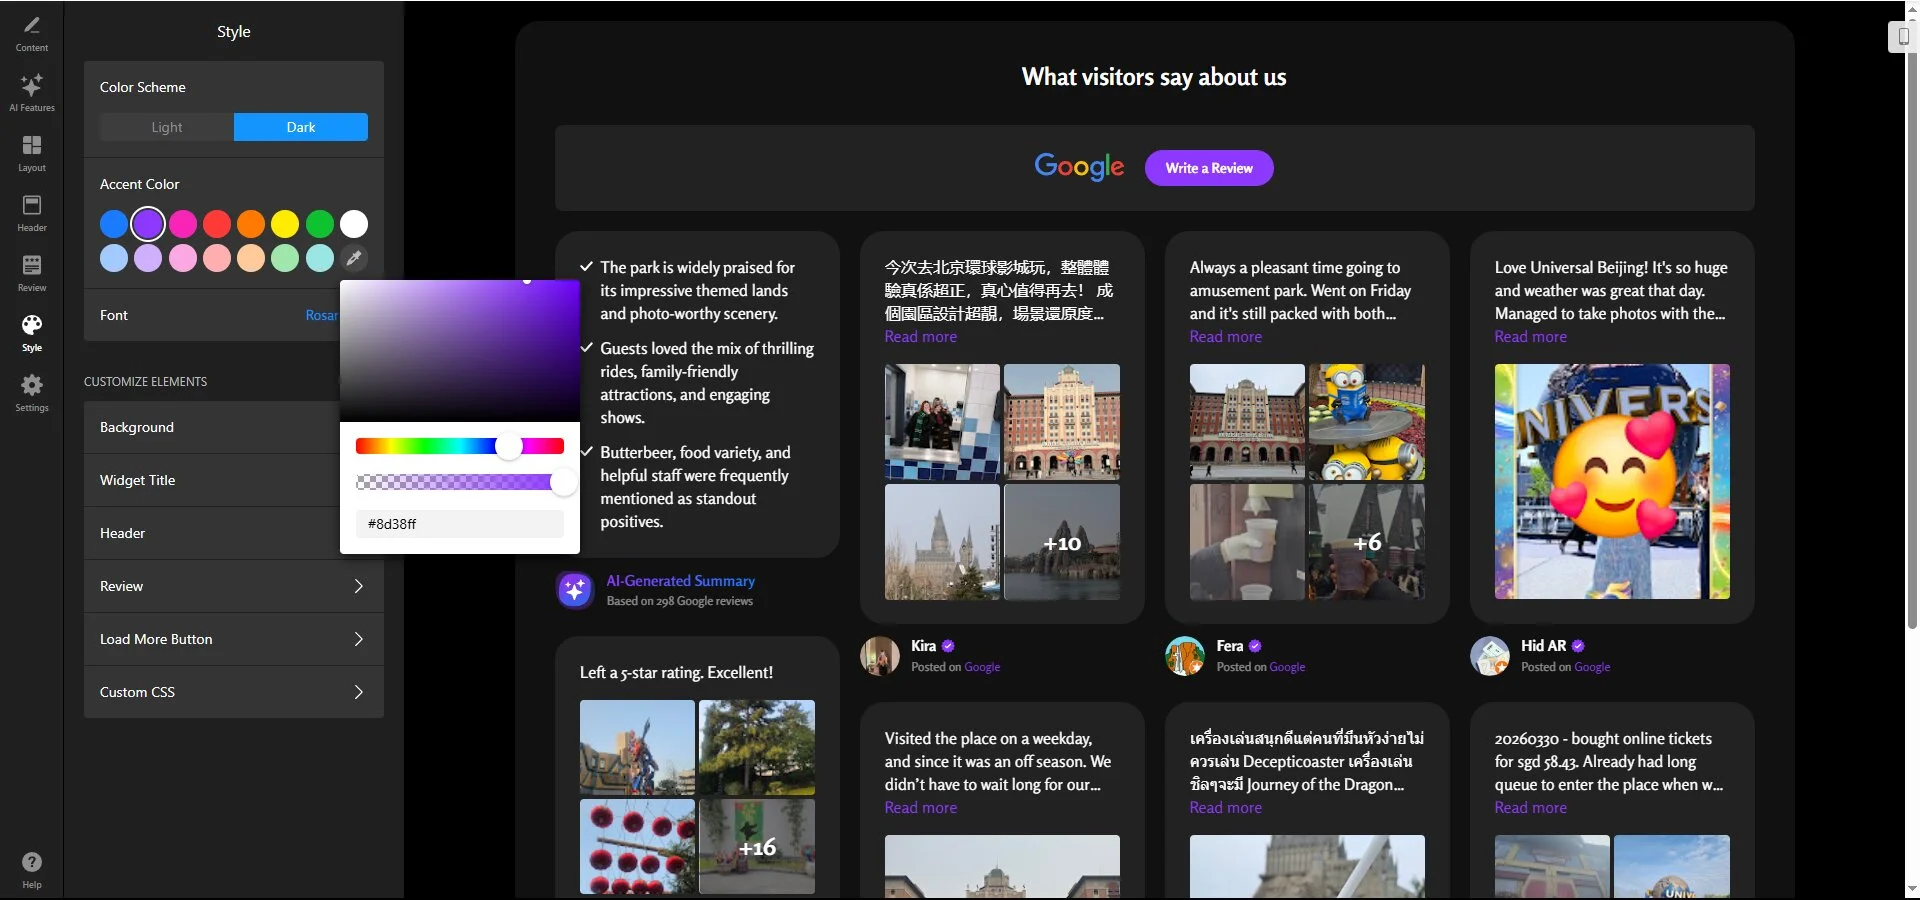
The Classic card style works for most websites because it preserves the familiar Google look that visitors already trust. If your website uses a dark background, switch to dark mode so the widget doesn’t create a jarring white block in the middle of the page.
Step 7: Filter and sort your reviews
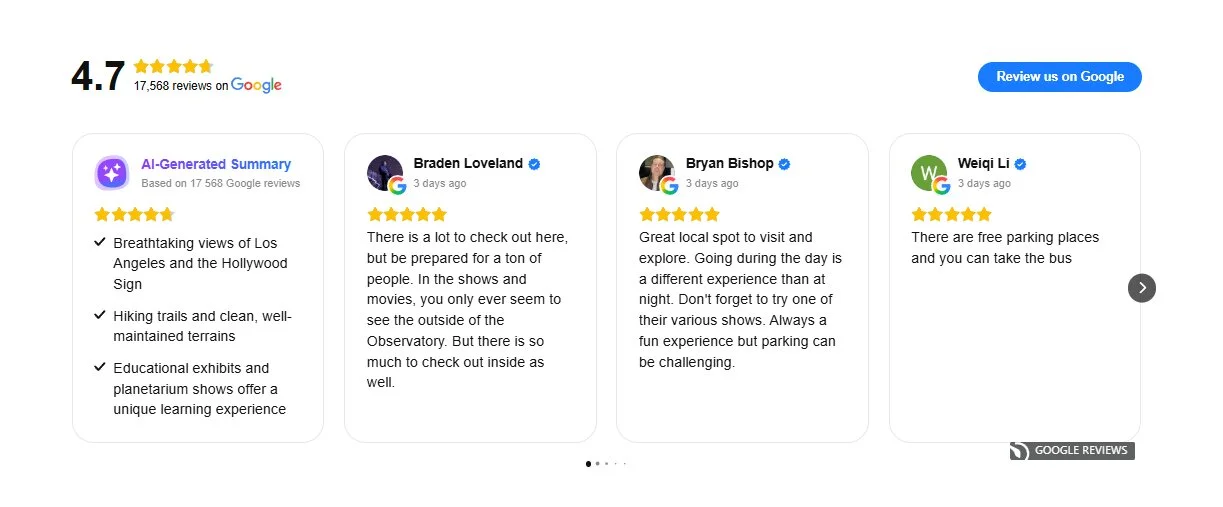
This is where the widget wins compared to native embeds. In the Settings tab under “Filter & Sort Reviews,” you can control exactly which reviews appear and in what order.
- Minimum star rating — show only reviews rated at or above a threshold (2–5 stars).
- Exclude by keyword or reviewer name — hide reviews containing specific words.
- Include by keyword — show only reviews mentioning a specific topic.
- Show only reviews with photos — filter to display only reviews that include customer images.
- Sort options — newest first, oldest first, highest rated first, or reviews with photos first.
Don’t filter too aggressively — a page showing only 5-star reviews looks curated, and visitors know it. Including a few 4-star reviews actually increases perceived authenticity. And if you have a few standout reviews, use the Pin to Top feature to make sure they’re always the first thing visitors see.
Step 7: Get the embed code and install
Once you’re happy with the setup, click “Add to Website” in the top right corner. You’ll get a Google Reviews embed code — a short HTML snippet with a script tag and a div element. Copy the full code.
Next, paste it into your website’s HTML editor wherever you want the reviews to appear. The exact steps depend on your platform. The widget works with most CMS and website builders, such as WordPress, Squarespace, Shopify, Webflow, Elementor, and Wix.
Troubleshooting quick check
- Reviews not loading: Verify your Google Business Profile is verified, public, and has reviews. The widget can’t display reviews from an unclaimed profile.
- Wrong business showing: Use Google Place ID instead of name search for precision. Multiple businesses with similar names can cause mismatches.
- New reviews not appearing: The widget caches reviews and refreshes every 72 hours. A review posted today may not show until the next cache cycle.
- Layout looks different on mobile: Check the mobile preview in the editor. Grid layouts may need fewer columns on small screens — adjust the mobile column count separately.
- “Write a Review” button not working: Verify the Google review link is configured correctly in the Header tab settings. The button redirects to your Google Business Profile’s review form.
Other Ways to Embed Google Reviews on a Website
A widget isn’t the only way to display Google Reviews. If you prefer a native solution or have developer resources, here are two alternatives worth considering.
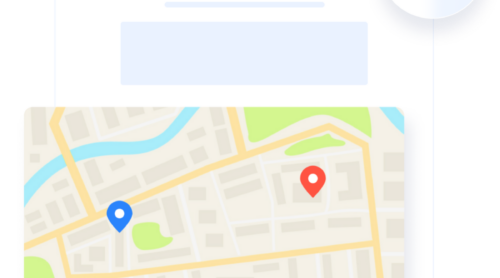
Google Maps embed (native iframe)
Google’s Maps Embed API lets you place an interactive map on your website showing your business location. Visitors can click the map to open your full Google Business Profile — where they’ll see your reviews, rating, and business details. The embed itself, however, is a map, not a review display.
- Go to Google Maps Embed API and set up a free API key in Google Cloud Console.
- Build the embed URL using your business name or Place ID with the place mode.
- Paste the iframe code into your website’s HTML editor where you want the map to appear.
- Publish and verify.
Google Places API (custom development)
If you have developer resources, the Google Places API gives you direct access to review data that you can display however you want. This is the most flexible method — and the most labor-intensive.
- Create a Google Cloud project and enable the Places API.
- Generate an API key with appropriate restrictions.
- Use the Place Details endpoint to fetch reviews for your business.
- Build a front-end display (HTML/CSS/JavaScript) to render the reviews on your website, handling pagination, caching, and responsive design yourself.
What each method actually displays
Since the three approaches look very different on the page, here’s a quick breakdown of what visitors actually see with each one.
| Feature | Elfsight widget | Google Maps embed | Google Places API |
|---|---|---|---|
| Individual review text | Yes | No | Yes (max 5) |
| Star ratings | Yes (overall + per review) | No (visible only after click-through) | Yes (if coded) |
| Reviewer names and photos | Yes | No | Yes (if coded) |
| Owner replies | Yes | No | No (not returned by the API) |
| Review photos | Yes | No | No (not returned by the API) |
| Layout options | 6 built-in | Map only | Whatever you build |
| Filtering | Star rating, keyword, individual reviews | None | Whatever you build |
| “Write a Review” button | Yes | No | If you build it |
Optimization Tips for Your Google Reviews Widget
Your widget is live — here’s how to get more out of it beyond the default setup.
- Enable Google Analytics tracking. The widget has built-in GA/GTM event tracking — it fires events when visitors view reviews, open popups, or click through to Google. Turn it on in Settings to see whether reviews are actually influencing behavior.
- Use the AI-generated review summary. The widget can auto-generate a short highlight reel of what customers mention most. Enable it in the AI Features tab — it’s especially useful above the fold where space is tight.
- Emphathize the best feedback. Pin your two or three strongest reviews to the top of the widget so they’re always the first thing visitors see. Pick reviews that mention specific outcomes — ‘saved us 40% on shipping’ converts better than ‘great service.
- Enable Schema markup for rich snippets. The widget supports Schema.org structured data that can surface star ratings in Google Search results. Won’t work on homepages — see our guide to adding review rich snippets for SEO.
- Highlight key phrases inside reviews. If a customer wrote something that nails your value prop, use the Highlight Text feature to make it stand out visually — draws the eye without editing the review.
- Put the widget on your thank-you page. Customers are most satisfied right after completing a purchase or booking. Pair the review display with the “Write a Review” button there to catch them at peak willingness to leave a review.
Frequently Asked Questions
How do I add Google Reviews to my website for free?
How to display Google Reviews on a website with custom code?
Do embedded Google Reviews update automatically?
Will embedding Google Reviews slow down my website?
Can I link Google Reviews to my website on Shopify, WordPress, or Wix?
Conclusion
You’ve now seen how to get Google Reviews onto your website — from a 5-minute widget setup with filtering and layout control, to native embeds and API-based custom builds. You know where to place reviews for the most impact, how to filter them without looking like you’re hiding bad feedback, and how to turn your review display into a review generation tool with the “Write a Review” button.
If you haven’t started yet, open the Google Reviews widget editor and try a template — you can preview the full setup before committing to anything. And if you’re in a vertical like restaurants, healthcare, or real estate, keep an eye out for our upcoming industry-specific guides on how to display Google Reviews on website pages tailored to your niche.
Source cited in the intro: BrightLocal Local Consumer Review Survey 2026