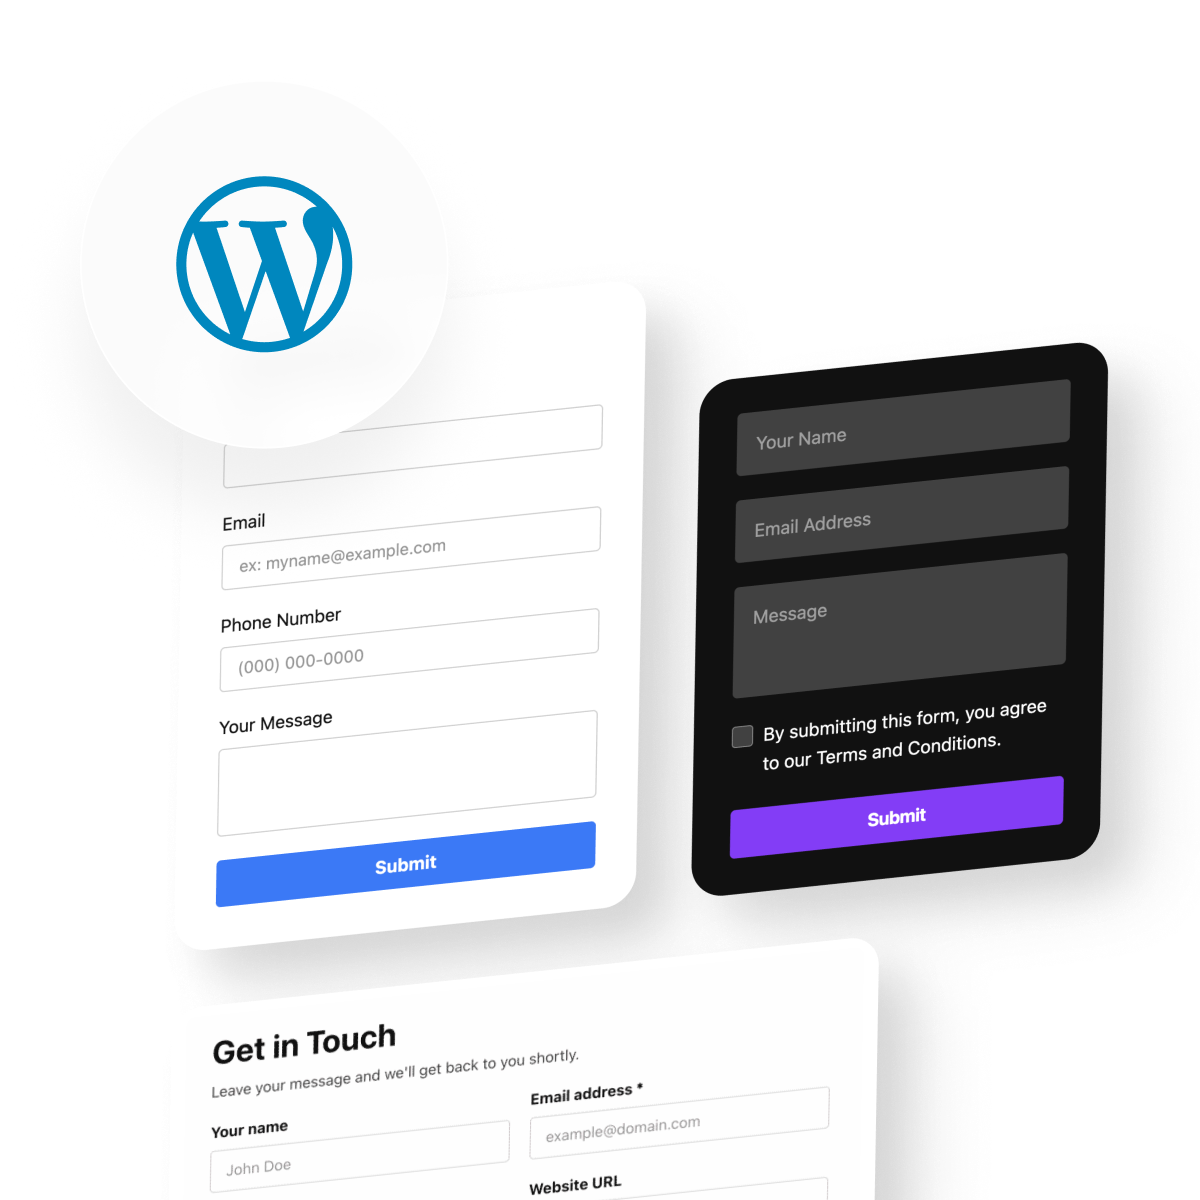
At some point, most WordPress websites outgrow the basics. You need to take bookings, collect project briefs, let people register for an event, gather feedback after a purchase, or accept order requests with custom specs. Each of these requires a different kind of form – different fields, different logic, different layout – and WordPress doesn’t ship with a built-in form builder that covers all of it.
This guide walks you through how to add a form in WordPress using the Elfsight Form Builder – a no-code visual editor that works on any WordPress setup without plugin installation. We’ll cover the full process from picking a form type through embedding it on a live page, along with alternative methods and when each one makes more sense.
- A full walkthrough with decision-making context at each step
- Common business scenarios — and how to configure forms for each
- An honest comparison of Elfsight vs. native WordPress form methods
- Optimization tips and real-world FAQs from WordPress users
5-Minute Setup: Add a Form in WordPress
If you already know what you need and just want to get it live, here’s the fast track to adding forms to WordPress in just a few steps:
- Open the Form Builder editor and select a template
- Configure and customize your form widget
- Click “Add to Website” and copy the embed code
- Paste the snippet into your WordPress backend → Publish
🚀 Build your own WordPress form right away in the interactive editor!
When (and Why) Add Forms to Your WordPress Website
You probably don’t need us explaining why forms are useful – you’re here because you already need one. But the type of form you build and where you place it matters just as much as the how-to steps. Here are the most common situations, with what to prioritize in each.
💬 Contact and lead capture
The most common starting point — a contact form, a newsletter signup, or a lead gen form on a landing page. The one thing most people miss: adding a single structured field like a “What’s this about?” dropdown saves hours of inbox sorting. For lead capture without a dedicated page, popup and floating panel forms work well — they trigger on button click or sit at the screen edge without eating up page real estate.
📅 Bookings, reservations, and appointments
Restaurants, salons, rental properties, consultants — if your business runs on scheduled slots, a booking form replaces phone tag. Collect the essentials (date, time, service type, contact info) and resist the urge to add fields that serve your internal ops but annoy the visitor.
💲 Orders and donations
Order forms cover scenarios where the purchase isn’t a simple add-to-cart — custom printing, catering, wholesale, service packages with configurable options. Pair with file upload fields when customers need to attach logos or design briefs. Donation forms are structurally simple, but conditional fields help here too — show recurring frequency options only when the donor opts in.
📋 Feedback, reviews, and surveys
Rating fields (stars, number scales, smileys) plus an optional comment box. Keep these short — a 3-field feedback form gets dramatically more responses than a 10-field one. If you want structured testimonials you can reuse on your site, add name, role, and a star rating alongside the comment so you get publishable quotes, not vague one-liners.
📑 Registrations, memberships, and applications
Event signups, membership forms, job applications, program admissions — these tend to be longer, and this is where multi-step layouts earn their keep. Breaking a 12-field form into three steps with a progress bar dramatically reduces abandonment. Application forms specifically benefit from conditional logic (show different questions based on the role or program selected) and file upload fields for resumes or portfolios.
The complexity should match the decision: a newsletter signup is one field, a contact form is three fields, and a grant application might be fifteen fields across four steps. Configure accordingly.
Now let’s build the actual form.
Step-by-Step: How to Add a Form in WordPress
This walkthrough uses the Elfsight Form Builder, which runs entirely in your browser — nothing to install on WordPress. You configure everything in a visual editor, get an embed code, and paste it onto your page.
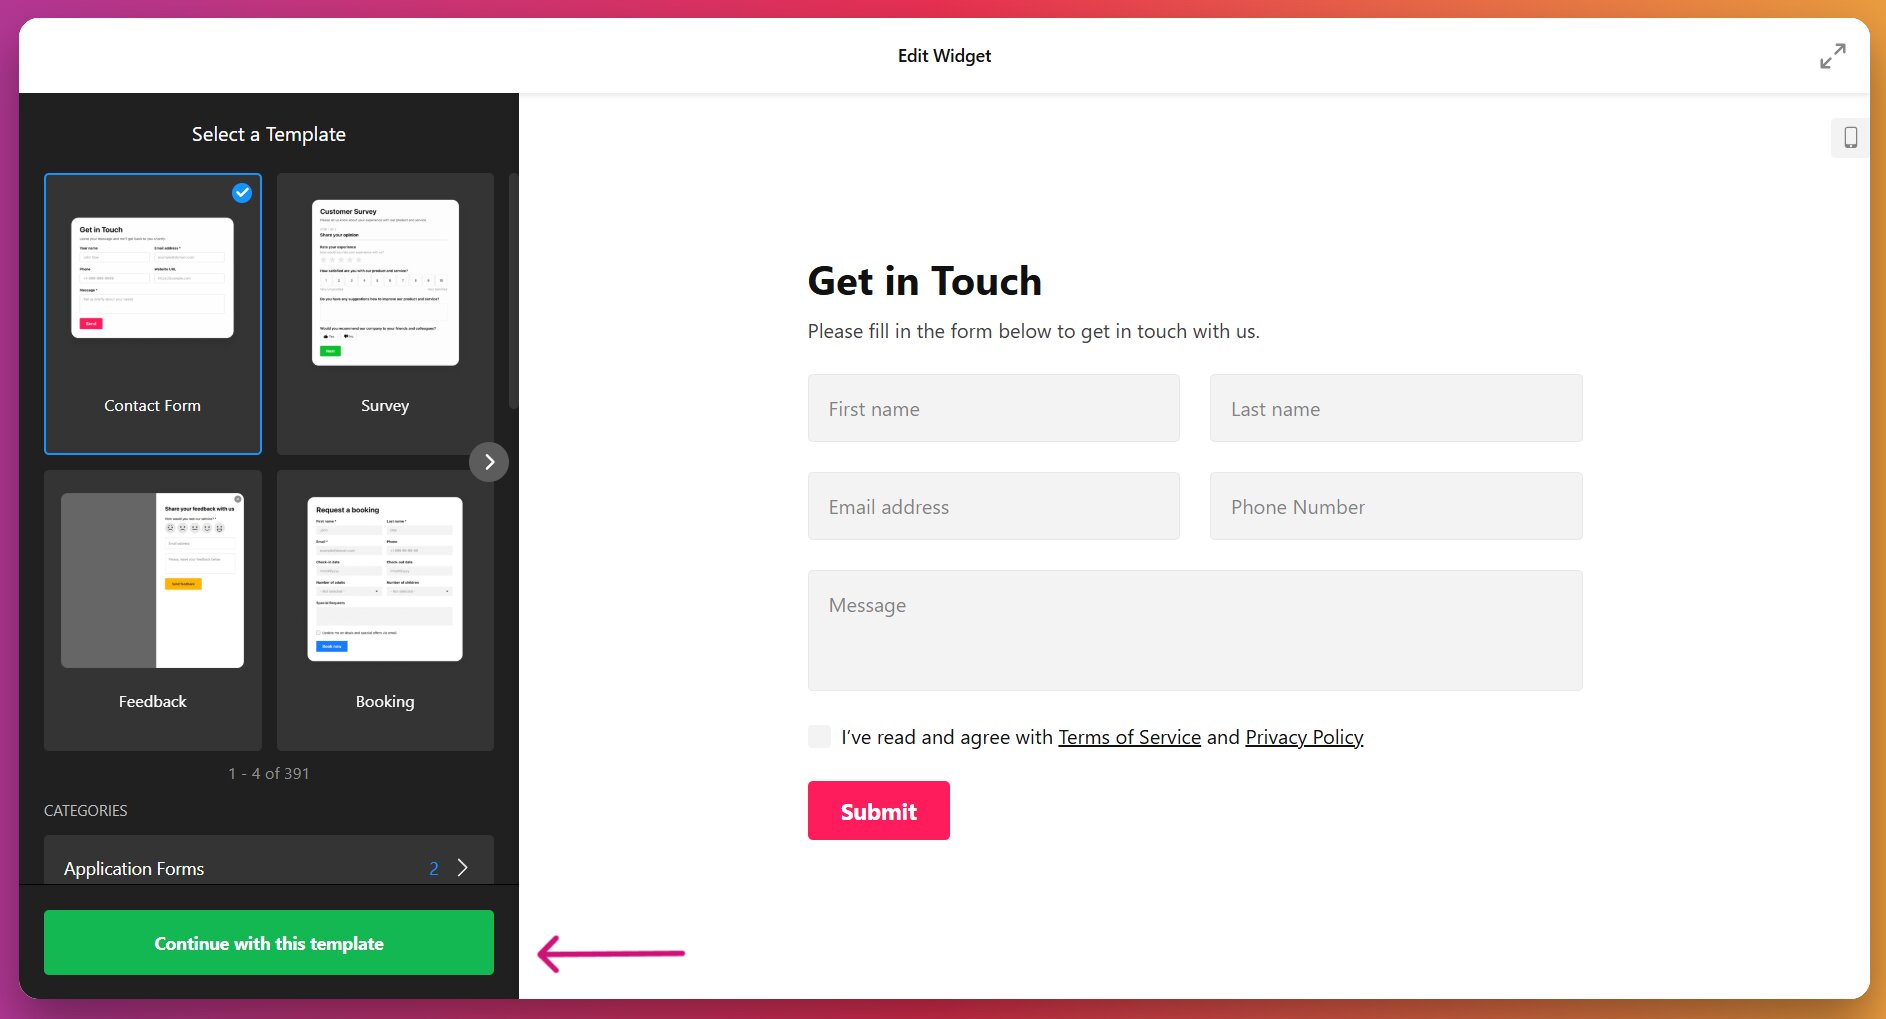
Step 1: Pick a Starting Point
Open the editor, and you’ll see 300+ template options for various use cases grouped into categories. The template you pick isn’t a locked-in commitment — it just pre-fills the editor with a relevant field set. You can add, remove, or rearrange any field afterward, so choose whichever is closest to what you need and customize from there.
Step 2: Build Your Field Set
This is where the form takes shape. The editor supports 15+ field types: text inputs, contact info, dropdowns, checkboxes, radio buttons, date pickers, file uploads, rating scales, and more. For each field, set the label, placeholder text, description, and whether it’s required or optional.
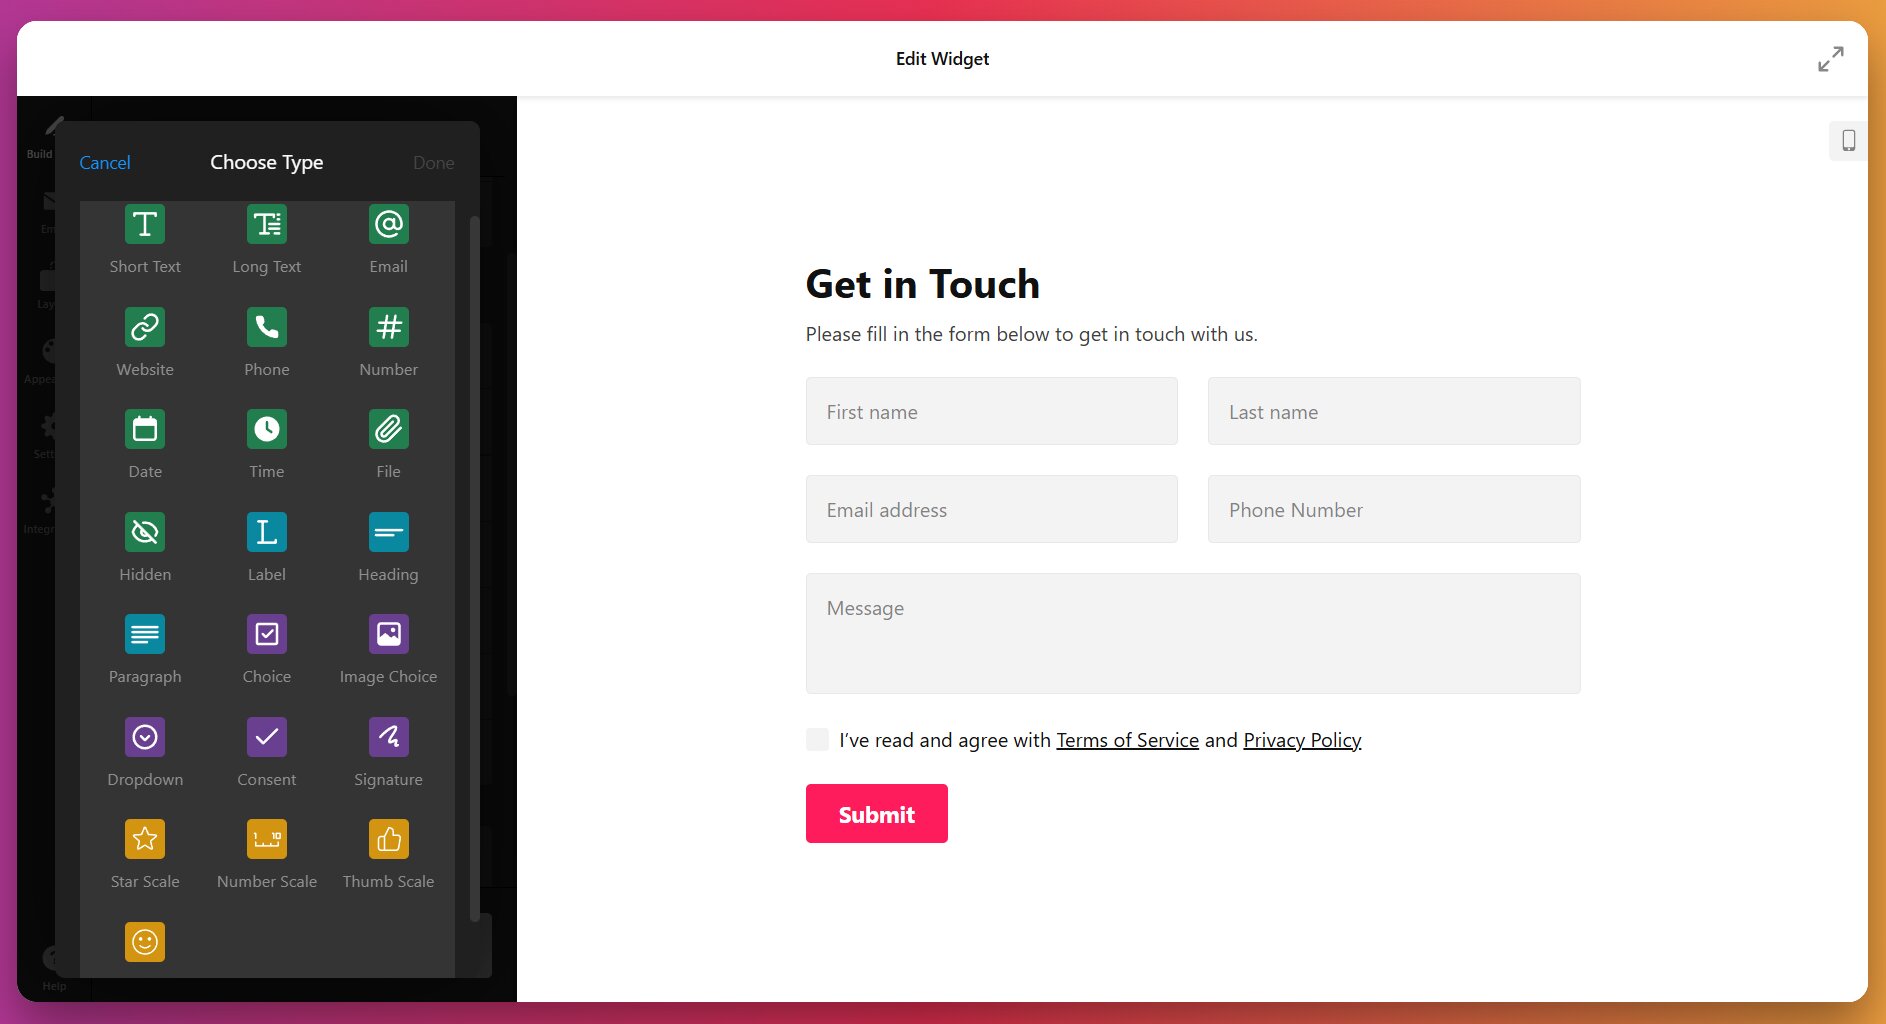
A few decisions that matter here:
Required vs. optional fields. Mark only what you genuinely need. Every required field increases friction. If you’re building a contact form, name and email are required — message might be too. Phone number? Make it optional unless you actually plan to call people.
Conditional logic. If your form serves multiple purposes, you can display different follow-up fields based on the visitor’s selection. For example, a photography studio’s booking form could show “Event Type” and “Guest Count” only when the visitor selects “Event Photography” from a service dropdown, while showing “Product Description” for product-shoot inquiries. Enable this per-field in the editor settings.
File uploads. Useful for design briefs, resumes, reference images, or any scenario where visitors need to attach documents. Keep in mind that requiring file uploads on a first-contact form creates friction — consider making it optional with a note like “Attach files if relevant.”
Step 3: Add Multi-Step Navigation (If Your Form Is Long)
If your form has more than five or six fields, break it into steps. Jump to the Layout tab if you haven’t already chosen a multi-step template, then back to the Build Form to fill each page separately. Each page becomes a separate step with Next and Back buttons, and a visual progress bar that shows completion status.
When you don’t need multi-step: Simple contact forms (3-4 fields), newsletter signups, and quick feedback forms work better as single-step. Adding steps to a short form just creates unnecessary clicks.
Step 4: Set Up Email Notifications
Navigate to the Email tab to control what happens after a visitor submits. This is where you set the recipient email (or multiple addresses — useful if both sales and support should see certain submissions), subject line, and which form field values get included in the notification email.
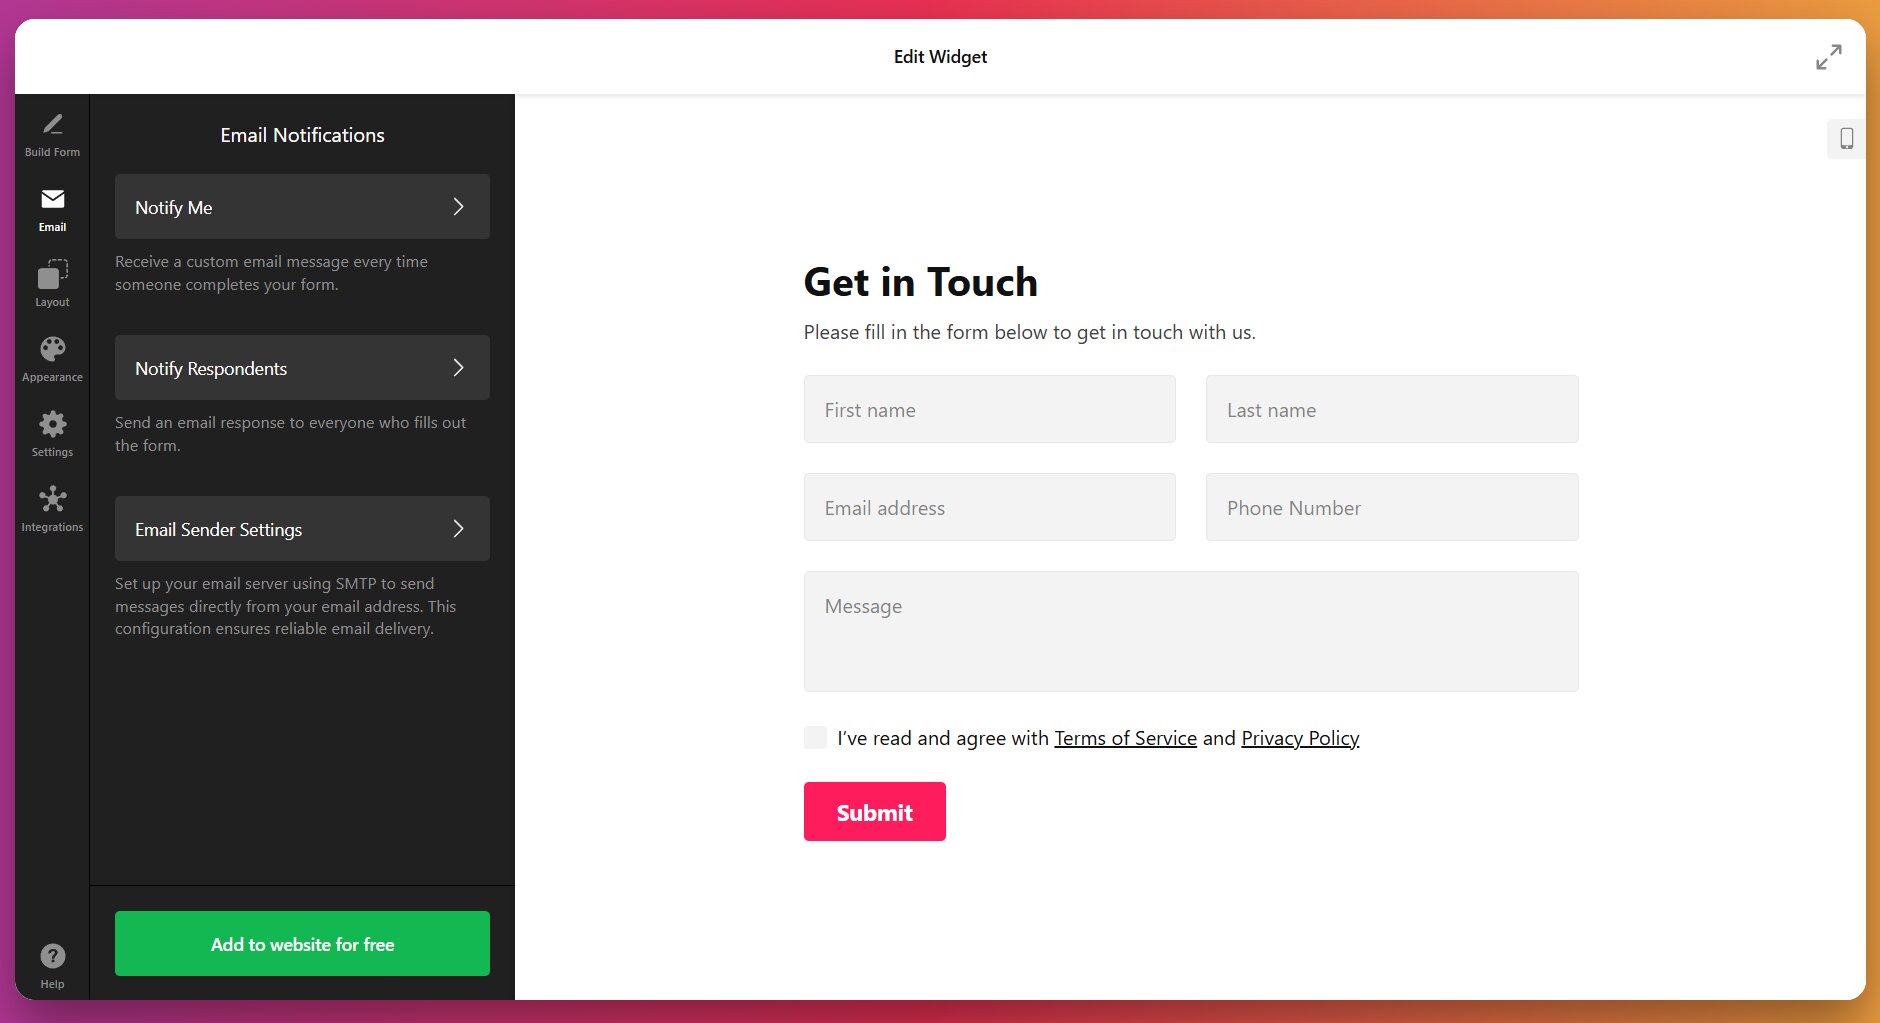
Two things worth configuring here that many people skip:
Auto-reply to the visitor. Enable this. A simple “Thanks, we received your message and will respond within 24 hours” confirmation builds trust and reduces “did my form go through?” anxiety. It also provides a natural place to set response-time expectations.
Custom subject lines with field values. Instead of a generic “New Form Submission,” include the visitor’s name or inquiry type in the subject: “New inquiry from {Name} — {Service Type}.” When you get 20 submissions a day, your inbox becomes scannable without opening each email.
Step 5: Choose a Layout and Customize the Design
Under Layout, you’ll see two embed options, which directly impact how your form will appear on your website:
- Default (inline) — Renders directly in the page content where you place the embed code. Best for dedicated form pages or sections within a landing page.
- Floating Pane — A sticky form that slides in from the side of the screen. Good for “request a callback” or “get a quote” forms that should be accessible from any scroll position without taking up page real estate.
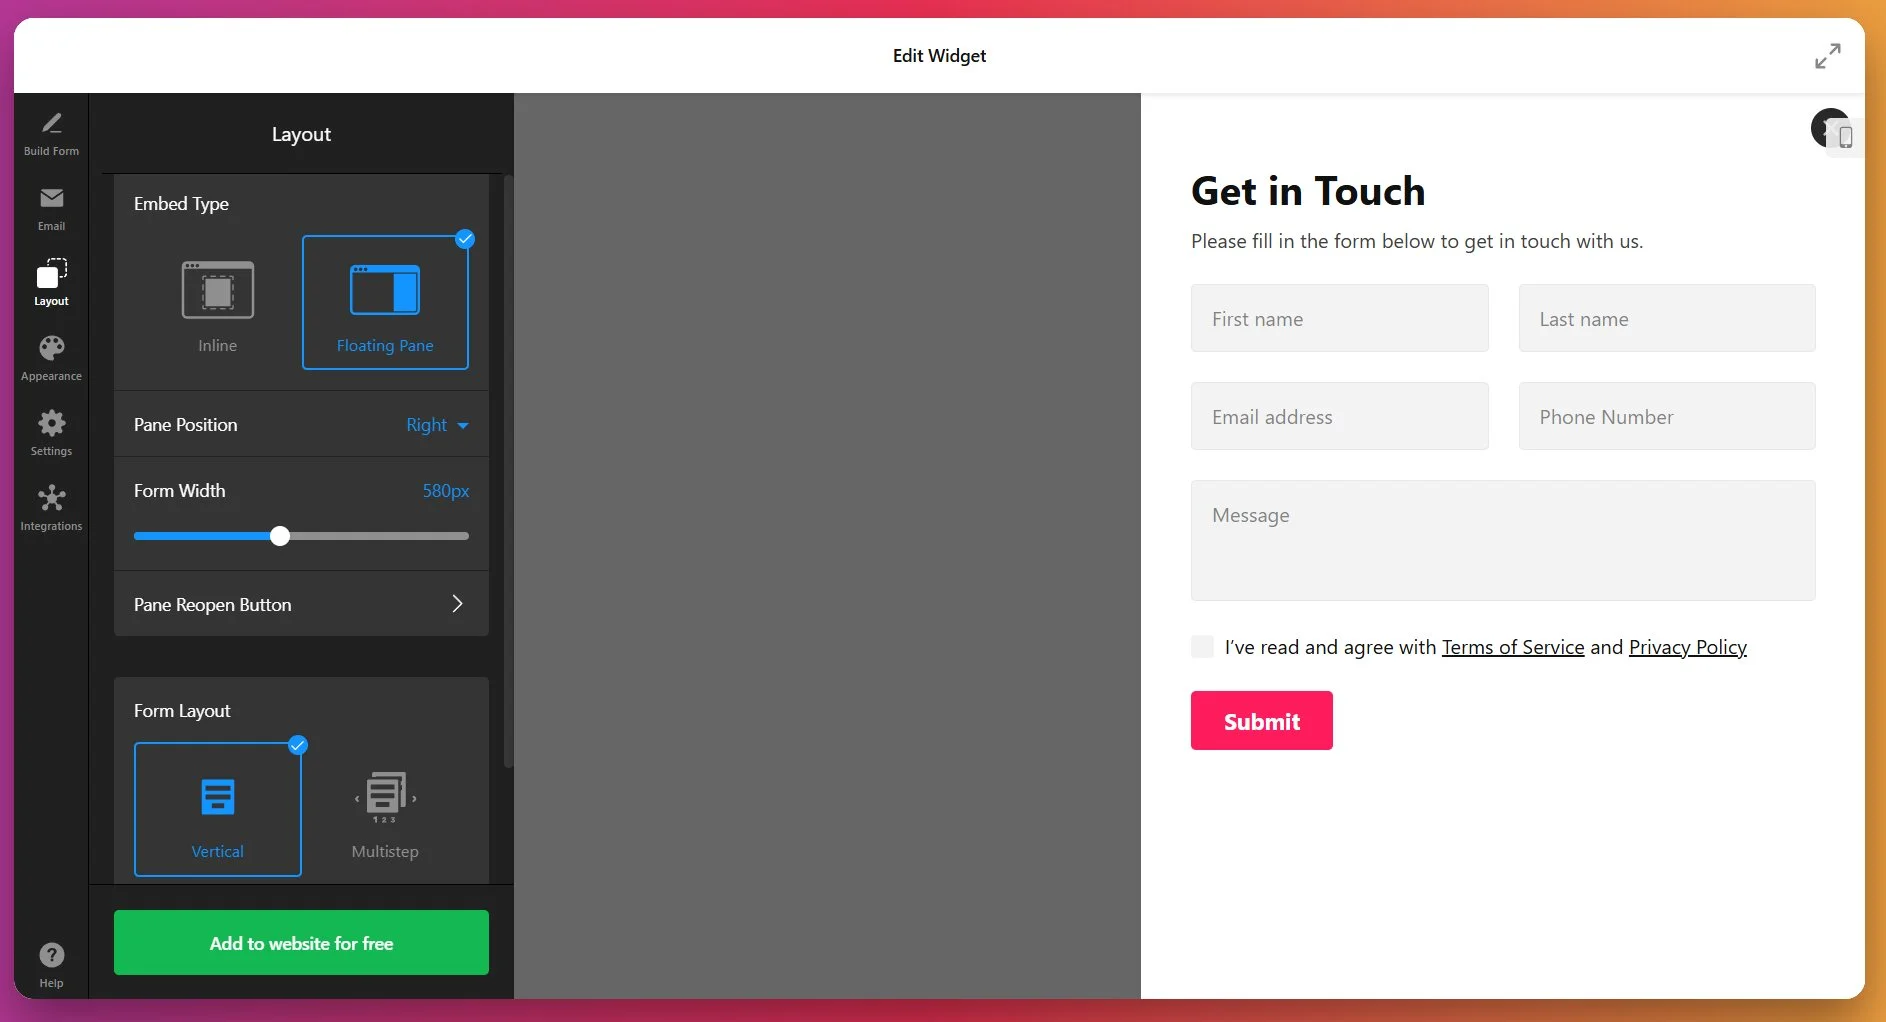
For the inline option, you can choose from three field arrangement styles: vertical, horizontal, and multi-step (as per navigation).
Once you’ve decided on positioning, switch to Appearance to fine-tune colors, fonts, field spacing, button styles, and border radius to match your WordPress theme. If your brand guidelines require specific styling beyond the built-in options, use the Custom CSS field.
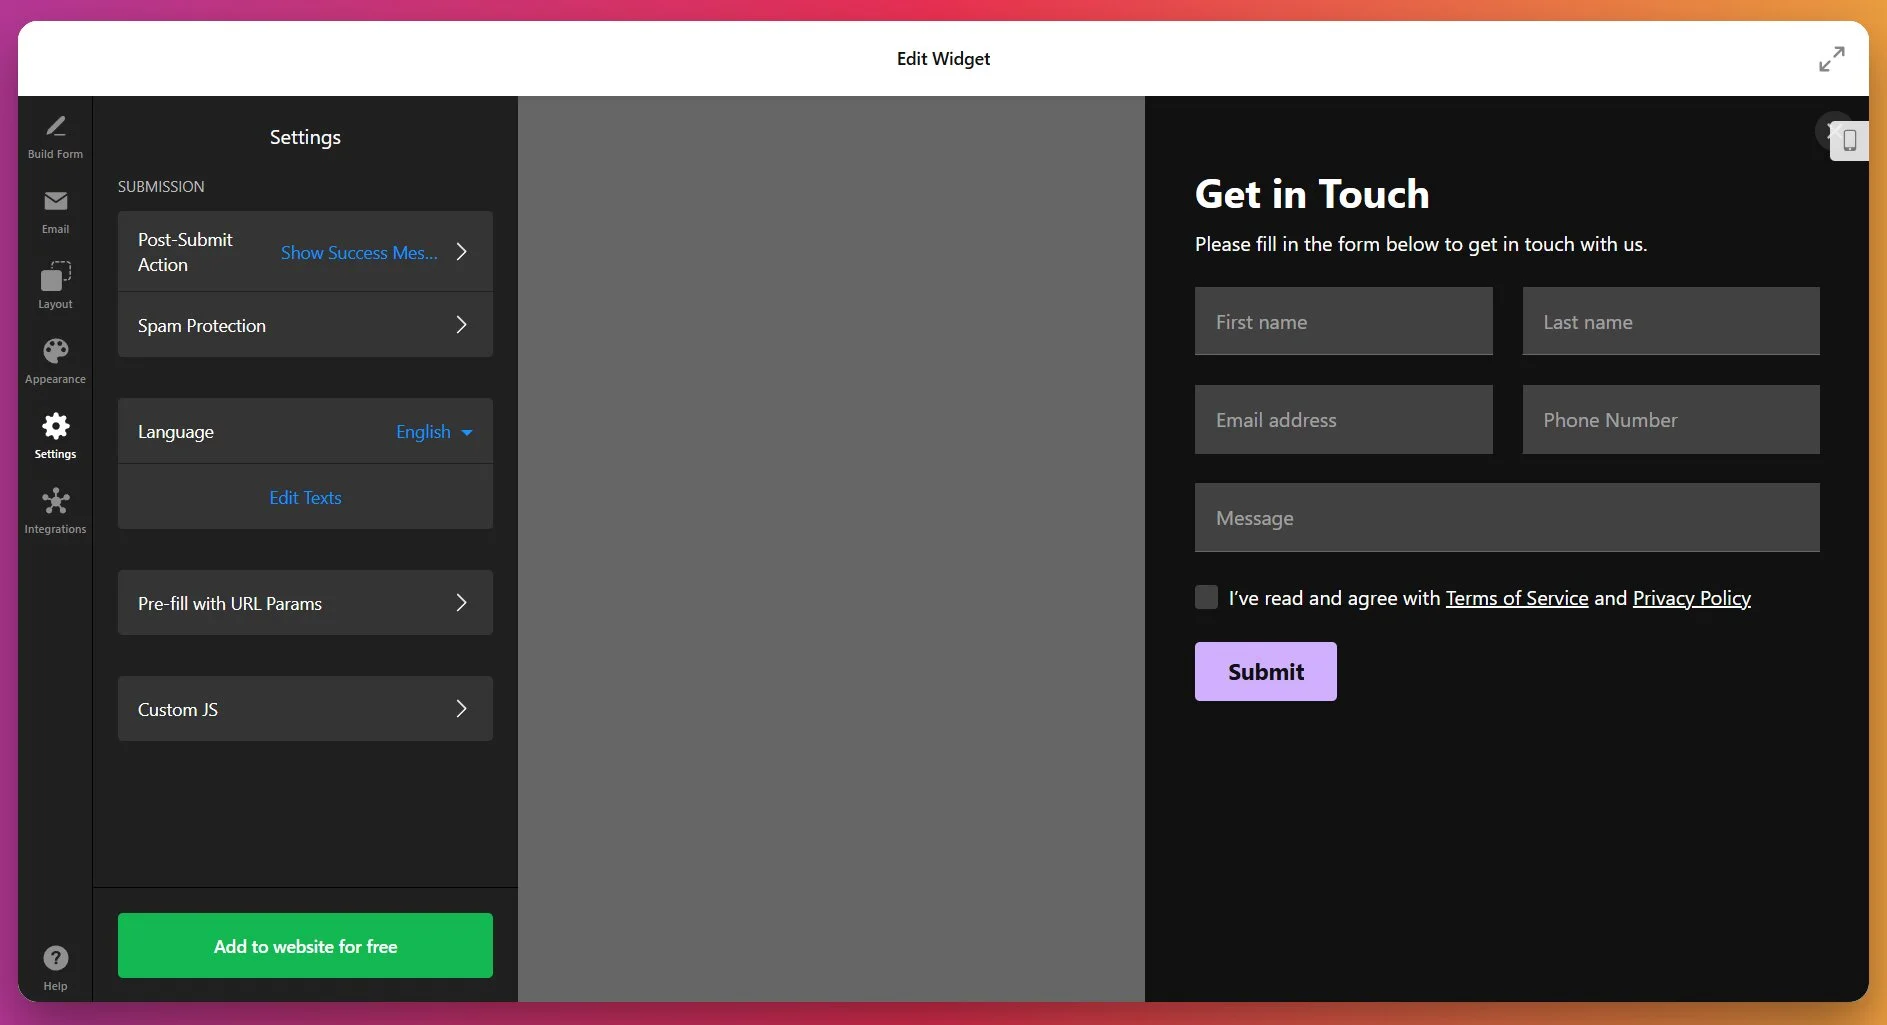
Step 6: Configure What Happens After Submission
Beyond email notifications, decide what visitors see after they hit Submit. Two options:
- Inline “Thank You” message — A confirmation appears within the form itself. Simple and contained. Works for sidebar or footer forms where redirecting to a new page would feel disruptive.
- Redirect to a URL — Sends visitors to a dedicated thank-you page after submission.
Step 7: Connect Integrations (Optional)
If your form submissions need to flow into other tools, open the Integrations tab. The Form Builder supports direct connections to:
- Google Sheets — Automatically push every submission into a spreadsheet. Useful if your team already tracks leads, orders, or registrations in Sheets and doesn’t want to export CSVs manually.
- Mailchimp — Route email signups and newsletter subscriptions straight into your Mailchimp audience list, with field mapping for segments and tags.
- Zapier / Make.com — Connect to 5,000+ apps. Send submissions to your CRM, create Trello cards from project intake forms, trigger Slack notifications for new bookings — whatever your workflow needs.
- Webhooks — For custom setups: send raw form data to any endpoint you control.
You can skip this step entirely if email notifications meet your needs, and come back later to set up integrations without re-embedding the form.
Step 8: Embed the Form on Your WordPress Page
Once your form is configured, click “Add to Website” to generate the installation code.
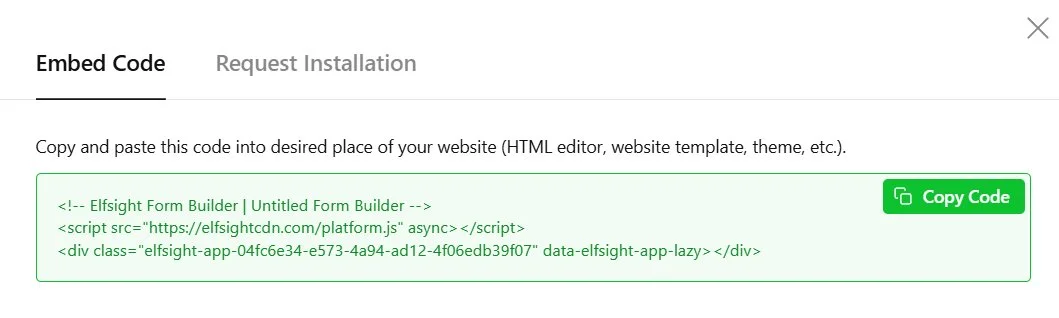
Here’s how to insert a form in WordPress:
- Log in to the WordPress backend and go to Pages, then open the target page for editing.
- In the Block Editor, click the + icon to add a new block.
- Search for and select Custom HTML.
- Paste the full Elfsight installation code into the block.
- Click Publish or Update.
Your form will appear on the live page immediately.
To add your form site-wide (e.g., in the sidebar or footer), go to Appearance → Widgets, add a Custom HTML widget to the desired area, paste the installation code, and save.
For WordPress websites using Elementor, drag the HTML element (not “Custom HTML”) onto the page and paste the code. For detailed platform-specific instructions, see our Help Center guide.
Other Ways to Add Forms in WordPress
Elfsight isn’t the only way to embed a form in WordPress, and depending on your situation, a different approach might be a better fit. Here’s an honest breakdown.
WPForms or Contact Form 7 (WordPress Plugins)
The most common approach. WPForms gives you a drag-and-drop builder inside the WordPress dashboard; Contact Form 7 is a lightweight, code-oriented alternative that’s been around since 2007.
- Go to Plugins → Add New in your WordPress dashboard.
- Search for “WPForms” (or “Contact Form 7”) and install/activate.
- Create a new form using the plugin’s built-in editor.
- Embed the form on a page using the plugin’s shortcode or block.
When this is the better choice: If you want everything managed inside WordPress and you’re comfortable with plugin maintenance, WPForms is a solid tool with conditional logic, multi-step forms, and payment integrations. Contact Form 7 is hard to beat if you’re a developer looking for a minimal, free solution and don’t mind writing CSS.
Manual HTML Form
For developers comfortable with code, you can create a form using raw HTML and handle submissions via a custom PHP script or a third-party endpoint like Formspree.
- Add a Custom HTML block to your page in the Block Editor.
- Write the HTML
<form>markup with your desired fields. - Set the
actionattribute to your PHP handler file or external service. - Style with CSS in your theme’s Customizer or child theme stylesheet.
When this is the better choice: If you need total control over markup and behavior, or if your form integrates with a custom backend. Also useful for very simple forms (one or two fields) where a full widget or plugin is overkill.
Google Forms (Embed via iframe)
Free, fast, and requires zero technical skill. Create a form at forms.google.com, grab the embed code, and paste it into a Custom HTML block.
When this is the better choice: Internal surveys, quick polls, or any situation where you don’t care about visual integration with your website. Google Forms is also the simplest option if you’re already working in Google Workspace and want responses flowing into Google Sheets automatically.
Let’s Compare the Tools
The short version: if you want advanced form features without plugin overhead or coding, Elfsight covers it. If you want everything inside the WordPress ecosystem and don’t mind paying for Pro features, WPForms is strong. If your form is simple and internal, Google Forms or a manual HTML form might be all you need.
| Feature | Elfsight Form Builder | WPForms / CF7 | Manual HTML | Google Forms |
|---|---|---|---|---|
| No coding required | ✓ | ✓ (WPForms) / (CF7) ⚠ | x | ✓ |
| Multi-step forms | ✓ | ✓ (WPForms Pro) | (manual build) | x |
| Conditional logic | ✓ | ✓ (WPForms Pro) | (manual build) | Basic ⚠ |
| Full design customization | ✓ | ⚠ Theme-dependent | ✓ (manual CSS) | x |
| No plugin installation needed | ✓ | x | ✓ | ✓ |
| Built-in email notifications | ✓ | ✓ | Manual setup | ✓ (via Sheets) |
| Popup / floating layouts | ✓ | x (needs add-on) | x | x |
| Works beyond WordPress | ✓ | x | ✓ | ✓ |
Optimization Tips for Your WordPress Form
Your form is live — now make sure it’s actually performing. Most form abandonment comes down to a few fixable mistakes.
- Cut every field you won’t act on. If your team won’t use a piece of info within 48 hours, don’t ask for it. You can always collect more in a follow-up.
- Use multi-step for 6+ fields. Break longer forms into steps with a progress bar. Front-load easy fields (name, email) in step one — sunk cost keeps visitors moving.
- Test on mobile before publishing. Check that dropdowns, date pickers, and the submit button all work on real phones. Most WordPress traffic is mobile.
- Match your theme’s design. Pull exact hex codes and font names from your WordPress theme and apply them in the editor. Two minutes of effort, noticeable difference in trust.
- Redirect to a thank-you page. This enables destination-based conversion tracking in Google Analytics — something inline success messages can’t do cleanly.
- Review submissions weekly. Look for patterns: where visitors drop off in multi-step forms, which fields get low-quality responses, and which forms get the most volume.
Frequently Asked Questions
How do I add a form to a page in WordPress without a plugin?
Can I add a form on WordPress that works on mobile?
How do I embed a form in WordPress if I use Elementor?
Why am I not receiving email notifications from form submissions?
Final Thoughts
You now have everything you need to add a form to your WordPress website — from a four-step embed to a full walkthrough of field configuration, multi-step layouts, notifications, and design. More importantly, you know which decisions matter at each step and how to configure for your specific use case, whether that’s a simple contact form or a multi-step project intake.
If you’re ready to get started, open the Elfsight Form Builder and try it for free. Pick a template, configure your fields, and have a working form on your WordPress page in minutes.