Adding a calendar to your Shopify store allows you to showcase upcoming events and important dates, improving customer engagement and interaction. Whether you need an appointment scheduler, an event showcase, or a booking system, integrating a calendar can enhance your store’s functionality.
A well-placed Event Calendar makes it easy for customers to stay informed and take action. With seamless integration, you can manage events efficiently and provide a better user experience. This feature is essential for businesses that rely on scheduling, ticket sales, or time-sensitive promotions.
- Improve customer engagement. Display upcoming events directly on your website to keep visitors informed and encourage participation.
- Enable seamless booking. Allow customers to book appointments or register for events without relying on external tools.
- Enhance store functionality. Integrate an interactive event display to streamline event management and improve user experience.
- Keep customers updated. Provide real-time updates on sales, product launches, and special events to drive more interactions.
Now that you understand the benefits of adding a calendar to Shopify, let’s explore how you can easily embed your own event showcase app using Elfsight’s solution.
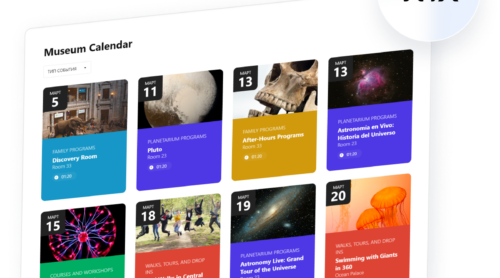
Quick Guide: Adding a Calendar to Shopify in Minutes
Setting up a calendar on your Shopify store is quick and hassle-free with Elfsight. It allows you to embed a fully customizable event calendar without coding. See how to quickly create and add the calendar:
- Open the editor and choose a calendar template that fits your needs.
- Add events manually or sync with external sources to streamline scheduling.
- Customize the layout, colors, fonts, and design to match your Shopify store’s branding.
- Adjust settings for event details, recurring events, and RSVP options to optimize user experience.
- Click “Add to website for free“, copy the embed code, and paste it into your Shopify backend.
That’s it! In just a few steps, you can embed a calendar in Shopify and start organizing events with ease!
Ready to boost engagement? Create your own Event Calendar in minutes!
Key Features of the Elfsight Event Calendar
Integrating the Elfsight Event Calendar into your Shopify store offers a comprehensive solution for managing and showcasing events. Here are the main features this solution has:
- Recurring Events. Easily set up events that repeat daily, weekly, monthly, or yearly, reducing manual input and ensuring accuracy.
- Event Categorization and Tagging. Organize events by categories and tags, allowing users to filter and find relevant events quickly.
- Detailed Event Popups. Provide in-depth information with popups that include dates, locations (with maps), and sharing options, enhancing user engagement.
- External Calendar Integration. Allow users to add events to their personal calendars, such as Google Calendar or Outlook, directly from your website.
- Timezone Support. Display event times accurately across different time zones, ensuring clarity for a global audience.
These robust features make the Elfsight Event Calendar an invaluable additon for any Shopify store aiming to enhance event management and user engagement. Next, we’ll provide a detailed guide on creating and installing this app to your website.
Installing Your Calendar on Shopify: Step-by-Step
Elfsight’s Event Calendar app allows you to display upcoming events, manage bookings, and improve customer engagement seamlessly. Follow these step-by-step instructions to create and configure your calendar for your Shopify store.
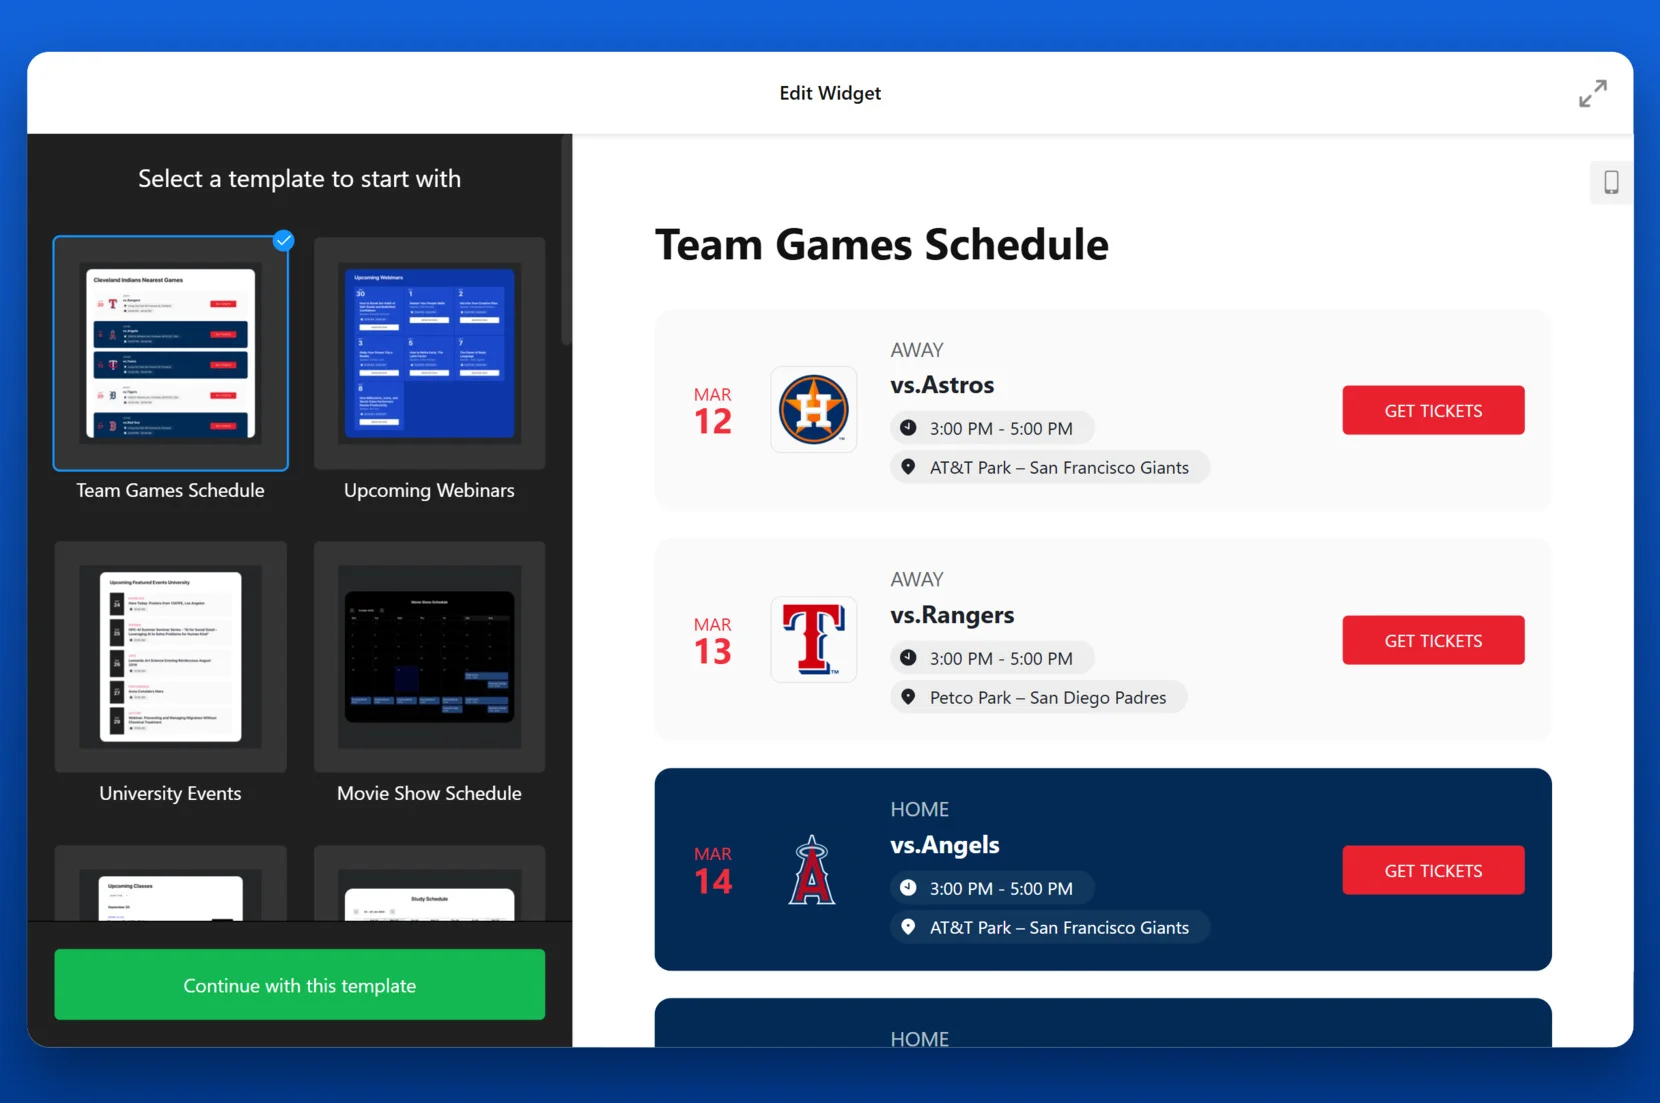
- Choose a Template. Open the editor and browse through the available templates. Select a layout that best fits your needы and click “Continue with this template“.

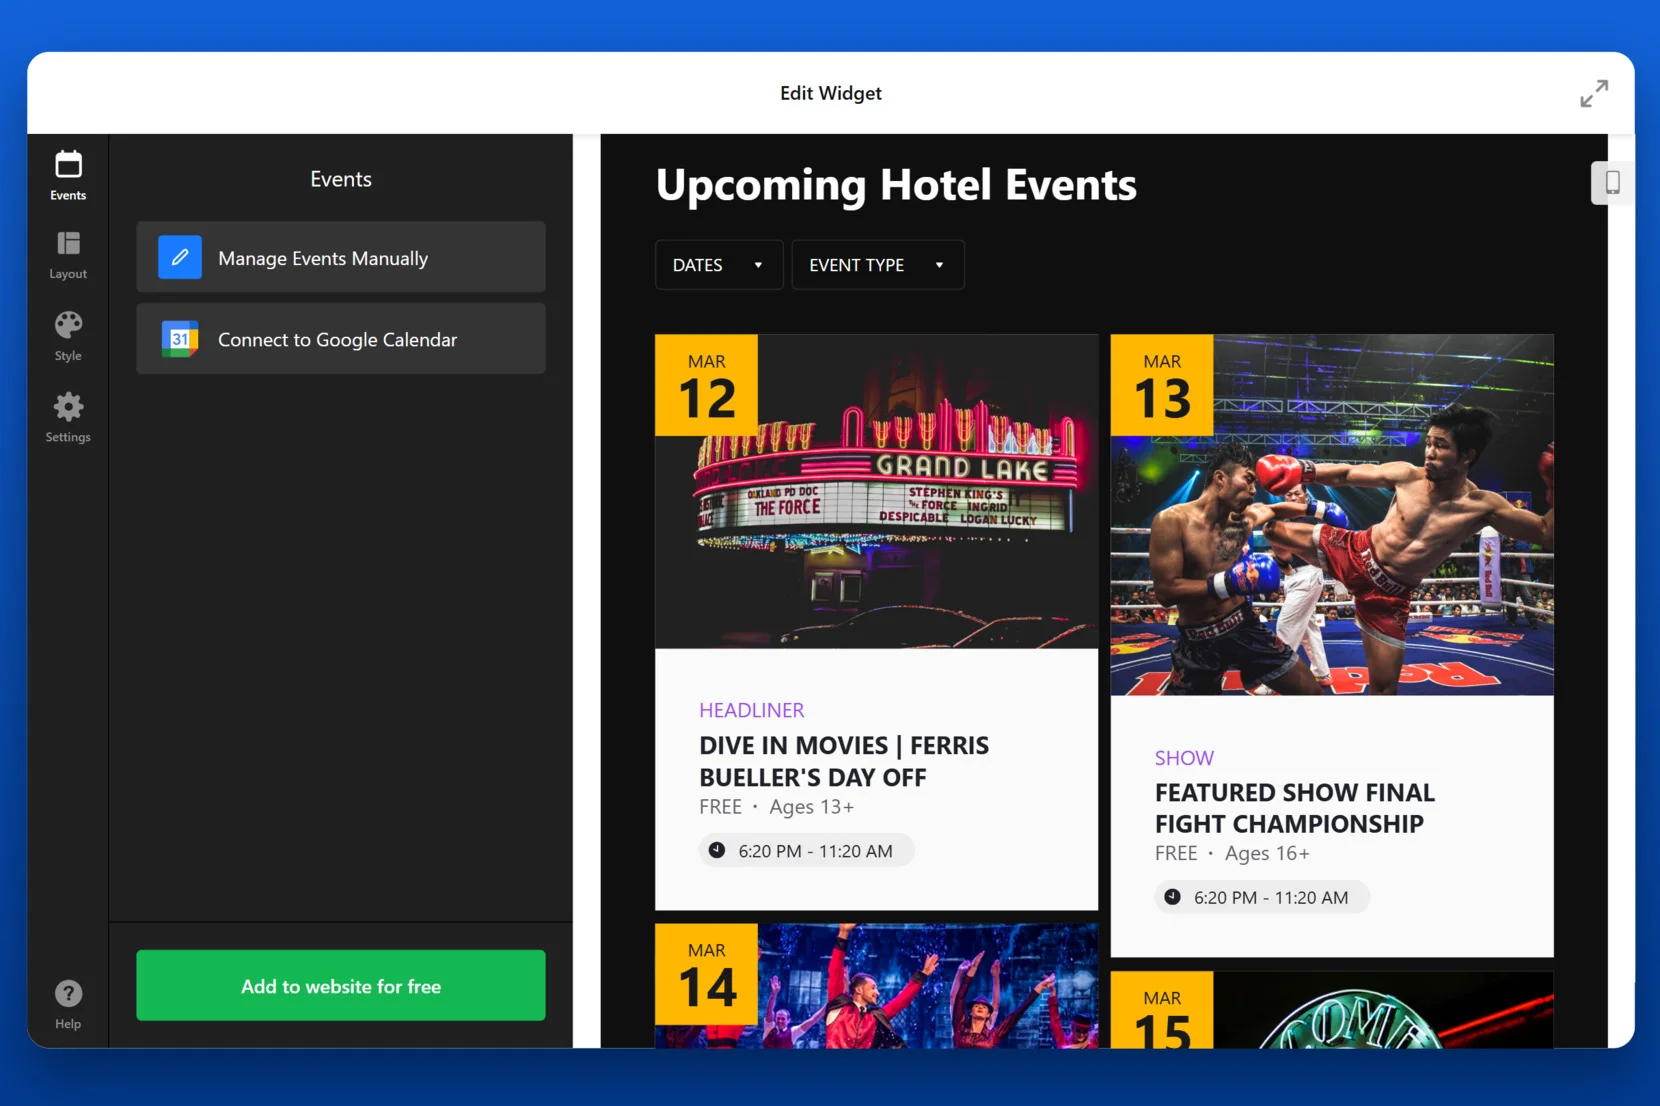
- Add and Manage Events. Navigate to the “Events” tab. You can either “Manage Events Manually” by adding event details like title, date, time, and location, or “Connect to Google Calendar” to sync events automatically.

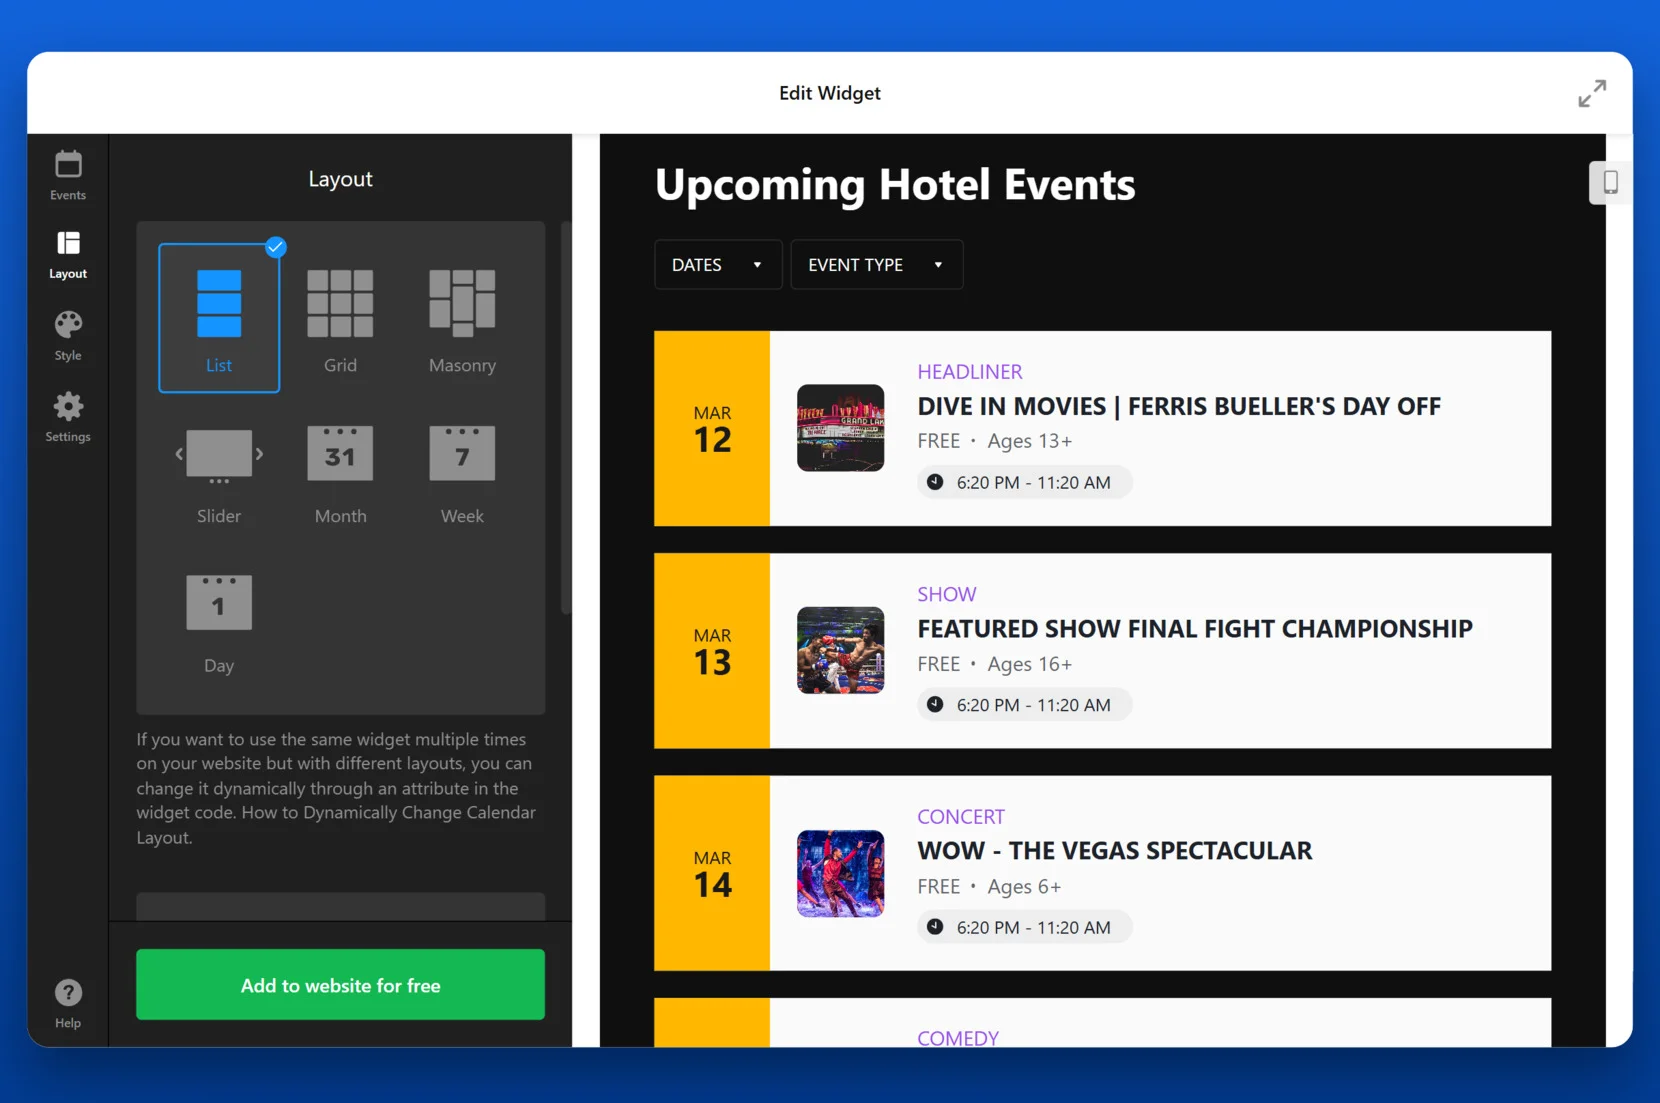
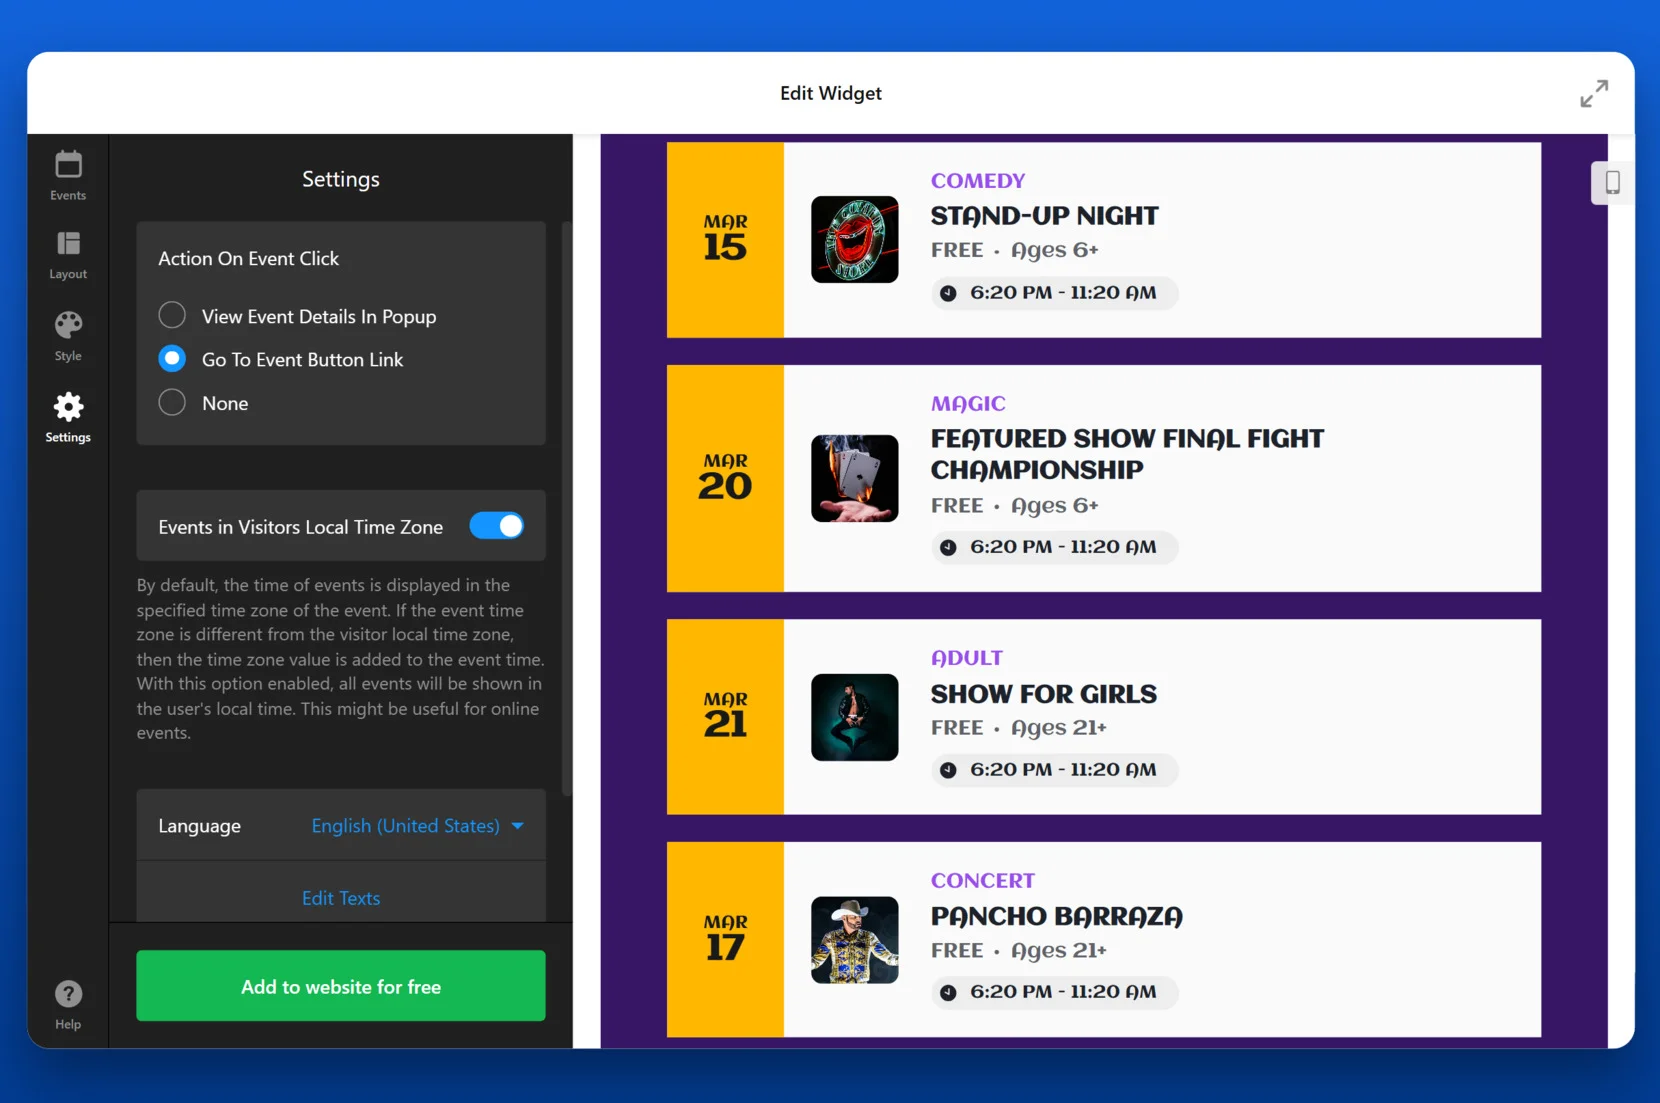
- Customize the Layout. Open the “Layout” section and choose a display style such as List, Grid, Masonry, Slider, or Month View. Adjust width, spacing, and alignment settings to match your store’s aesthetics.
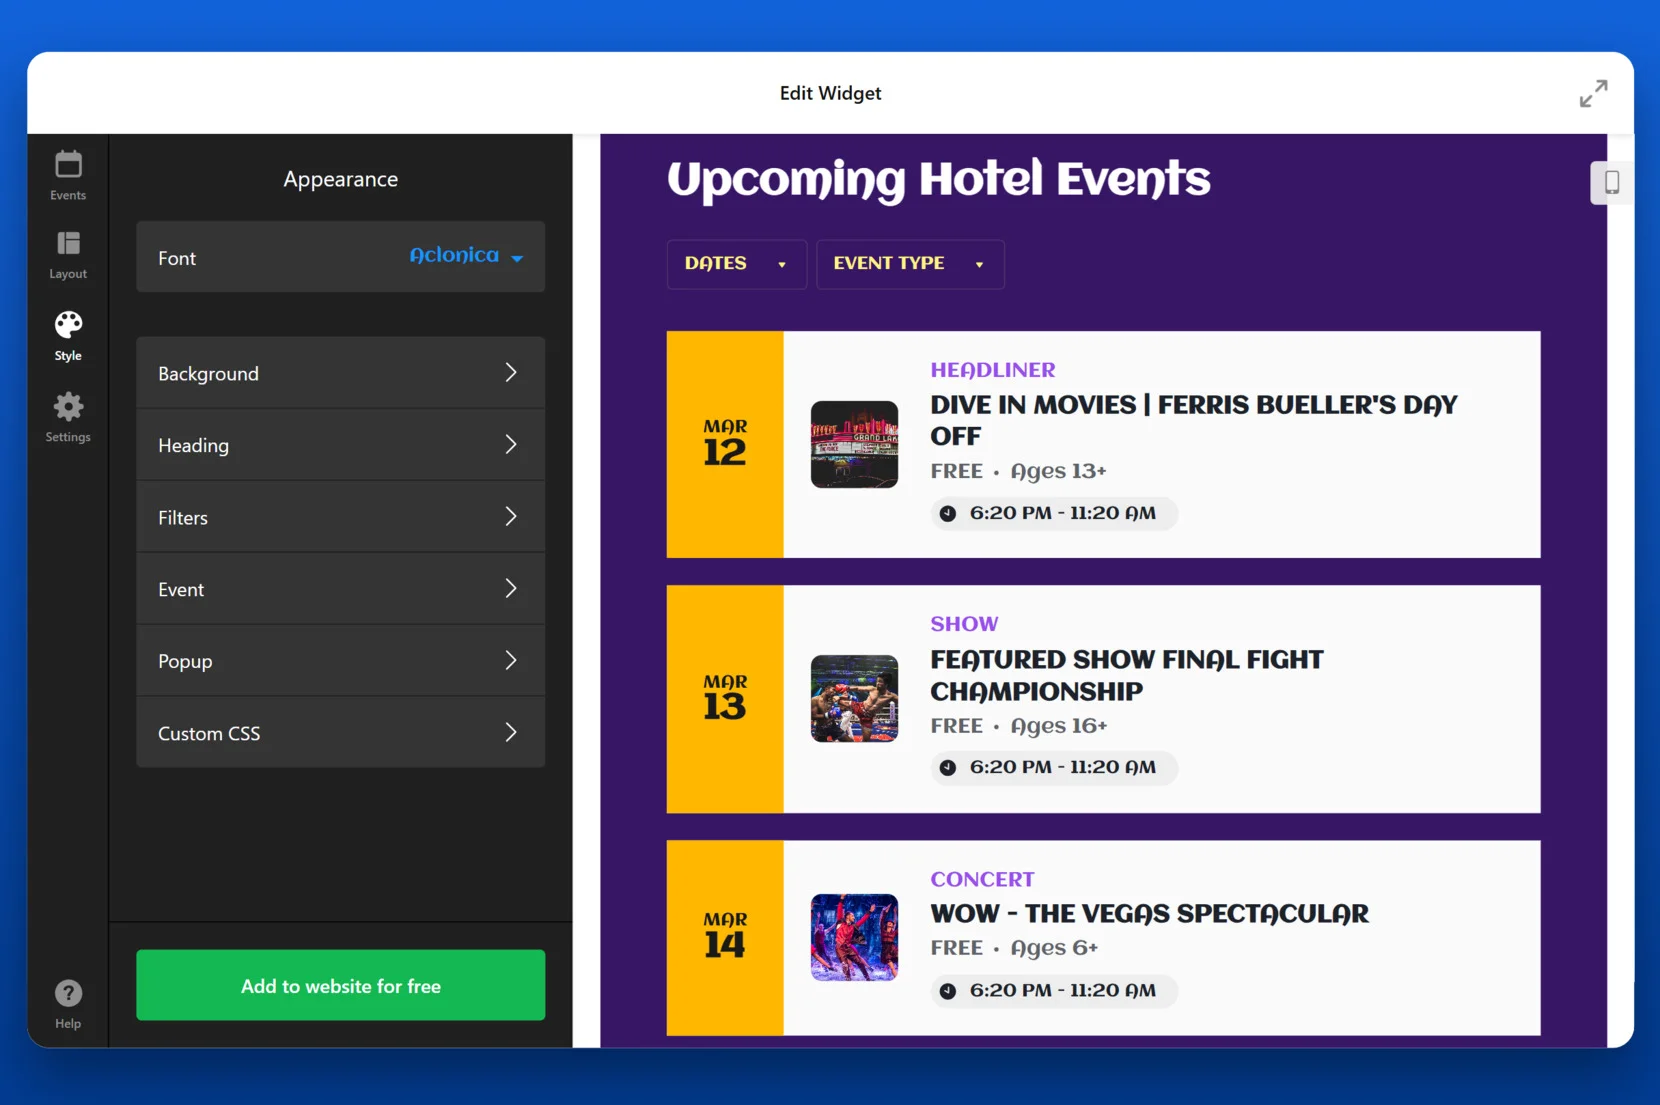
- Adjust Styling and Appearance. Go to the “Style” tab to modify the design. Choose a Font Style, customize Background and Event Card Colors, and enable filters to help users navigate events by type or date.

- Set Up Event Behavior and Localization. Under the “Settings” tab, configure user interaction options. Select what happens when an event is clicked (Open a Popup or Redirect to a Link), enable Event Display in Local Time Zones, and customize language settings.
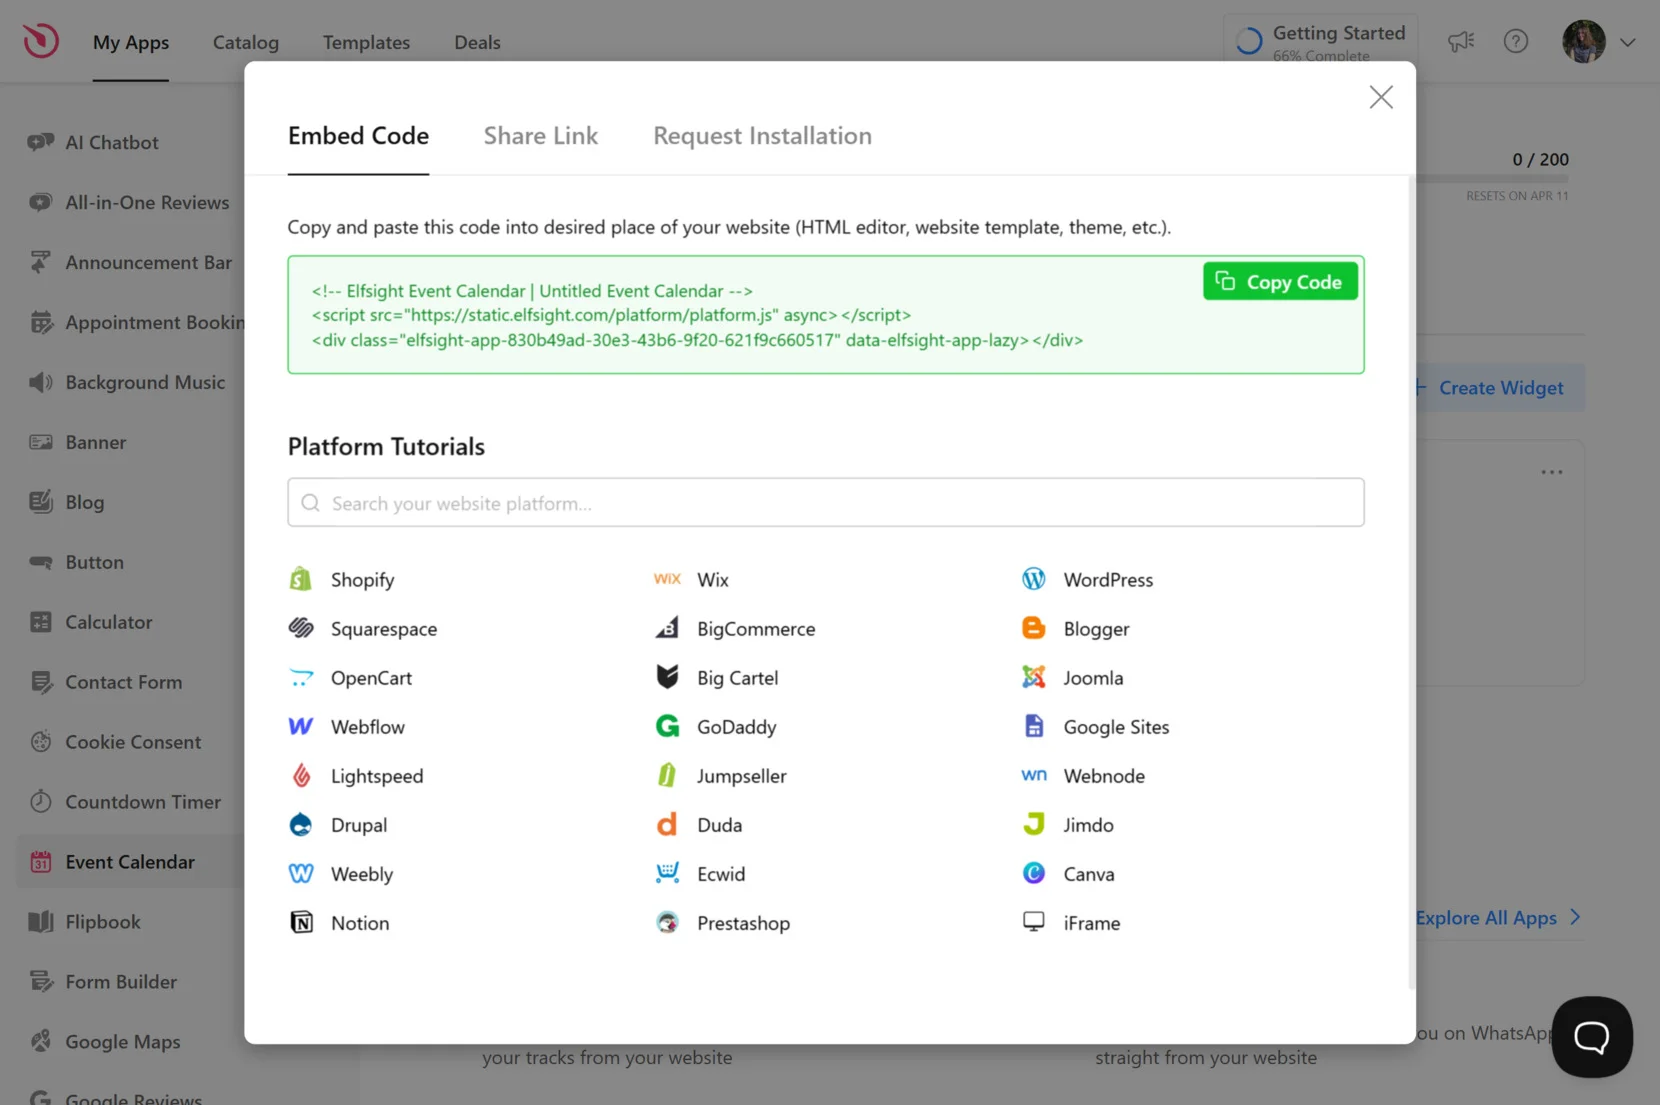
- Embed the Code on Your Website. Click “Add to website for free” and copy the generated embed code. In your Shopify Admin, go to Online Store > Themes, click Customize, and add a Custom HTML block where you want the calendar to appear. Paste the code and save changes.
By following these steps, you can easily integrate an interactive event calendar into your Shopify store. Whether you’re promoting events, scheduling bookings, or managing store activities, this app offers an effective and user-friendly solution.
Alternative Solutions to Embed a Calendar
While Elfsight offers a robust solution for integrating an event calendar into your Shopify store, there are several other methods available. Below, we explore two other solutions and provide detailed instructions for their implementation.
Using Shopify’s API for Custom Calendar Integration
For those seeking a tailored solution, Shopify’s API allows for the development of custom event calendars. It provides seamless integration with Shopify’s backend, enabling automatic event updates and synchronization with store data.
Here’s the instruction:
- Set Up a Shopify Partner Account. Create a Shopify Partner account to access development resources and create private apps.
- Create a Private App. In your Shopify admin panel, navigate to “Apps” and select “Manage private apps“. Click “Create a new private app” and configure the necessary permissions.
- Access Shopify’s API. Use the provided API credentials to interact with Shopify’s API endpoints. Refer to Shopify’s API documentation for guidance.
- Develop the Calendar Feature. Utilize programming languages such as Ruby or Python to build the calendar functionality. This includes designing the user interface and integrating event data.
- Embed the Calendar into Your Store. Incorporate the custom calendar into your Shopify theme by modifying the Liquid templates and adding the necessary HTML, CSS, and JavaScript code.
Embedding a Google Calendar
Integrating a Google Calendar into your Shopify store is a straightforward method to display events. This approach is ideal for those who already use Google Calendar for event management. It allows automatic synchronization, ensuring that any changes made in Google Calendar are instantly reflected on your website.
Here are the steps to using this solution:
- Create a Public Google Calendar. In your Google Calendar account, create a new calendar or use an existing one. Set the calendar’s visibility to the public.
- Obtain the Embed Code. Navigate to the calendar’s settings, locate the “Integrate calendar” section, and copy the provided embed code.
- Add a New Page in Shopify. In your Shopify admin panel, go to “Online Store” > “Pages” and click “Add page“. Name it appropriately, such as “Events” or “Calendar“.
- Insert the Embed Code. In the page’s content editor, switch to the HTML view and paste the Google Calendar embed code.
- Save and Publish. Save the changes and view the page to ensure the calendar displays correctly.
Comparison of Calendar Integration Methods
Below is a comparison of the discussed above methods and the Elfsight Shopify calendar solution, highlighting their major pros and cons.
| Method | Pros | Cons |
|---|---|---|
| Elfsight | Offers extensive customization, multiple layout options, and seamless Shopify integration without coding. Includes event filtering, color customization, and third-party calendar sync. | Requires a subscription for advanced features, but a free plan is available with basic functionality. |
| Shopify API | Provides full control over event management, allowing businesses to build a custom event system tailored to their needs. Can integrate directly with Shopify’s checkout, customer data, and inventory. | Requires coding knowledge and significant development time. Best suited for developers or businesses with technical resources. |
| Google Calendar | A free and simple way to display events. Allows automatic synchronization, so updates in Google Calendar reflect instantly on your Shopify store. | Limited customization options and lacks deep Shopify integration. The design may not match store branding without custom CSS or third-party tools. |
Each method presents unique advantages and limitations. When selecting the appropriate solution, consider factors such as customization needs, technical resources, and budget.
In the next section, we will provide tips for effectively utilizing your chosen event calendar to maximize customer engagement.
Best Practices for Using a Calendar Effectively
Adding a calendar to your Shopify store is just the first step. To get the most out of it, you need to optimize its setup and use key features that improve customer engagement. Below are some practical tips to ensure your calendar functions efficiently and provides the best experience for your customers.
- Keep your calendar updated. Regularly updating your calendar ensures that customers always see the latest events, promotions, and availability. An outdated calendar can lead to confusion and missed opportunities.
- Enable reminders and notifications. Many event calendar tools offer automated reminders for both store owners and customers. Setting up notifications for upcoming appointments or sales events can significantly improve attendance and engagement.
- Make your calendar mobile-friendly. A large portion of your visitors will access your store from mobile devices. Ensure your Shopify scheduling calendar is fully responsive and easy to navigate on smaller screens. Test how it looks and functions on different devices to avoid usability issues.
- Integrate with other business tools. Syncing your event calendar with Google Calendar, Outlook, or other scheduling platforms can help streamline business operations and prevent scheduling conflicts.
- Encourage customer interaction. Boost engagement by allowing customers to RSVP, book appointments, or add events to their own calendars. Interactive features make your calendar more than just a display — it becomes a valuable tool for your audience.
By following these tips, you can turn your calendar into a powerful business tool that drives conversions and improves customer experience. Now, let’s explore real-world use cases and industries that benefit the most from a Shopify calendar.
Who Benefits from Having a Shopify Calendar: Cases
Event calendars are valuable for a wide range of industries, helping businesses streamline scheduling, boost engagement, and enhance customer experience. Below are key industries where an event calendar plays a crucial role, along with real-world use cases from major brands.
Retail and E-Commerce 🛒
Retailers and online stores use event calendars to promote product launches, seasonal sales, and exclusive shopping events. A well-placed calendar on a Shopify store ensures customers stay informed about upcoming promotions and limited-time offers.
Nike integrates a calendar on its website to announce sneaker releases, allowing customers to set reminders and join exclusive purchase queues. This approach creates excitement and drives urgency around new product launches.
Health and Wellness Businesses 🩸
Fitness centers, yoga studios, and wellness clinics benefit from embedding a calendar in Shopify to manage class schedules, appointment bookings, and wellness events. A scheduling system helps customers easily register for sessions and avoid conflicts.
Peloton provides an interactive event display where users can book live workout sessions and plan their training schedules. This feature enhances user engagement and promotes a sense of community.
Hospitality and Event Planning 🎉
Restaurants, hotels, and event organizers leverage calendars to manage reservations, special dining experiences, and private event bookings. A well-integrated calendar helps streamline operations and improve customer experience.
OpenTable’s embedded calendar allows diners to book tables at preferred times, view upcoming special events, and receive confirmation instantly, reducing wait times and improving efficiency.
From retail promotions to fitness scheduling and hospitality reservations, a Shopify event calendar enhances organization and engagement across various industries.
Explore 30+ Event Calendar templates


Common Issues and How to Fix Them
While integrating a calendar into your Shopify store is generally straightforward, some common issues may arise during setup and use. Below, we address frequent challenges and provide solutions to ensure a seamless Shopify calendar integration.
Why is my Shopify calendar not displaying correctly?
My customers can’t book events. How do I fix this?
What should I do if my calendar loads slowly?
Why isn’t my calendar loading on mobile devices?
By addressing these common challenges, you can ensure a smooth and efficient calendar experience for both your business and customers.
Conclusion
Adding a calendar to your Shopify website is an effective way to enhance customer engagement, streamline event planning, and provide a better user experience. By selecting the right scheduling calendar, keeping it updated, and optimizing its functionality, you can maximize its impact on your store’s success.
Whether you’re in retail, fitness, hospitality, or any other industry, embedding a calendar can help drive conversions and improve customer interaction. If you’re ready to integrate a calendar into your Shopify store, now is the perfect time to get started!
Need More Info?
We hope this guide has provided valuable insights into adding a calendar to Shopify. If you need further assistance, feel free to reach out — our team is always happy to help. At Elfsight, we focus on delivering user-friendly, no-code solutions to make your website more interactive and efficient.
Join our growing Community to share your thoughts, discover new ideas, and suggest features for future updates. We value your feedback and invite you to contribute your ideas to our Wishlist!