WordPress Business Hours plugin
Create your Business Hours plugin
Why People Love Elfsight
Ever have someone message you at 7 PM: “Are you still open?”
With the Elfsight Business Hours plugin, your schedule becomes crystal clear – no more guesswork, no more manual replies. It shows exactly when you’re open (or closed) in a neat, stylish display that fits your WordPress layout.
Easy to set up, looks good everywhere (phones, tablets, desktops), and works even if you’d rather be doing something else than tinkering with code.
Did you know?
According to Think with Google, about 76% of people who search locally on their phone visit a business within just 24 hours.
Integrate Elfsight’s Business Hours plugin into your WordPress website for free now and let customers know exactly when you’re open.
Key Features of the WordPress Opening Hours Plugin
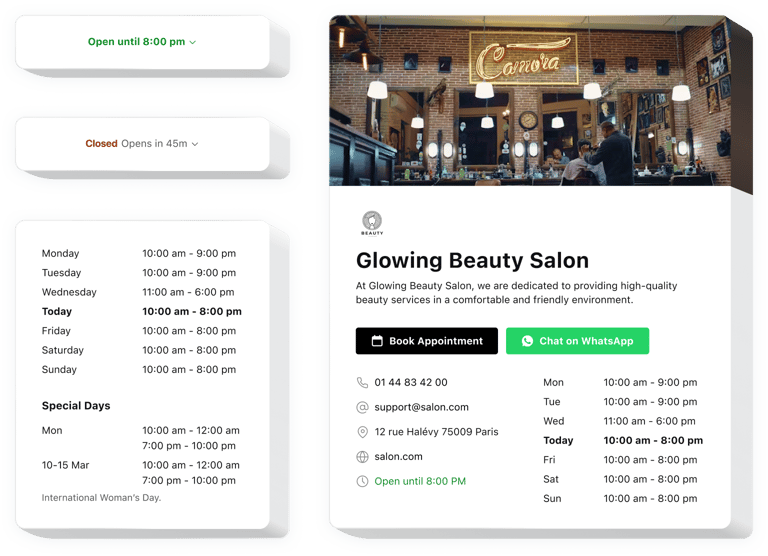
- Highlight current status: Automatically shows if your business is open, closing soon, or closed.
- Custom hours: Easily add holidays, special days, or temporary schedules.
- Flexible layout: Choose between full tables or compact designs that expand for details.
- Timezone awareness: Set your hours in your local timezone to ensure accuracy.
- Simple customization: Adjust colors, fonts, and layout to match your website style.
- Mobile-ready: Works smoothly across phones, tablets, and desktops.
How to Add the Business Hours to WordPress
Method 1: Inline Widget
This option is perfect if you want to display your business hours right inside your content – for example, on your “Contact Us” or “About” section. It looks neat and blends naturally with the rest of your page.
- Pick a template: Open the Elfsight editor and select a layout you like.
- Customize the widget: Set your schedule and adjust the design to match your website.
- Generate the installation code: Once you’re happy with your widget, click “Add to website for free.” The platform will automatically generate an HTML snippet for you to use.
- Embed it on your website: Open your WordPress dashboard, go to the page or post where you want your schedule displayed, switch to the HTML or “Code” view, and paste the snippet exactly where you’d like the widget to appear.
Method 2: Floating Widget
Choose this method if you want your business hours to always stay visible – for example, as a small icon or floating panel that visitors can open from any page.
- Select a template: In the editor, pick the option that fits you best.
- Personalize the widget: Add your schedule, define the placement, and adjust colors.
- Copy your custom code: Once everything looks right, click “Add to website for free” and copy the code Elfsight provides.
- Insert the code in WordPress: In your WordPress admin panel, go to “Appearance → Customize → Additional CSS/HTML,” scroll down, and paste the snippet before the closing
</body>tag. Save your changes to make the widget live across your entire website.
Need help? Visit the Help Center to explore our step-by-step guides, or share ideas in the Wishlist. You can also see the latest updates in the Changelog.
