Add Countdown Clock to Your Website With Widget
Looking to add a touch of excitement to your website? Discover the magic of Elfsight Countdown Timer widget. With this impressive tool, you can effortlessly create eye-catching countdowns and clocks, even without any coding experience. The widget offers a seamless solution to display time-sensitive events and promotions, captivating your website visitors instantly.
Integrating countdowns and clocks onto your website is a breeze and can be done in just a few straightforward steps. Here’s how you can do it:
- Get started by signing up for a free account with Elfsight, a leading provider of countdown and clock widgets.
- Select your favorite template and save the widget designed specifically for adding countdowns and clocks.
- Copy the unique installation code and easily embed it in your desired location on your website.
Impressed by its simplicity? But wait, there’s more! You can explore the widget’s versatility through a free, interactive online demo without the need for sign-up. Unleash your creativity and enhance your website with captivating countdowns and clocks to create a sense of urgency and boost user engagement.
How to Integrate Captivating Countdowns on Your Website
If you’re looking to add a sense of expectation to your website or blog, Elfsight Countdown Clock Timer is the perfect solution. Once you’ve customized the display to match your preferences, the next step is to seamlessly embed it into your web pages. The process is simple and efficient, allowing you to incorporate the Countdown Timer widget into any HTML field on your website, regardless of the platform you’re using.
By leveraging the Elfsight Countdown Timer widget, you can enjoy a host of benefits, including:
- Displaying countdowns and clocks for free, with full functionality.
- Customizing the design and template effortlessly through the user-friendly admin panel – no coding required.
- Keeping your website up-to-date with the latest time-sensitive events through automatic updates.
To embed the Elfsight Countdown Clock Timer widget on your website, follow these easy steps:
- Log in to your Elfsight widget provider’s admin panel.
- Create, customize, and configure your Countdown Timer widget to suit your preferences.
- Save your widget settings.
- Copy the provided installation code.
- Paste the code into the HTML field on the backend of your website.
That’s it! Now you can take full advantage of the Elfsight Countdown Clock widget on your website, enhancing your audience’s experience with captivating countdowns and clocks that create a sense of urgency and engagement.
Integrate Attractive Countdowns on Your WordPress Website with Elfsight Widget
Enhance your website with dynamic Countdowns and Clocks using the Elfsight Countdown Timer widget. Whether you’re using the default website editor or a popular visual builder like Elementor, embedding the widget is a breeze.
Option 1: Default Website Editor
To add Countdowns and Clocks to your website, begin by creating and customizing the Elfsight Countdown Timer widget in the admin panel. Then, copy the provided installation code and paste it into the HTML field of your website’s admin panel. Follow these simple steps:
- Create the Elfsight Countdown Clock widget in the admin panel.
- Copy the installation code.
- Log in to your website account.
- Navigate to the relevant page where you want to embed the widget.
- Add a custom HTML block to the desired section of the page.
- Paste the Elfsight Countdown Timer code into the block.
Save the changes, and you’re all set! The Countdowns and Clocks will now be seamlessly displayed on your website without the need for HTML code modifications.
Option 2: Elementor
If you prefer using Elementor for visual editing, integrating the Elfsight Countdown Clock widget into your website is a breeze. Here’s how:
- Create the Elfsight Countdown Timer widget for free in the admin panel and save it.
- Copy the installation code.
- Access your website’s admin dashboard and select the desired page.
- Choose “Edit with Elementor” from the page list or the WordPress page manager.
- Drag the “HTML” element to the area of the page where you want to embed the Countdowns and Clocks.
- Paste the Elfsight Countdown Timer code into the element.
Save the changes in both Elementor and WordPress, and you’re good to go! The dynamic Countdowns and Clocks will now be displayed on your website, adding a sense of urgency and engagement to your content. Repeat this process for each page where you want to showcase the Elfsight Countdown Timer widget.
By using the Elfsight Countdown Timer widget, you can effortlessly enhance your website with captivating Countdowns and Clocks, improving your audience’s experience and boosting their engagement.
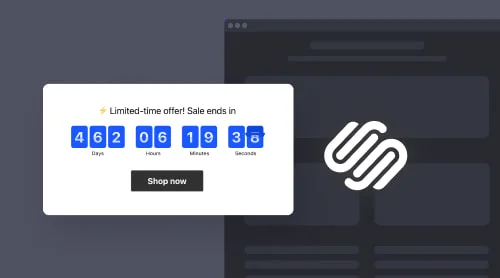
Integrate Dynamic Countdowns on Your Squarespace Website with Elfsight Countdown Timer Widget
To effortlessly add captivating Countdowns and Clocks to your website, follow these simple steps to embed the Elfsight Countdown Timer widget:
- Create and customize the Countdown Timer widget on Elfsight.com to suit your preferences.
- Copy the provided installation code for the widget.
- Log in to the admin panel of your website.
- Navigate to the page where you want to showcase the Countdowns and Clocks.
- Insert an HTML code block onto the desired page.
- Paste the copied installation code into the code block.
Save the changes and preview the page. Now, your website will beautifully display dynamic Countdowns and Clocks, creating a sense of urgency for your visitors. With the Elfsight Countdown Timer widget, you have complete control over the design and functionality of the display. The best part is that the widget is free to use, and any customizations you make in the admin panel will be instantly reflected on your website.
Elevate the interactive experience of your website with the Elfsight Countdown Timer widget and captivate your audience with visually stunning Countdowns and Clocks.
Enhance Your Shopify Website with Elfsight Countdown Timer Widget
Boosting engagement on your website has never been easier with the Elfsight Countdown Timer widget. As a website owner, you know the importance of creating a sense of urgency and excitement for your visitors. Here’s a simple guide on how to add dynamic Countdowns and Clocks using the Elfsight Countdown Timer widget:
- Create a customized Countdown Timer widget for free on Elfsight.com.
- Copy the provided installation code for the widget.
- Log in to your Shopify website’s admin panel.
- Navigate to the page where you want to embed the Countdowns and Clocks.
- Insert an HTML code block on the desired page.
- Paste the copied installation code into the code block.
Save and preview the page. Voila! Your website will now display dynamic Countdowns and Clocks, creating a compelling sense of urgency and driving visitor engagement. With the Elfsight Countdown Timer widget, you have complete control over the design and functionality of the display. The best part is that it’s completely free to use, and any customizations you make in the widget’s admin panel will be instantly applied to your website. Elevate your website’s interactive experience and captivate your audience with the Elfsight Countdown Timer widget. Get ready to make a lasting impression with visually stunning Countdowns and Clocks on your website.
Enhance WooCommerce with Elfsight Countdown Clock Widget
Optimize your WooCommerce website with the Elfsight Countdown Timer widget. Adding a Countdown Timer to your site is now hassle-free. Follow these simple steps to embed the widget and create a sense of urgency:
- Create a customized Countdown Timer widget on Elfsight Apps and save your settings.
- Copy the code generated for your widget.
- Easily embed the code into your website’s HTML and activate the Countdown Timer.
No need for technical expertise or hiring a developer. The Elfsight Countdown Timer widget empowers you to effortlessly enhance your WooCommerce site, encouraging conversions and improving user experience with dynamic Countdowns and Clocks. Elevate engagement and boost sales by adding the Elfsight Countdown Timer widget to your WooCommerce website today!
How to Embed Elfsight Countdown Clock on Your Magento Website
Create and customize the Widget. Start by accessing Elfsight Apps and begin building your custom Countdown Clock. Tailor the design and set the countdown to suit your preferences. Once you’re satisfied, save all the changes.
Copy the Provided Code. After customizing your Elfsight Countdown Timer, copy the unique code snippet that will display the timer on your website.
Paste the Code on Your Website. Navigate to the desired location on your website where you want the Countdown Timer to appear. Insert the copied code into the relevant HTML section or widget.
Preview and Activate. Save the changes and preview your website to witness the Elfsight Countdown Timer in action. You’re all set to engage your visitors with the dynamic and visually appealing countdown clock.
With Elfsight Countdown Clock, you can create a sense of urgency, drive conversions, and elevate your website’s user experience. The best part? You don’t need to be a coding expert or seek professional help. Adding this widget is a seamless and hassle-free process, empowering you to create excitement and drive action on your website. Plus, with automatic updates, you’ll always have the latest features and enhancements at your disposal.
Full Tutorial on Countdown Timer Creator
First, we welcome you to watch an video tutorial on how to build the countdown timer widget into any HTML in general. This is the easiest way to get acquainted with the countdown creator and to make an easy start, so that you will have a better understanding of the HTML Countdown Timer:
Upon watching the video, you might want to have a text guideline for you and your colleagues, so that it would be easy to find guidance whenever you appeal to the countdown timer creator. Follow these steps to create a custom plugin for your website as a result.
Preliminary steps
Log in or Sign up. Create an Elfsight account or log in if you already have one to access all the free features and custom elements of the Countdown Timer creator.
Navigate to Apps Catalog. Once you’re logged in, go to your profile. From there, locate and click on the Apps Catalog menu.
Search for Countdown Timer Creator. Inside the Apps Catalog, use the search bar to find the Countdown Timer creator among the wide selection of widgets available.
Customize widget stage
Choose a Template. The first thing you see on the left of the timer creator page is a range of templates. Browse through the various options made by Elfsight developers for the Countdown Timer creator and move on with the one that best fits your online store website’s purpose.
Customize Appearance. Modify the countdown timer’s appearance in the creator online to make it match your website’s design. You can add a call-to-action button, enable the clock’s animation, personalize the message, adjust colors, change fonts, and build the plugin’s style. Ensure the custom countdown timer has a nice appearance on your website.
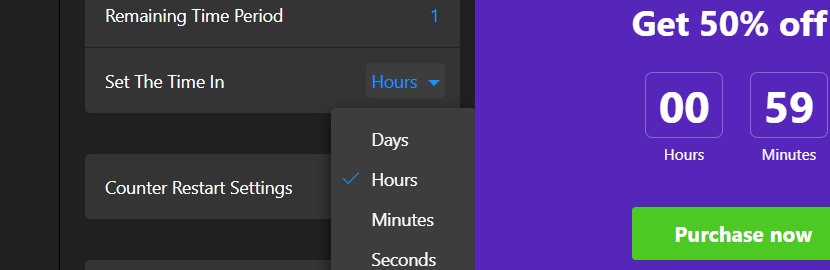
Set Date and Time. Specify the expiration date and time to make your custom countdown plugin logical. Choose from custom timer types, including start-to-finish, remaining time counter per visitor, and start-to-finish number counter. Your clock can count seconds, minutes, hours or days online.
Final phase in Creator
Preview the Results. Before you finish the building process, preview the custom countdown timer using the Elfsight Countdown creator and see how it will appear on your website. Make sure it counts time as planned.
Publish Your Countdown Timer. After you’re satisfied with the custom clock, click on the “Publish” button at the upper right of the Elfsight Countdown creator. This action generates an embed code specific to your custom plugin.
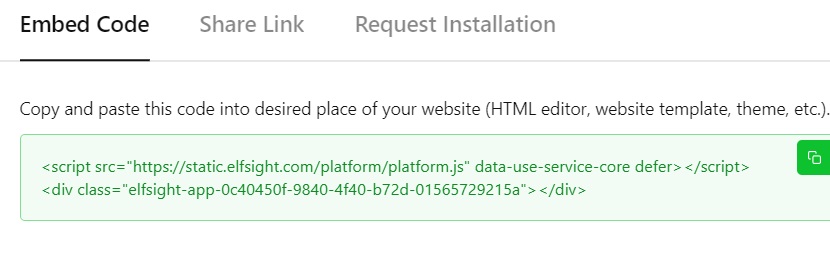
Copy the Embed Code. After you’ve done an excellent job in the creator menu, you receive a custom HTML code to build into the website. Copy the HTML code that was generated for your specific countdown timer widget.
Embed HTML into your Website
Paste the Code. Insert the created code of your custom plugin into the desired section of the website or content management system. Watch changes online if your website CMS can do that.
Verify Display. Take a moment to verify that the custom countdown timer that you created is displaying on your website the way you like.
Finalize Publication. If everything looks as expected, save the changes you’ve made to your website. Make sure all the page’s sections stay where they are supposed to be. This completes the publication process, and you now have the Elfsight Countdown Timer ready to engage your audience.
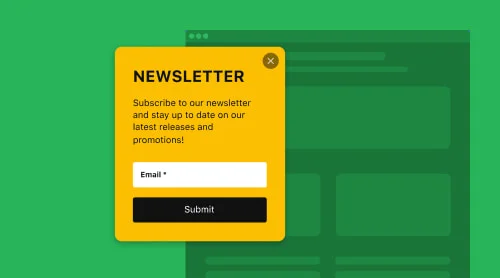
Check Out the Versatile Capabilities of Elfsight Countdown Timer
Seamlessly integrate the Elfsight Countdown Timer widget into your website and gain access to a plethora of exceptional features. This incredible countdown timer widget offers a seamless process of embedding, unlocking its powerful functionalities as soon as you create an account. Let’s explore the key capabilities that will enhance your website:
| Create Tailored Countdowns | Design captivating countdown timers that perfectly align with your brand and website aesthetics. Customize the appearance, duration, and triggers of each timer, creating a sense of urgency and driving conversions. |
| Multiple Timer Options | Manage and deploy multiple countdown timers simultaneously, targeting various products, promotions, or events on your website. Leverage the power of different timers to captivate your audience and boost engagement. |
| Flexible Placement | Embed countdown timers effortlessly anywhere on your website. From the homepage to product pages and landing pages, choose ideal locations to maximize impact and enhance the user experience. |
| Triggered Display Options | Utilize advanced trigger settings to display countdown timers based on specific user interactions. Activate timers on scroll, hover, or click, delivering them at the perfect moment to stimulate action. |
| Customizable Designs | Craft visually stunning countdown timers that captivate your audience. Customize colors, fonts, sizes, and styles to match your website’s branding, creating a seamless and immersive user experience. |
| Real-Time Updates | Experience real-time updates with the Elfsight Countdown Timer widget. The timers automatically adjust to the current time and date, ensuring accurate and reliable countdowns for your customers. |
| Mobile Responsiveness | Deliver a seamless user experience across all devices with fully responsive countdown timers. Whether visitors access your website from desktops, tablets, or mobile devices, the timers will adapt flawlessly. |
Discover the Power of Elfsight Countdown Timer Widget
Now, let’s dive into the various styling options available with the Elfsight Countdown Timer widget. These examples showcase the endless possibilities for customizing your countdown timers, aligning them perfectly with your website’s aesthetics. Whether you have a personal blog or a thriving online store, these examples will inspire you to elevate your user experience with eye-catching countdown timers.
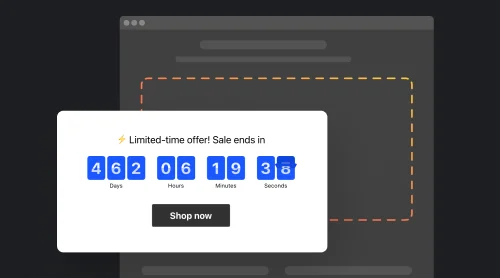
Example 1: Discount Period Clock
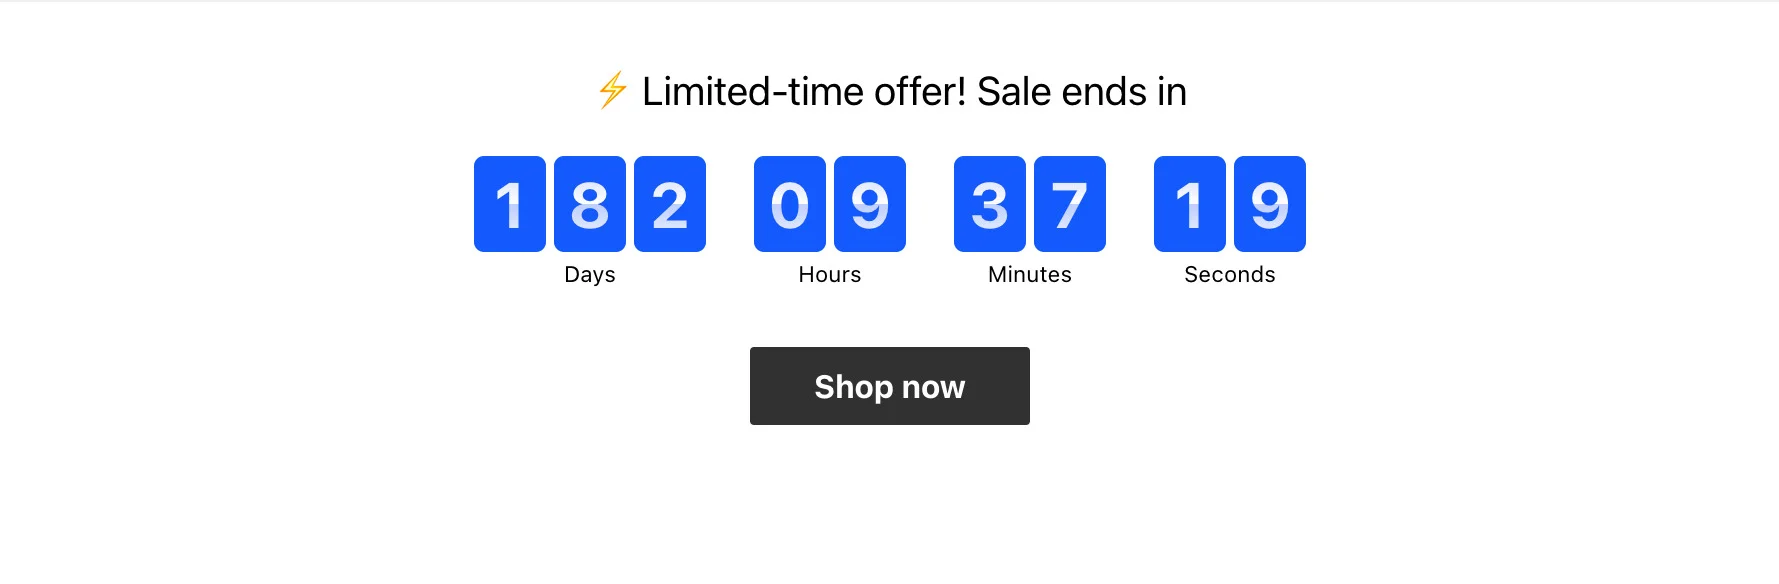
Create a captivating countdown timer on your website to highlight your exclusive discount period or special offer. This timer will serve as a powerful visual reminder for visitors to seize the limited-time opportunity. With every passing second, the sense of anticipation will grow, encouraging users to make a purchase. Once the countdown reaches zero, you can display a custom message, reinforcing the importance of the offer.
Example 2: Festive Sale Banner Timer

Leverage the holiday season’s spirit to boost sales by embedding a festive-themed top banner with a countdown timer on your website. The timer will subtly remind visitors about your ongoing sale as they explore your content. The banner will gracefully accompany users as they scroll, ensuring maximum visibility and engagement.
Example 3: Special Offer Bottom Bar Clock

Announce your exclusive coupons and special deals using an enticing countdown timer displayed in a floating bottom bar on each page. The timer, along with a personalized message, entices visitors to take action before time runs out, with easy access to the coupon page in just one click.
Example 4: Personalized Countdown Timer

Create a unique countdown timer for each visitor, offering a special bonus within a short time frame. This personalized approach adds a sense of urgency and encourages immediate action. Easily set the timer’s duration and experiment with different color combinations and predefined styles to capture every user’s attention.
Example 5: Event Start Countdown Widget

Promote upcoming events, contests, or occasions in advance by displaying a countdown timer on your website. Customize the timer to count down the days until the event starts, building anticipation among your audience. Enhance the timer with a button that enables users to register or explore event details.
Example 6: Limited-Time Shipping Banner

Drive sales and incentivize quick purchases by featuring a fixed top banner with a countdown timer. This banner offers shoppers a special bonus and counts down a short period for them to take advantage of it. Whether it’s free shipping or a unique gift, the banner’s clickability engages users and encourages prompt action.
Example 7: Wedding Countdown Widget

Celebrate your upcoming wedding by adding a delightful countdown timer to your website. The timer will remind everyone about the joyous occasion and keep guests eagerly looking forward to the big day. Customize the timer with a theme that matches your wedding style and add emojis to the message text for an extra touch of emotional charm.
With Elfsight Countdown Timer, you have the creative tools to add interactive countdowns to your website, enhancing user engagement and creating memorable experiences for your audience.
Conclusion
The Elfsight Countdown Timer widget is a powerful tool that empowers website owners to effortlessly enhance user experience and engagement. With its seamless integration process, you can easily embed captivating countdown timers on your website, no matter your platform. The widget offers a plethora of customization options, allowing you to create tailor-made timers that perfectly align with your website’s aesthetics. Whether you run a personal blog or a bustling e-commerce website, the Elfsight Countdown Timer widget is a versatile addition that can drive conversions and boost user interaction.
By harnessing the potential of multiple timers, you can effectively target various promotions, events, and offers, delivering a dynamic and immersive experience to your visitors. The triggered display options ensure that your countdown timers appear at the perfect moment, stimulating action and capturing attention. Additionally, the real-time updates guarantee accurate countdowns, keeping your audience well-informed and engaged.
The beauty of this widget lies not only in its captivating designs but also in its mobile responsiveness, ensuring a seamless user experience across all devices. With the Elfsight Countdown Timer widget, you have the power to transform your website into an interactive and engaging platform that keeps visitors eagerly anticipating every “tick” of the clock. Embrace the potential of countdown timers and create a sense of urgency that motivates action and elevates your online presence. Embed the Elfsight Countdown Timer widget today and make every moment count on your website.