
Did you know? With 434 million active accounts globally, PayPal remains one of the most trusted digital payment methods for both consumers and merchants.
Accepting payments directly on your website removes friction from the buying journey. The fastest way to add a PayPal button to your website is with Elfsight’s PayPal Button Widget, which lets you create no-code checkout buttons, subscription payments, and donation buttons in minutes. Visitors click your button and complete payment through PayPal’s secure, familiar checkout – cutting friction and building trust with a globally recognized payment method.
- Embed a PayPal button on your website without coding skills
- Create checkout buttons, subscriptions, and donation forms
- Compare PayPal’s official button method with a third-party solution
- Optimize button placement and design for higher conversion rates
Add a PayPal button in 4 steps
If you’re ready to embed right away, here’s the fastest route to adding a PayPal button on your website:
- Open Elfsight’s editor and select a payment type.
- Enter your PayPal seller email and set payment details.
- Customize the widget to match your brand.
- Copy your embed code and paste it into your website’s backend.
Create your PayPal payment button in the live editor! ↓
What makes this PayPal solution stand out
Now that you understand the simplicity of this setup, let’s explore the key capabilities that set this PayPal widget apart from native options and other alternatives:
| Key feature | Why it matters |
|---|---|
| Three payment types in one widget | Create checkout buttons for one-time purchases, subscription buttons with flexible billing periods, or donation buttons with fixed or variable amounts—all from a single tool. |
| Built-in payment system icons | Display Visa, Mastercard, American Express, and Discover logos beneath your button. Seeing familiar payment options increases buyer confidence and checkout completion rates by signaling security. |
| Full style customization for your brand | Control button size, shape, color, text, border thickness, and PayPal logo appearance. Your payment button blends seamlessly with your website design instead of standing out awkwardly. |
| Multi-currency and localization support | Sell in your customers’ currency with a localized checkout page, so international buyers see prices and the payment screen in a familiar format. |
| Recurring subscription billing | Set a billing interval and switch on automatic recurring payments, so subscribers stay active without manual re-billing each cycle. |
| Tax and shipping configuration | Add taxes as a percentage or fixed amount, plus shipping fees directly in your button setup. The final price displays transparently on PayPal’s checkout page. |
| Post-purchase redirect option | Send customers to a thank-you page or special offer after successful payment. Track conversions more effectively and maximize upsell opportunities. |
For the complete breakdown of available functionality, visit the Features Page.
How to embed a Paypal button on website
Want to fine-tune every aspect of your payment button? This section walks you through each configuration step, from selecting payment types to styling your button for maximum conversions.
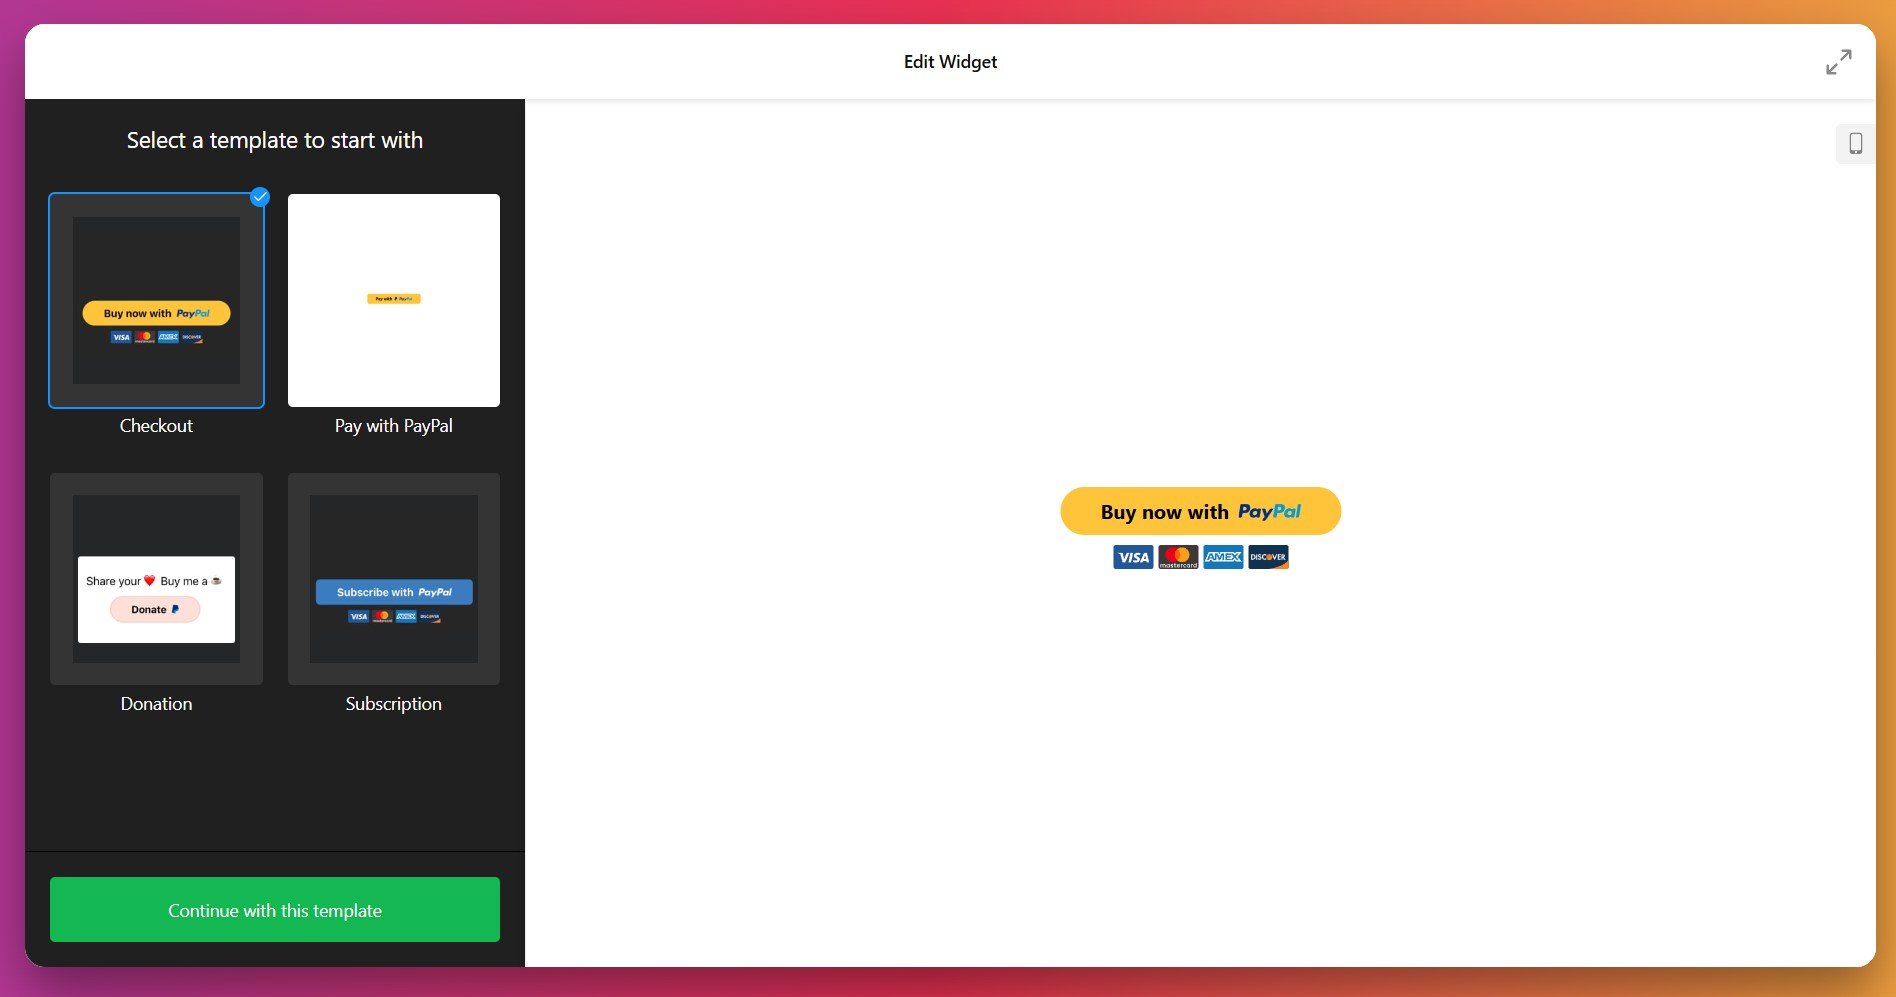
1. Choose your payment type
Launch the PayPal Button editor and select the payment model that aligns with your business:
- Checkout type processes one-time purchases with a product name, price, optional shipping, and tax settings. Ideal for selling products or services on a per-transaction basis.
- Subscription type sets up recurring payments at intervals you define. Perfect for membership sites, software licenses, or recurring services.
- Donation type lets supporters contribute fixed amounts or choose their own donation sum. Works for nonprofits, creators, community projects, or content funding.
If you’re offering more than one subscription tier, remember each PayPal button covers a single plan. Lay your options out side by side with a Pricing Table so visitors can compare plans, then pair each tier with its own subscribe button.
Setting up a PayPal Donate Button
To add a PayPal donate button to your website, select the Donation payment type in the editor. It’s the simplest of the three to configure — no product name, shipping, or tax to set. Choose your currency and localization, then pick a donation type:
- Optional – donors enter any amount they like. Best for open-ended giving, tips, or “pay what you want” support.
- Fixed – you set a single donation amount. Useful for a specific ask, like a set membership or contribution tier.
Add a call-to-action above the button (e.g., “Support our mission”), style it to match your page, and embed it wherever donors are most likely to act — a campaign page, an about page, or your footer.
2. Enter your PayPal account details
Navigate to the Payment tab and enter your PayPal seller email address. This is the account where payments will be deposited. Make sure you’re using a PayPal Business Account (personal accounts cannot accept payments through buttons).
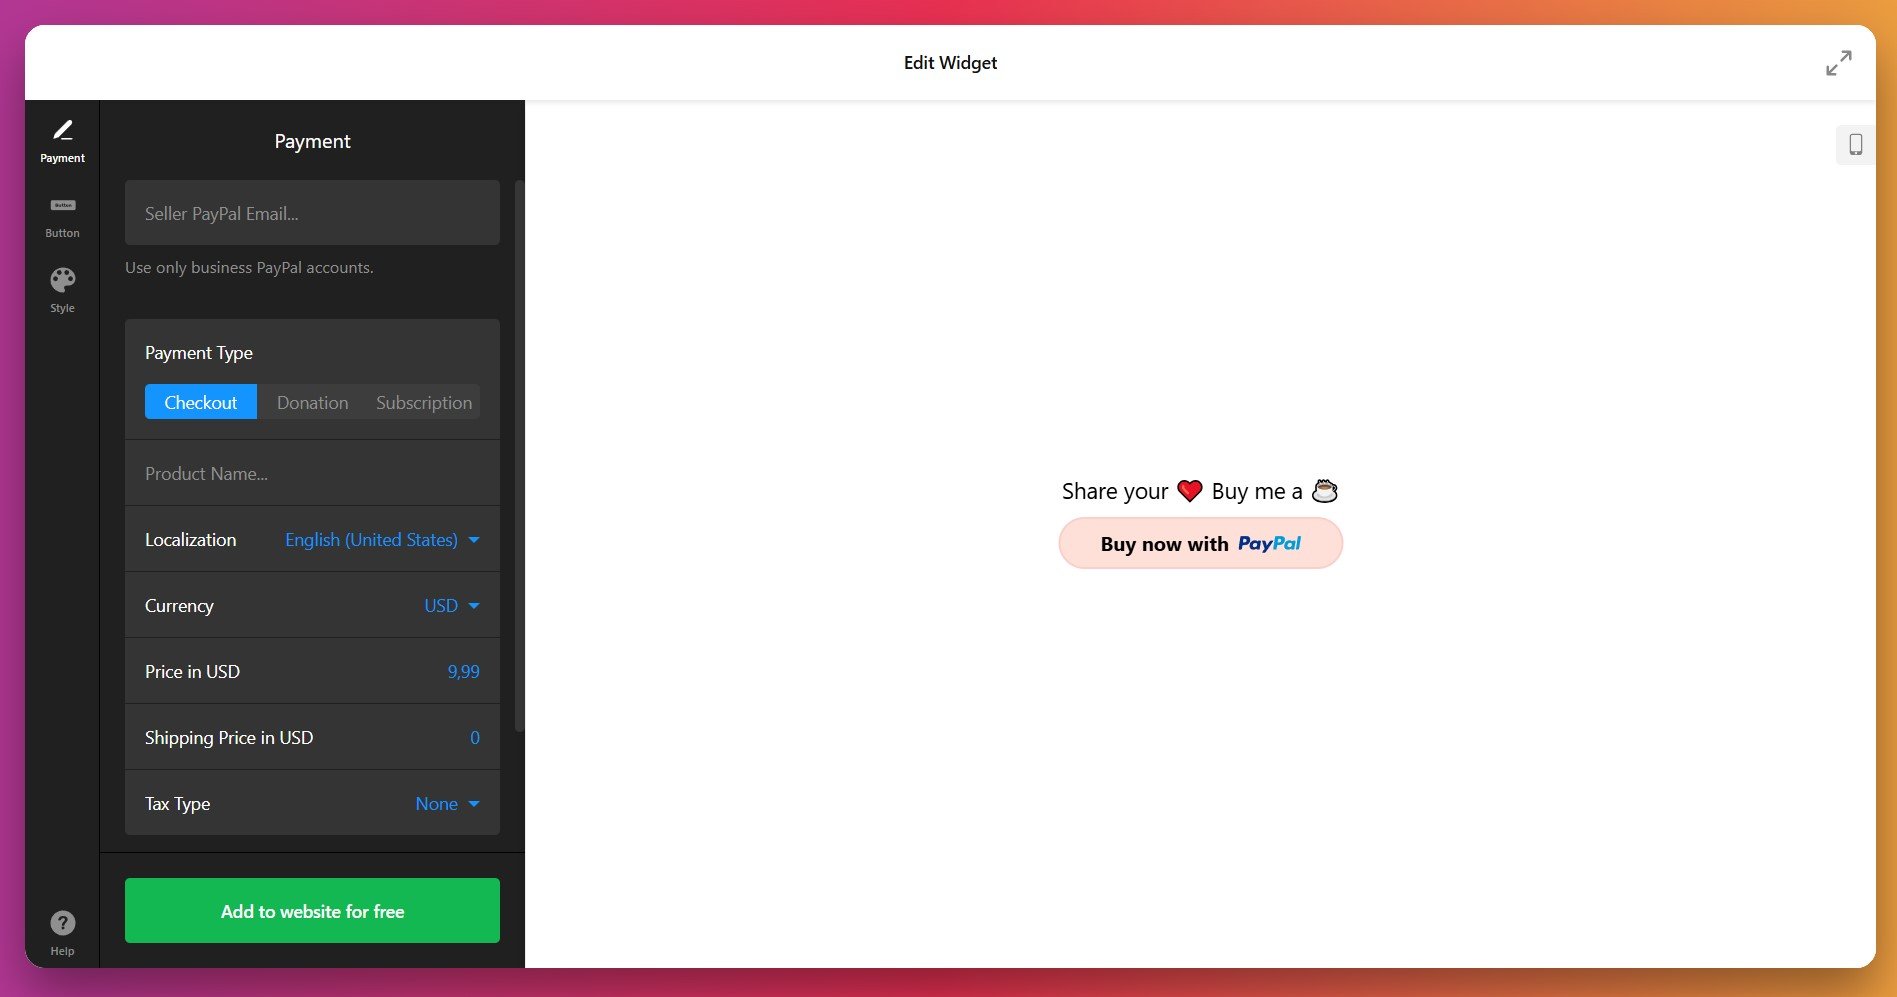
3. Configure payment details
For checkout buttons, enter these essential details:
- Product name – The item or service customers are purchasing (e.g., “Premium Course Access,” “Consulting Package”).
- Price – The payment amount in your chosen currency.
- Currency and localization – Select your country and payment currency (20+ options supported). This displays the checkout interface in the local language.
- Shipping price – Optional fee for physical goods. Leave blank if you offer free shipping or sell digital products.
- Tax type – Choose None, Percentage (calculated from total), or Fixed amount.
For subscription buttons, you’ll also set the billing interval and whether payments recur automatically. For donation buttons, decide whether donors choose their own amount or if you set a fixed sum.
4. Customize Button text and elements
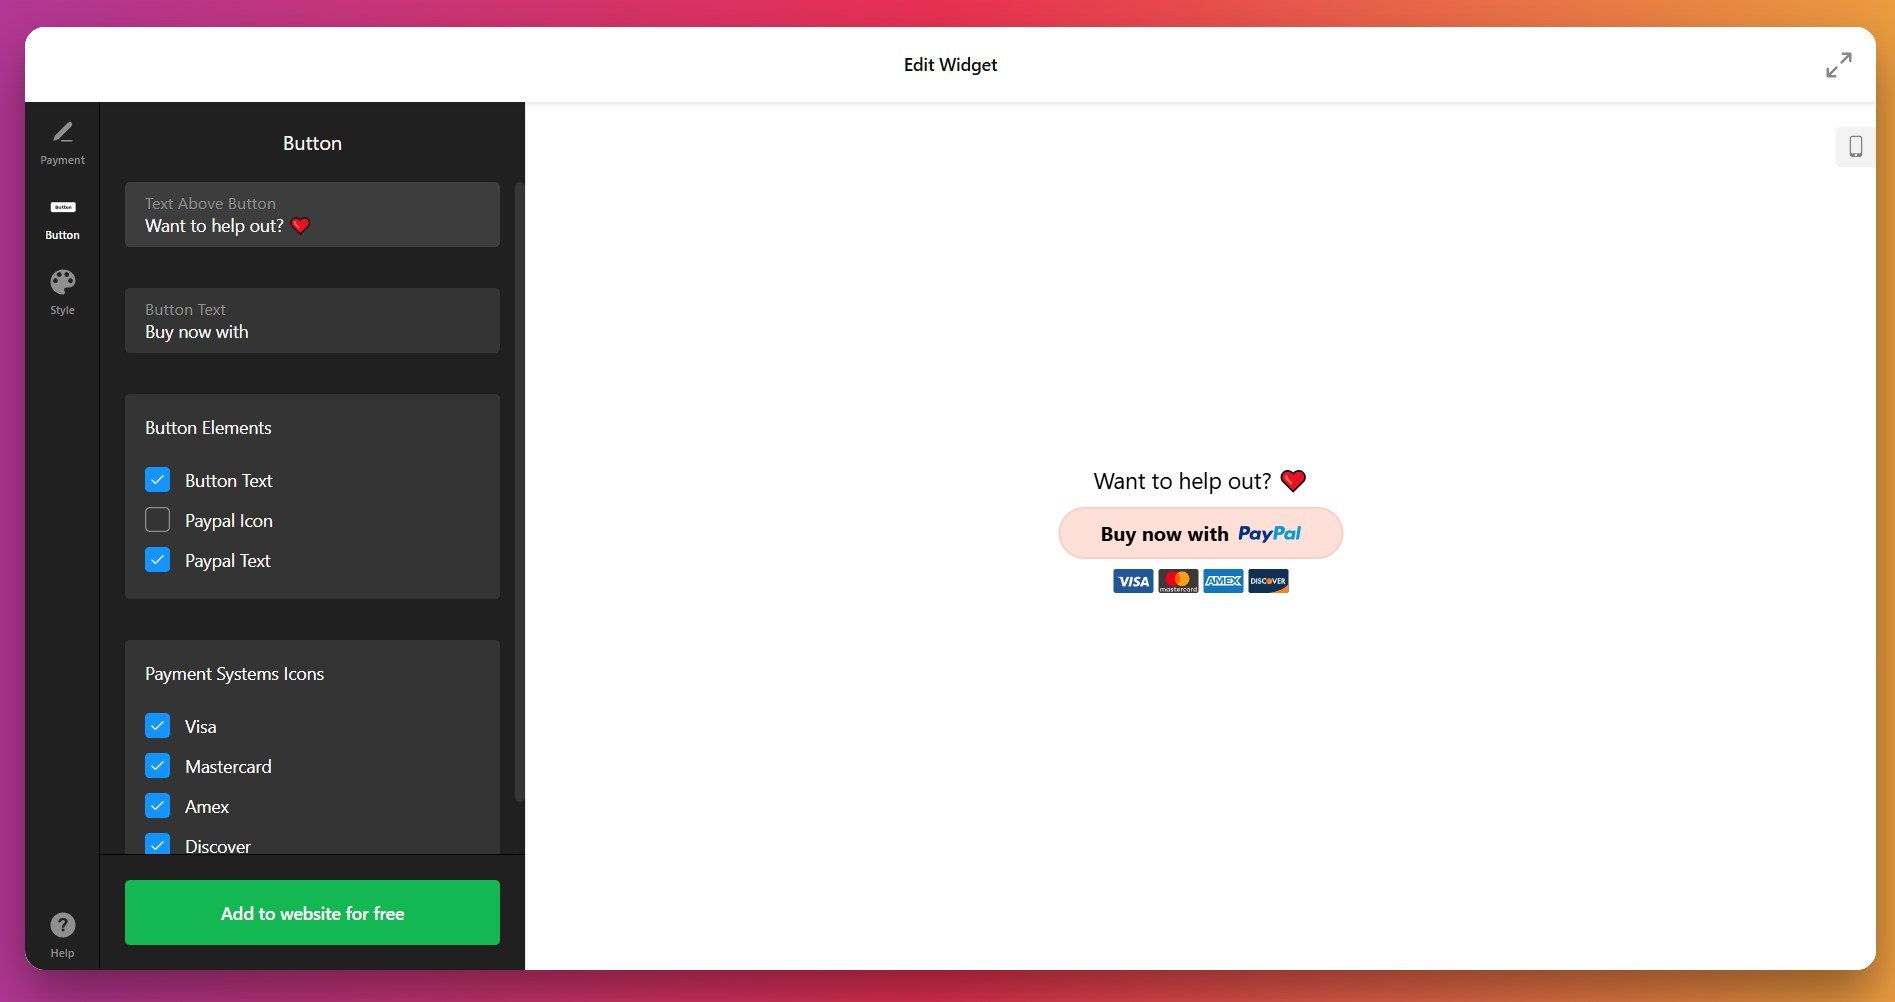
In the Button tab, decide which elements your PayPal button will display:
- Text above button – A headline or call-to-action above the payment button (e.g., “Ready to get started?” or “Support our mission”).
- Button text – The label on the button itself (defaults to “Buy Now,” “Subscribe,” or “Donate,” but you can customize it).
- Button elements – Toggle visibility of button text, PayPal icon, and PayPal branding text.
- Payment system icons – Show or hide Visa, Mastercard, American Express, and Discover logos below your button.
5. Style your button for maximum impact
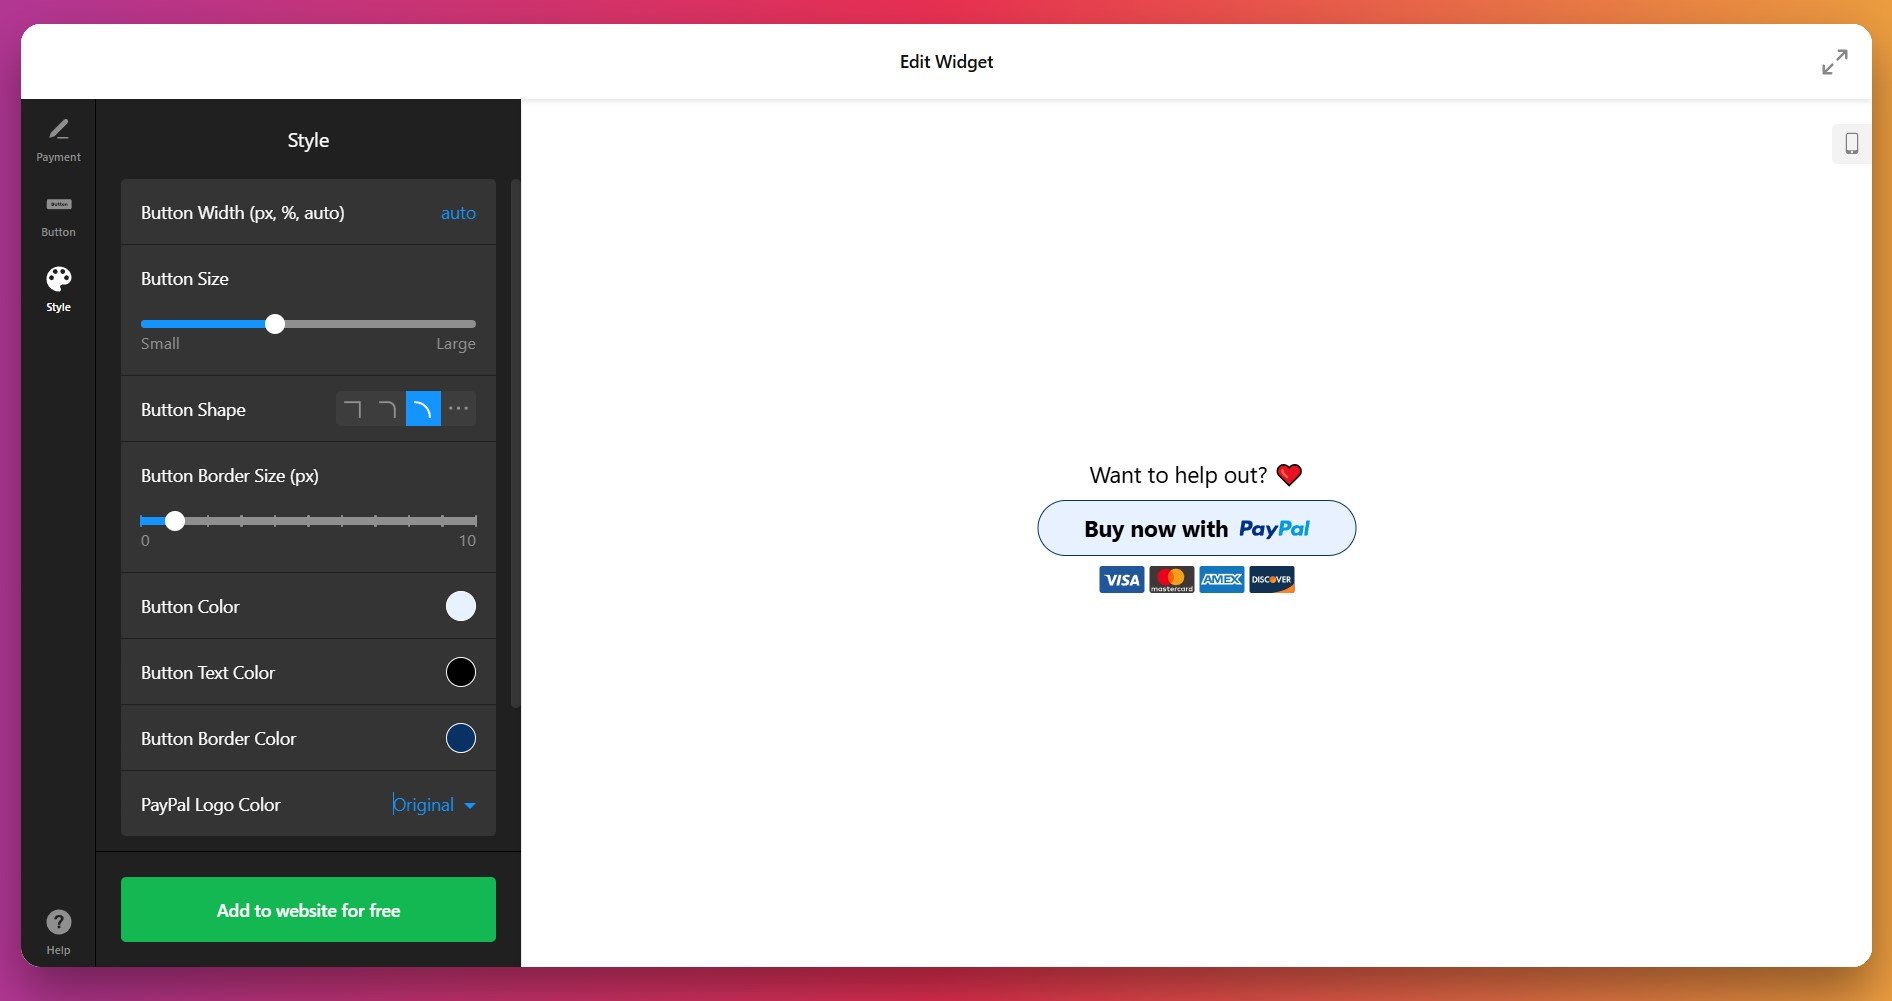
In the Style tab, fine-tune your button’s appearance to match your website:
- Button width – Choose pixels, percentage of container, or autofill.
- Button size – Drag the slider from small to large. Bigger buttons get more clicks.
- Button shape – Rectangle, rounded corners, or fully rounded.
- Border thickness – Adjust from 0 to create a bordered button.
- Colors – Customize button color, text color, border color, and PayPal logo color independently.
If default styling options aren’t enough, the Custom CSS field lets you make granular adjustments. For example, you can change fonts, adjust spacing, or apply hover effects. The Elfsight Community Forum provides ready-to-use CSS snippets if you’re not comfortable writing code.
6. Copy and Paste Your Embed Code
Once satisfied with your setup, click the green “Add to website for free” button. Copy the entire code block – you’ll need it to launch your widget.
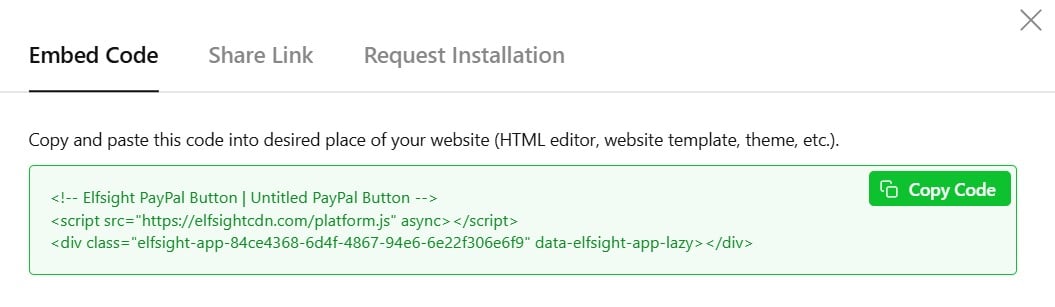
Paste your PayPal button code into your website’s backend. The exact process depends on your platform. For example:
WordPress (Gutenberg Editor – Block Editor)
- Navigate to the page or post where you want to add the button.
- Click the “+” icon to add a new block.
- Search for and select “Custom HTML.”
- Paste your Elfsight PayPal code into the Custom HTML block.
- Click “Update” or “Publish” to save your changes.
- Confirm you pasted the complete embed code—it should be several lines long, not truncated.
- Make sure you used a Custom HTML or HTML block, not a Text block.
- Clear your browser cache and refresh the page.
- Test in a different browser to rule out local issues.
- If still missing, check your browser’s developer console (F12) for JavaScript errors.
Beyond Elfsight: Understanding Your Payment Button Options
While Elfsight simplifies payment button creation, several other approaches exist for accepting PayPal payments on your website. Each has its own strengths, limitations, and ideal use cases. Here’s how they stack up:
PayPal’s Official Button Builder
PayPal’s native button tool lets you create payment buttons directly from your PayPal account without third-party tools.
- Log in to your PayPal account. Go to “Tools” → “All Tools” → “PayPal Buttons” (or search “Create Payment Links and Buttons”).
- Select button type. Choose “Buy Now,” “Donate,” or “Subscribe” depending on your need.
- Configure payment details. Enter product name, price, currency, and any shipping or tax information.
- Copy the HTML code. PayPal generates embed code for your button. Copy the full snippet.
- Paste into your website. Insert the code into a Custom HTML block on your page, post, or website builder.
PayPal’s official buttons have minimal customization—you can’t change colors, text, or shape much beyond basic options. The button typically appears in PayPal’s standard blue, which may not match your brand. Style options are restricted compared to third-party solutions.
Full details are available in PayPal’s Developer Dashboard.
Stripe Checkout (Third-Party Alternative)
Stripe is another popular payment processor that competes with PayPal. It offers checkout buttons through Stripe’s payment links.
- Create a Stripe account. Sign up at stripe.com and verify your identity and bank account.
- Generate a payment link. Go to Products → Prices → Payment Links and create a new link for your product.
- Customize the checkout page. Add a product image, description, and branding colors through Stripe’s interface.
- Copy your payment link. Get the URL and either embed it as a button or link on your page.
- Embed on your website. Paste as a standard hyperlink or use a Code block to embed a custom button pointing to your Stripe link.
Stripe checkout typically opens a new page or tab, taking visitors away from your website. This interrupts their browsing experience and can impact brand perception. Stripe’s fees are also similar to PayPal (2.9% + $0.30 per transaction in the US).
More information is available in Stripe’s Payment Links documentation.
WooCommerce PayPal Payments
If you’re using WordPress and need a full e-commerce solution, WooCommerce is a popular plugin that integrates PayPal and other payment methods.
Configure PayPal. Go to WooCommerce Settings → Payments and set up the PayPal Payments extension (the official, current WooCommerce integration — PayPal Standard has been deprecated and removed from WooCommerce core).
WooCommerce means installing an extension, configuring products, and running a full store backend. It’s powerful for large catalogs but overkill if you just need a single payment button. Note that the older “PayPal Standard” gateway is no longer supported for new stores — new setups use the PayPal Payments extension.
More information is available in WooCommerce’s PayPal Integration Guide.
How do these methods compare?
| Method | Best for | Main limitation |
|---|---|---|
| Elfsight PayPal Button | Fully customized, branded buttons with minimal setup. Works on any platform. One-time payments, subscriptions, and donations all in one tool. | Requires a free Elfsight account; button code must be manually placed on each page where needed. |
| PayPal Official Button | Direct integration without extra accounts; zero setup fees; trustworthy as the official PayPal tool. | Limited design customization; buttons appear in PayPal’s standard style; fewer payment type options. |
| Stripe Checkout | Professional checkout experience; strong security and fraud prevention; detailed analytics. | Requires a separate Stripe account and setup; the checkout opens on a Stripe-hosted page. Fees vary by region. |
| WooCommerce | Complete e-commerce store with product management, inventory, shipping, and extensive customization. | More complex to set up and maintain; hosting requirements can be expensive; overkill for single-button use cases. |
📝 Strategic tips for maximum conversion
The difference between a button that converts and one that doesn’t often comes down to placement, design, and surrounding context. Based on patterns we’ve seen with thousands of users, these practices deliver measurable results:
- Plan one button per item from the start. Each widget is a single button tied to one product or amount. Selling several things means several buttons — decide your structure before you build, rather than trying to cram options into one.
- Open payment in a modal with the Popup widget. Pairing the PayPal Button with Elfsight’s Popup lets buyers pay without navigating to a separate page first, so they don’t lose their place in your content.
- Collect details first with Form Builder. For custom orders, event sign-ups, or anything needing buyer info, place a Form Builder widget ahead of the button — gather what you need, then send them to pay.
- Selling digital goods? Mind the “Shipped To” field. PayPal’s receipt shows a shipping address on Checkout payments even for no-ship items. Set expectations in your copy, or use the Donation type where an address isn’t part of the flow.
- Don’t build logic around the redirect for failed payments. The Redirect URL fires on success only — there’s no separate cancel/failure redirect. Keep “what happens next” info on the success page, not mid-checkout.
- No Buy Now, Pay Later here. The widget doesn’t offer BNPL. If installment payment is a hard requirement for your audience, plan around PayPal’s own hosted options or a dedicated tool instead of promising it on the button.
Frequently asked questions
Do I need a PayPal Business Account to accept payments?
What payment types can I create with Elfsight's widget?
Can I add taxes and shipping to my PayPal button?
What currencies does the PayPal button widget support?
Is there a fee for using Elfsight's PayPal button?
Can I embed multiple PayPal buttons on the same page?
Ready to accept payments?
You’ve now seen how to add a PayPal button to your website without touching code. The flow is the same for any use case: connect your PayPal Business account, pick a payment type, style the button to match your brand, and paste the embed code into your platform. Two things worth remembering — each button handles a single item or amount, and the payment itself completes on PayPal’s secure checkout, so buyers finish through a flow they already recognize.
Compared with PayPal’s native button, Stripe, or a full WooCommerce store, the Elfsight widget lands in the sweet spot for most sites: branded, customizable buttons covering all three payment types, with minimal setup and no store backend to maintain.