Building a calculator for your WordPress website is a simple yet powerful way to enhance functionality фтв improve user engagement. Whether you’re offering cost estimates, product comparisons, or service quotes, a calculator makes complex information accessible in real time.
If you’re looking for an easy method to boost interaction, reduce bounce rates, and convert more visitors, integrating a calculator is exactly what your website needs. It doesn’t require coding and can be customized to fit any industry or business goal.
- Better user experience. Visitors can calculate prices, compare options, or get instant answers without leaving your page, keeping them engaged longer.
- Higher conversion rates. Interactive features like calculators increase the likelihood of action — filling out a form, requesting a quote, or making a purchase.
- Time-saving automation. Instead of manually answering pricing or service questions, the calculator delivers answers instantly, saving time for both users and your team.
- Professional appearance. A well-designed calculator adds credibility and demonstrates that your business invests in user-friendly digital solutions.
- Customizable to your niche. Whether you’re in real estate, finance, fitness, or e-commerce, you can tailor calculators to meet specific needs and expectations.
Now that you know why a calculator is a valuable tool to have , let’s walk through a quick way to create and embed one on your WordPress website using a no-code solution.
How to Add Calculator to WordPress: Quick Guide
Elsight offers the fastest and most beginner-friendly way to create a calculator for your website. No need to write code or hire developers — just follow a few intuitive steps using the visual editor.
- Open the Elfsight editor and select a calculator template that fits your needs.
- Adjust the layout, structure, and logic settings to define how the calculator works.
- Customize colors, fonts, buttons, and spacing to match your website’s design.
- Click “Add to website for free“, then copy the generated code and paste it into your WordPress backend.
These simple steps will get your calculator up and running in no time, helping you provide real-time calculations to your audience. The process is smooth and quick.
See the widget in action – build your own Calculator in minutes!
Top Features of Elfsight’s Calculator
Creating a calculator is one thing — but choosing the right solution can make all the difference in terms of performance, flexibility, and results. Elfsight’s calculator is more than a basic widget — it’s a fully customizable, conversion-focused tool built to fit the unique needs of your business.
It’s built for WordPress users who need a fast, code-free way to embed a calculator that looks great and performs even better. With a visual interface and extensive customization options, you’ll be able to launch a tailored experience without relying on developers or complex integrations.
Here are the key features and benefits that make Elfsight’s calculator a smart choice:
- Flexible layout options. Choose from multiple templates and layout styles to match your website’s structure and design preferences.
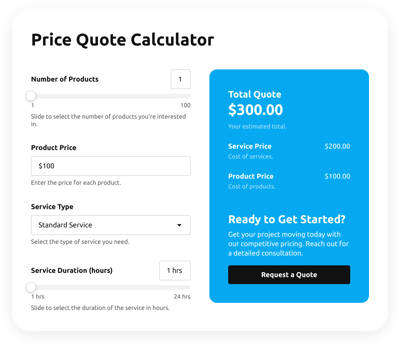
- Custom calculation logic. Define your own formulas and input fields to generate precise results for any type of calculation — price, quotes, estimates, and more.
- Visual editor with live preview. Customize the calculator with real-time feedback to ensure it looks and works exactly how you want.
- Lead capture integration. Collect user data through built-in forms, ideal for generating leads and boosting conversions.
- Mobile responsiveness. The calculator adapts to all screen sizes, offering a smooth experience across devices.
- Conditional logic support. Show or hide fields dynamically based on user input for more interactive and personalized calculations.
- One-click install on WordPress. Copy the code and paste it — no coding skills required or third-party plugins needed.
These features are designed to help you build not just a functional calculator, but a highly engaging and strategic element on your website. It’s an ideal solution for marketers, service providers, and e-commerce businesses that want to give users immediate, tailored results.
Now that you understand why Elfsight is a powerful option, let’s move on to a complete walkthrough — so you can build and install your calculator with total confidence.
Using the WordPress Calculator Builder: Step-by-Step
The below guide will show you how to create a personalized calculator, configure its layout and logic, and embed it into your WordPress website — step by step. No special tech skills required.
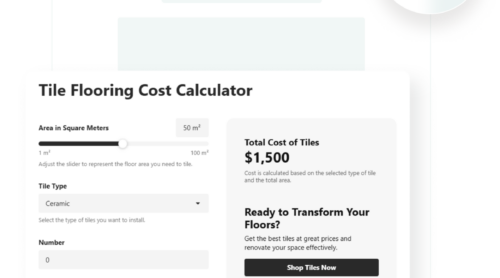
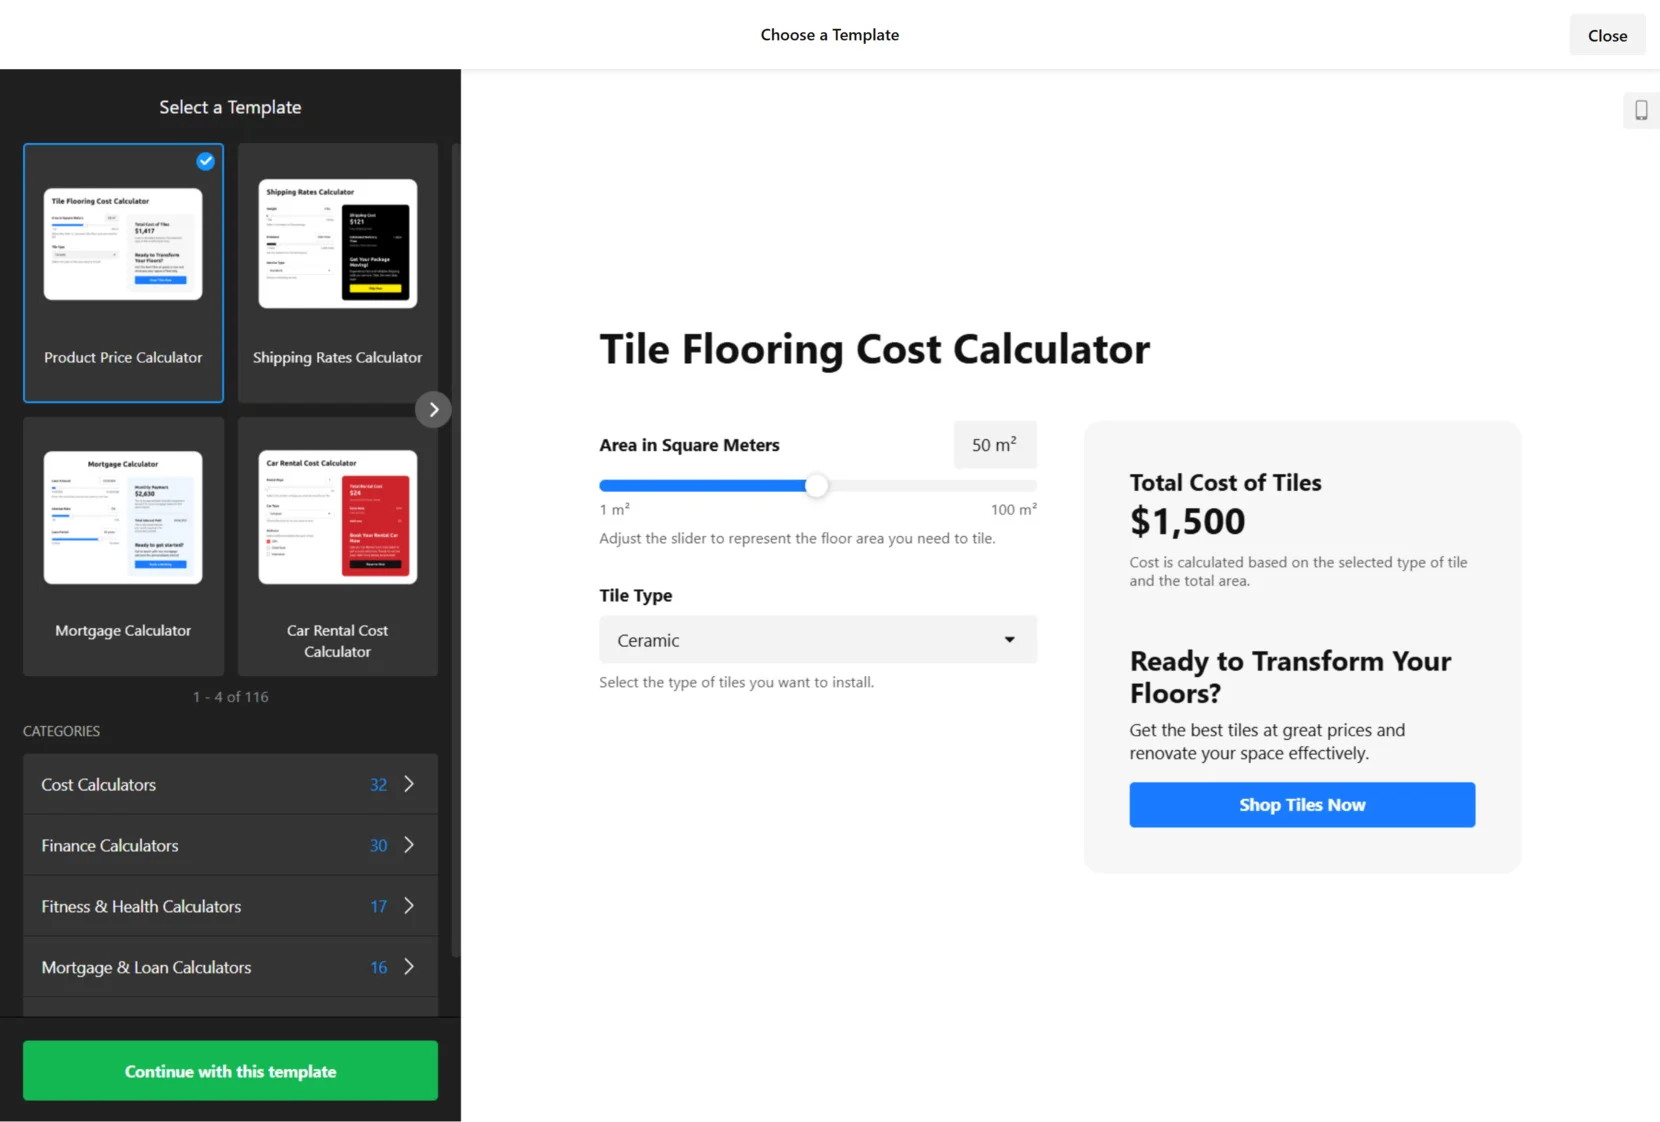
- Select a starting template. Open the Elfsight Calculator editor and browse the available templates. Choose one that fits your business goals — whether it’s a price estimator, finance calculator, or any other use case — then click “Continue with this template”.

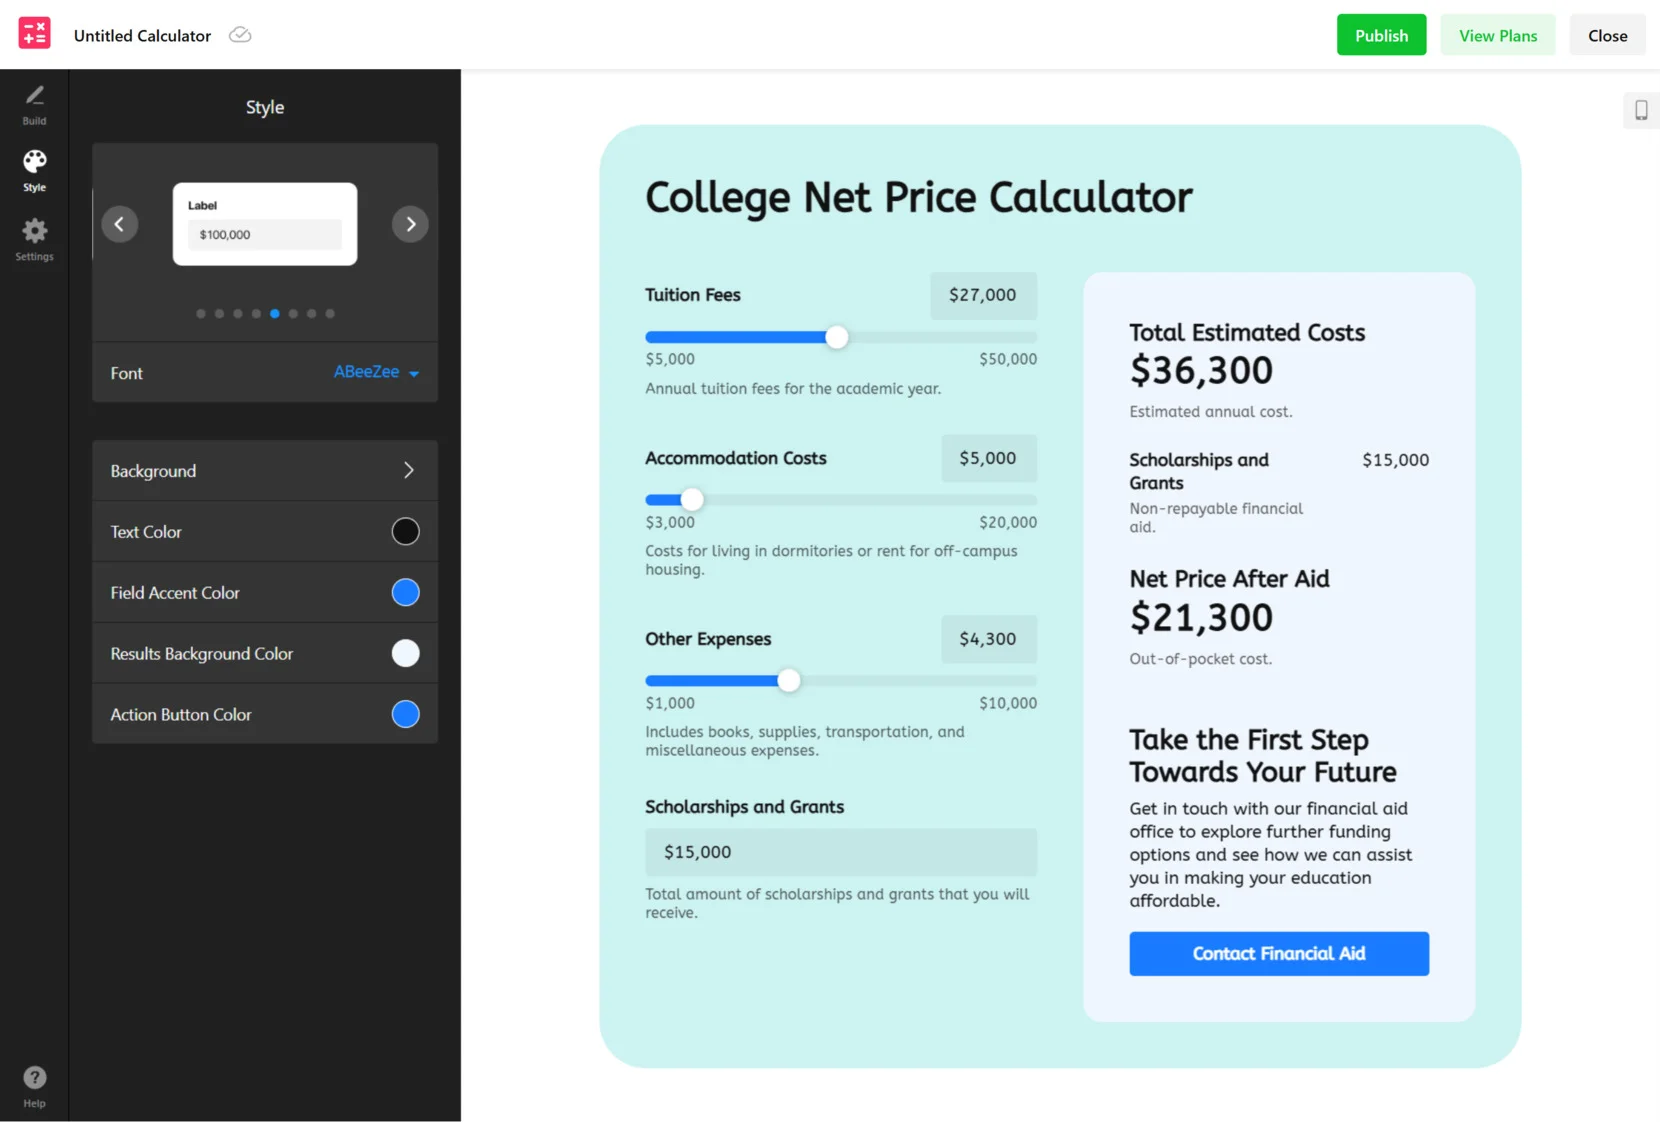
- Add Fields and Define Your Logic. Go to the “Build” section to add input elements like amounts, percentages, or user-defined values. Then scroll to the “Calculations” panel where you can input your own formula or let the built-in AI tool create one based on plain-language instructions.
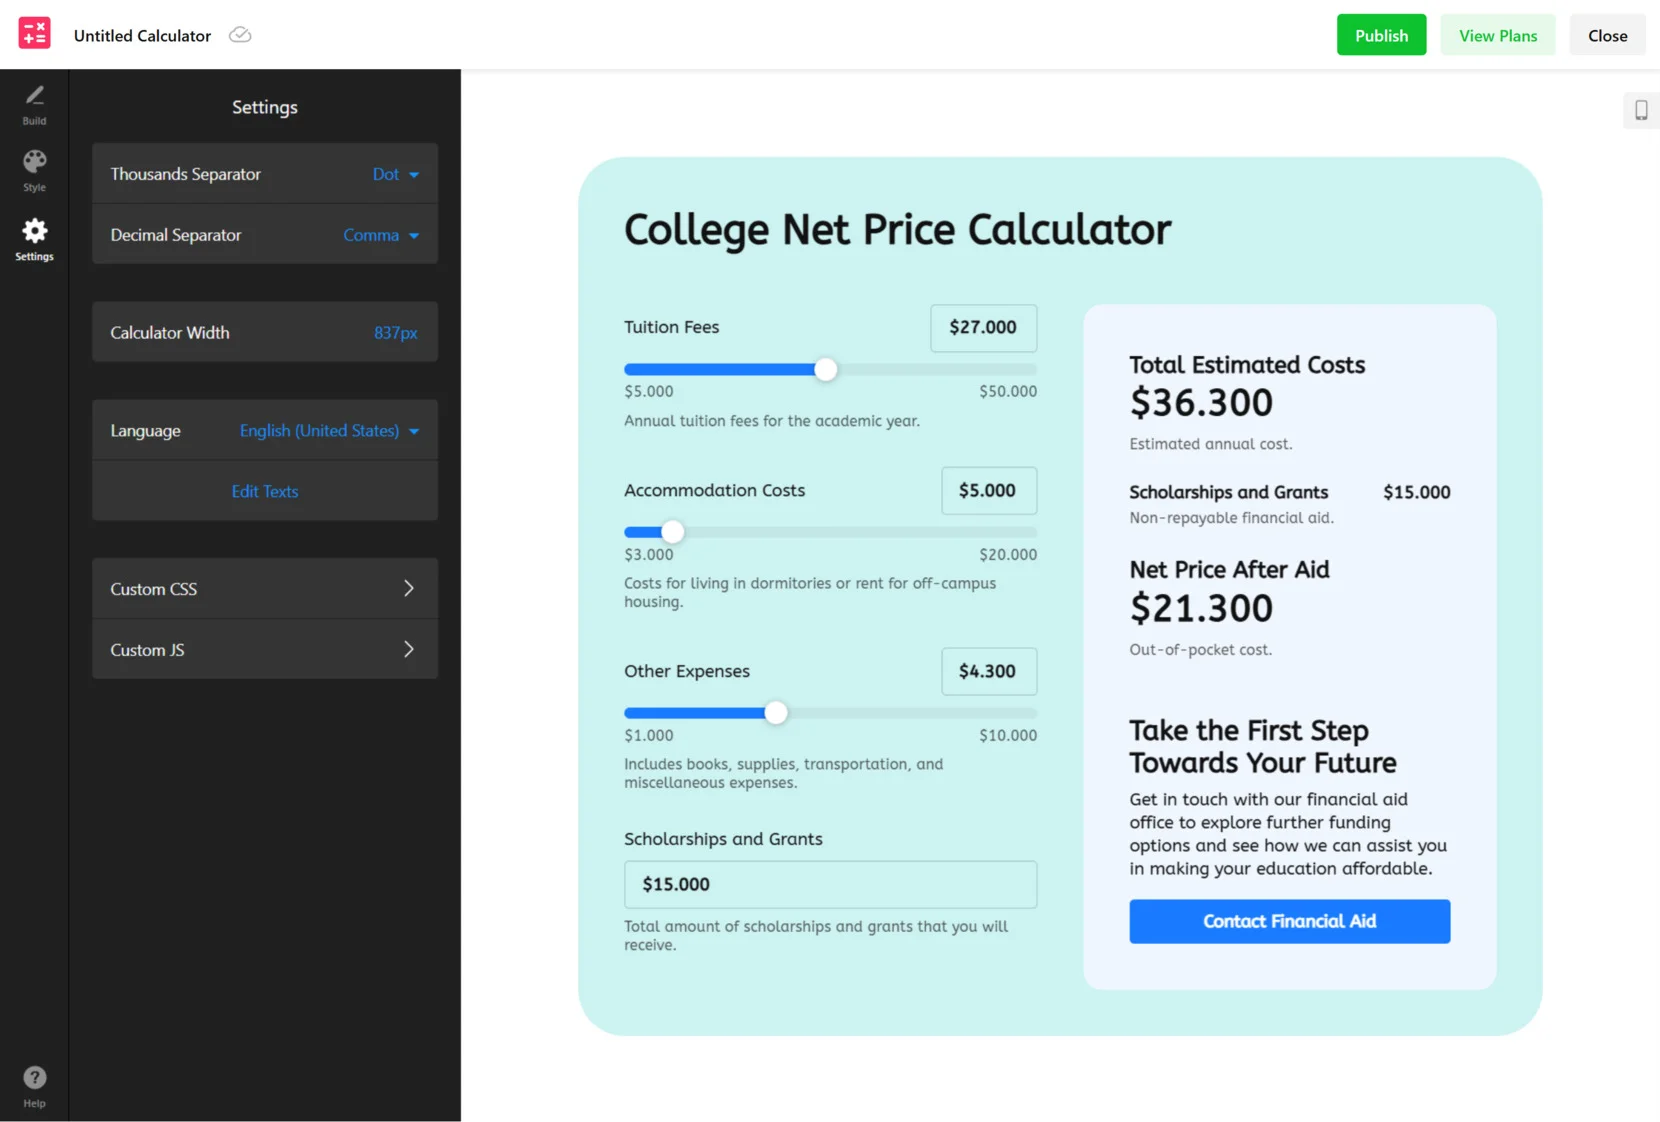
- Style the Calculator’s Appearance. Switch to the “Style” tab to personalize the look of your widget. Adjust font types, button styling, background colors, and other design elements. You’ll see a real-time preview update with each change you make.
- Configure Display and Behavior. Under the “Settings” tab, you can manage number formatting, choose the widget width, and set the display language. Here, you can also modify field labels or add custom scripts to tailor the calculator’s functionality.
- Embed the calculator on your website. Once you’re happy with the setup, click “Add to website for free” and copy the embed code. Head to your WordPress admin panel.

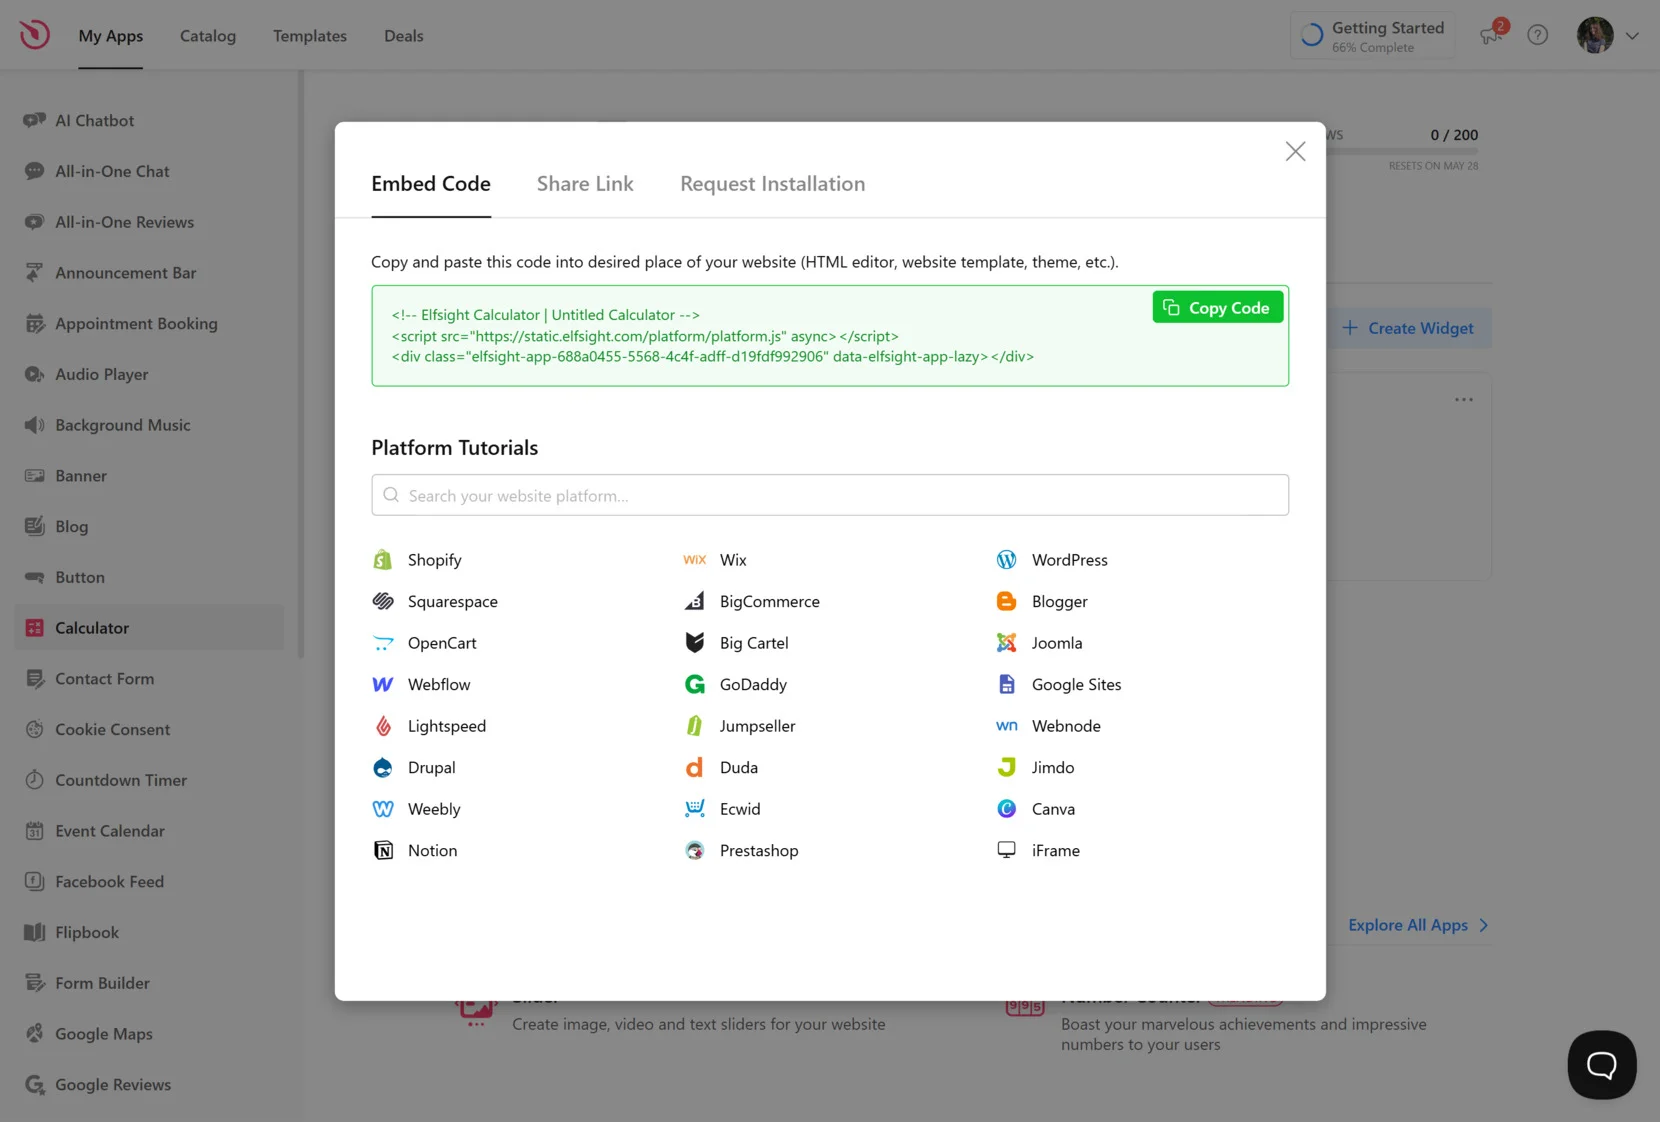
Since you’re working with WordPress, embedding the Elfsight calculator is especially straightforward. After copying the generated code from the Elfsight editor, navigate to your WordPress dashboard. Open the page or post where you want the calculator to appear, add a “Custom HTML” block in the Gutenberg editor, and paste the code inside. Update or publish the page to make the widget live.
If you’re using a page builder like Elementor or WPBakery, simply drag in an HTML or Code widget and paste the embed code there. No plugin installations or external scripts are required.
This setup gives you a fully functional calculator ready to engage users, collect data, or drive conversions. You’re free to return to the editor anytime to make updates, adjust formulas, or test variations.
While Elfsight makes it incredibly easy to build and embed your calculator, it’s worth knowing that there are other methods you can explore as well. In the next section, we’ll look at a few alternative options for embedding a calculator to your WordPress website and help you decide when they might be the right fit.
Alternative Way to Embed a Web Calculator
For those users who have specific design or functional requirements — and feel comfortable working with code — manual integration using HTML and JavaScript is a valid alternative to using a pre-built widget.
This method involves hand-coding the calculator’s layout using HTML, applying styles with CSS, and writing logic in JavaScript. It’s especially useful for developers or users with web development experience who want to implement unique functionality or integrate the calculator into a complex workflow.
Below you will find the guide to working with this solution:
- Set up the HTML structure. Create an HTML form that includes input fields and a button to trigger the calculation. Use elements like <input>, <label>, and <button> to collect user values.
- Add CSS styling for layout and responsiveness. Write CSS to control the appearance of the calculator, such as field spacing, button design, background colors, and font styling. Use media queries to ensure mobile responsiveness.
- Write the JavaScript logic. Create a function that reads the input values, performs calculations, and displays the result in a target element. Attach the logic to the button click event.
- Embed the complete code into WordPress. Open the page or post where you want to insert the calculator, add a “Custom HTML” block, and paste your HTML, CSS, and JavaScript code. Save and preview the page to verify it works as expected.
Here’s a basic example of a custom HTML calculator code that adds two numbers:
<div style="max-width: 300px; font-family: Arial, sans-serif;">
  <h3>Simple Addition Calculator</h3>
  <label>First number:<br>
    <input type="number" id="number1" style="width: 100%; padding: 8px; margin-bottom: 10px;">
  </label>
  <label>Second number:<br>
    <input type="number" id="number2" style="width: 100%; padding: 8px; margin-bottom: 10px;">
  </label>
  <button onclick="addNumbers()" style="width: 100%; padding: 10px; background: #4CAF50; color: white; border: none;">Calculate</button>
  <p style="margin-top: 15px;">Result: <strong><span id="result">—</span></strong></p>
</div>

<script>
  function addNumbers() {
    const a = parseFloat(document.getElementById('number1').value);
    const b = parseFloat(document.getElementById('number2').value);
    const result = a + b;

    document.getElementById('result').textContent = isNaN(result) ? 'Please enter valid numbers' : result;
  }
</script>
This calculator performs a simple addition and provides instant results. You can expand it with custom formulas, validation rules, and dynamic fields as needed. Check out our detailed guide on how to make a simple HTML calculator for additional code examples and instructions.
Keep in mind that this method requires manual setup, regular updates, and thorough testing, especially if you’re adding complex logic or dynamic field interactions. For more solutions, read our article to learn about other WordPress calculator builders worth your attention.
Comparison: Elfsight vs. Manual Embedding
If you’re unsure which method to choose, the table below will help you compare Elfsight’s no-code solution with manually coding a calculator. It highlights key advantages and limitations based on usability, customization, and maintenance requirements.
| Method | Pros | Cons |
|---|---|---|
| Elfsight Widget | Designed for ease-of-use, it requires no coding and includes visual setup, customization options, and instant WordPress integration. | Advanced logic is limited to what the widget supports out of the box, though most use cases are well covered. |
| Manual Coding | Gives full creative and functional control over every part of the calculator — perfect for highly specific tasks or unique use cases. | Requires web development knowledge, takes more time to build, and may need troubleshooting, especially for mobile optimization or layout conflicts. |
For developers or users with precise needs, manual embedding is a powerful option. But for business owners, marketers, or anyone who values speed, design, and reliability, Elfsight remains the smartest and most efficient way to embed a calculator in WordPress. Let’s now look at some helpful tips to get the most out of your widget.
Tips to Get the Most Out of the Calculator Widget
Once you’ve added a calculator to your WordPress website, there are a few best practices to ensure smooth performance, optimal user experience, and maximum benefit. These tips apply to any embedded widget, whether it’s custom-built or third-party, and help avoid common mistakes during integration.
- Place the calculator in a high-visibility section. Users should find the widget where they expect it — typically near pricing, product selection, or lead generation forms. Avoid burying it too far down the page.
- Test the widget across devices and screen sizes. After embedding, preview the calculator on desktop, tablet, and mobile to confirm proper display and responsiveness.
- Make sure the input fields are clear and labeled. Always include descriptive labels for each field and guide users with placeholder text or tooltips if the calculation logic is complex.
- Monitor loading speed. Ensure the widget doesn’t noticeably slow down the page. If needed, defer loading until the user scrolls to it or use lightweight code formatting to reduce impact.
- Use appropriate width and padding settings. When embedding in sidebars or narrow sections, adjust the container’s width and internal spacing so the widget remains readable and usable.
- Update logic and content periodically. If your pricing model or calculation rules change, make sure the calculator reflects those changes to avoid confusing users or showing incorrect results.
- Track user interaction with analytics tools. Use event tracking to measure how often the calculator is used and optimize based on user behavior data.
Before publishing, always preview your calculator inside the live page layout—this ensures spacing, fonts, and responsiveness are visually aligned with your overall design.
By following these tips, you’ll ensure the calculator enhances user interaction without introducing technical issues or design conflicts. Next, let’s explore some use cases and industries that benefit most from having calculators on their websites.
Who Should Use a WordPress Calculator
Calculators are versatile tools that can enhance customer experience, reduce pre-sale friction, and increase conversions across a wide range of industries. Below are some of the most common industries where businesses successfully use calculators to deliver value and improve engagement on their WordPress websites.
Application in real estate 💰
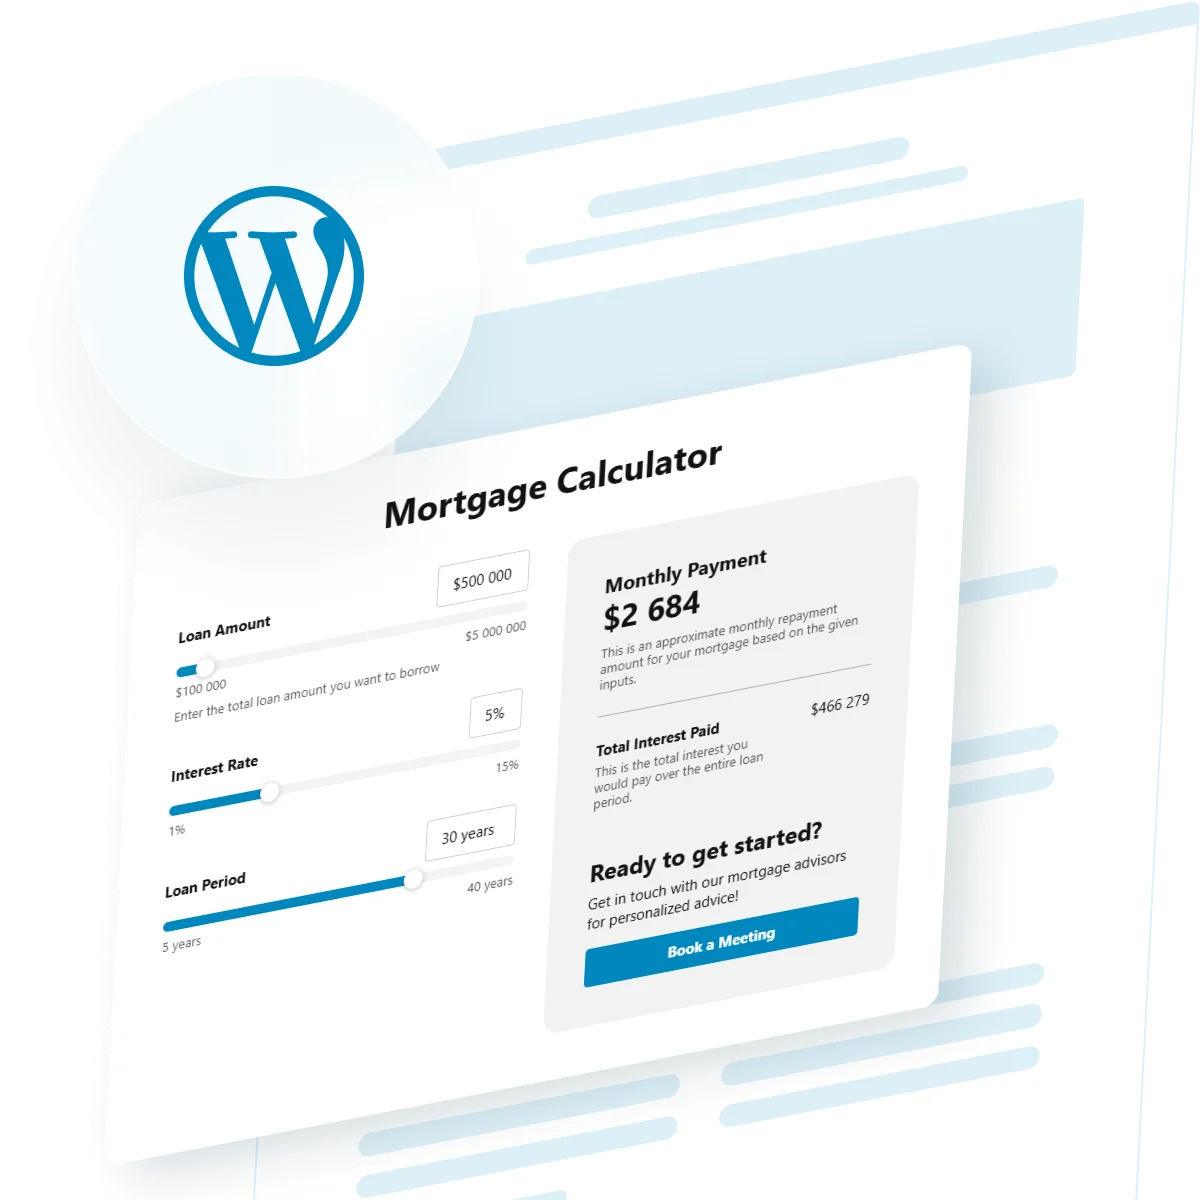
Real estate companies can use calculators to help clients estimate mortgage payments, determine affordability, or compare rent vs. buy scenarios. These tools allow users to explore financial options directly on the property page, making it easier to take the next step with confidence.
Application in health and wellness 💪
Health professionals, fitness coaches, and wellness businesses often embed calculators to estimate body mass index (BMI), daily calorie needs, or workout schedules. These features help engage users with personalized data and position the business as a trusted authority in health-related topics.
Application in e-commerce and services 💳
Online stores and service providers use pricing or quote calculators to provide real-time cost estimates based on user selections. From custom printing and event planning to product configurators, calculators help customers make faster decisions and reduce cart abandonment.
As you can see, calculators aren’t just limited to one niche. They can serve almost any business model that involves pricing, personalization, or decision-making support. Next, we’ll look at common issues that may arise and how to troubleshoot them effectively.
Explore 115+ Calculator templates


Fixing Common Issues
Even with the most intuitive tools, you might encounter occasional challenges when embedding or managing a calculator on your WordPress website. Below are common questions and answers to help you resolve issues quickly and keep your calculator running smoothly.
Why isn't the calculator displaying on my WordPress page?
Can I use multiple calculators on the same page?
The calculator is not working on mobile devices. What should I do?
How do I update the formula or logic after publishing?
Why are my form fields not reacting to user input?
How can I improve load speed if the calculator is affecting performance?
Addressing these common issues ensures your calculator stays reliable and effective. In the final section, we’ll recap what you’ve learned and point you toward the easiest way to get started.
Final Thoughts
Adding a calculator to your WordPress website is a smart, user-focused move that boosts engagement, provides instant value, and simplifies the decision-making process for your visitors. Whether you’re offering quotes, estimates, or interactive decision tools, a calculator enhances usability and helps turn visits into conversions.
From fast visual builders like Elfsight to manual code integration, you’ve explored several methods to get started. With the right setup and best practices in place, your calculator can function as a seamless part of your user journey — enhancing your business’s credibility and efficiency without requiring extra resources or development.
Need Help Getting Started?
We hope this guide gave you the clarity you need to launch a calculator on your WordPress website. If you still have questions, contact us — our team is here to help you create a functional, professional widget experience. At Elfsight, we’re committed to offering flexible, no-code solutions that fit real business needs.
Join our growing Community to exchange ideas, get inspired, and contribute your own feature requests. We’d love to hear your feedback — don’t hesitate to share your thoughts through our Wishlist!