What Is Countdown Timer Creator?
The Countdown Timer creator is a tool that does wonders in the marketing world and literally works as a magnet—it magnifies sales, engagement, and conversion rates with unbelievable power and strength! As the clock goes tick-tock, you get your own custom timer installed on the website within a few clicks.
Many businesses of any size and in every niche have proven that integrating countdown timers into their websites is beneficial. Yes, the purposes vary—product launches, flash sales, upcoming events, limited-time offers, or creating anticipation—but the high demand highlights the positive side effects that come along when you step up in a big game.
So the questions are raised up in the air: How to make a custom countdown timer for your website? And which creator to use?
How Does the Countdown Timer Creator from Elfsight Work
With the discourse in mind, there is a perfect widget made for your website—Countdown Timer creator from Elfsight. It’s free of coding, so it wouldn’t be a necessity for you to start a programming course or hire an in-house developer.
The simplicity applies to pretty much every aspect you see in the timer creator: ready-to-use templates, fast customization, royalty-free features, dozens of custom elements, and many more to explore. You no longer have to face hardships to level up your brand strategy and business website.
To make everything said above reasonable, here’s a step-by-step guide on how to use it effectively on your website:
- Sign up for a free account or log in to the existing one to open the Elfsight dashboard.
- Search for the Countdown Timer in the Apps Catalog.
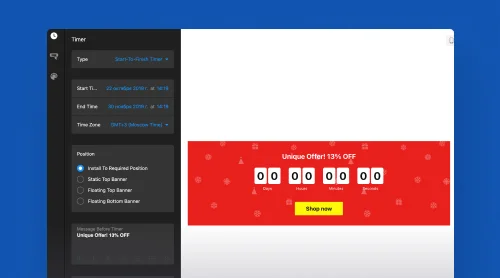
- Personalize the widget using custom elements and features.
- Obtain and embed the generated code snippet into your website editor. After saving changes, your countdown will be live!
Is it hard to believe? Try out yourself using the free online demo below and explore endless options for growing people’s attention to you!
How to Use and Add the Countdown Timer Creator on Your Website?
As we have said before, the Countdown Timer creator is pretty versatile. For those who aren’t familiar with coding or design, it won’t take too much to learn how to use it.
The custom creator offers a range of features, including different timer types, customization options, and intuitive management. So here’s how to make the most of the powerful HTML Countdown Timer:
Step 1: Authorize yourself to open the Countdown Timer widget
The first thing you should do to access all the free features and custom elements of the countdown creator is log in or sign up for an Elfsight account.
Step 2: Find the Countdown Timer creator
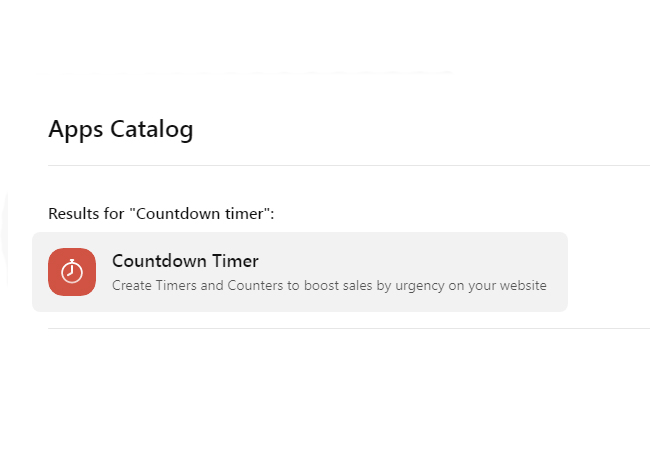
Straight after you’ve entered the profile, navigate to the Apps Catalog menu. Within a wide selection of widgets, start looking for the Countdown Timer creator using a search bar.
Step 3: Choose your countdown type
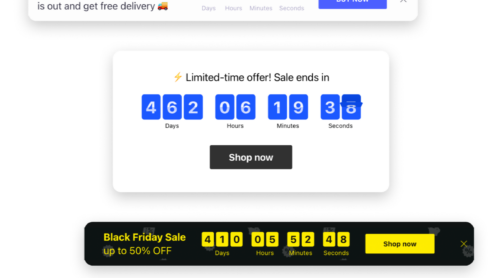
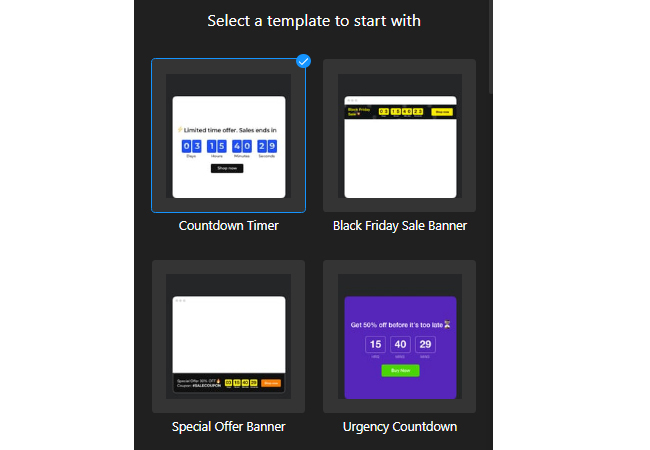
The Countdown Timer creator offers various timer templates: wedding, evergreen, Black Friday, launch, Thanksgiving, coming soon, and many more. Depending on your website’s purpose and the type of countdown you want to display, you can select the appropriate one.
Step 4: Customize your countdown timer
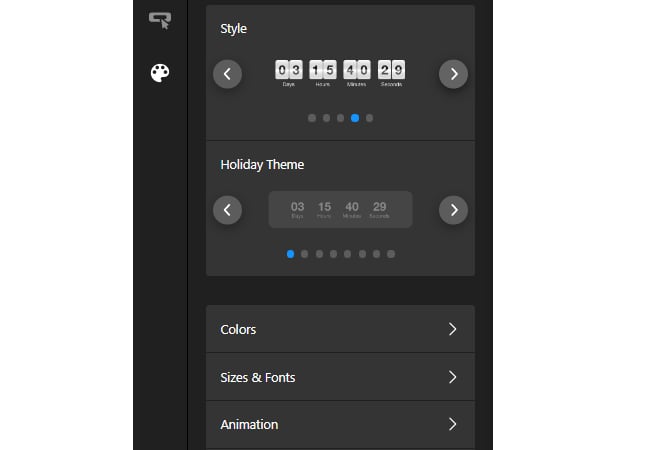
Match your countdown timer’s appearance with your website’s design choice. The creator lets you add a call-to-action button, turn on the animation, personalize the message, change the color scheme, adjust the fonts, and even pick a timer style! Make the countdown personal to blend it harmoniously with the overall look and feel of your website.
Step 5: Set countdown timer expiry
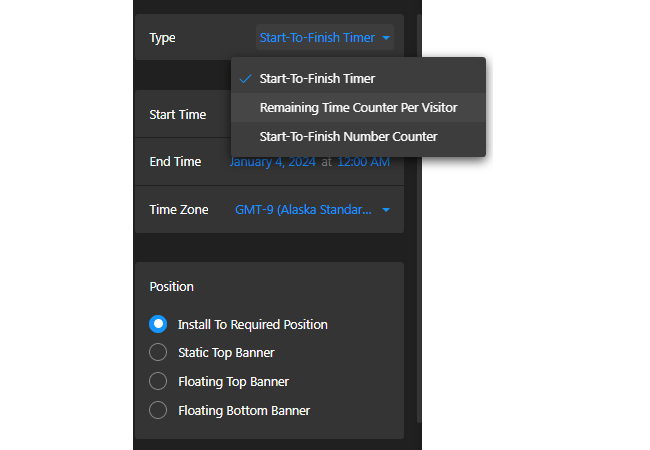
Specify the date and time for your countdown timer to expire by choosing a custom timer type: start-to-finish, remaining time counter per visitor, and start-to-finish number counter. Be careful to input accurate duration details.
Step 6: Take a final look at your countdown timer
Once you have customized your countdown timer using Elfsight’s Countdown Timer creator, preview the results.
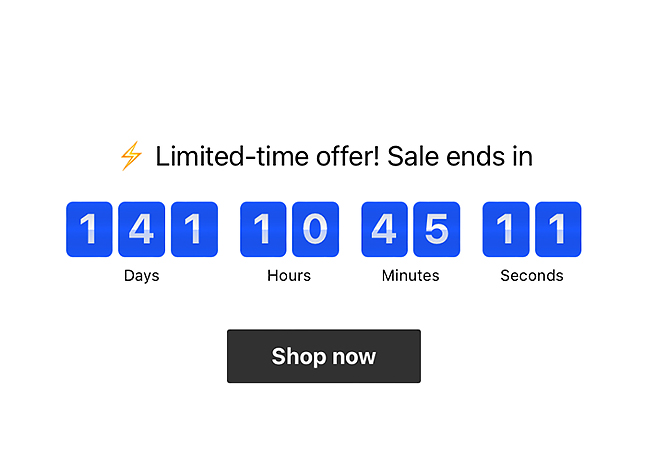
Step 7: Generate custom embed code for the countdown plugin
After creating and configuring your countdown timer, click on the “Publish” button provided by Elfsight creator. It will generate an embed code specific to your countdown timer.
Step 8: Choose the countdown placement method
Elfsight offers direct code integration. So copy the custom code and get your website’s platform installation instructions for more specific info.
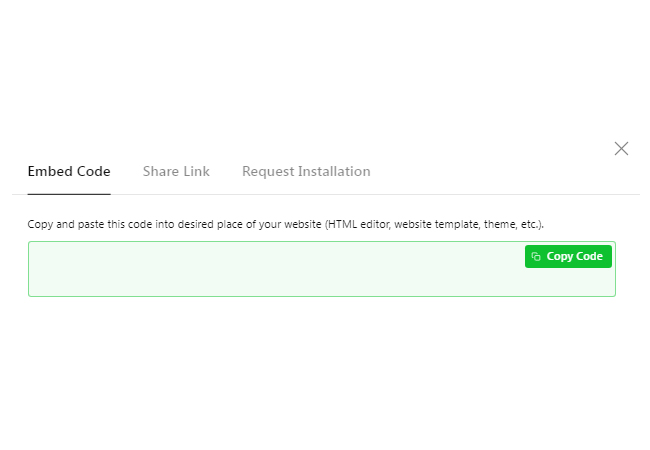
Step 9: Paste the embed code for the countdown on your website
Paste the generated embed code into the desired section of your website’s HTML or content management system. Ensure that it’s done correctly for the countdown timer creator to display properly.
Step 10: Publish your countdown on the website
If everything looks good, finish the publication process on your website by saving changes and letting the countdown timer work its magic.
By following the steps outlined above, you can effectively create, customize, and integrate timers that align with your website’s goals and aesthetics. Remember to place the countdown timer in a noticeable and strategic location on your website to maximize its impact.
Learn to add your custom timer to WordPress
- Access WordPress Backend. Log in to your WordPress website’s backend. Click on “Appearance”, then select “Themes”. Find the theme, click on the three dots, and choose “Edit”.
- Add Code Element to Page. Go to the “Pages” tab, choose the desired page. Click the template on the right side. In the editor, locate where you want to show the countdown clock widget, then click “Add Block” and select “Custom HTML”.
- Paste HTML Code. Paste your plugin code in the popup window, then save changes.
This way the Elfsight Countdown Timer is added to WordPress to be a great help for your online store and make browsing pages more interesting for your clients.
Countdown Timer Creator Best Practices
Honestly, before publishing a countdown creator masterpiece on a website, there is a lot of work that has to be done behind the scenes. Let us guide you through the best free practices for creating and utilizing countdown timers to maximize engagement and drive conversions.
Countdown Practice #1: Set clear and attainable goals
Before adding a countdown timer creator to your website, be sure of what you’re aiming for. Here are some tips and tricks:
- Define the purpose. Determine why you need a custom countdown timer. Ask yourself what you want to achieve through the custom timer: is it a boost of sales, creating buzz for limited-time promotion, or encouraging sign-ups for an upcoming webinar?
- Increase engagement. Set a goal for the level of engagement you want to get with the free countdown timer: increasing click-through rates, time spent on the website page, or capturing user attention.
- Boost conversions. Decide on specific targets like percentages or the conversion number within a given timeframe.
- Enhance the user experience. Consider how the countdown timer can enhance the overall user experience on your website: improve user satisfaction, reduce bounce rates, or increase repeat visits.
By establishing custom metrics and defining the purpose, you can track and measure the impact of the countdown timer.
Countdown Practice #2: Pick the right time duration
The duration of your free countdown timer should be a strategic decision. Determine the ideal time frame without making it too short or long based on the purpose and context.
So here are some general recommendations to maintain user engagement and prevent irritation:
- For short-term events or limited-time offers, a custom countdown timer of a few minutes to a few hours can create a sense of urgency and encourage website users to take action quickly.
- For medium-term events or promotions, a countdown timer of around 24 hours to a few days can be effective in generating excitement and driving conversions.
- For long-term events or campaigns, a countdown timer of a few days to several weeks can help build anticipation and sustain user interest over time.
Countdown Practice #3: Optimizing placement is worth your attention
Consider the optimal placement of your countdown creator on your website. Let’s go through some common custom choices made by other businesses:
- Above the fold. For sure, the best position is at the top of your website. Why? It gets the most visibility and immediately catches users’ attention.
- Header or navigation bar. Make your custom countdown a prominent addition to the website. It will be hard to miss while marketing the events.
- Sidebar. Incorporating the countdown timer into one of the sidebars of your website can provide a consistent reminder without being too intrusive.
- Landing page. If you have a dedicated landing page for a specific event or promotion, embed the countdown timer as a central element to create a sense of urgency and encourage conversions.
- Product page. If you’re running a limited-time offer or flash sale, this custom choice can prompt users to purchase much faster.
As you can see, you need to be strategic. Feel free to position it at the highly impactful points where you get the most views or sales.
Countdown Practice #4: Personalize the countdown’s message
Tailoring the custom timer’s message to resonate with your target audience is crucial. Customize the copy to match your brand’s tone and style. Think about factors such as age, geographic location, and consumer preferences to offer a more personalized experience.
Here are a few custom-made message examples:
- Limited-time offer: “Hurry, the clock is ticking away! Only a few hours left to use this exciting deal!“
- Event countdown: “Join us for the big event! Reserve a spot for yourself before time runs out!“
- Product launch: “Be the first one to get your hands on our latest product! Launching in X days!“
- Sale countdown: “Don’t miss out on Black Friday discounts! The sale ends in X minutes!“
- Registration deadline: “Time is running out! Sign up by X date to secure your spot!“
These are just a few ideas, but the goal is to create a sense of urgency and encourage website visitors to take action before the free countdown timer expires.
Countdown Practice #5: Add relevant and eye-catching design elements
Design plays a significant role—select graphics that align with your website’s branding elements and the campaign or event you are promoting. Vibrant colors, selling custom copy, and captivating images are a way to go if you want to enhance the overall visual appeal and make it stand out.
To get your visitor even more excited, you can include emojis:
- ⌛ Hourglass—this emoji represents time running out and can be used to indicate a countdown is in progress.
- ⏱ Stopwatch—the emoji represents measuring time and can be suitable for conveying a sense of urgency or timed events.
- 🚀 Rocket—it can symbolize the launch or starting something when the custom countdown ends.
- 🔥 Fire—this emoji shows off how cool the deal is and encourages website visitors to take action quickly.
- 🎉 Party popper—adding a celebration emoji like a party popper can create a sense of anticipation for the event or offer that the countdown is leading up to.
Plus, do not compromise on mobile-friendliness. The timer with your custom design should be responsive across different devices and screen sizes. It is the key to guaranteeing a seamless user experience and maintaining engagement on the go.
Countdown Practice #6: Make it dynamic using animation
A static timer might not create the desired impact. Consider using dynamic custom designs that visually reflect the ticking second by second.
Some popular options include:
- Fade. The custom timer digits fade out whenever it’s the moment to change.
- Slide. This animation represents a simple transition effect where numbers slide out to display the counting digits.
- Flip. The timer digits can flip or rotate to reveal the changing numbers.
Countdown Practice #7: Include the call-to-action button
Let the website timer speak for itself by accompanying it with a compelling call-to-action button. Use action-oriented language that motivates users while using a custom creator.
Here are a few examples:
- “Add to Cart” or “Buy Now“—If you use a free timer to create a sense of urgency for a limited-time offer or promotion, a call-to-action button that leads to the product or service’s purchase page can be handy.
- “Join Now” or “Sign Up“—If the custom timer is part of a newsletter campaign or exclusive membership access, this button can foster website visitors to get onboard much faster.
- “Register” or “Book Now“—If the website timer is related to registration deadlines or upcoming bookings, an added in the creator CTA button can direct visitors to a submission form to fill out.
- “Learn More” or “Get Updates” – If the goal of your timer is to generate interest or anticipation, this custom call-to-action button can heat the excitement and lead website users to more information.
Reorient the situation and take matters into your own hands by aligning a call-to-action button to the specific intent of the free timer and guiding website visitors toward the desired action.
Countdown Practice #8: Implement actions upon expiration
When the custom countdown ends, ensure that website users are directed to the desired place immediately.
Here are a few examples of actions you can add in the creator for a countdown timer upon expiration:
- Redirect to a different website page. You can configure the custom timer creator to automatically redirect users to a specific page upon reaching zero. For example, a promotional offer, a thank-you page, or a page with related content.
- Display a custom message or notification. When the countdown timer expires, you can display a copy to inform users that the time is up. This message can encourage them to take an alternative action or provide additional instructions.
- Hide or remove the countdown timer from a website. Once the timer reaches zero, you can choose to hide or remove it from the screen to prevent any confusion or distraction for website users.
With that being said, let’s also mention a few cool benefits you can receive while implementing a Countdown Timer creator right into your life.
Benefits of Using Countdown Timer Creator on Your Website
Using a Countdown Timer creator can provide several benefits for both you as a website owner and your website visitors. Here are some advantages:
| 1. Increased conversion rates | Custom timers have proven to be highly effective in increasing conversion rates. By creating a sense of urgency, they incentivize users to take immediate action, leading to a higher number of conversions. |
| 2. Enhanced user engagement | Your users are more likely to engage with your website and stay longer when presented with an interactive countdown timer. The visual and time-sensitive nature of the custom timer encourages users to explore your offerings further. |
| 3. Improved sales and revenue | The urgency created by custom countdown timers compels website visitors to make quicker purchasing decisions. It results in increased sales and revenue for your business as users seize limited-time offers or engage with time-sensitive promotions. |
| 4. Effective lead generation | Countdown timers can be a valuable tool for generating leads on a website. By integrating custom timers into capture forms or offering time-limited incentives, you can entice visitors to provide their contact information before time runs out. |
| 5. Efficient event promotion | For events—such as webinars, product launches, or flash sales—using a Countdown Timer creator can effectively foster anticipation and excitement for website users. By highlighting the limited time remaining until the event starts, you can generate buzz and drive registrations. |
| 6. Enhanced website aesthetics | Custom countdown timers can serve as visually appealing elements on your website, adding to its overall design. Well-designed custom timers enhance the website’s aesthetics and provide a professional and engaging user experience. |
| 7. Easy implementation | With a Countdown Timer creator, integrating timers into your website becomes effortless. The creator offers a simple and intuitive interface, allowing you to customize with royalty-free features and custom elements, insert, and manage countdown timers with ease. |
| 8. Sense of exclusivity | Make your users feel privileged and chosen to continue building trust and growing credibility as the free countdown timer goes tick-tock. |
| 9. Reduction in cart abandonment | Countdown timers can help reduce cart abandonment rates by showing off transparency and limitation deals on a website. |
Final Thoughts on Countdown Timer
Incorporating a Countdown Timer creator into your website can provide numerous benefits, from increased conversions and engagement to improved user experience and marketing effectiveness. Elfsight offers a user-friendly Countdown Timer creator that simplifies the whole process, allowing you to create visually stunning and highly effective custom countdown timers for websites.
With strategic placement, appealing designs, and a sense of urgency, free countdown timers can become powerful tools in your website’s arsenal, driving your desired actions and helping you achieve your business goals.
Learn more about the Countdown creator using the sources below:
So, what are you waiting for? Start using the Countdown Timer creator today and take your website to the next level!


