Online Table Form Scheduling Software
- Service Info with Price & Duration
- Availability Hours
- Clients Email Notifications
- Owner Email Notifications
- Google Calendar Integration
- Timezone Configuration
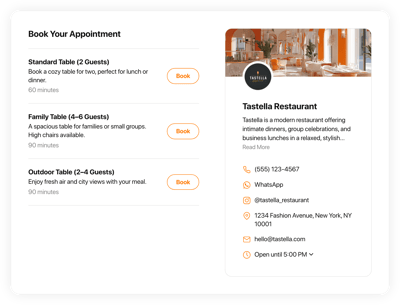
- Business Profile Card
- Minimum Booking Lead Time
- Advance Booking Time
- Advanced Design & Layout Settings
- CSS & JS Editors
- Coding-Free Editor
- 70+ Languages Support
- Optimized for All Mobile Devices
- Page-Speed Friendly Lazy Loading
- Fast Website Integration
Need a Different Template?
Here’s what people say about Elfsight Appointment Booking system


FAQ
How to add the Table Form booking system to the website?
If you wish to add the Table Form to your website, do the following:
- Personalize the appearance of the Appointment Booking widget to match your taste.
- Sign in to your Elfsight admin panel or set up a free account.
- Get the generated installation code.
- Access your website.
- Paste the shortcode into your website editor. It’s that simple!
What website platforms does the Table Form scheduling software integrate with?
You can add the Appointment Booking plugin to practically every website, regardless of the platform and CMS. But here’s a list of the top 10 frequently used options based on our users’ choices:
Squarespace, Wix, HTML, Webflow, WordPress, Shopify, Elementor, Google Sites, GoDaddy, iFrame.
Do I need to have coding or programming skills to embed the Table Form booking platform?
No. Using the intuitive widgets by Elfsight, you can add the Table Form to your website using your own capabilities. You no longer need to look for a specialized coding application, improve the coding know-how, or bring in a skilled programmer—it’s super efficient.
Can I use the online Table Form scheduling software for free?
Certainly. You have five subscription packages to select: Free, Basic, Pro, Premium, and Enterprise. The Free plan includes all the customization possibilities and features so that you won’t experience limitations. Yet, as you upgrade, the more enticing bonuses await you.
Where can I add the Table Form widget on my website?
These are the prime placements to add the widget on your website: the homepage, service-oriented sections, contact information pages, landing pages highlighting service deals, and relevant articles on your offerings. The aim is to maximize the ease and availability of reservation for your audience.
How to customize the online Table Form booking platform?
The widget personalization allows you to adapt multiple settings to identify the finest arrangement that fits your brand image and website layout. Here’s what you can do:
- Service
To enhance client understanding, clearly highlight your service offer: name, descriptions, prices, working hours, and durations. Keep your contact information readily visible: phone number, WhatsApp, Instagram, location address, email, and website. - Google Calendar integration
Elfsight presents a synchronization functionality to add, update, and keep track of Google Calendar appointments. - Notifications
Automatically issue a confirmation email to clients with specifics upon booking and get notified via email when every appointment is made. - Custom elements and features
Nevertheless, there are countless aspects awaiting exploration: available hours, time zones, layouts, sizes, fonts, color schemes, languages, custom CSS editor, custom JS editor, and so much more.
You can be at ease knowing that any questions or uncertainties you may encounter will be taken care of by our committed Customer Support Team. They are constantly available to provide you with assistance, ensuring a smooth experience from start to finish!
Help with Table Form Scheduling Software Setup and Website Installation
To assist you with widget template exploration, we’ve compiled a multitude of resources. Check these out: