Add Event Booking Calendar to WordPress with Plugin
The Elfsight Appointment Booking plugin is an intuitive tool that allows you to showcase your events, time slots, and engagements on your WordPress site with ease. You can easily tailor your event booking calendar to suit the aesthetics of your website. By inputting events with a name, description, duration, pricing, working hours, and picture, you can present your visitors with a comprehensive outlook of your forthcoming plans. Furthermore, you have the flexibility to personalize the color palette, typography, and format of your calendar to correspond with your website’s appearance.
To integrate the Elfsight Booking Calendar plugin on your website, simply follow these straightforward steps:
- Experiment with our interactive preview and form your inaugural event booking WordPress calendar plugin.
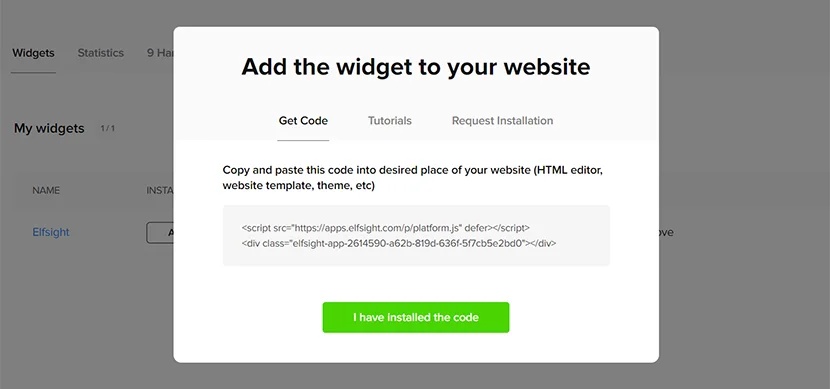
- Save your calendar and copy the code from the prompt box.
- Paste the code into the HTML editor of your WordPress website.
Build your Appointment Booking Calendar today and showcase your events in an incredibly structured manner!
How to Add Event Booking Calendar Plugin on WordPress Website
If you operate a business that necessitates booking event booking, having a simple calendar on your WordPress site can significantly enhance your customer satisfaction. Elfsight Appointment Booking Calendar is the ideal plugin for this purpose! With its user-friendly interface and customization capabilities, you can produce a calendar that satisfies all of your event booking requirements.
WordPress, on the other hand, is a flexible platform that can be utilized for various purposes, and including an event booking calendar is no different. And Elfsight also presents an event booking calendar plugin that integrates seamlessly with your WordPress site.
To integrate the event booking calendar plugin onto your website, follow the simple steps that we’ve depicted in our tutorial below. And if you’re utilizing a different platform, don’t fret! Our comprehensive guide furnishes step-by-step directions for incorporating the calendar plugin to other platforms as well.
Regardless of whether you’re a healthcare professional, a beauty establishment, or a personal trainer, using an event booking calendar can assist you in managing your bookings and appointments more efficiently.
To integrate the Elfsight Booking Calendar with your WordPress website to make life of your website visitors more simple, just follow the steps provided below:
- Log in to your Elfsight account at Apps Elfsight, or establish a new one if you haven’t already.
- On the Applications dashboard of your account, locate and select the Appointment Booking plugin that you wish to add to your website.
- TTailor your event booking calendar to match the style of your website. You can include events with a title, description, pricing, time, duration, and image in your calendar plugin. Additionally, you can customize the color scheme, font style, and layout of your calendar.
- After you’ve finished customizing your calendar, click on the “Get the Code” button to copy the code for your appointment and scheduling calendar.
- Go to your WordPress website’s HTML editor and paste the code where you want the calendar to appear.
- Save your modifications and refresh your website to see your event booking calendar in operation.
After you’ve integrated the Elfsight event booking calendar plugin into your WordPress website, you may need to ensure that it is available on all pages of your site. This is particularly crucial if you want your visitors to be able to view upcoming events at any time on your calendar. Moreover, due to the various intricacies of certain WordPress themes, there may be different methods for adding this simple event booking calendar plugin to all pages of your website, which can result in slightly different appearances. Now, let’s take a look at three ways you can accomplish this.
Add Booking and Event Calendar Via WordPress Theme Editor
One simple method to embed the event booking calendar plugin on your WordPress website is by using the WordPress Theme Editor. Here are the steps you should follow:
- Log in to your WordPress site and click on the Appearance tab in the left menu. Next, select Theme Editor.
- On the Theme Editor page, navigate to the footer.php file located in the right menu Theme Files. Insert the code in front of the closing tag and click the Update file button.
- That’s it! You can now integrate the event booking calendar plugin on all pages of your WordPress website, making it more prominent for users to send messages.
There are also other options available to embed the calendar for event booking, so let’s explore some of them.
Add Booking and Event Calendar Via the Widgets Option
To embed event booking calendar plugin on your WordPress website using the Widgets option, follow these steps:
- Log in to the backend of your WordPress website.
- Click on the “Appearance” tab in the left menu and select the “Widgets” option.
- Look for the Custom HTML widget in the “Available Widgets” list.
- Choose one of the footers from the drop-down menu and click the “Add Widget” button.
- Paste your WhatsApp addon installation code into the content field and click the Save button.
- Congratulations! You have successfully added your event booking calendar plugin to your WordPress website using the Widgets option.
However, there is yet another way to embed the event booking calendar plugin on your WordPress website. Let’s take a look at how you can do that.
Add Booking and Event Calendar Via the Customize Option
Just follow these steps to embed event booking calendar plugin using the WordPress Customize option:
- Log in to your WordPress site admin panel. Go to the “Appearance” tab in the left menu and select the “Customize” option.
- Locate the “Widgets” option in the left menu and click on it.
- Select the Add Widget option at the bottom of the menu and select Custom HTML from the menu that appears.
- Enter your plugin’s installation code in the content field. Click the “Publish” button to make all changes.
Done, now you know how to improve your WordPress website performance with the best event booking calendar plugin by embedding it in each of the pages of your website.
Numerous users of different Content Management Systems (CMS) favor using a graphical editor instead of the default editor since it eradicates the necessity to manage HTML. WooCommerce, a website plugin, facilitates business proprietors to effortlessly modify their websites. Here’s what needs to be done if you want to add calendar plugin you your WordPress site through WooCommerce:
- Create an Elfsight calendar plugin within a single administrative panel. Save it. Replicate the installation code.
- In the WordPress site management interface, choose the site of your choice.
- Choose “Edit with WooCommerce” either from the site index or from the site management page.
- Drag the “HTML” component to the preferred location on the page and insert the installation code for the live chat.
- To save your modifications in WooCommerce, click on “Update”.
You can employ this guide to attach a modified HTML code to any website created with WooCommerce. Just repeat the process as required for various pages, and the rating widget will immediately materialize on your WooCommerce website.
In this guide, we will learn how to add an Elfsight Appointment Booking to your WordPress Gutenberg editor.
- To begin, go to your Gutenberg editor and click the “Add” button in the top right corner.
- Type “Elfsight” in the search bar and select the Elfsight Appointment Booking plugin from the suggested options.
- In the Event Calendar block, right-click and select Paste to insert the Elfsight installation code.
- Click Post in the upper-right corner and then click Post again.
- Choose View Page to see what the Appointment Booking plugin looks like on your WordPress website page.
Congratulations! You have successfully integrated the Elfsight Appointment Booking into your WordPress website. Your website visitors can now view upcoming events and plan accordingly.
Elementor expands the functionalities of typical WordPress and simplifies the process of implementing certain modifications to web pages. In the guide beneath, you may observe the complete procedure that is required to insert an event booking calendar onto your WordPress site using Elementor.
- Navigate to the necessary page in your WordPress dashboard.
- Opt for the “Edit with Elementor” function either from the pages list or from within the WordPress page editor.
- Move the HTML component to the desired location on the page using the drag-and-drop feature.
- Insert the installation code for your calendar into the HTML code section in the left-hand menu.
- Click on the “Update” button to save the modifications in both Elementor and WordPress.
By adhering to these guidelines, you can effortlessly integrate the event booking calendar plugin into the HTML code of any WordPress website that has been created utilizing the Elementor tool.
Event Booking Calendar Examples
In this section, we’ll explore various design choices for your event booking calendar after selecting an Elfsight WordPress plugin. The templates provided below are only a small fraction of the customization choices available to you, as the event booking calendar provides extensive functionality options to tailor it to your specific use case. These examples are suitable for a variety of purposes, including integrating the calendar into personal websites, large enterprises, and online stores.
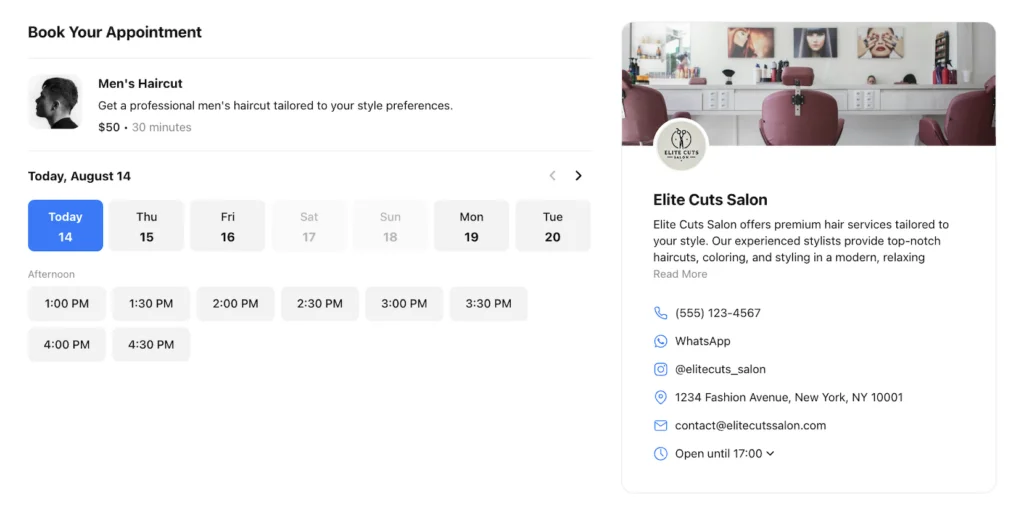
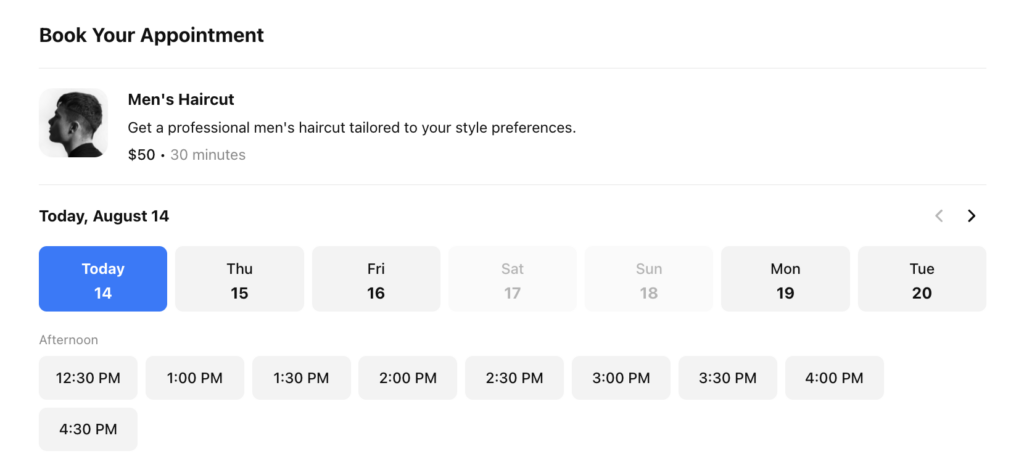
Template 1: Haircut Booking
Imagine your clients seamlessly booking appointments with a complete and informative experience that showcases your brand—it is possible with the calendar plugin for WordPress. It offers everything they need – detailed service descriptions, your business profile, operating hours, real-time availability, and even images of your services. Give the WordPress calendar plugin a try!
Template 2: Inline Booking Button
Seamlessly integrate the booking process into your website with the WordPress calendar plugin! The Inline Booking Button template lets you embed a button directly on your website, inviting customers to open the booking calendar in a pop-up window. The complete booking experience is just a click away.

Template 3: Floating Booking Button
Make booking effortless for your customers with the Floating Booking Button template. This WordPress calendar plugin displays a button that conveniently floats on your website, allowing clients to access the booking calendar quickly, regardless of their location on your page. Enjoy all the features within easy reach!

Template 4: Booking Form Only
For a streamlined and efficient booking process, the WordPress calendar plugin is your go-to choice. It focuses on the core functionality, displaying available time slots and essential service details, allowing for quick and easy bookings.
Conclusion
Incorporating a WordPress appointment and event booking calendar plugin into an online business website can provide numerous advantages. By automating the booking process with a plugin, businesses can save time, minimize errors, and enhance customer satisfaction with a clear event calendar displayed on their website.
The added convenience of event booking plugin calendar can improve customer retention and draw in new customers, resulting in a boost in revenue. Additionally, integrating an appointment calendar plugin onto a WordPress website can enhance a business’s online presence, making it easier for potential clients to locate and book appointments.
By selecting a reliable scheduling WordPress calendar plugin and customizing it to suit their needs, businesses can streamline their operations and increase their profits. So, whether you operate an e-commerce store or any other type of business website, it’s time to consider incorporating an appointment and event booking calendar plugin onto your WordPress website’s HTML code.
If you require further assistance with the calendar, you have the following options:
- Support. If you have any remaining queries, you can always get in touch with our support team or refer to the articles in the Help Center.
- Forum. Connect with fellow Elfsight users and share your ideas.


