Best-in-Class
Coding-Free
Easy-to-Use
Instagram Feed widget for website
Show photos, videos, and reels from Instagram to enhance visual appeal and give visitors the social proof they need to feel confident in your brand.
Create Widget for Free
No credit card needed

Trusted by over 3,000,000 small business, agencies and top global brands worldwide
Create your Instagram Feed widget
Configure your widget and add it to your website for free!
Why do I need to embed an Instagram Feed?
Real content. Real vibes. Real engagement.
Bring life to your content
Real photos and posts from Instagram give your website a human touch users notice instantly.
Increase engagement by +40%
Pull visitors deeper into your brand’s world with a familiar Instagram look.
Attract more Instagram followers
Use website visitors as a new source of potential Instagram audience and gain more followers.
0%
websites support
0+
hours of development invested
1 min
to start using the widget
0%
customer satisfaction rate
Join 2,078,753 customers already using Elfsight Apps
You can start with creating your first Elfsight Instagram Feed widget for free.
What makes Elfsight Instagram Feed special?

Any Instagram photos
Instagram photos from username, hashtag or location in any combination
With Elfsight widget for Instagram, you are free to show photos from Instagram by all available means - hashtags, URLs, or usernames, and any combination of those. It's so easy to fill your feed! For the most careful content selection, you can use two types of feed filters - excluding by sources and showing only from limited ones.
Learn more
Exclude by hashtag filter helps me to sort out the photos from my Instagram that are not business-related and only show the right stuff.
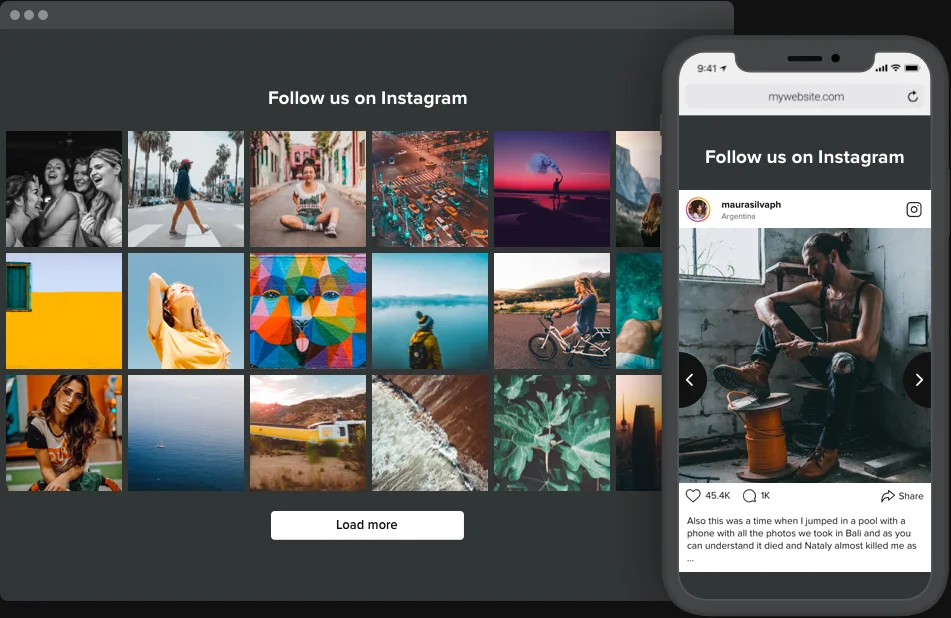
50+ customization options
Custom Instagram feed embed for any use-case
With diverse settings of the responsive interface, you can add maximum customization to the design of your plugin. Start with choosing IG feeds templates - there are tons of professional designs. Then select layout for your photos - Slider or Grid . Afterwards, choose your post template variant, set parameters of columns and rows, and don’t forget to create an eye-catching title. The gallery size is also under your control, so you can configure your unique Instagram widget for website.
Learn more
I use Tile template to hide all the post details and create a clean gallery with my Instagram photos.
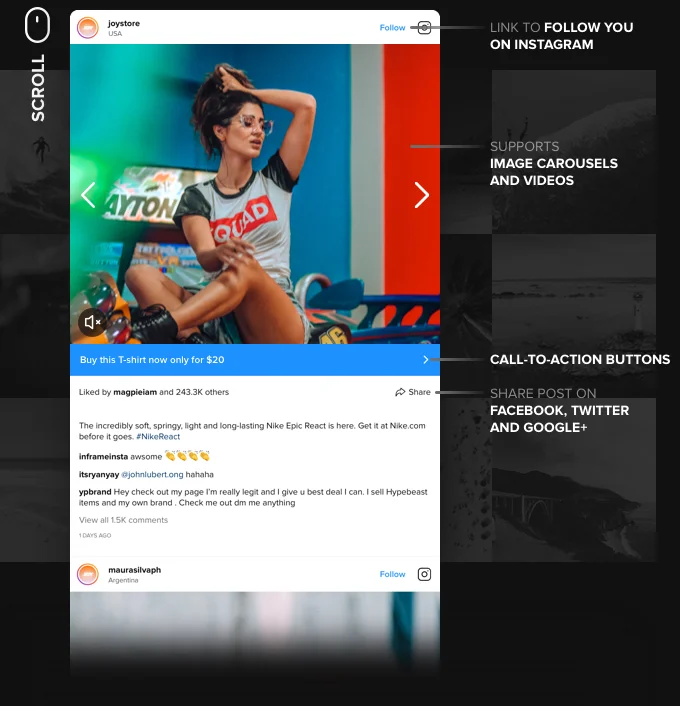
Interaction elements
Engagement from the first sight
InstaShow is the best Instagram Feed for growing your visitor engagement! It includes a lot of features, which will help you with this: Popup mode showing photos in full size and playing videos right on the page for lasting demonstration; a variety of post elements, such as Follow and share icons allowing seamless interaction; and call-to-action buttons that are here to inspire and motivate activities.
Learn more

12 predefined color schemes
Easily matching your website style
Make your widget an integral part of the overall website style, giving it the matching custom look. Our Instagram widget offers you a choice of 12 ready-to-use color schemes, featuring trendy and balanced color solutions to create an unforgettable gallery! And if you want even more customization, you are free to additionally paint 12 elements of the interface yourself. Make your Instagram Feed hit the style!
Learn more
Usage examples
See a selection of real examples to explore the full potential of Instagram Feed for your website.
See in action
Live demo
Try all the features of Instagram widget in live demo now. No fees. No registration. No coding.
Try now
Why Elfsight widget of all others?
Impressive features are only one of the things to enjoy. To charge your website with all it needs, our support team is always ready with high-quality guidance in any enquiry and the latest updates.
Interactive configurator
No programming, no need to hire a developer - our live panel ensures IG feeds installation in a few easy steps to save your time and money.

Qualified Elfsight team
Premium help and free widget embedding will guarantee you the smoothest and problem-free user experience.

Stunning Elfsight Apps service
Cloud IG feeds for systematic automated updates, fast bug fixing and great loading speed in any location.
What our customers say ❤️

Best looking Instagram Feed widget for website. Incredibly easy configuration through the plugin developers website. Tons of options and simply beautiful. Also, I had a few questions that were immediately answered within 24 hours! I'm super happy.

EVERYTHING about this plugin for Instagram is excellent! Doesn't slow my page down at all, the code is excellent, the features are actually more than I expected. And the authors for Instagram gallery widget are fast and more importantly informative! I wish all authors supported their products like this.

This is an amazing responsive plugin that works extremely well with minimal setup. The author has done an outstanding job. This is the only widget I've found that actually works.

WOW! Such a great plugin. I spent hours using other Instagram feeds, and wasn't happy with the results. I tried out the Elfsight feed widget for Instagram and within 10 minutes I had everything I wanted and so much more! Great work!

This is by far the best method I have found to embed Instagram on my website, and the support staff I have come into contact with has been phenomenal: quick and courteous response, always willing to help. Kudos to you guys!
Thank you so much!
Thank you so much!

Tried many Instagram feeds and widgets for Wordpress sites and this one is the best by far, it has the most customization features than the other apps, and a clean UI that is very easy to use... 5 Stars
Instagram Feed Template Catalog
Choose from our ready-to-use widget templates to use as is, or customize them to suit your style.
Embed a customizable grid of the Instagram feed on your website to enhance your website's visual appeal and raise brand awareness.
Embed an Instagram feed with profile details to highlight the legitimacy of your brand.
Embed a sleek and fully functional slider to display your trendy Instagram feed.

Embed Instagram content feed sorted by a hashtag on your website to drive sales.
Embedding a wall of Instagram posts on your websites creates a dynamic social media hub for better engagement.
Embed an eye-catching carousel format to enhance the visual display of your Instagram images and videos.

Embed a small and minimalist Instagram feed on your website to keep it sleek and simple all at once.
No Suitable Template?
You can easily assemble the widget you need using our simple-to-use configurator.
Frequently Asked Questions
Do I need an Instagram Business account or a personal profile?
You can use a public personal account without login. If your profile is private or restricted, switch to Business or Creator mode to connect properly. Private profiles won’t display posts unless converted and connected through the Business API.
What sources can I display in the feed?
You can display posts from an Instagram account feed or from a specific hashtag. To show posts where your profile is mentioned or tagged, use the Elfsight Social Feed widget.
Can I combine multiple accounts or hashtags in one feed?
Yes, you can add up to five different sources in a single widget, including multiple usernames, multiple hashtags, or any combination of accounts and hashtags together.
Does the widget support videos, carousels, and Reels?
The widget supports all post types, including videos, multi-image carousel posts, and Reels.
What content filtering options are available?
The widget provides two filters under the Sources settings: Show and Hide Posts to include or exclude posts by specific words, hashtags, or post URL.
Can I use the Instagram Feed on any website platform?
Yes, Elfsight works with all major builders like WordPress, Shopify, Wix, Squarespace, Webflow, Elementor, HTML, Magento, WooCommerce, jQuery, Joomla, Google Sites, Prestashop, BigCommerce, Drupal, iFrame, ModX, Blogger, Weebly, GoDaddy, Webnode, Adobe Muse, Jimdo, Lightspeed, and more.
How can I embed Instagram Feed on my website?
You can add the widget to your website in just a few simple steps:
- Select a template in the Elfsight editor.
- Customize the feed and copy the installation code.
- Paste the code into a Custom HTML block on your website.
Once installed, any changes you make in the Elfsight editor will be applied to your website automatically.
See the full step-by-step guide on how to add an Instagram Feed to your website.
How often does the widget update with new posts?
The feed content refreshes automatically every 48 hours. The widget caches your Instagram posts to reduce load, and it will fetch any new posts when the cache period expires.
Does Elfsight cache images or data to improve performance?
Yes, for better performance, the Instagram Feed widget caches the images and data it retrieves every 48 hours.
Join 2,078,753 customers already using Elfsight Apps
Get the taste of 80+ powerful apps by Elfsight. No credit card. Joining is free!
Get started
Get 20% discount now!