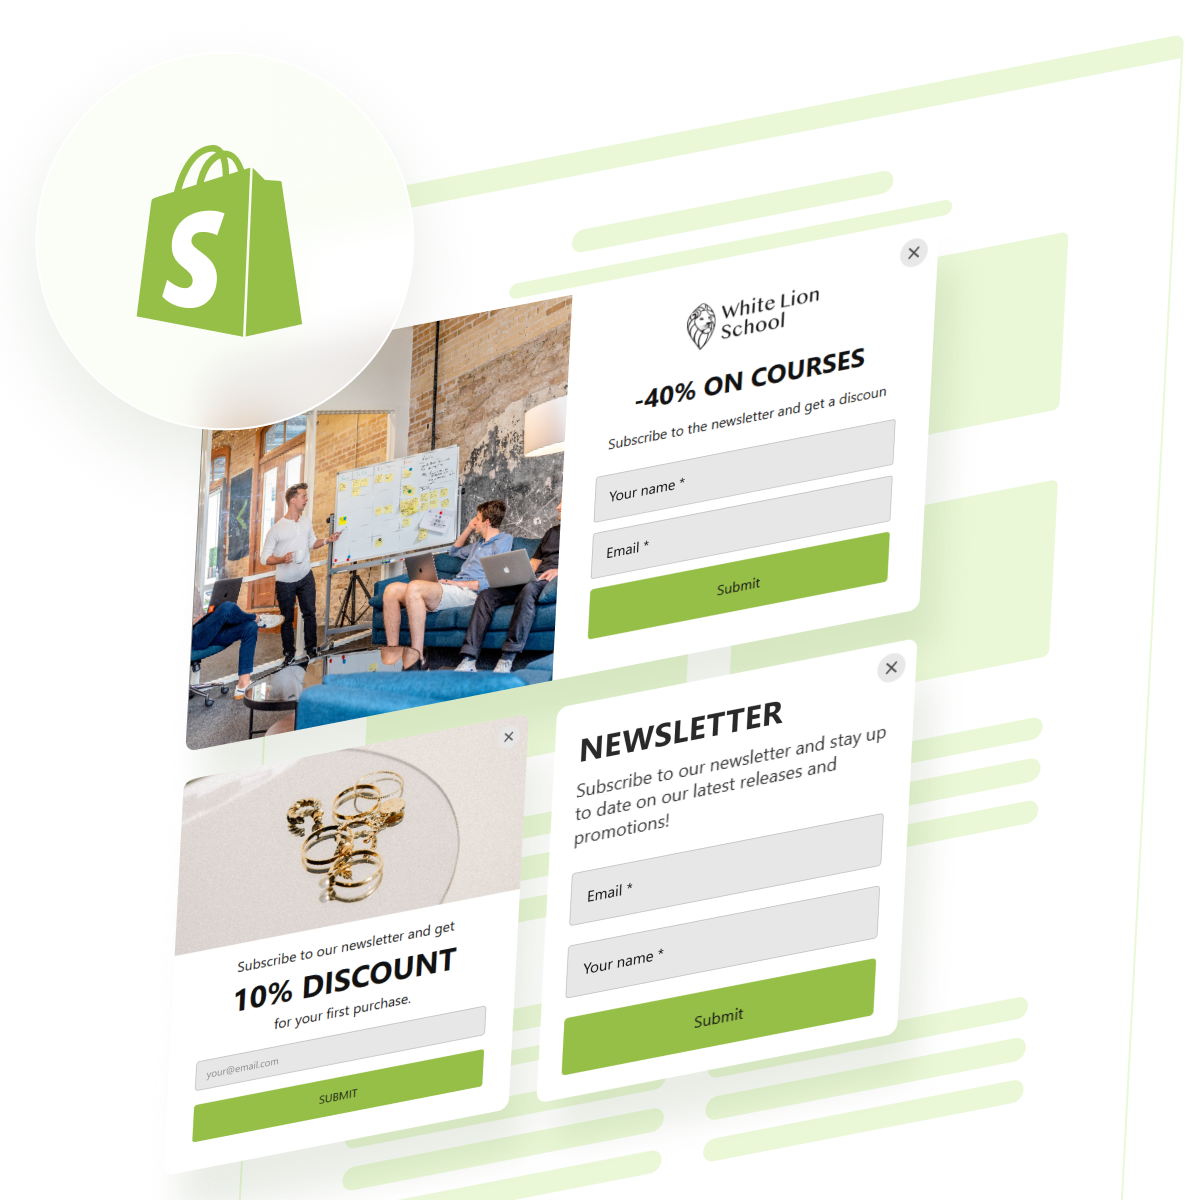
Capturing the attention of potential customers is one of the biggest challenges in eCommerce. A newsletter popup is a smart and proven way to encourage visitors to subscribe to your email list while browsing your Shopify website.
If you’re looking to grow your audience, boost engagement, and drive repeat sales, adding a newsletter popup is exactly what you need. It’s simple to implement and delivers real, measurable value for your business.
- Grow your Shopify mailing list effortlessly. Popups make it easy to collect email addresses from engaged visitors, helping you build a solid base of potential customers.
- Convert store visitors into leads. A well-timed popup grabs user attention and turns casual browsers into subscribers, giving you more chances to convert them later.
- Boost marketing ROI with email campaigns. A larger email list means more targeted campaigns, which often result in higher conversion rates and better long-term retention.
- Deliver special offers at the perfect moment. You can use popups to share discounts or welcome messages that encourage immediate action.
- Customize messages for different behaviors. With smart triggers, popups appear based on user actions — exit intent, time on page, or scroll depth—making them more effective.
Now that you know why newsletter popups are essential for your Shopify website, let’s look at the quickest way to get one up and running using Elfsight.
Quick Way to Add Newsletter Popup to Shopify
Elfsight newsletter popup makes it fast and effortless to create a professional-looking subscription banner for your Shopify website — no coding or design skills required.
- Open the Elfsight editor and select a newsletter popup template that fits your goals.
- Adjust the layout, text, and call-to-action settings to align with your branding and messaging.
- Customize colors, fonts, button styles, and behavior triggers like scroll depth or exit intent.
- Click “Add to website for free“, then copy the embed code and paste it into your Shopify website backend.
With just a few simple steps, your popup will be live and ready to collect new subscribers. You can always return to the editor to tweak the design or update the content as needed.
Try it now – create your own newsletter popup in minutes!
Top Features of Elfsight’s Solution
Once you’ve seen how easy it is to build a Shopify popup, it’s worth understanding what makes Elfsight’s solution a powerful tool for your newsletter strategy. It’s not just about design — Elfsight gives you the flexibility and features to drive real results.
Here are the standout features and benefits that make Elfsight’s popup widget a top choice:
- Advanced targeting options. Show your popup to the right users based on exit intent, scroll depth, time on page, device type, or traffic source.
- Flexible display triggers. Choose when and how your popup appears — on page load, after inactivity, or even on button click — to match user behavior.
- Fully customizable design. Adjust layout, colors, fonts, and animation to perfectly fit your branding without writing a single line of code.
- Multiple popup formats. Use banners, floating boxes, fullscreen overlays, or embedded inline elements depending on your goal.
- Email integrations included. Seamlessly connect to Mailchimp, Google Sheets, or other services to manage new subscribers in real time.
- Mobile-optimized experience. Your popup looks and works great on smartphones and tablets, keeping conversions high on all devices.
- Performance and conversion stats. Track popup views, interactions, and collected emails to evaluate your results and optimize over time.
Equipped with these features, Elfsight’s popup widget is more than just a form — it’s a smart tool to grow your email list and boost engagement. Let’s now walk through the full setup process step by step.
Embed a Newsletter Popup to Shopify: Step-by-Step
Now that you know what Elfsight’s popup widget offers, it’s time to walk through the full setup process. Below is a detailed, step-by-step instruction on how to create, customize, and embed your newsletter popup on a Shopify website using Elfsight’s editor.
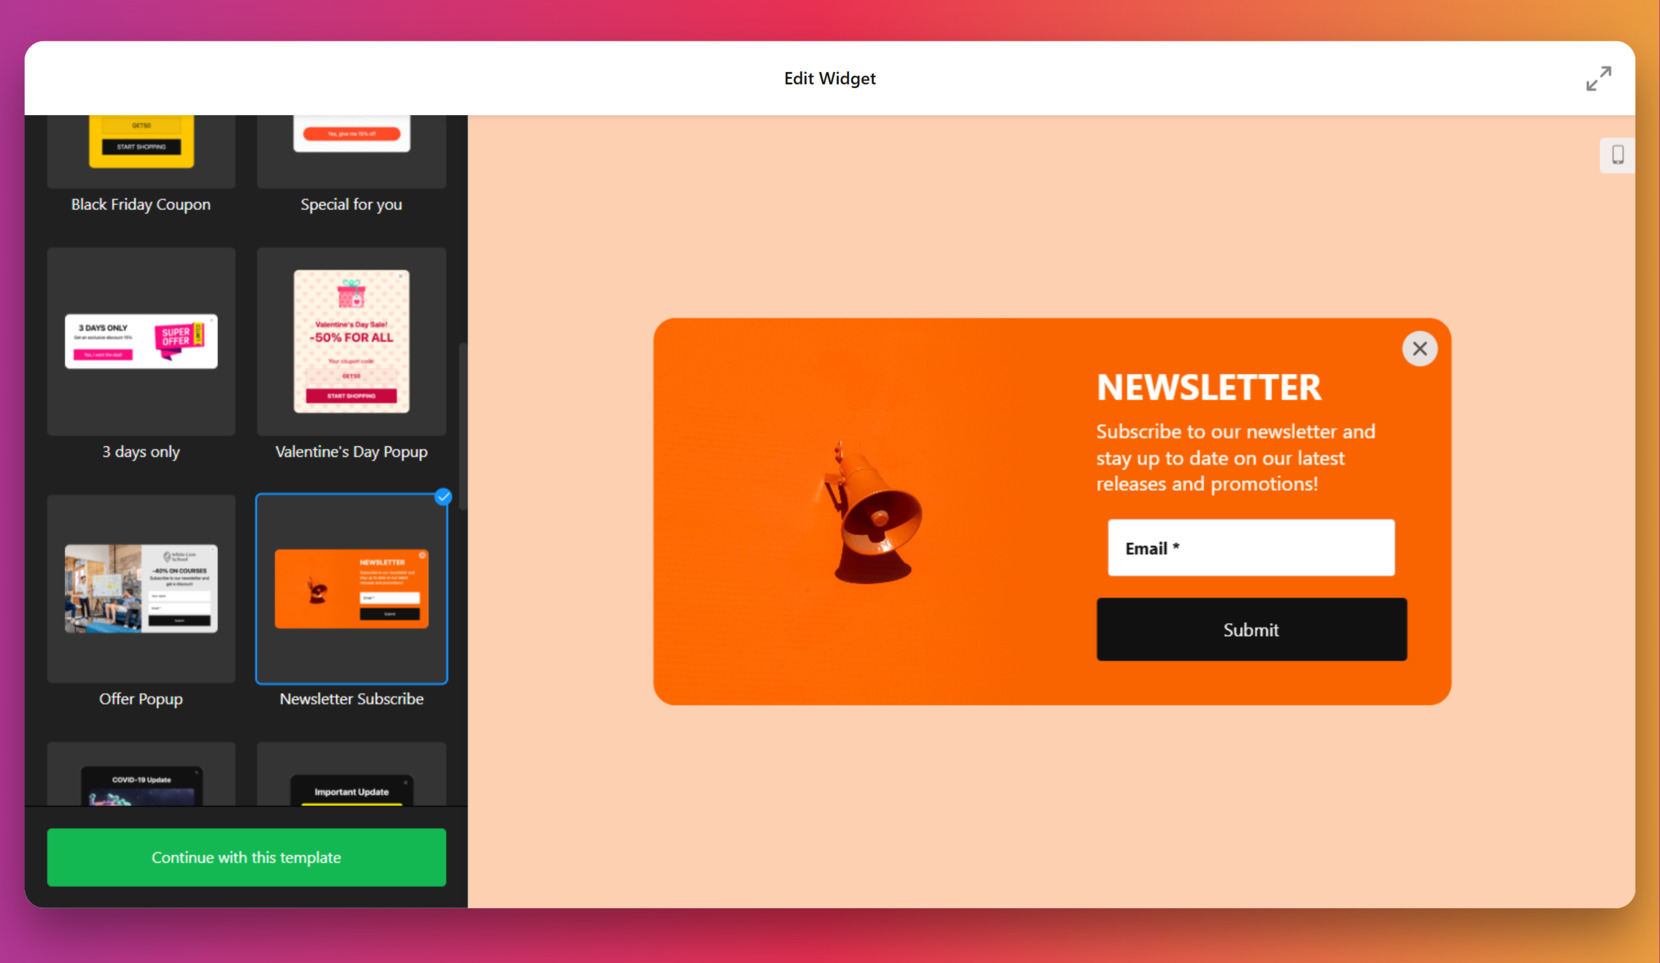
- Choose a Template. Open the Elfsight Popup editor and browse the available options. Select “Newsletter Subscribe” from the template list and click “Continue with this template”.

- Edit the Content and Appearance. Use the Builder panel to modify text, form fields, and background color. Change fonts, buttons, or images to match your visual identity. You can also include a consent checkbox for privacy compliance. Optional: Use the AI Generator and it will create the widget layout for you automatically.
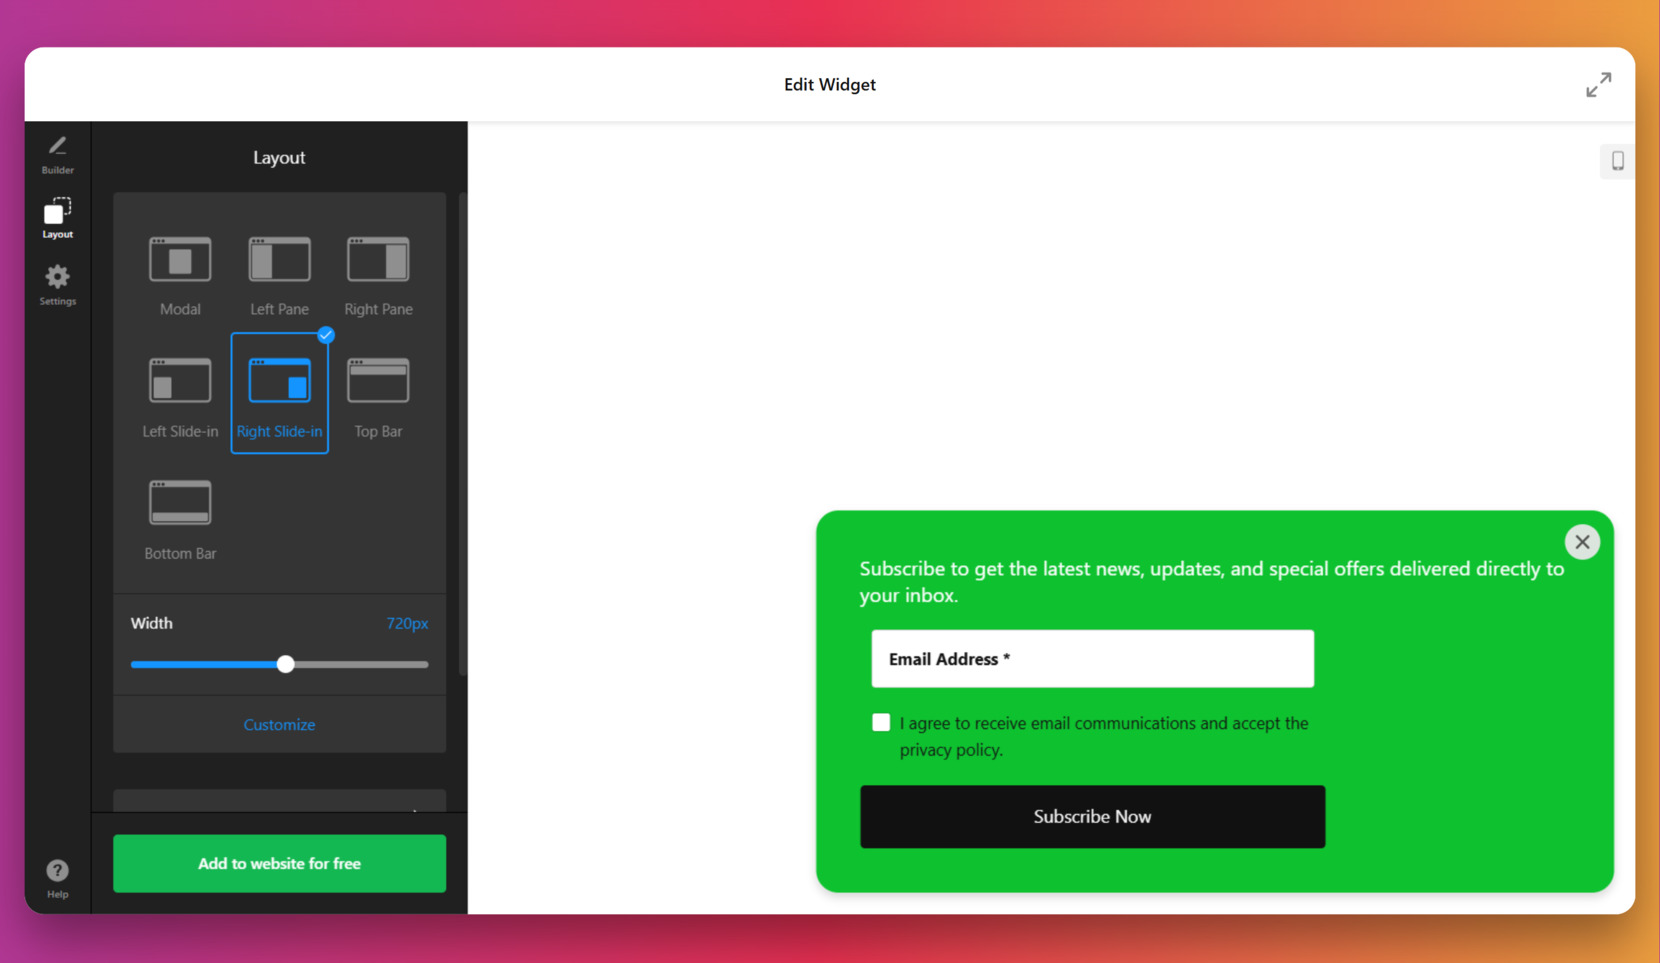
- Customize the Layout. Navigate to the “Layout” tab. Choose how the popup will display — modal, slide-in, top bar, or bottom bar. Adjust the width and click “Customize” to match the layout with your branding.
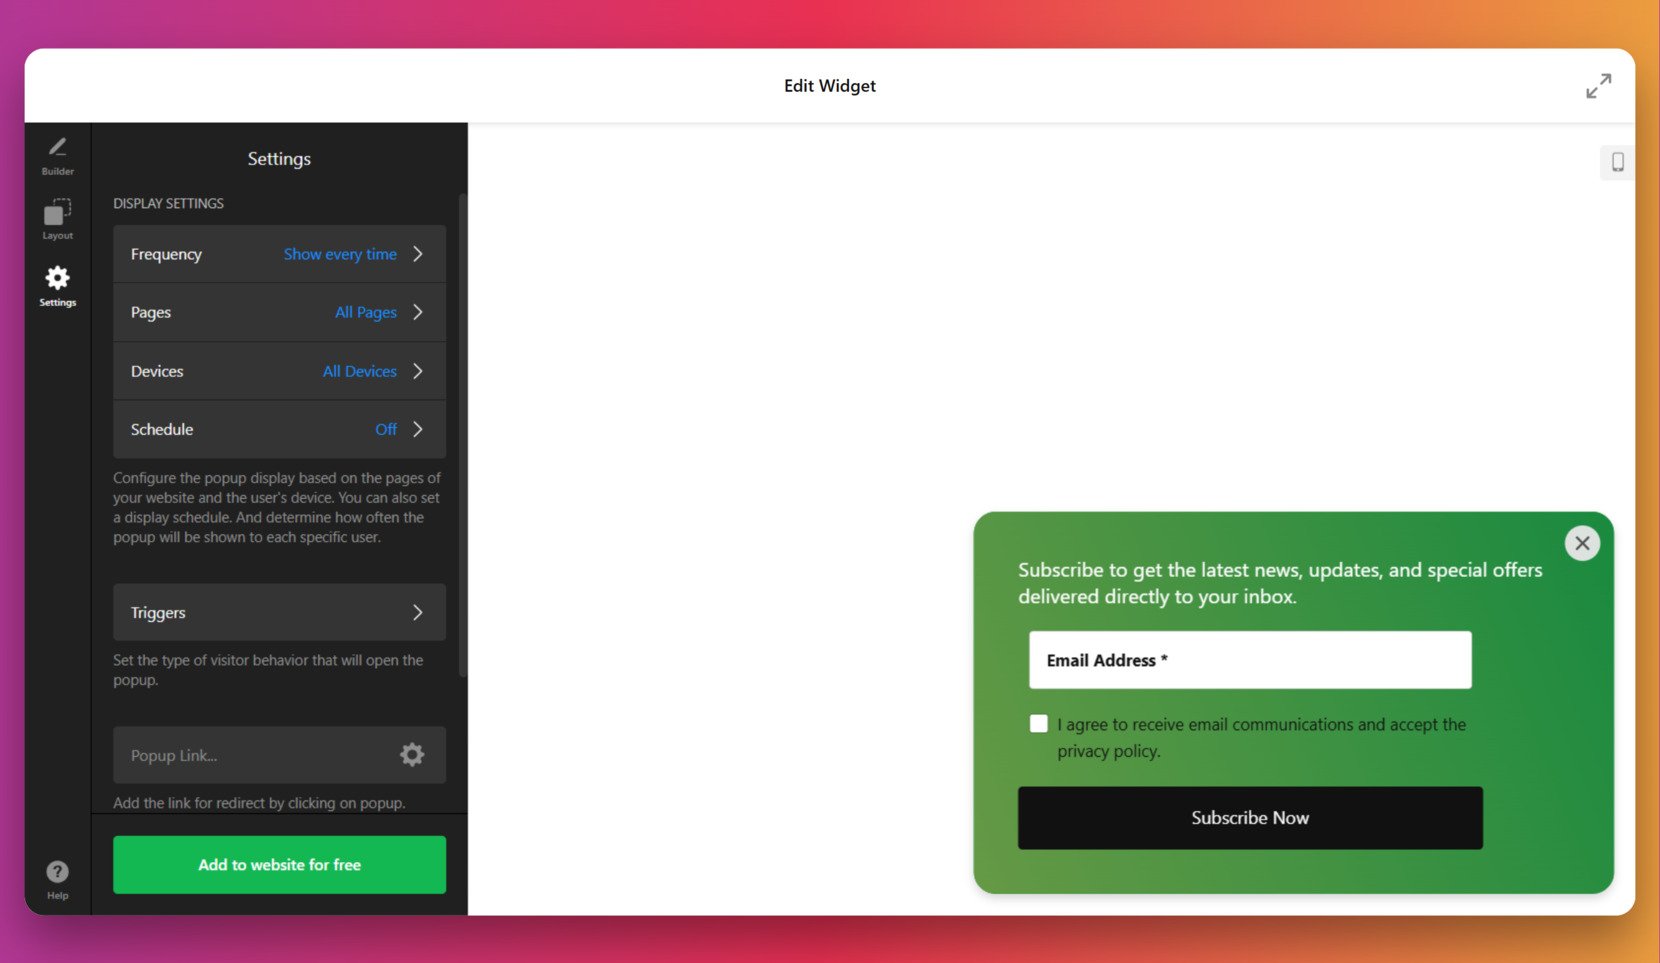
- Set Display Triggers and Rules. Open the “Settings” panel to define when and how the popup appears. You can configure display frequency, schedule, device targeting, and behavior-based triggers like scroll or exit intent.
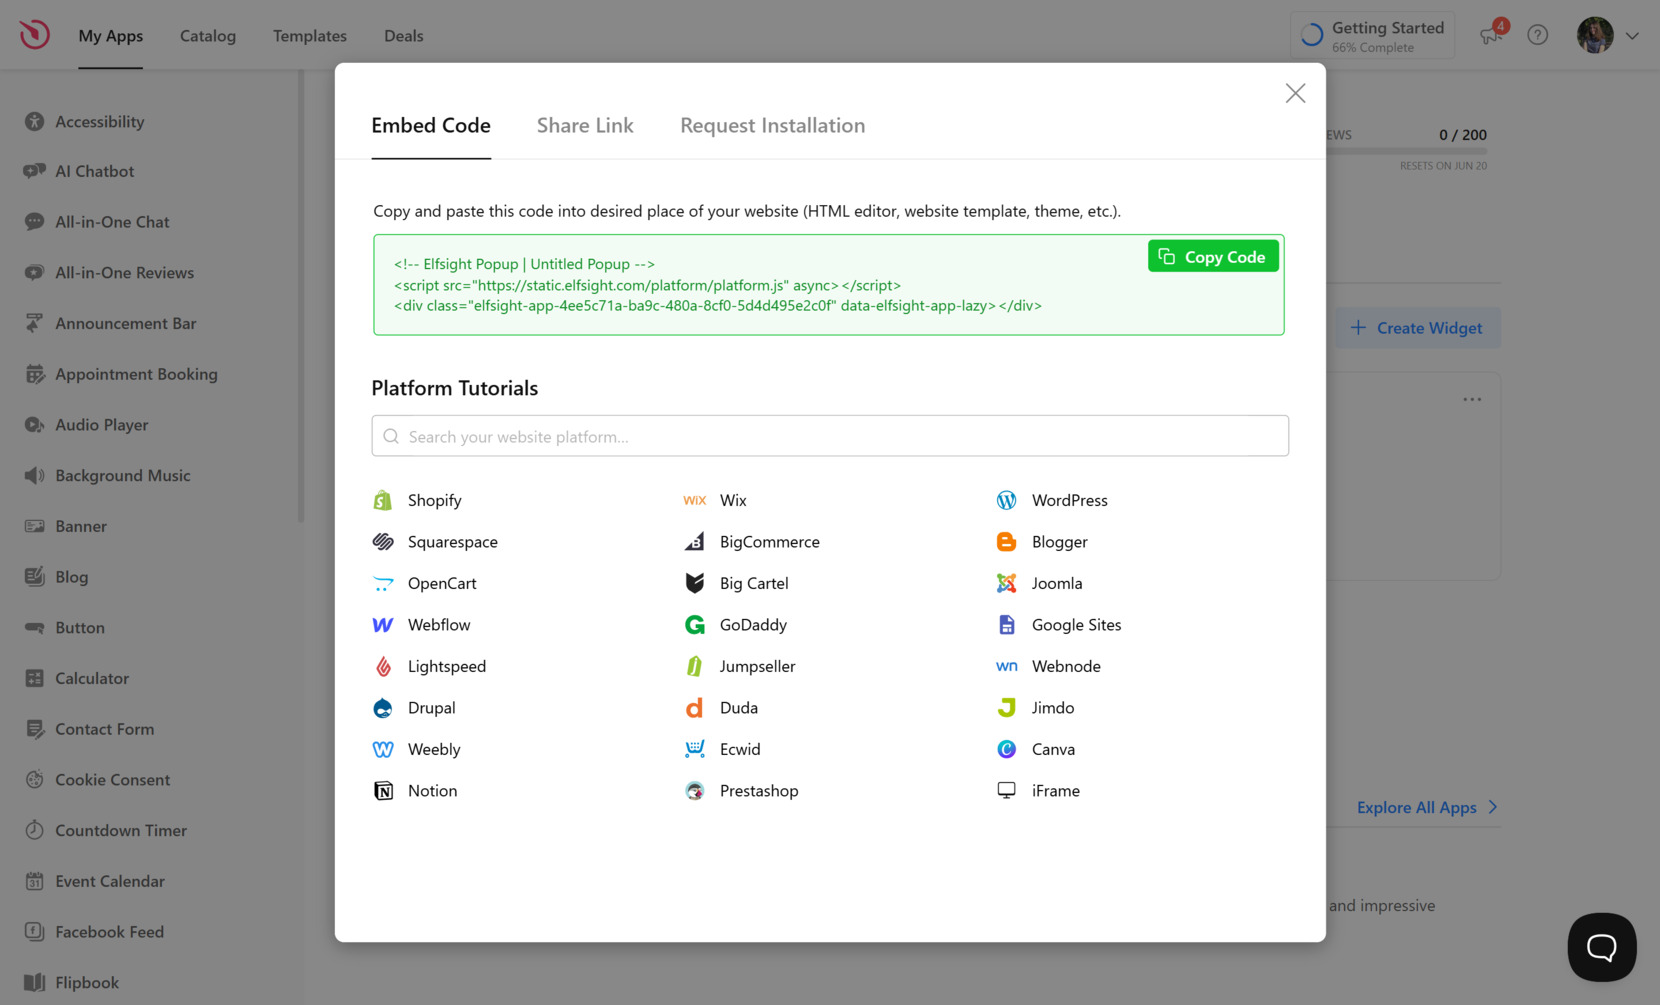
- Embed the Popup in Shopify. Click “Add to website for free” and copy the generated code. Go to your Shopify admin, open the theme editor or custom code section, and paste the embed code where you’d like the popup to load. Save and publish your changes.


After publishing, the popup will instantly go live on your Shopify website, ready to collect subscriber emails with a sleek and fully branded look.
Elfsight offers one of the fastest and most flexible ways to launch your popup — but it’s not the only option out there. Let’s explore some alternative methods to add a newsletter popup to your Shopify website.
Other Ways to Integrate Popups on Shopify
Besides Elfsight, there are several alternative methods you can use to add a newsletter popup to your Shopify website. Below are two reliable methods that are suitable for users comfortable working with native features or basic manual customization.
Shopify Forms App (by Shopify)
Shopify offers its own free app called “Shopify Forms,” which allows you to create and display email signup popups on your storefront. It’s a native solution and integrates directly with your Shopify admin and customer database.
- Go to your Shopify admin and open the App Store. In the Shopify dashboard, click “Apps” in the left menu, then click “Shopify App Store”.
- Search for “Shopify Forms” and install the app. Locate the app developed by Shopify and click “Install”. Confirm the installation to add it to your account.
- Open the app and choose “Create form.” You’ll be taken to the Forms editor where you can choose between a popup or embedded layout.
- Customize your popup’s appearance and messaging. Adjust the form fields, CTA button, font style, background color, and alignment to match your branding.
- Set the form behavior. Choose whether the popup shows on page load, after delay, or on scroll. You can also control how often it’s displayed to the same visitor.
- Define targeting rules and display conditions. Set which pages, devices, or user actions should trigger the popup visibility.
- Save and publish your form. Once complete, your popup will appear automatically on your Shopify website without needing to edit any code.
This method is best suited for Shopify store owners who want a free, native solution that integrates directly with their store’s backend.
Shopify Custom Code via Theme Editor
If you’re comfortable editing theme code, you can manually create a basic newsletter popup using custom HTML, CSS, and JavaScript. This method allows for complete design freedom but requires technical skills and is best suited for developers or advanced users.
- Open Shopify admin and go to “Online Store” → “Themes.” Click “Customize” on your current theme, then select “Edit code”.
- Create a new section or snippet for your popup code. In the left-hand panel, click “Add a new section” and name it something like “newsletter-popup.liquid”.
- Paste the HTML structure for the popup. Add your form markup, including input fields for email and a submit button. Use proper semantic tags and form IDs.
- Add CSS to style the popup. Define styles to position, animate, and design the popup window. Use fixed positioning and z-index to overlay it correctly.
- Write JavaScript to control visibility. Add JS to trigger the popup on scroll, delay, or exit intent. Also, include logic to close the popup or prevent multiple displays.
- Insert the popup section into your theme. Include the section in your “theme.liquid” or appropriate template file using {% section ‘newsletter-popup’ %}.
- Save and publish the changes. Preview your website to test the popup and adjust the behavior or styles as needed.
This method gives you complete creative control but requires maintenance and technical knowledge for updates or error fixing.
Comparison: Elfsight vs Other Methods
Let’s take a closer look at how Elfsight compares to the other available options for adding a newsletter popup on a Shopify website:
| Method | Pros | Cons |
|---|---|---|
| Elfsight Popup Widget | Offers a no-code, fully customizable popup with advanced display rules and seamless email integrations. | Requires embedding a code snippet, for which users have to create an Elfsight account. |
| Shopify Forms App | Easy to use and integrates directly into Shopify with no code required. | Limited customization options and lacks advanced targeting or styling capabilities. |
| Custom Code in Shopify Theme | Complete design freedom and control over popup behavior with full code access. | Requires development skills and lacks built-in analytics, integrations, or support. |
Each method has its use cases, but for most Shopify users looking for ease of use, rich features, and quick deployment, Elfsight stands out as the most balanced and powerful solution. Let’s now go over practical tips to get the most out of your popup and increase your email signup conversions.
Tips to Make Your Newsletter Popup Perform Better
To ensure your newsletter popup performs well and doesn’t interfere with the user experience, follow these practical tips. These best practices apply to any popup widget, no matter which tool or method you use.
- Time your popup wisely. Avoid showing your popup immediately after the page loads. Instead, trigger it after a user has spent 5–10 seconds on the page or scrolled a certain percentage. This makes it feel less intrusive and more relevant.
- Use exit intent or scroll-based triggers. Popups triggered when a user shows intent to leave or scrolls past 50% of the page are more likely to capture engaged visitors without disrupting their browsing.
- Limit how often the popup appears. Show the popup only once per session or once every few days. Repeated popups can frustrate users and hurt conversions.
- Keep the message short and clear. Tell visitors what they’re getting and why it matters. Mention perks like discounts, exclusive news, or early access in one or two lines.
- Use a strong call to action. Your CTA button should stand out visually and be action-oriented — use phrases like “Subscribe Now”, “Get 10% Off”, or “Join the List”.
- Make it mobile-friendly. Always test your popup on mobile. The content should be readable, buttons should be clickable, and the close button should be easily accessible.
By applying these tips, you’ll make your popups more effective while keeping the experience user-friendly. Now let’s take a closer look at who benefits the most from using newsletter popups and how they are used across different industries.
Who Should Use Newsletter Popups: Use Cases
Newsletter popups are a versatile tool that can be applied across a wide range of industries. Whether you sell physical products, offer digital services, or promote exclusive content, popups help grow your email marketing list and convert visitors into engaged subscribers.
Application in fashion and apparel 👙
For fashion brands, newsletter popups are perfect for promoting exclusive launches, limited-time offers, or seasonal collections. They allow businesses to capture visitor emails during high-traffic periods like new drops or sales and turn interest into long-term engagement through targeted follow-ups.
Application in health and wellness 🧘
Wellness stores and supplement brands use newsletter popups to distribute expert content, share health tips, and promote product bundles. The popup can also encourage visitors to join a broader health community, subscribe to a challenge, or get updates on new product lines.
Application in digital products and online courses 💻
Creators, educators, and digital product sellers benefit from popups by using them to build email lists for course launches, webinars, and product updates. These businesses often offer lead magnets like free ebooks or intro lessons in exchange for signup, which popups help deliver quickly.
No matter the industry, newsletter popups provide a flexible way to engage users at the right time and turn casual visitors into long-term subscribers. But like any tool, implementation can come with occasional challenges. Let’s now cover common problems and how to solve them efficiently.
Fixing Common Issues
Even though newsletter popups are easy to set up, users may occasionally encounter configuration issues or behavioral quirks. Below are common problems along with clear answers to help you solve them quickly.
Why isn’t my popup showing on the website?
How do I prevent the popup from showing too often?
Can I control which pages the popup appears on?
Why doesn’t the popup appear on mobile devices?
How can I make sure the popup doesn’t block important content?
The popup loads but doesn’t collect emails. Why?
Most popup issues come down to configuration or placement errors, which are easy to resolve with a few checks.
Conclusion
Adding a newsletter popup to your Shopify website is one of the most effective ways to grow your email marketing list and turn casual visitors into long-term customers. With flexible targeting, custom design options, and real-time integrations, popups help you deliver the right message at the right time — without disrupting the shopping experience.
Whether you choose Elfsight’s ready-to-use solution, Shopify’s built-in tools, or a custom-coded setup, the key is thoughtful configuration and timing. With the guidance provided in this article, you’re well-equipped to launch a popup that not only looks great but also performs exceptionally across any device or audience segment.
Need Help Getting Started?
We hope this tutorial has given you everything you need to create your first popup. If you’d like more assistance, contact us — we’re here to help you build the perfect newsletter widget for your website. At Elfsight, we focus on delivering easy-to-use tools that bring real results for your business.
Come join our supportive Community to exchange feedback, ideas, and solutions with other users. And if you have suggestions for new features, don’t hesitate to submit them to our Wishlist — we’re always listening!