

As an online store owner, you probably want your Shopify to stand out and earn trust fast – but encouraging new visitors to buy isn’t easy when your pages lack real customer feedback. Reviews are often the first thing shoppers look for; they turn hesitation into confidence and boost your products’ creadibility instantly.
The easiest way to display authentic customer feedback is with an All-in-One Reviews Widget that automatically pulls and updates reviews from various platforms – Google, Facebook, Yelp, Etsy, you name it – right on your Shopify pages. It takes minimal setup, blends with your store’s design, and keeps your website fresh with actual customers’ voices — no coding needed.
- Turn customer feedback into social proof that sells.
- Set up and style your reviews widget in minutes.
- Avoid mistakes that break your reviews display.
- Use insider tips to make your review section perform best.
To keep things simple, we’ve organized the installation process into two parts. Below you’ll find both: an instant embed tutorial and a detailed follow-along guide. Let’s start with quick setup.
Set Up Your Reviews in 4 Easy Steps
If you want to know how to add reviews to Shopify right away, here’s your shortcut. Follow these easy steps to launch your widget:
- Open Elfsight’s editor and pick a template.
- Customize your Reviews widget.
- Click ‘Add to website for free’ and copy the code.
- Paste it into your Shopify website’s backend.
Launch the live demo and add reviews to your Shopify store!
What Makes This Widget Work So Well
Now that you’ve seen how quick and easy it is to embed the widget, let’s take a closer look at the features that make it worthwhile:
| Key Feature | Why it Matters |
|---|---|
| Combine 60+ review sources in one display | Show all your best feedback in one place, so visitors get the full picture instantly. |
| Showcase real review details and source links | Build trust with transparent social proof—every review is clearly authentic and clickable. |
| Filter and sort by keyword, sentiment, or platform | Highlight exactly the reviews you want, tailored to your audience or campaign. |
| Custom layouts, colors, and platform tabs | Match your website’s look and keep your brand front and center with flexible design options. |
| Invite new feedback with a “Write a review” button | Make it easy for happy customers to share their experience right from your reviews widget. |
These are just a few ways the All-in-One Reviews widget can help you showcase customer trust and attract more purchases. If you want to explore the full list of its capabilities, check out the Features Page.
Detailed Guide: Add and Customize Your Widget Easily
Ready for a deeper dive into the setup and customization? This section covers everything from design tweaks to placement options to make your reviews widget unique and effective.
1. Select Template
The first step is to open the editor and choose one of the pre-made templates that you like best. There are six starter layouts available:
- Grid displays reviews in a clean, evenly spaced grid of cards.
- List stacks reviews vertically in a single column, making each testimonial more readable and attention-focused.
- Masonry organizes reviews in a dynamic, Pinterest-style grid where cards adjust in height.
- Slider / Carousel rotates reviews automatically or on click/swipe.
- Floating Badge stays visible as visitors scroll, displaying your overall rating and star score.
- Sidebar “sticks” to the side of the page; visitors can open or collapse it anytime.
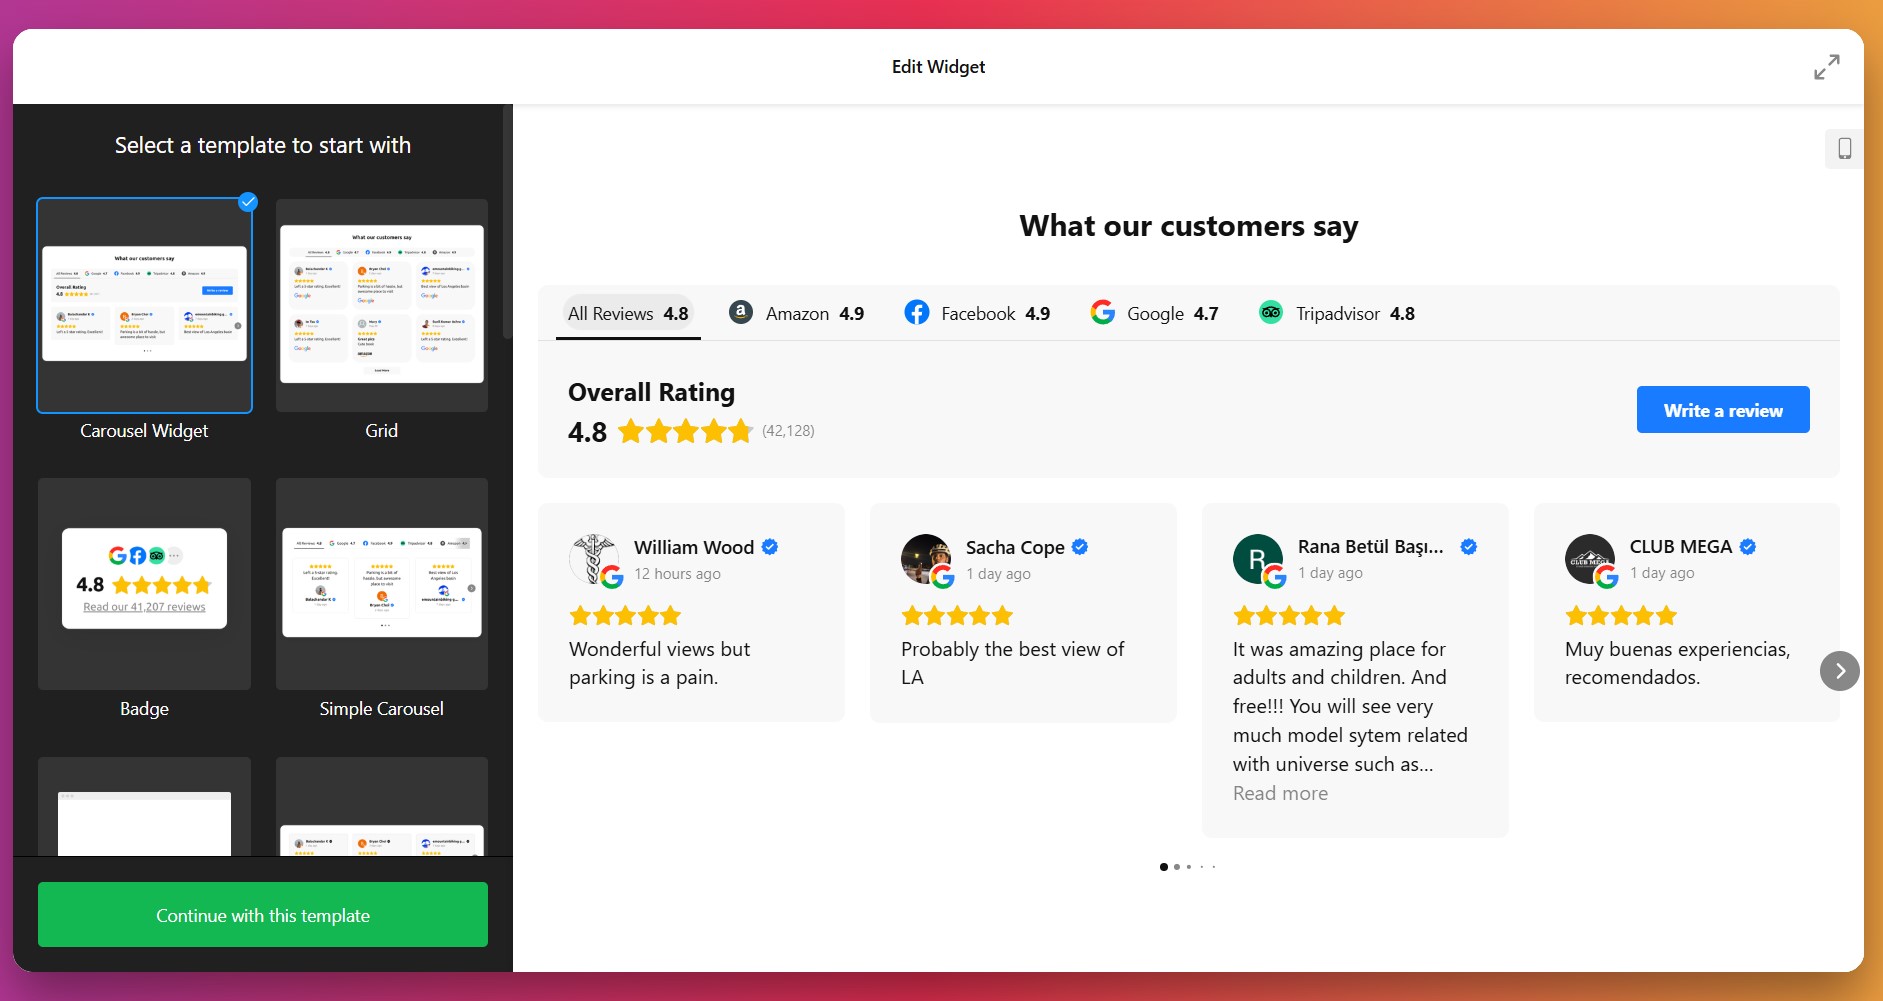
Once you’ve made your choice, click “Continue with this template” to proceed to setup and styling.
2. Add Your Business Source
Navigate to the “Source” tab on the left and enter your business name or paste a direct link to your reviews profile.
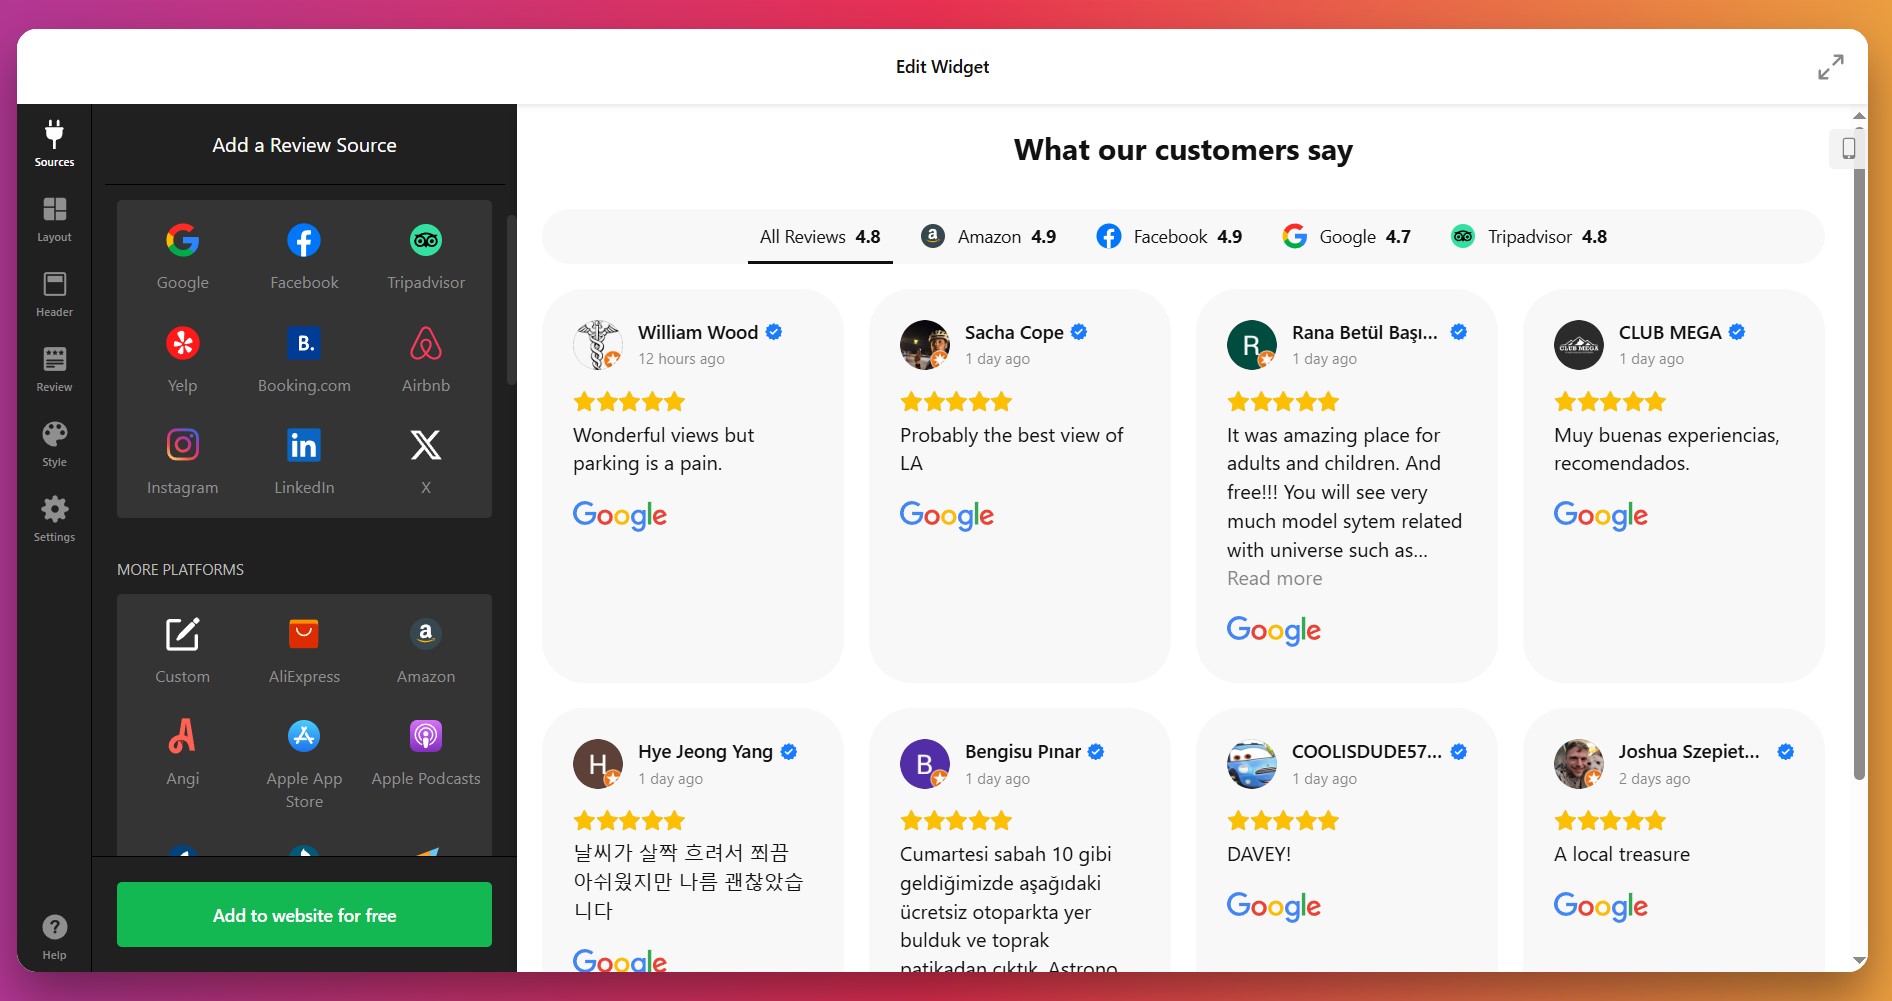
The widget supports 60+ different platforms to pull reviews from; you just need to click “+Add Source” to add more.
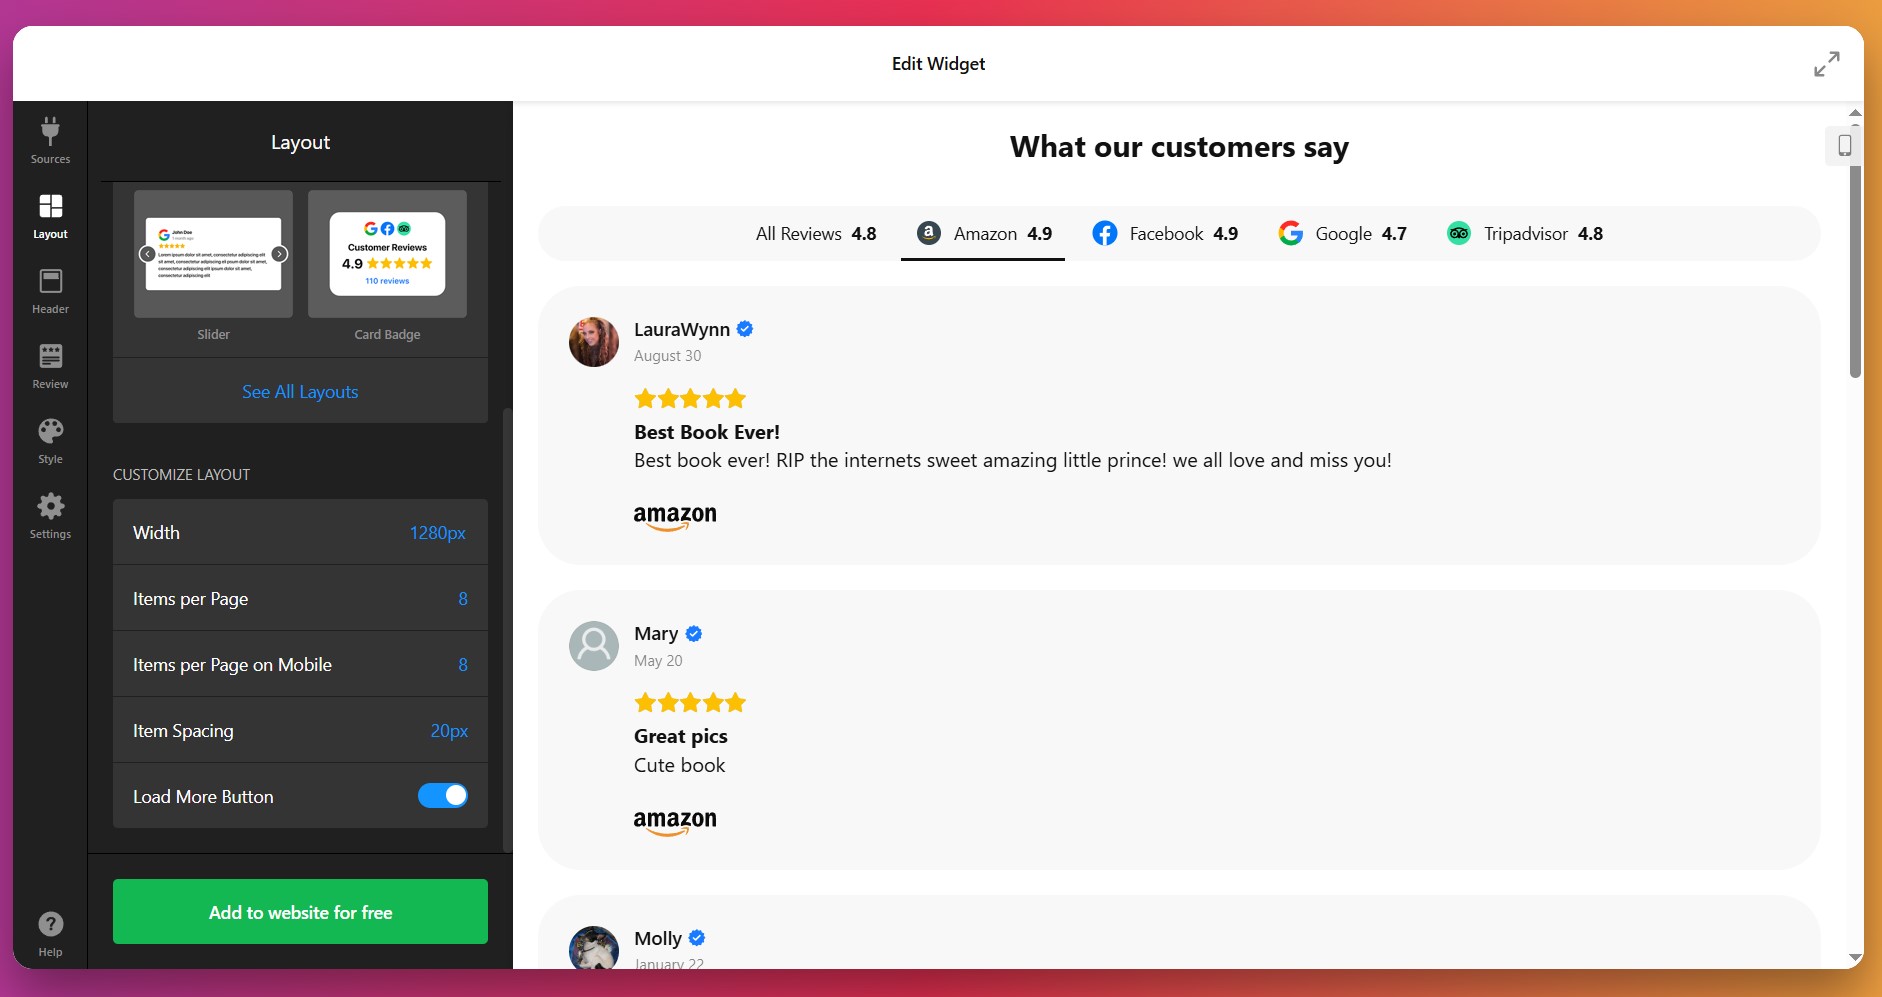
3. Customize the Layout
Under the “Layout” tab, you control how your reviews will look on desktop and mobile devices. You can tweak the widget’s width, item spacing, animation, number of columns & rows to display, among other settings.
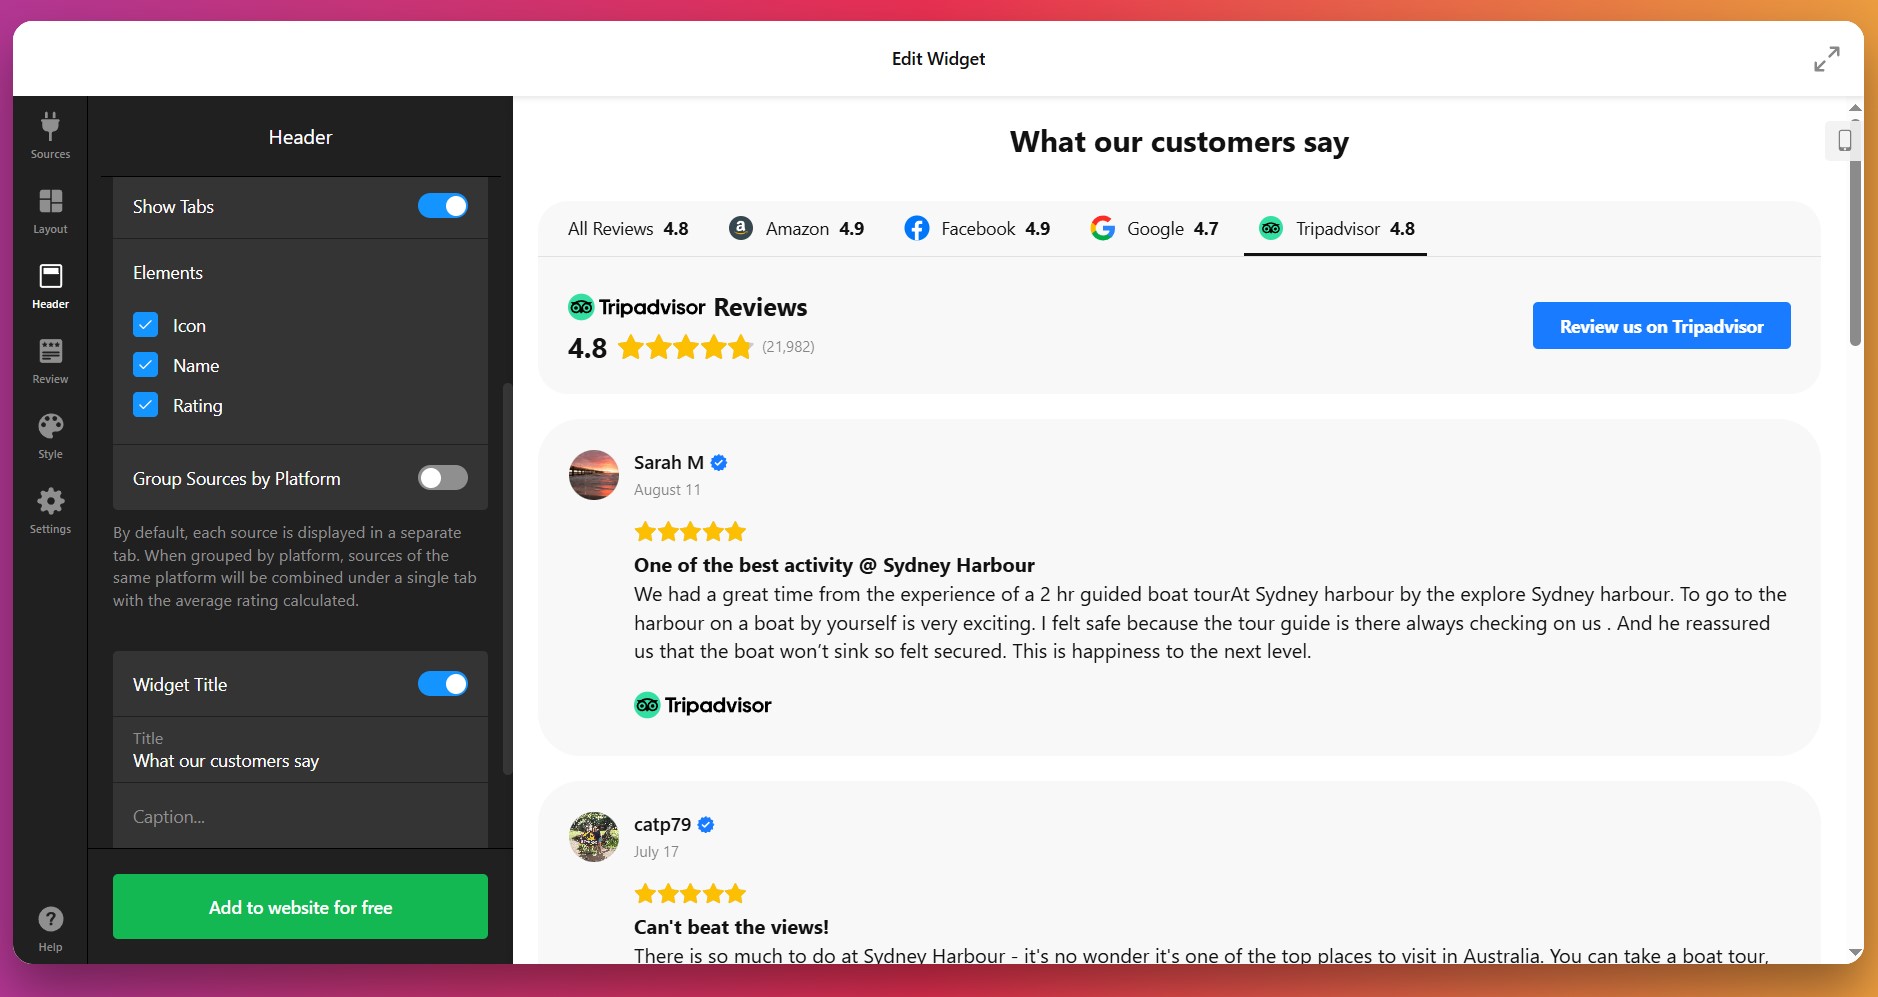
4. Adjust Header Display Options
In the “Header” tab, you can enable or disable elements like title, star rating, platform tabs, and number of reviews. Don’t forget to enable the “Write a Review” button by checking the box under ‘Elements’ so that new customers can add product reviews on your Shopify right from the widget as well.
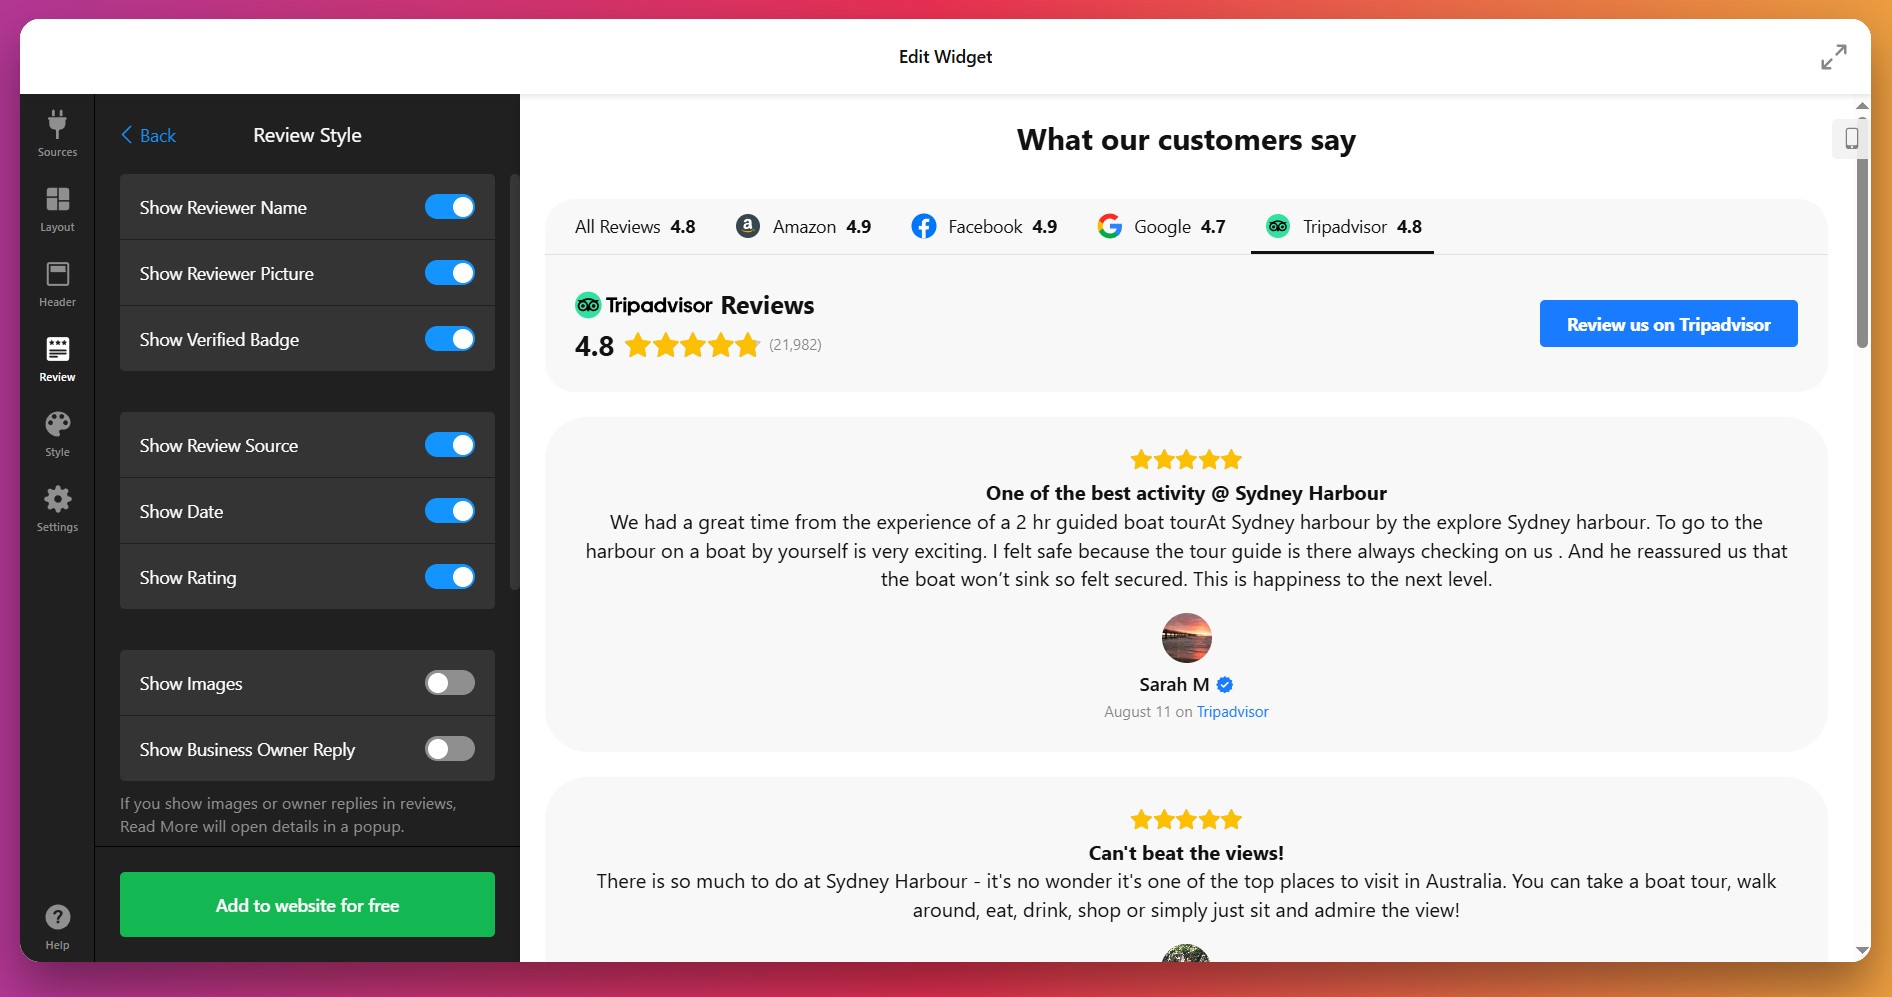
5. Set Review Card Styles
Go to the “Review” tab next to choose the visual style of individual review cards. You can configure how the reviewer’s name, image, text length, and review source appear. Just click Customize to adjust each as you prefer.
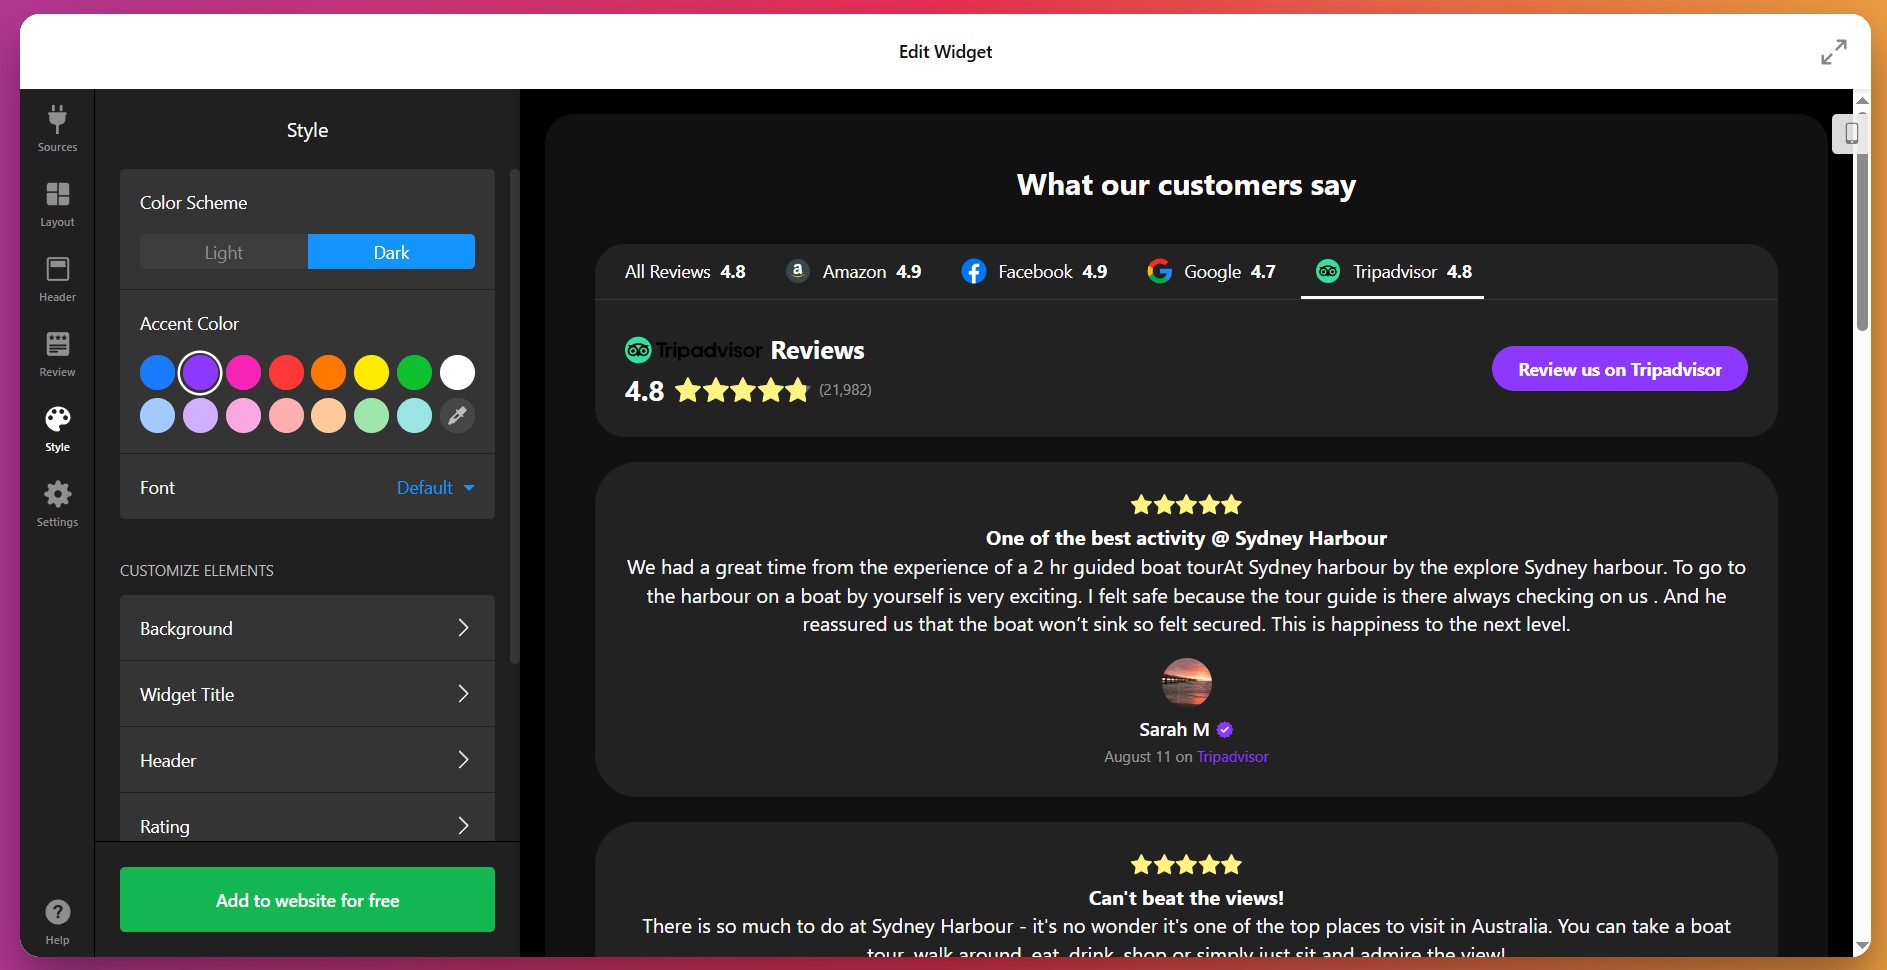
6. Style the Widget Appearance
Under the “Style” tab, select a light or dark theme first, define an accent color, and adjust fonts. You can also tweak background and border styles to match your branding. If you’re using the Slider layout – navigation arrows are also customizable.
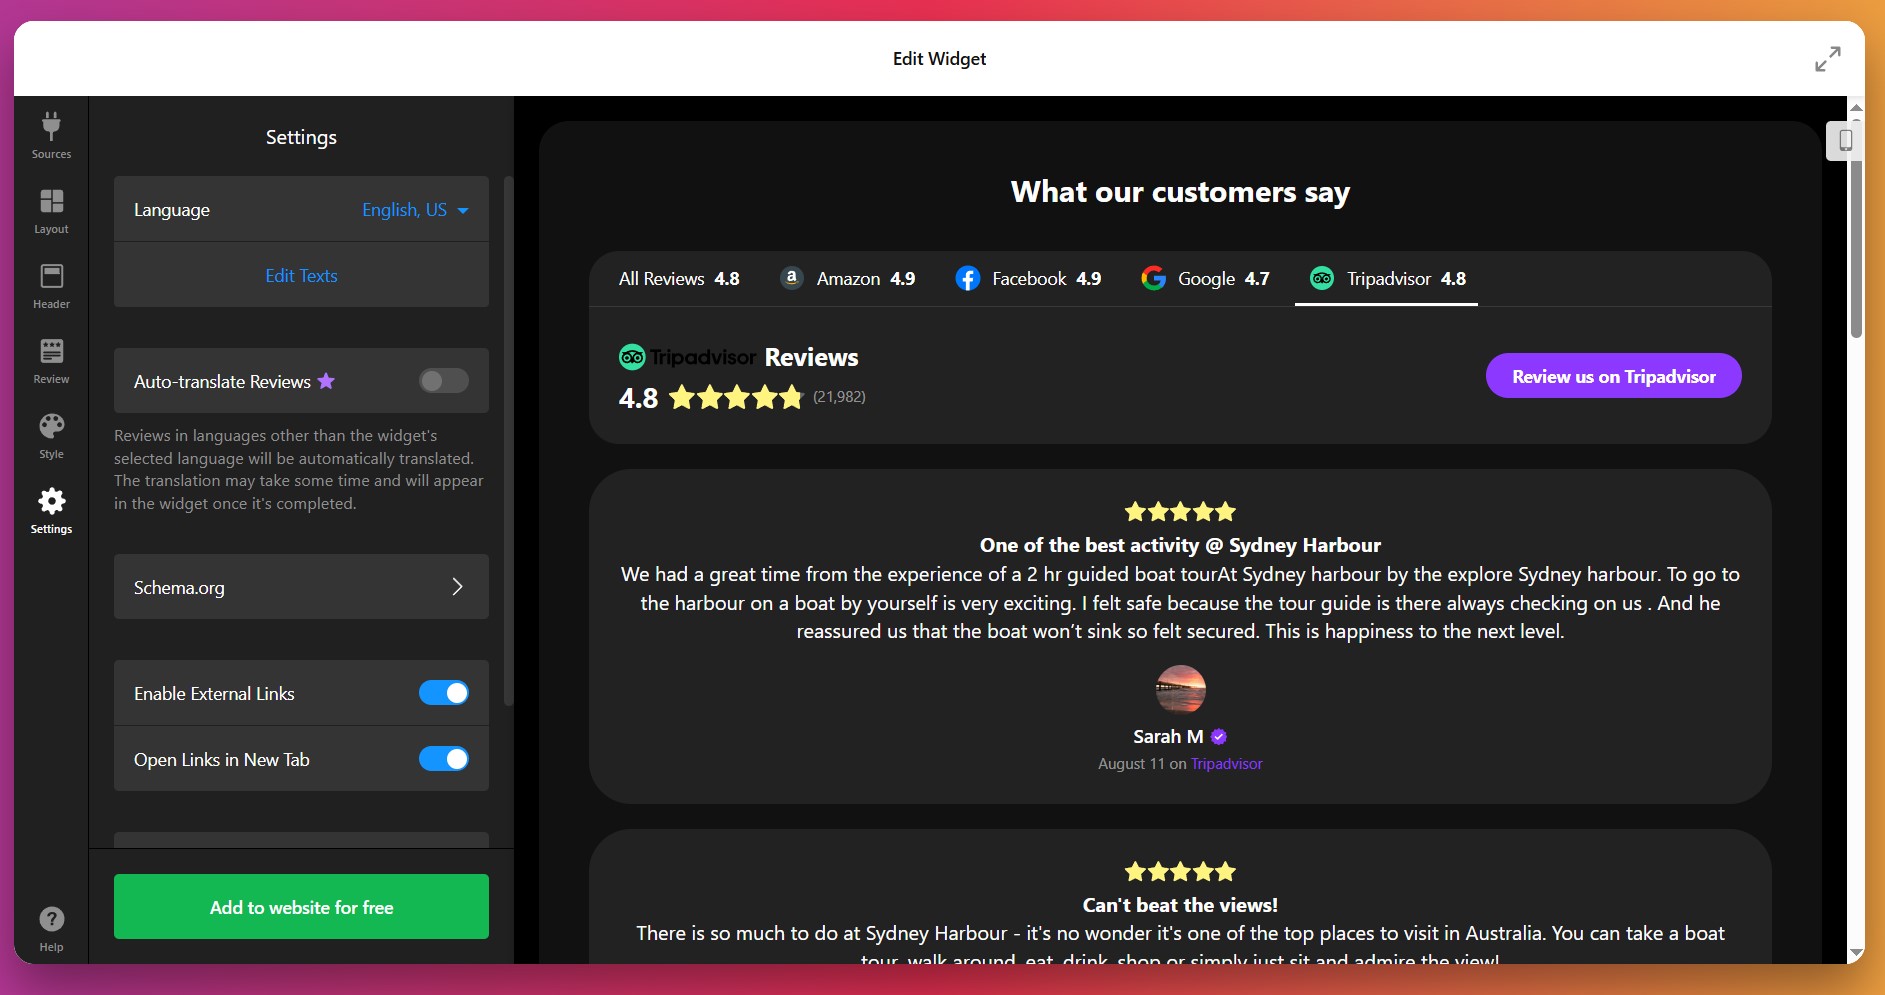
7. Configure Settings and Extras
Finally, use the “Settings” tab to adjust widget language, schema markup, review translation, and check whether links open in a new tab. This section also controls advanced display behavior, including Custom JS for those who are comfortable with some coding.
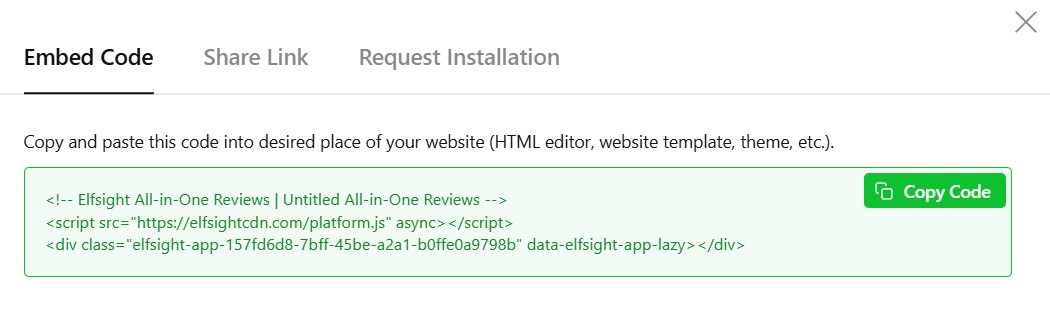
8. Copy the Embed Code
Once you’re satisfied with your setup and design, click the green “Add to website for free” button. The configurator will generate a unique embed code you can copy.
9. Add Reviews on Shopify
To put reviews on Shopify, pick a method that matches where you’d like the widget to appear:
Specific page — Online Store 2.0
- In Shopify admin go to Sales Channels → Online Store → Themes and click Customize.
- Select the target page from the dropdown at the top of the visual editor.
- Click Add section and choose Custom Liquid.
- Paste your snippet into the Custom Liquid field and click Save.
Specific page — Vintage themes
- In Shopify admin go to Online Store → Themes → Customize.
- Select the page to edit from the top dropdown.
- Click Add section → Custom Content. Inside the Custom Content block use Add block → Custom HTML if required.
- Paste your Elfsight embed code into the HTML field, set container width to 100% if needed, and click Save.
All pages (site-wide)
- In Shopify admin click the … menu and choose Edit code.
- Open
Layout → theme.liquid - Paste your Elfsight snippet before the closing tag and click Save.
Product pages
Adding to product description
- Go to Products and open the product to edit.
- Click the
</>icon to open the HTML editor, paste your code, and click Save.
Adding to all product pages
- In Shopify admin go to Online Store → Themes → Actions → Edit code.
- Open
Sections → main-product.liquid - Paste your Elfsight code where you want it to appear and click Save.
Widget vs Native Solutions
There’s more than one way to add customer reviews on Shopify — here’s how each method compares:
Shopify’s Built-In Product Reviews App
Shopify’s own Product Reviews app lets you collect and show customer reviews on any product page.
- Install the app. Find and add the Product Reviews app from the Shopify App Store.
- Add review blocks. Use Shopify’s theme editor to place review sections on product pages.
- Customize appearance. Adjust basic layout and colors in the app settings.
- Collect reviews. Customers submit reviews through a form displayed on your product pages.
- Moderate and publish. Approve or hide reviews from the app dashboard.
Design and display options are basic, so reviews may not fully match your website’s branding.
Full instructions are available in the Shopify’s help center.
Shopify’s Native Section or Block for Reviews
Shopify’s Online Store 2.0 themes allow you to add a default review block to product pages.
- Go to theme editor. Open your theme in Shopify’s Customize interface.
- Add a review block. Click “Add section” or “Add block,” then select the built-in reviews option.
- Place the block. Drag the review block to your preferred location on the page.
- Save your changes. Click Save to update your live website.
- Invite customers to review. Customers use the form to leave feedback on products they purchased.
This block does not support rich media, imports, or advanced moderation.
More details are available in the Shopify theme documentation.
Importing Reviews via CSV
Shopify allows you to import customer reviews using a CSV file, which can be managed through certain apps or Shopify’s built-in tools.
- Prepare your CSV file. Create a spreadsheet with review data in Shopify’s required format.
- Access the reviews app. Open the Product Reviews app or relevant native import menu.
- Upload the file. Select “Import” and upload your CSV.
- Verify imported content.Check that reviews display correctly on your product pages.
- Moderate as needed.Approve or edit imported reviews from your dashboard.
Importing reviews by CSV requires extra steps and does not allow for real-time collection or easy updates.
You can find more details in Shopify’s CSV import/export documentation.
How Do These Methods Compare?
| Method | Major Pro 👍 | Major Con 👎 |
|---|---|---|
| Elfsight Widget | Highly customizable with seamless design integration. | Requires a separate subscription outside Shopify’s app store. |
| Shopify Reviews App | Free and directly supported by Shopify. | Limited design choices and lacks rich media support. |
| Native Theme Review Block | Quick to add and easy to use in theme editor. | No advanced features like media uploads or analytics. |
| CSV Import | Useful for bulk adding historical reviews. | Manual and does not support ongoing, automated collection. |
📝 Insider Checklist: Make the Most of Your Widget Setup
From the Elfsight team’s experience helping thousands of users add reviews across different platforms, we’ve gathered that a few practical tweaks make all the difference. Here’s our go-to checklist for getting the most out of your Reviews Widget setup:
- Choose the right platforms to aggregate. Limit sources to those that matter most to your audience, such as Google, Yelp, Facebook, or Amazon, for focused credibility and faster widget load times.
- Make review details transparent. Always display the review author, profile photo, rating, and link to the source to build trust and show authenticity at a glance.
- Use filtering and sorting for relevance. Set up keyword or sentiment filters so only the most impactful, current, and relevant reviews show—avoid overwhelming visitors with outdated or off-topic feedback.
- Customize layout and colors for branding. Adjust widget colors, fonts, and card layouts to match your website design for a seamless, professional appearance.
- Encourage fresh feedback visibly. Place the “Write a review” button where users will notice it and link directly to your main business profiles to prompt action without confusion.
- Enable translation and localization. Activate multilingual interface options and set default locale so international visitors see reviews in their language for maximum reach.
- Test responsiveness on all devices. Preview the widget on mobile, tablet, and desktop to ensure reviews display clearly and buttons remain easily tappable.
To put it all together, let’s look at a real business using the All-in-One Reviews to display their customers’ feedback.
All-in-One Reviews at Work: Wales Outdoors
Wales Outdoors is a tourism business run by Andrew Lamb, offering guided hiking and adventure tours across Wales. The website uses 10+ Elfsight widgets to enhance engagement and trust. Among them, the All-in-One Reviews widget plays a central role — collecting and showcasing genuine client feedback from multiple platforms in one elegant feed.
Before using Elfsight
Managing and displaying customer reviews from different platforms was a hassle. Testimonials were scattered across Google, Facebook, and TripAdvisor, which made it difficult to highlight real customer experiences or build instant credibility with new visitors.
- Reviews spread across multiple sources
- No unified design or control over presentation
- Missed opportunities to use social proof for conversions
With the All-in-One Reviews Widget
“Elfsight has been a game changer with widgets that work, work well, and are visually attractive.”
Andrew Lamb, Wales Outdoors
Now, all reviews appear together in a unified, customizable feed powered by Elfsight’s All-in-One Reviews. Visitors can instantly see ratings and testimonials from trusted platforms — Google, Facebook, and TripAdvisor — all styled to match the site’s branding. This integration helps new customers feel confident when booking their next adventure.

Results
By embedding authentic customer feedback directly on the website, Andrew strengthened trust and reduced hesitation among potential clients. Visitors can browse verified reviews without leaving the page, helping to drive more inquiries and bookings. The consistent design also reinforces brand reliability and transparency.
Other widgets in use
Wales Outdoors also uses YouTube Gallery, AI Chatbot, Photo Gallery, and Store Locator. Together, these widgets create a seamless, trust-driven experience — from visual storytelling to customer support and booking.
The All-in-One Reviews widget turns scattered feedback into a powerful trust engine — helping tourism and service websites convert curious visitors into confident customers with authentic, automatically updated social proof.
This real-world example shows how All-in-One Reviews can centralize credibility, simplify reputation management, and support sales for businesses of all kinds. The following FAQ covers practical ways to get the most from your Reviews widget setup.
Common Widget Problems and How to Fix Them
A few common hiccups can happen along the way – here’s how to solve them fast. Check the most commonly asked questions about All-in-One Reviews widget from our community of users:
Why doesn’t my review widget show up after installation?
Why are reviews missing or not updating in the widget?
What should I do if reviews disappear after changing my Shopify theme?
How do I fix broken or misaligned widget layouts?
Why are widget buttons or pagination not working?
Got Questions or Ideas? Let’s Connect
We hope this guide helps you get the most out of the All-in-One Reviews widget on your Shopify store. To explore latest updates, request new features, or share insights with our team and other users – check out our lively Community Forum. Don’t hesitate to reach out to us on socials – LinkedIn, X, and Facebook – we’d love to hear what works for you!


