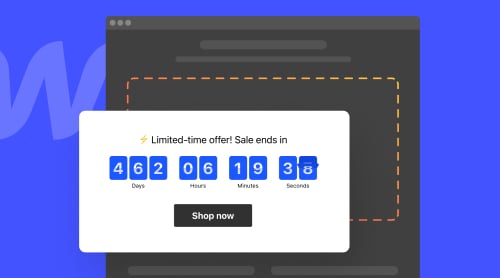
The Easy Way to Add Timer to Webflow: Use Custom Widget
Amidst the plethora of plugins available for various platforms, Elfsight has crafted an exceptional Countdown Timer tailored for your Webflow website, injecting a vibrant pulse into its functionalities. This widget is designed to amplify your audience’s anticipation for the events unfolding on your site. Imbedded seamlessly into your code, this widget generates a lively atmosphere while invoking a compelling sense of urgency. The ticking clock counting down beckons visitors to explore, engage, and seize the opportunities presented. We are going to focus on how to embed the Webflow Countdown Timer into your website.
The Elfsight Countdown Timer for Webflow is not just a free tool, but a hassle-free one as well. You don’t need to possess advanced IT skills to implement it and effortlessly integrate the finished widget into your Webflow pages. All you need to do to embed it to your website is to follow these easy steps:
- Integrate: Get started by acquiring the Elfsight Countdown Timer widget directly from our website.
- Customize: Navigate to your Webflow dashboard and pinpoint the ideal spot on your webpage to showcase the countdown timer. Craft a visually captivating layout with Webflow’s intuitive customization options.
- Embed: It’s a breeze! Copy the provided code snippet from Elfsight.
- Witness: Preview your masterpiece, and when satisfied, hit the publish button to let your Webflow website come alive with the dynamic countdown timer.
Boost your Webflow site and watch conversions soar as the countdown begins!
The Detailed Tutorial: How to Embed Countdown Clock to Webflow
Elevating your Webflow website with the Elfsight Countdown Timer is a breeze, even for those with basic web skills. With an intuitive online editor at your fingertips, you can effortlessly craft a custom widget that seamlessly fits your Webflow needs and elevates your website’s visual appeal.
Ready to dive in? Follow along with our user-friendly tutorial video below for a straightforward guide on getting the countdown clock ticking on your Webflow site. It’s the easy way to infuse urgency and enhance your Webflow website with the power of the countdown!
Ready to transform your online presence and engage your audience with captivating timers? Let’s explore the straightforward path to infusing your site with dynamic countdowns with further instructions.
Add Countdown Widget to a Specific Page of Your Webflow Website
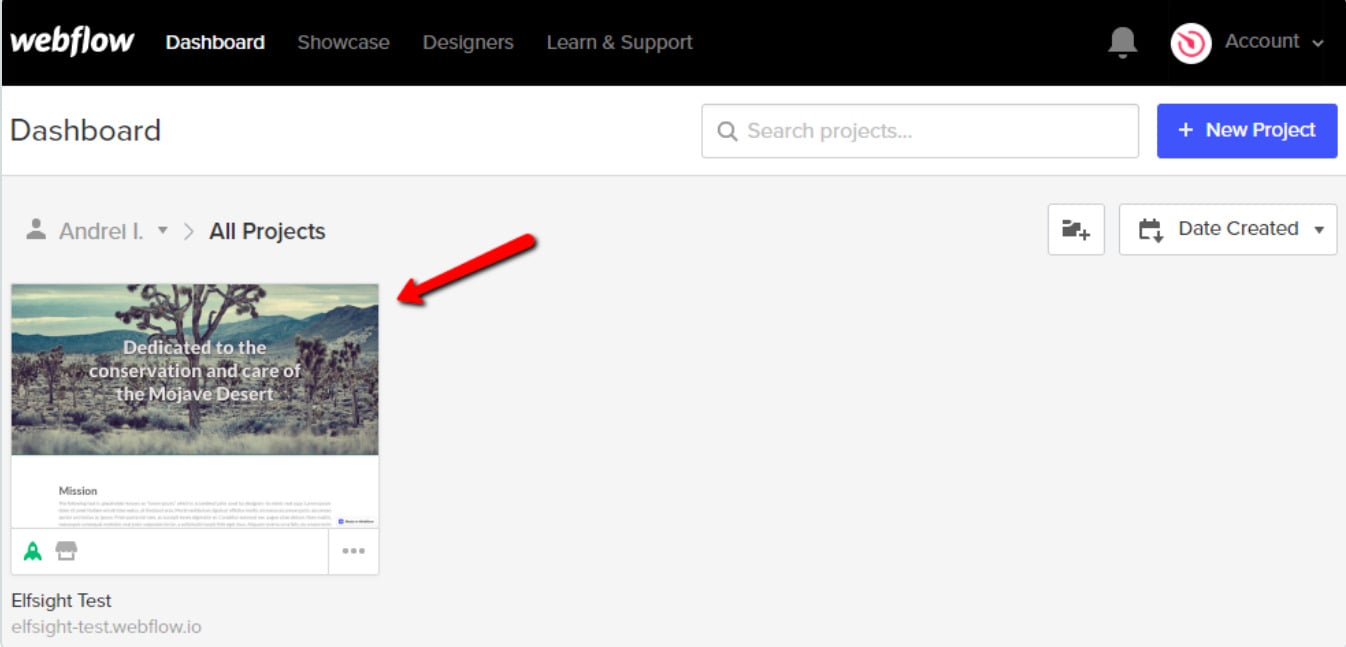
Below are the steps you need to follow if you want to embed Countdown clock widget to some specific page of your website:
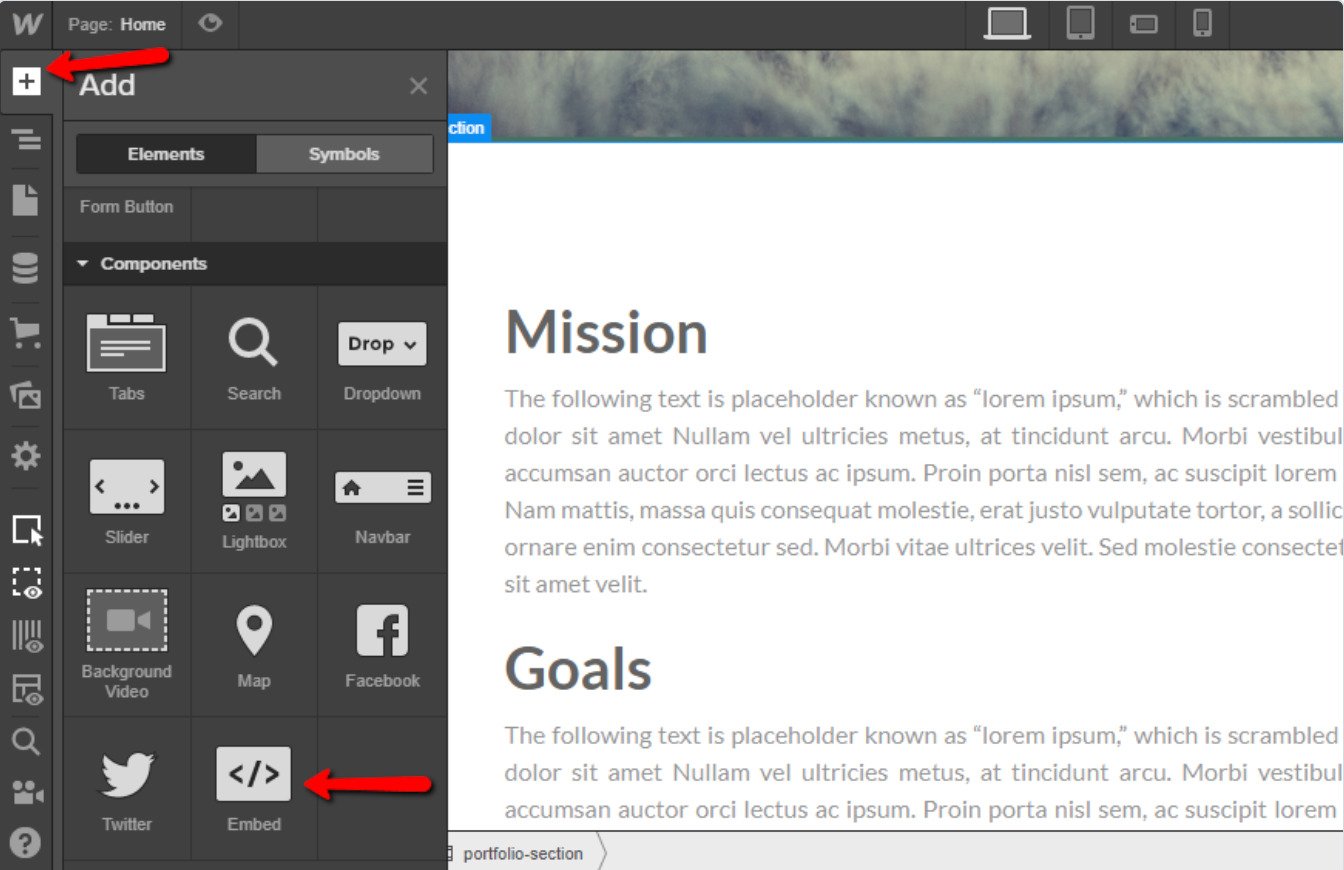
2. Embed the Widget: To add the widget, navigate to the Webflow editor. Click the Plus icon and effortlessly drag and drop the Embed element from the menu on the left to the exact spot where you want your countdown to shine.
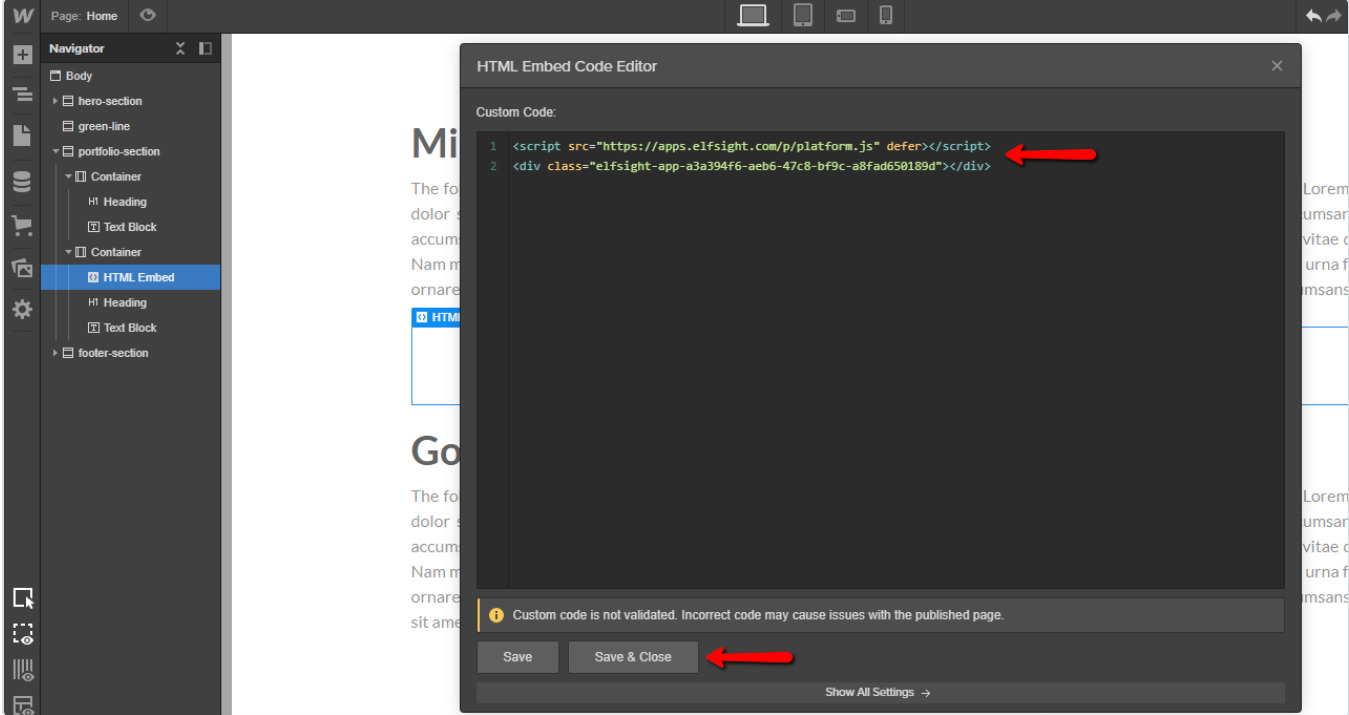
3. Insert the Code: Paste the installation code into the HTML Embed Code Editor window that pops up. Click “Save & Close.”
4. Customize and Publish: Fine-tune your countdown timer’s settings in the right-hand menu, then hit “Publish” and select the domains where you want it to go live.
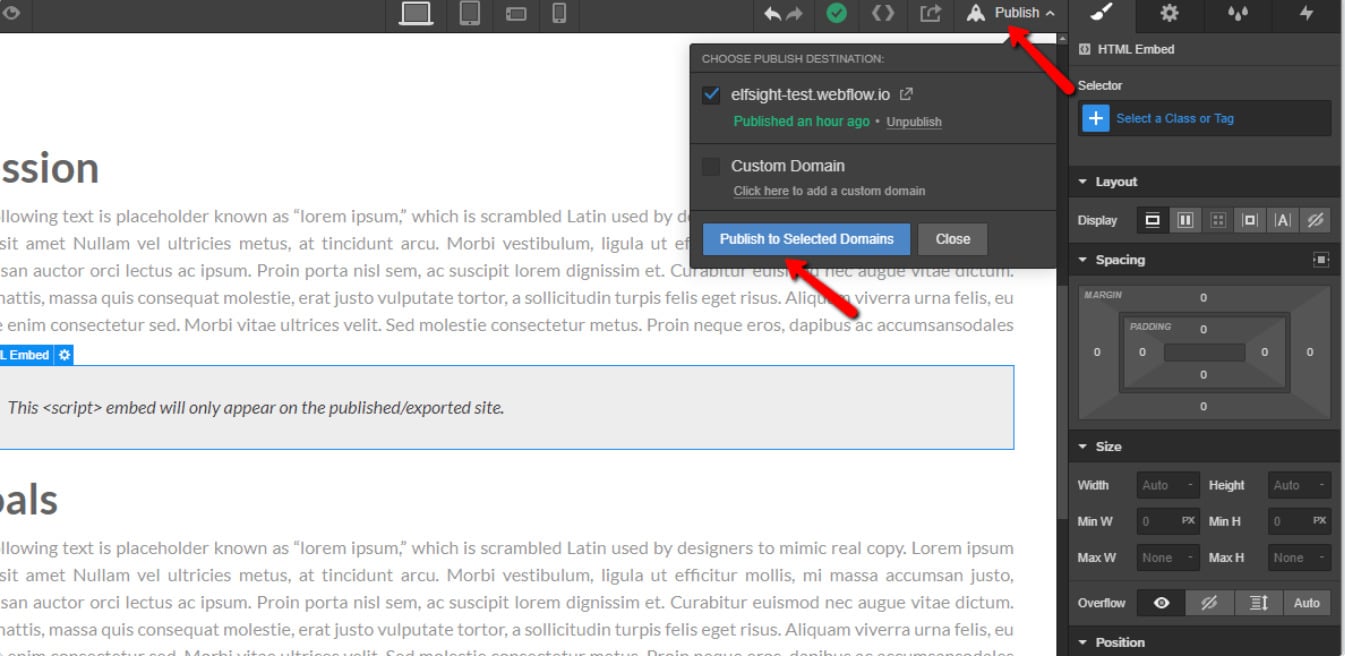
That’s it! Your Webflow website now boasts a dynamic countdown widget, effortlessly added with just a few clicks.
Add Countdown Widget to All Your Webflow Website Pages
And below are the steps you need to follow in order to add Countdown Timer to all pages of your Webflow website:
- Step 1: Access Your Webflow Website Settings. Begin by logging into your Webflow account and navigating to the settings of your desired website.
- Step 2: Embed the Timer Widget. Now, it’s time to infuse that countdown magic into your site. Head over to ‘Custom Code,’ where you’ll paste the installation code provided by your chosen countdown timer widget. Then, simply click ‘Save Changes.’
- Step 3: Share the Excitement. With the countdown timer integrated into your website, it’s time to let the world see it. Click ‘Publish’ and then select ‘Publish to Selected Domains.’
And there you have it! You’ve seamlessly added the countdown timer to all pages of your Webflow website.
Elevate Your Webflow Site with the Power of Countdown Timer: Usage Examples
Seamlessly integrated into your Webflow platform, dynamic Countdown offers a host of remarkable functions, enabling you to craft compelling countdown experiences that will leave a lasting impression on your visitors. Let’s dive into the essential features that make Webflow’s countdown timer the top choice for enhancing your site.
| Main Advantages | Description |
| User-Friendly Webflow Integration | Embrace the intuitive interface of Webflow’s custom countdown timer app, enabling both tech-savvy and non-technical users to effortlessly design and configure captivating timers. Crafting engaging countdowns to captivate visitors is now hassle-free, requiring no coding expertise. |
| Flexible Timer Design Options | Unleash your creativity with Webflow’s custom countdown timer app, offering an array of design choices that seamlessly blend with your website’s aesthetics. Select from a diverse range of templates, fonts, colors, and animations to create visually stunning timers that align with your brand identity. |
| Precise Audience Targeting | Harness advanced targeting capabilities with Webflow’s custom countdown timer app. Effortlessly tailor triggers like exit intent, scroll depth, or time delay to ensure your timers appear at the perfect moment, maximizing conversion opportunities and engaging the right audience. |
| Seamless Webflow Integration | Experience seamless integration with Webflow, the leading web design platform, and elevate your online presence’s potential. Whether you’re using Webflow’s native features or exploring the possibilities with custom apps, Webflow’s custom countdown timer app seamlessly complements your setup. |
| Insightful Analytics and Reporting | Gain valuable insights into your timer performance with Webflow’s custom countdown timer app. Explore comprehensive analytics and reporting features, monitoring critical metrics like impressions, clicks, and conversion rates to optimize your timer campaigns effectively and make data-driven decisions. |
Explore Webflow Countdown Timer Customization
Discover the incredible world of countdown timers with Webflow. In this tutorial, we’ll guide you through the easy and custom way to get countdown timers on your website. Whether you’re managing a personal blog or a booming online store, you’ll find that adding these timers can be a game-changer.
Webflow’s countdown timer feature provides an array of options to tailor your timers precisely to your website’s design. Say goodbye to a static website and usher in dynamic, engaging countdowns that captivate your audience. Join us as we explore the versatility of Webflow’s countdown timer – the easy way to elevate your website.
Countdown Timer 1: Exclusive Discount Alert

Capture your visitors’ attention with a compelling countdown timer gracing your Webflow website, showcasing exclusive offers and time-limited discounts. As the seconds steadily tick away, a sense of anticipation builds, urging users to seize this unique opportunity. When the countdown reaches its zenith, reinforce the urgency with a personalized message that compels immediate action.
Countdown Timer 2: Festive Sales Boost

Infuse the holiday spirit into your sales strategy by incorporating a festive-themed top banner adorned with a countdown timer on your Webflow website. This subtly effective timer keeps the ongoing sale prominently in mind for your visitors as they explore your captivating content. It gracefully accompanies users during their scroll, ensuring maximum visibility and sustained engagement. Embed Webflow Countdown Timer to create festive mood.
Countdown Timer 3: Exclusive Offer Alert Bar

Announce exclusive coupons and special deals with an enticing countdown timer housed in a floating bottom bar that gracefully appears on every page of your Webflow site. The timer, complemented by a personalized message, entices visitors to act promptly before time slips away. Accessing the coupon page is just a click away, making this offer both effortless and compelling.
Countdown Timer 4: Personalized Urgency

Craft a tailored countdown timer for each visitor, presenting a special bonus within a limited timeframe. This personalized touch injects a sense of urgency, prompting immediate action. Easily configure the timer’s duration and unleash your creativity by experimenting with diverse color schemes and predefined styles to captivate each user uniquely.
Countdown Timer 5: Event Countdown Widget

Drive anticipation and engagement by prominently featuring a countdown timer on your Webflow website, promoting upcoming events, contests, or special occasions. Customize the timer to count down the days until the event commences, building excitement among your audience. Elevate the timer’s functionality with a registration button or a link to event details, encouraging active participation.
Countdown Timer 6: Limited-Time Shipping Incentive

Boost sales and expedite purchases by showcasing a fixed top banner equipped with a countdown timer. This banner entices shoppers with a special incentive, counting down a brief window for them to seize the opportunity. Whether it’s free shipping or an exclusive gift, the banner’s interactivity engages users and inspires swift action.
Countdown Timer 7: Wedding Day Anticipation

Celebrate the upcoming joyous occasion of your wedding by adorning your Webflow website with a delightful countdown timer. This charming timer serves as a heartwarming reminder, keeping your guests eagerly anticipating the big day. Customize the timer to match your wedding theme and sprinkle in some emotive emojis within the message text for an extra touch of emotional charm.
Elevate your Webflow website’s engagement and conversions with these imaginative countdown timer solutions. It’s the effortless and captivating way to ensure every moment counts for your valued visitors.
Why Your Webflow Website Needs Countdown Timer
Capturing and retaining the attention of website visitors is a challenge that every online business faces. Enter the Countdown Timer widget – a dynamic and engaging tool that can transform the way your website interacts with its audience. Below we’ll discuss why it is extremely important not to ignore the Countdown Timer.
A Game-Changer for Your Webflow Website
Picture this: you’ve worked tirelessly to create a stunning website on the Webflow platform. Your content is top-notch, your products are irresistible, and your services are unmatched. But how do you ensure that your visitors stay engaged, make purchases, or sign up for your newsletter? The answer lies in the strategic use of Countdown Timers.
Countdown to Conversions
Studies show that a well-placed countdown timer can significantly boost website conversions. In fact, a recent survey revealed that websites that incorporated countdown timers saw a whopping 35% increase in user engagement. That’s more than a third of your visitors taking a closer look at what you have to offer! Benefit from new conversions embedding Webflow Countdown Timer.
Webflow’s Custom Timer Solution
But it’s not just about any countdown clock; it’s about finding the right timer for your website. With Webflow, you can easily get a custom timer that seamlessly fits your site’s aesthetics. No coding expertise is required; Webflow offers an intuitive way to enhance user interaction.
Creating Urgency and FOMO
Countdown timers tap into the psychology of urgency and the fear of missing out (FOMO). When visitors see a timer ticking down, whether it’s signaling a limited-time discount, an upcoming event, or the end of a special offer, they’re more likely to take action. It’s a proven way to nudge your audience toward that “Add to Cart” or “Sign Up Now” button.
Countdown Timers: Beyond Sales
But Countdown Timers aren’t just for boosting sales. They’re versatile tools that can be used in various creative ways. Think about promoting an upcoming webinar, a product launch, or even a website anniversary celebration as another reason to embed Webflow Countdown Timer. The possibilities are endless, and the engagement is priceless.
Conclusion
Incorporating a dynamic countdown timer into your Webflow website can yield a plethora of benefits. By harnessing the power of Webflow’s Countdown Timer widget, you can infuse your site with a sense of urgency, elevate user engagement, and drive meaningful action. This strategic addition provides a clear and visually compelling indicator for time-sensitive events, promotions, or product launches, equipping your visitors to make informed choices.The automation offered by this widget streamlines the countdown process, ensuring precise timekeeping and minimizing potential errors. This convenience not only enhances customer satisfaction but also holds the potential to bolster retention rates. Furthermore, the urgency it fosters has the capacity to attract new customers, ultimately translating into increased revenue.
Beyond its functional advantages, integrating the Webflow Countdown Timer enhances your website’s overall appeal and interactivity, creating a more seamless user experience that aligns harmoniously with your brand identity. Whether you manage an e-commerce platform or a diverse business website, this widget is a versatile and valuable addition.
Should you require further guidance on leveraging the Webflow Countdown Timer widget, you have several resources at your disposal:
- Customer Support: For any lingering inquiries or assistance, our dedicated support team is readily available. Alternatively, you can refer to the comprehensive articles in our Help Center for detailed guidance.
- Community Engagement: Join our thriving community of Webflow users to exchange insights, share ideas, and explore the myriad possibilities that our Countdown Timer widget offers. Collaboration and innovation await in our forums.
Incorporating this dynamic countdown timer into your Webflow website is not just a functional enhancement; it’s a strategic move to enhance user engagement, create a sense of urgency, and drive conversions. Now you are empowerd with knowledge on how to embed Countdown Timer into your website. Elevate your website today with this user-friendly and highly effective tool.


