What Is a Countdown Timer Generator?
An HTML countdown timer generator is a simple way to create a live ticking clock that shows the remaining time until a specific event or deadline on your website. It’s a visual interactive element that keeps your visitors informed, engaged, and ready for the moment you’re counting down to.
If you’re planning a product launch countdown or just want to boost urgency and user interaction, this is exactly what you need. A Countdown Timer widget can be added in minutes, looks great on any page, and works with zero coding skills required.
- Create urgency that drives action. Countdown timers trigger a sense of limited time, which encourages users to act faster — great for promotions or signups.
- Keep visitors informed about key dates. Whether you’re launching a new product or revealing something big, a timer helps set clear expectations.
- Increase time spent on your page. A ticking timer draws the eye and keeps users focused, boosting engagement and attention.
- Fit any website design with ease. Timers are fully customizable to match your brand’s look and feel.
Now that you know what a timer generator is, let’s walk through how to use it create a helpful widget for your website.
Make a Countdown Timer in Seconds
With Elfsight’s counter solution, you don’t need to write a single line of code or worry about complicated setup — just follow these steps to get your countdown up and running in under a minute.
- Open the Elfsight editor and choose a countdown timer template that fits your goal.
- Set the date and time for your countdown, then adjust layout and other settings.
- Customize the widget’s design to match your branding.
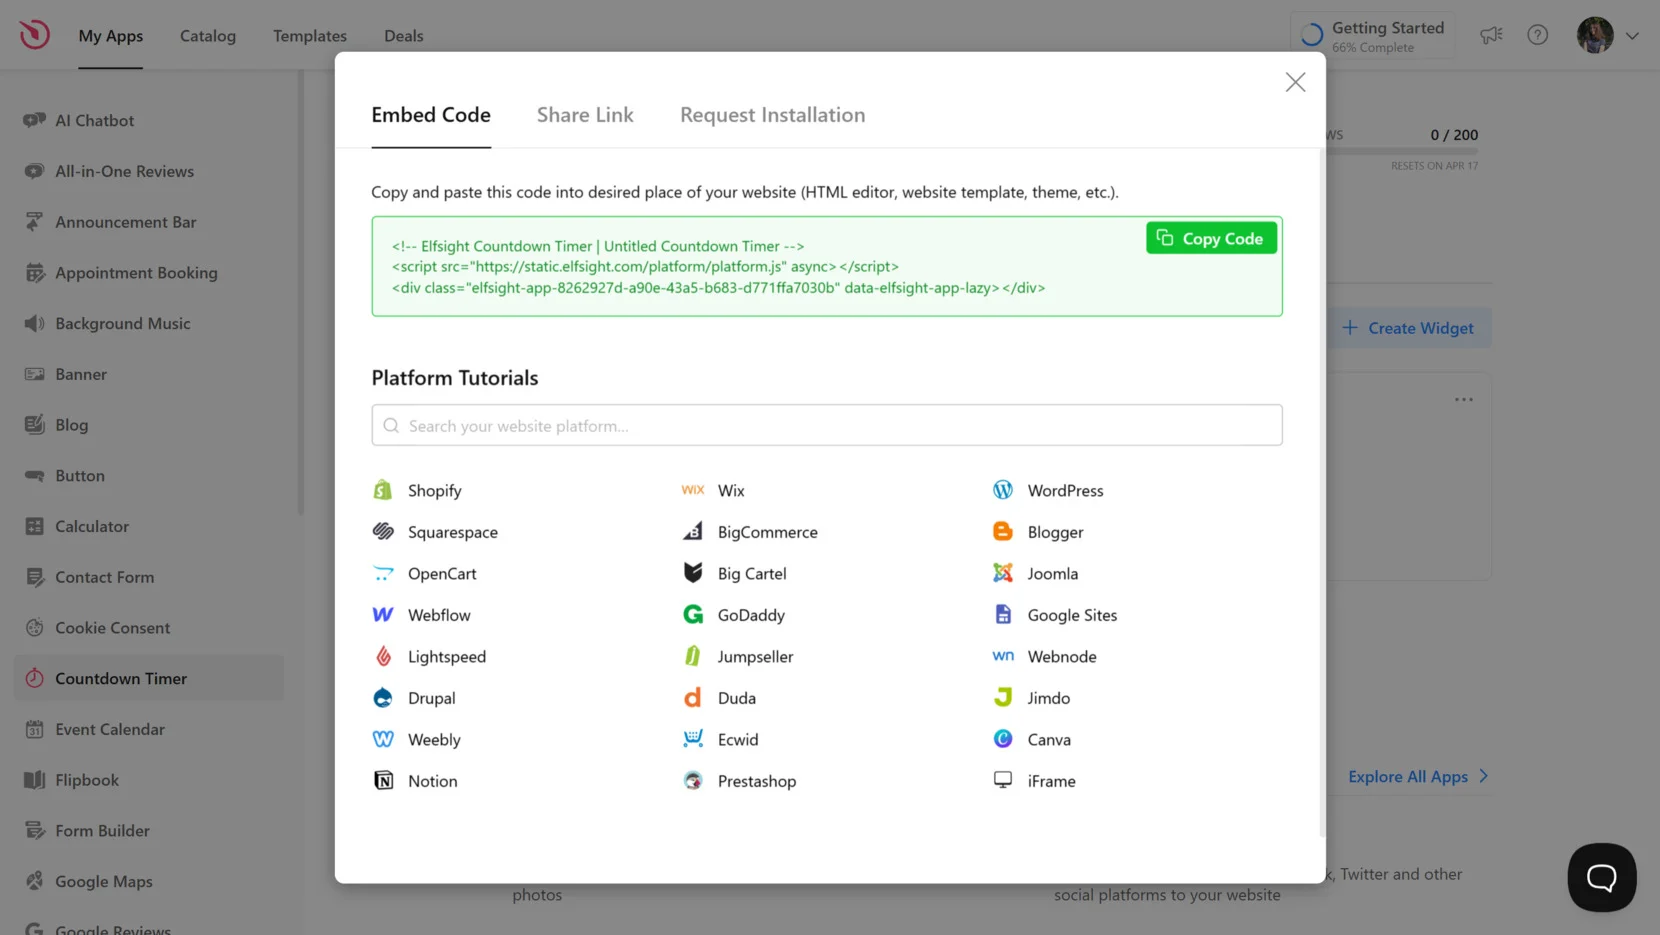
- Click “Add to website for free“, copy the code, and paste it into your website’s backend.
See the widget in action – build your Countdown Timer in seconds!
Features of Elfsight’s Countdown Timer
After seeing how simple it is to build your timer, let’s look at what makes Elfsight’s countdown widget stand out. From flexible styling to real-time ticking elements, it’s designed to give you full control over how the countdown looks and functions on your website.
- Multiple timer types for different goals. Choose between start-to-finish countdowns, recurring timers, and timers that end at a specific date and time.
- Custom styling with no coding. Easily change colors, fonts, spacing, and layout to fit the visual style of your website using intuitive controls.
- Auto-restart and loop modes. Keep engagement high with timers that reset automatically — ideal for daily deals, repeating events, or rolling offers.
- Urgency-driven actions. Use a call-to-action button that appears when time runs out to drive conversions or trigger next steps.
- Mobile-ready and responsive. Your countdown adapts to every screen size and device, with flawless real-time ticking visuals.
- Seamless HTML embedding. Get a clean embed code that drops into any HTML block without interfering with your website’s design.
With these features in place, you’ll have a powerful and flexible countdown ready to deploy. Next, let’s walk through the full step-by-step guide for creating and embedding your widget.
How to Set Up Your Countdown Timer
Elfsight makes it easy to build a professional counter widget that looks great and works smoothly on any website. In just a few steps, you can customize the layout, set your timing logic, and publish a fully functional countdown in minutes. Below is a detailed walkthrough of how to generate and install your widget using the Elfsight editor.
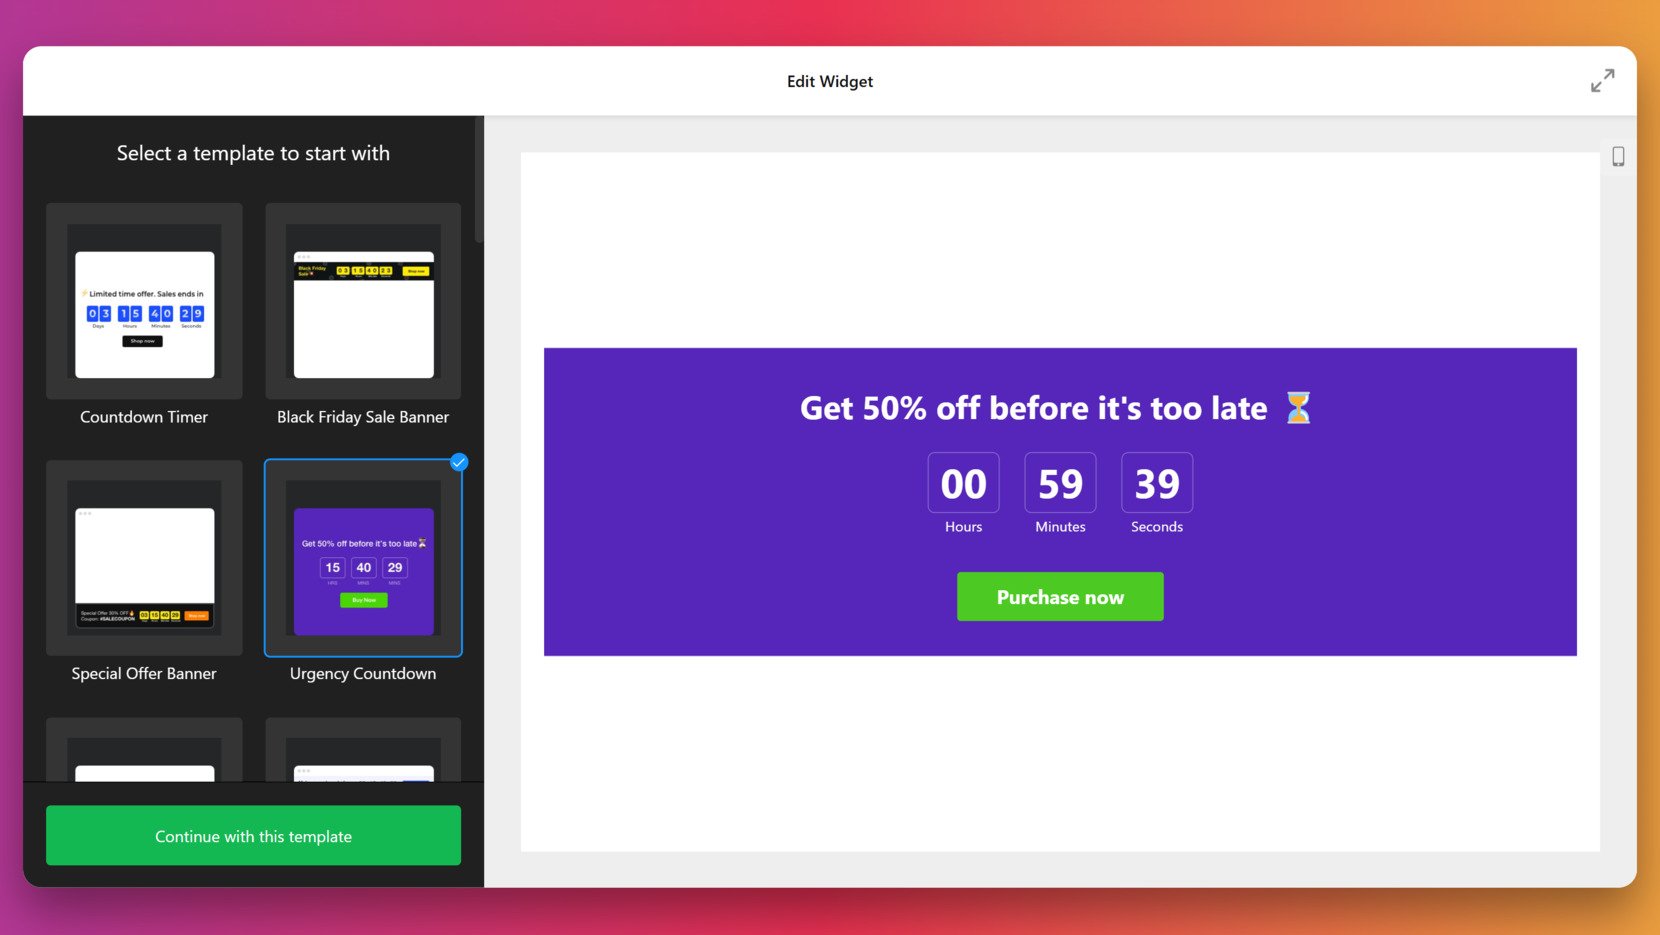
- Select a template to start. Open the editor and browse the available layouts. Choose a template that fits your campaign — like an urgency banner, Black Friday offer, or standard countdown — and click “Continue with this template”.
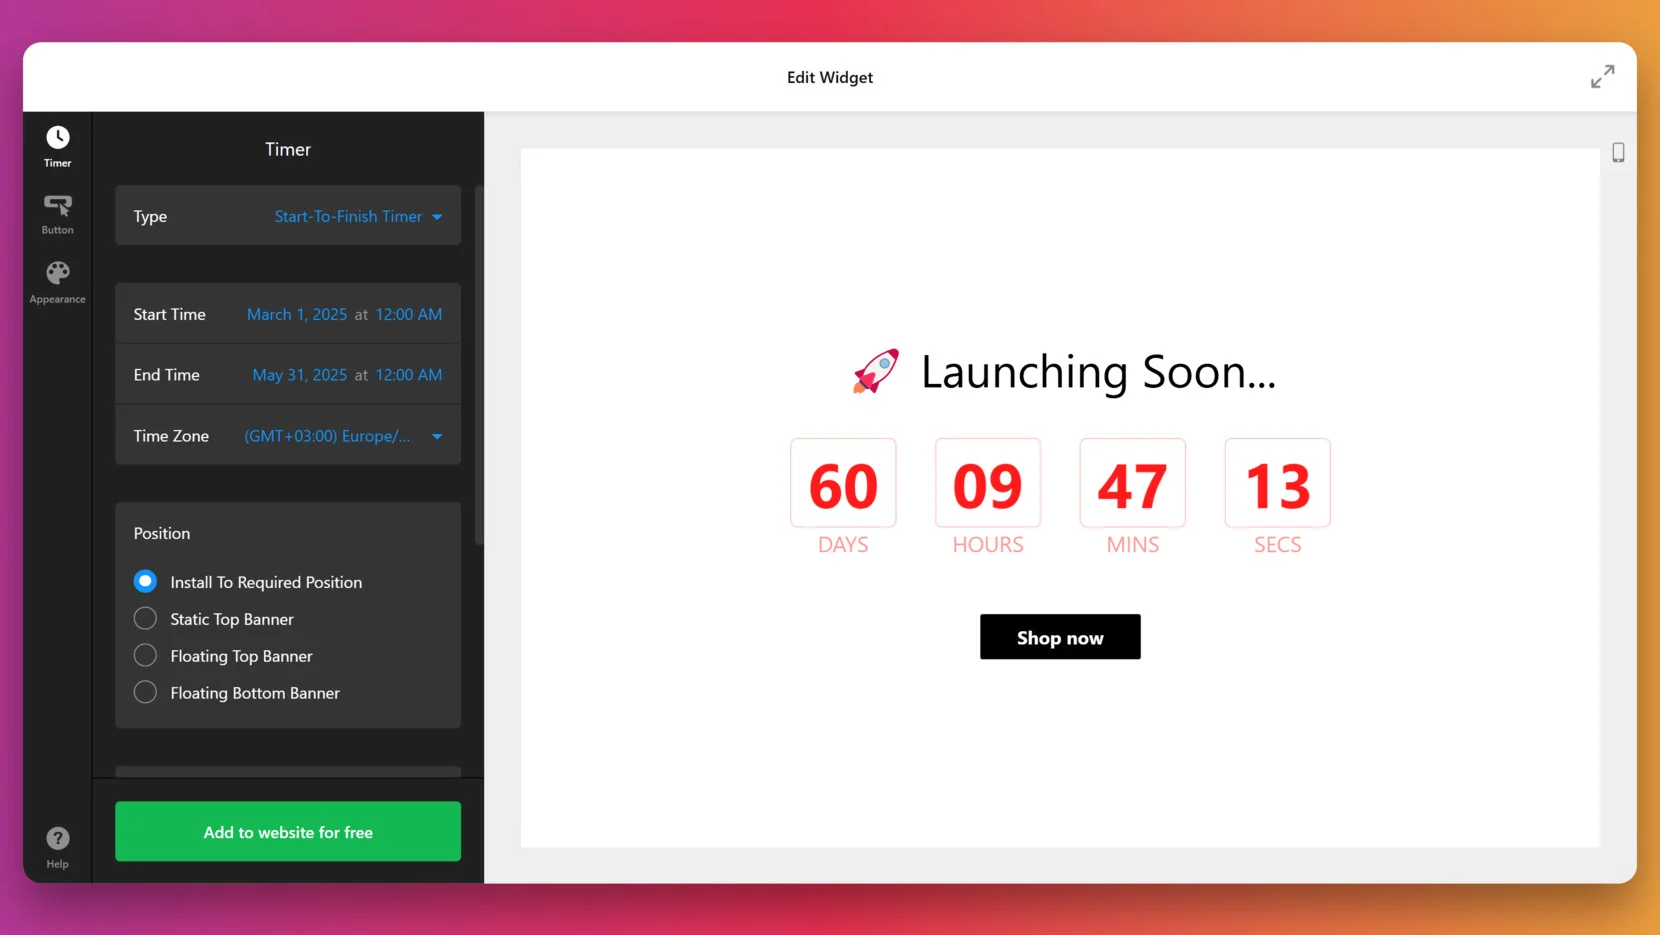
- Set your timer logic and position. In the “Timer” section, select the type of countdown (e.g., Start-To-Finish). Define the start and end time, choose the correct time zone, and decide on placement like embedded, static banner, or floating position.
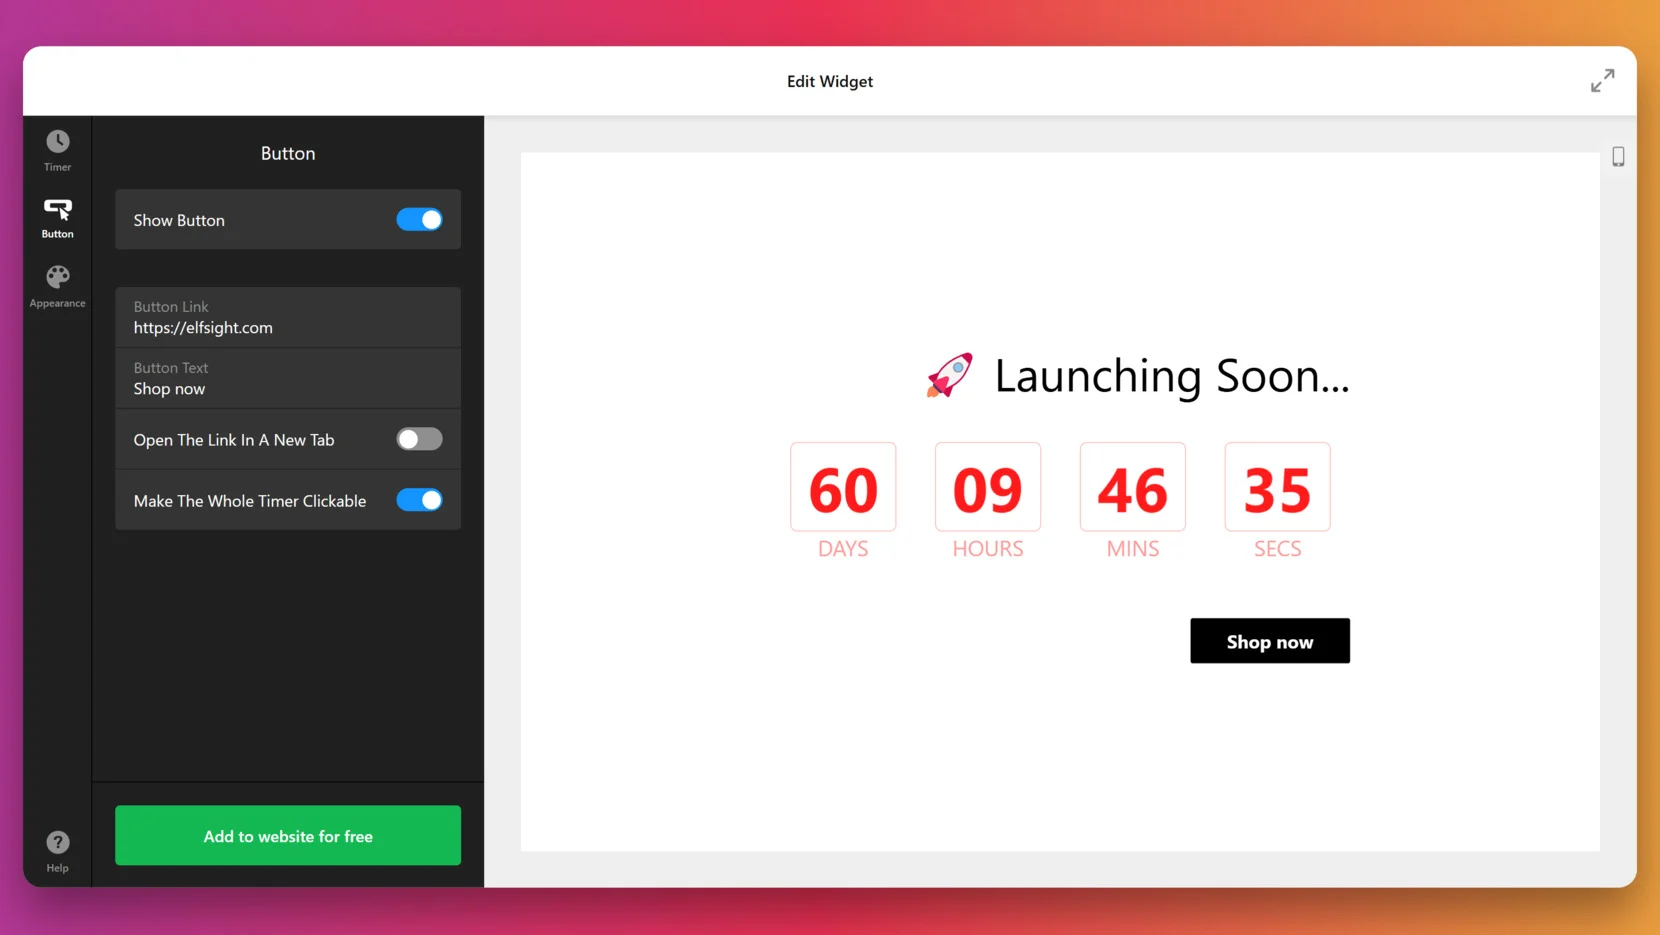
- Customize the call-to-action button. Go to the “Button” tab to enable a clickable button on your timer. Enter the button text and link URL, toggle whether it opens in a new tab, and decide if the full timer should be clickable.
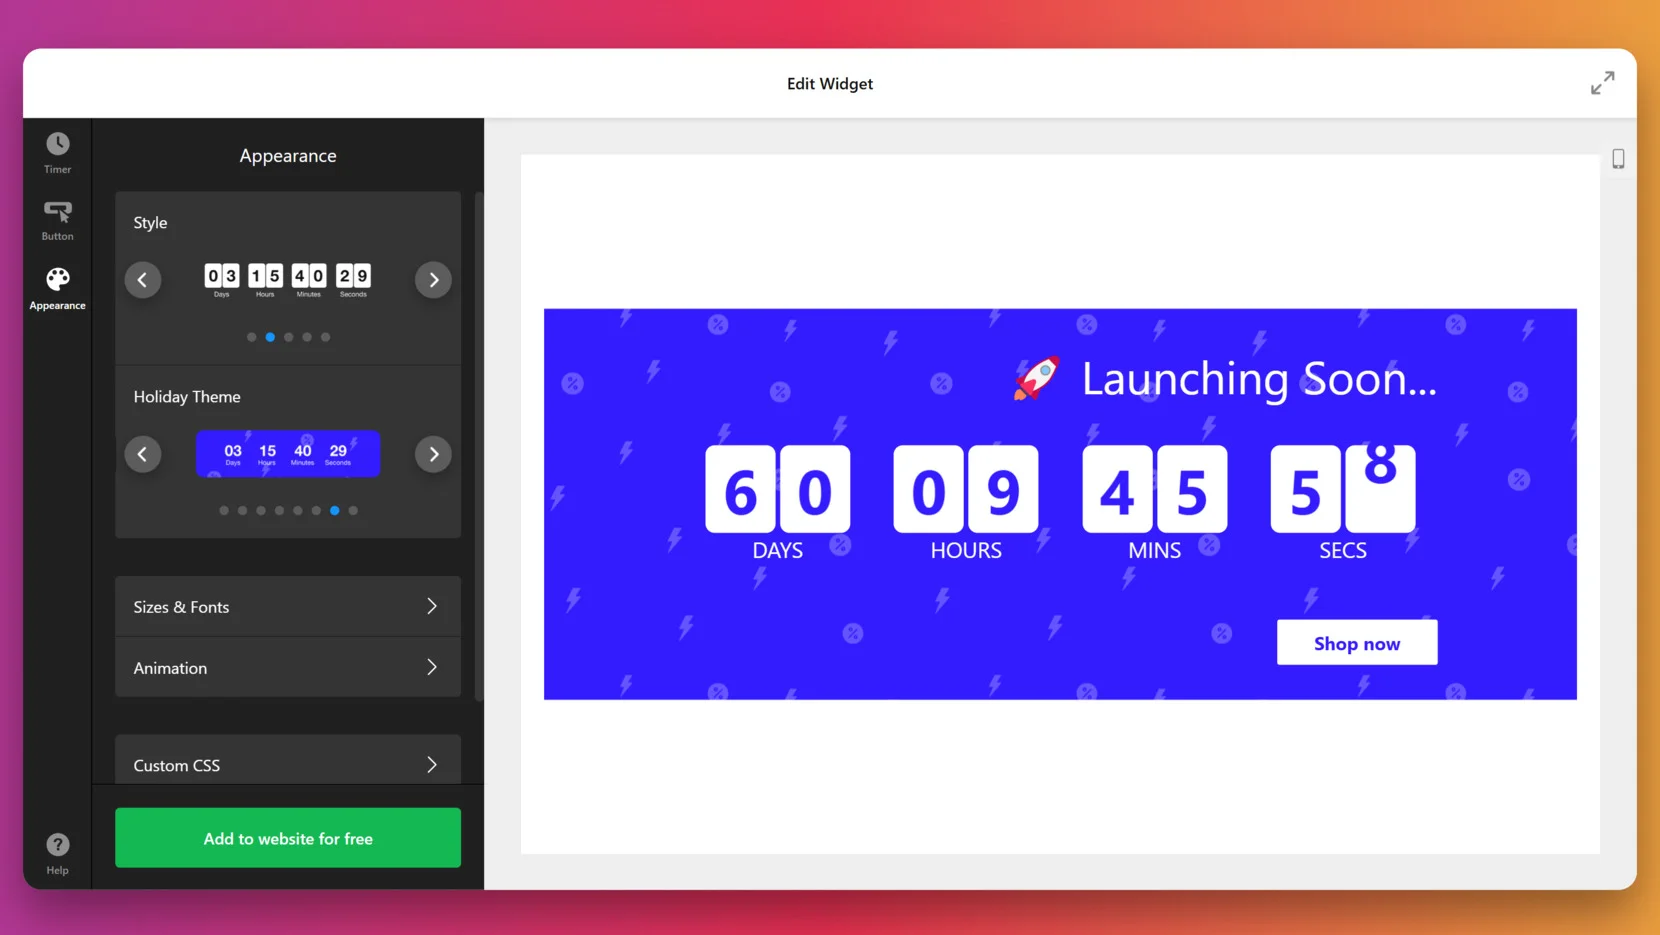
- Design your widget’s appearance. Under “Appearance”, adjust the layout style, holiday theme, font, background, animation effects, and any custom CSS. This ensures your countdown aligns with your website’s design.
- Copy and embed the widget code. Once everything is set, click “Add to website for free” and copy the generated countdown timer HTML code. Paste it into an HTML block or custom code section on your website and save the changes.
That’s it! With these steps, your countdown will be up and running — optimized for performance, responsiveness, and conversions.
Where and How to Embed the Website Timer
Once you’ve customized your countdown widget, the next step is to embed it directly into your website. This can be done using a simple HTML snippet or by placing it within your platform’s code block or integration panel.
Below are the key ways to embed the countdown timer across different environments.
- Raw HTML integration: Copy the full embed code from Elfsight and paste it into an HTML block in your website editor. This method works best if you’re using a custom-coded website or platforms that support manual code editing.
- WordPress: Open the page or post editor, add a “Custom HTML” block, and paste the timer code inside. For Elementor users, use the “HTML” widget to embed it into your layout.
- Webflow: In the Webflow Designer, drag an “Embed” element onto the canvas and insert the code. Save and publish to make the timer live.
- Squarespace: Use the “Code” content block and insert the timer code there. Make sure to place it in a section where it won’t be overridden by custom styling.
- Shopify: Navigate to “Online Store” → “Pages” or “Themes”, then edit the HTML of your page or theme file. Paste the embed code where you want the countdown to appear.
- BigCommerce: Go to the “Storefront” → “Web Pages” or “Theme Files”, locate the area where the timer should appear, and paste your code snippet into the HTML section.
To maximize visibility and effectiveness, consider where you place the timer on your website. The best pages include:
- Homepage banners. Grab attention immediately with a bold countdown for sales or upcoming launches.
- Landing pages. Create urgency on promotional or sign-up pages to increase conversions.
- Checkout pages. Use timers to encourage faster purchases with time-sensitive discounts.
- Product pages. Highlight limited-time availability or seasonal offers next to key product information.
- Popups and floating bars. Display countdowns as floating or sticky elements to keep them visible while users scroll.
Regardless of the platform you’re using, the embed process is quick and code-friendly.
Writing Countdown Timer HTML Code
If you’d like to build your own countdown timer manually, you can do it using a combination of HTML for structure, CSS for styling, and JavaScript for functionality. Below is a step-by-step instruction for creating a basic countdown counter that dynamically counts down to a future date.
- Create the HTML structure. Add a simple container with <span> elements to hold the countdown values:
<div id="countdown"> <span id="days"></span>d <span id="hours"></span>h <span id="minutes"></span>m <span id="seconds"></span>s </div> - Write the JavaScript logic. Use JavaScript to calculate the time difference between the current moment and your target date:
<script> const countdown = () => { const endDate = new Date("2025-12-31T23:59:59").getTime(); const now = new Date().getTime(); const distance = endDate - now; const days = Math.floor(distance / (1000 * 60 * 60 * 24)); const hours = Math.floor((distance / (1000 * 60 * 60)) % 24); const minutes = Math.floor((distance / 1000 / 60) % 60); const seconds = Math.floor((distance / 1000) % 60); document.getElementById("days").innerText = days; document.getElementById("hours").innerText = hours; document.getElementById("minutes").innerText = minutes; document.getElementById("seconds").innerText = seconds; }; setInterval(countdown, 1000); </script> - Apply basic CSS (optional). Style your timer to make it more visually appealing:
<style> #countdown { font-family: Arial, sans-serif; font-size: 24px; font-weight: bold; } #countdown span { margin-right: 10px; } </style>
If writing JavaScript feels overwhelming or you need to add countdowns to several pages fast, a generator with ready-made templates is a much better choice — no coding, no technical setup required. Curious why it’s the smarter approach? Let’s break it down in the next section.
Why Use a Generator Instead of Code?
After embedding your Countdown Timer widget, you might wonder whether it’s better to build it manually or use a generator. Here’s why choosing a visual tool like Elfsight is a more efficient and reliable option compared to writing countdown code by hand.
- Much faster setup with zero coding. A generator lets you create a fully functional HTML timer in minutes — no scripting, no debugging, just point, click, and publish.
- Fewer technical errors and misfires. Manual countdown code often leads to typos, broken logic, or display bugs. Generators eliminate that risk by giving you a tested, ready-to-use embed.
- Consistent design every time. A generator ensures your countdown matches your brand without needing CSS adjustments or theme overrides.
- Mobile-optimized by default. Generators produce responsive code that scales across devices — no extra tweaks needed for smartphones or tablets.
- Live previews and instant updates. You can test changes in real time, so there’s no need to reload your website every time you update the countdown clock code.
- Maintenance-free deployment. Once installed, the widget updates automatically — you won’t need to reapply changes every time your timer expires or settings change.
When it comes to building and managing a website counter, a visual generator removes the guesswork and keeps your workflow smooth. But even with a seamless setup, you might face minor issues — let’s take a look at common countdown embed problems and how to fix them fast.
Quick Fixes for Embed Issues
After you’ve generated and embedded your countdown widget, you might run into a few common issues — especially related to display, styling, or functionality. Below are the most frequent problems users face when working with countdown timer HTML code, along with easy solutions to get everything working properly.
Why isn’t the countdown timer showing after I paste the code?
Why does the timer look broken or out of place on mobile?
The timer loads slowly or only appears after scrolling. Why?
Can I display multiple timers on one page?
Fixing these common issues ensures your event countdown timer performs as expected across all devices.
Final Thoughts
Using an HTML countdown timer generator like Elfsight gives you an effortless way to add real-time urgency to your website. Whether you’re launching a new product, running a limited-time offer, or simply creating anticipation, a counter widget helps you deliver clear messaging with minimal setup and maximum impact.
From fully customizable design to fast embedding and reliable performance across all devices, this solution makes it easy to align your countdown with your brand and content strategy. Instead of writing complex countdown timer code, you get a flexible, reusable element that keeps your promotions consistent and visually effective.
Need More Help?
We hope this guide gave you everything you need to build a powerful countdown widget for your website. If you’d like more guidance, feel free to reach out to us — we’re here to help make your experience as smooth as possible. At Elfsight, we’re dedicated to offering no-code widgets that help your business grow and thrive.
Want to share your ideas? Join our Community to connect with other users, or suggest new features directly on our Wishlist — we’d love to hear from you.


