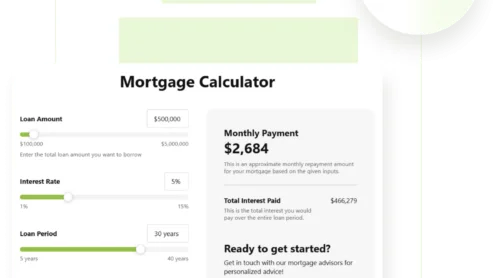
An interactive lead generation calculator is a dynamic tool embedded on your website that helps visitors estimate outcomes — such as potential savings, ROI, or service costs — based on their input. It simplifies complex calculations and provides immediate value, making it an effective way to attract and engage potential customers.
If you’re looking for a solution that not only captures attention but also converts interest into action, a website calculator is exactly what you need. It speaks directly to user intent, delivers real-time results, and serves as a silent yet powerful customer acquisition engine.
- Boosts engagement instantly. Interactive elements keep users on the page longer and encourage them to explore your offer more deeply.
- Qualifies leads automatically. By collecting specific input data, you can filter serious prospects from casual visitors without manual effort.
- Visualizes customer outcomes. Users can see potential savings, benefits, or ROI — driving informed and faster decision-making.
- Optimizes your conversion funnel. A well-placed calculator smoothly guides visitors through the funnel, from awareness to action.
- Collects valuable lead data. You gain insight into what customers need, enabling smarter sales and marketing follow-ups.
Now that you know how a calculator supports customer acquisition and streamlines your conversion funnel analysis, let’s look at how you can create one quickly using Elfsight.
How to Quickly Set Up a Web Calculator
Creating a lead gen calculator for websites is a fast and effective way to start collecting qualified leads with zero development time. Elfsight offers an intuitive visual editor, letting you build and launch your own interactive calculator in just a few steps — no tech skills needed.
- Open the Elfsight editor and select a ready-made calculator template that fits your needs.
- Customize input fields and logic based on the type of leads you want to capture.
- Adjust layout, colors, typography, and spacing to match your website’s design.
- Click “Add to website for free“, then copy the code and paste it into your website’s backend.
This setup lets you deliver real-time results to visitors while gathering critical lead data in the background. It’s a simple upgrade with high impact — perfect for service providers, consultants, and ecommerce businesses alike.
See the widget in action – build your own lead calculator with our easy editor!
Why Choose Elfsight: Best Features
Now that you know how easy it is to build a calculator, let’s take a closer look at why Elfsight is a standout choice. It offers a combination of flexibility, customization, and lead generation functionality — perfect for businesses looking to maximize results without technical overhead.
Here are the main features and benefits that make Elfsight’s calculator widget a smart addition to your website:
- Pre-built templates for every use case. Save time with ready-to-go templates for pricing, ROI, cost estimation, and lead scoring — customizable in minutes.
- Conditional logic support. Show or hide questions based on user input to keep the experience relevant and streamlined.
- Custom formulas and calculations. Build complex logic with ease using built-in math operations tailored to your business model.
- Lead capture integration. Collect user data directly through the calculator and send it to your email or CRM for quick follow-up.
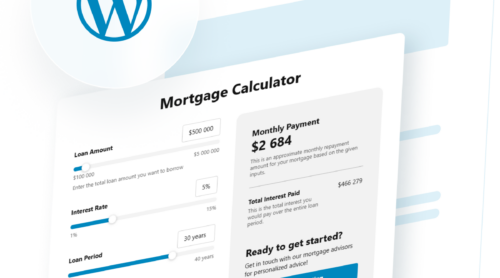
- Seamless embedding options. Add the widget to any platform using a single code snippet — compatible with HTML, WordPress, Shopify, and more.
- Fully customizable design. Adjust colors, fonts, layouts, and input styles to match your branding with no coding required.
- Mobile-friendly and fast-loading. Optimized for speed and responsiveness across all screen sizes to ensure smooth user experience.
With these capabilities, Elfsight helps you launch a functional and conversion-focused calculator in no time. Now let’s go through a detailed walkthrough of how to build and publish one on your website.
Create an Interactive Calculator: Step-by-Step
Now that you’ve explored Elfsight’s features, it’s time to build your own interactive calculator for lead capture. Below is a step-by-step guide based on the actual widget interface, showing you how to go from template selection to website installation — ideal for creating a value estimator with no coding involved.
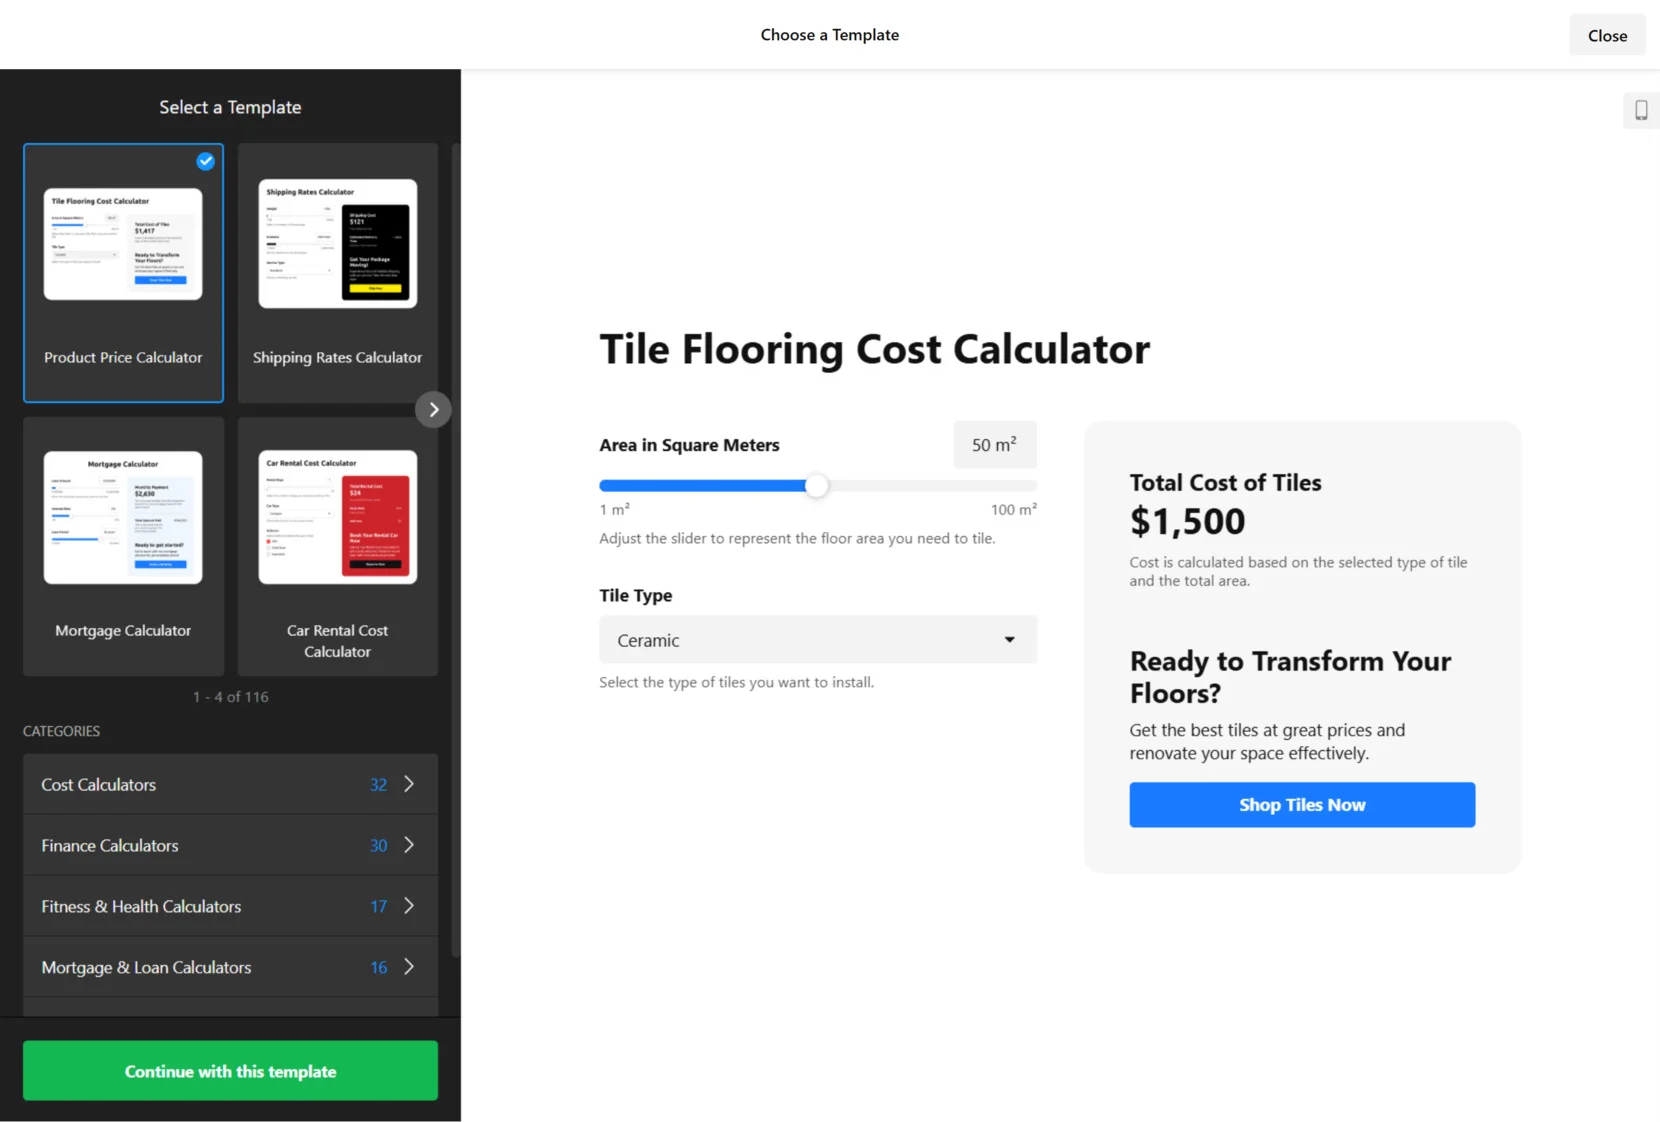
- Select a Template. Start by opening the Elfsight calculator editor. Browse through 100+ templates or search by category like cost, finance, or ROI. Choose the one that best fits your business use case (e.g., product pricing or shipping calculator) and click “Continue with this template”.

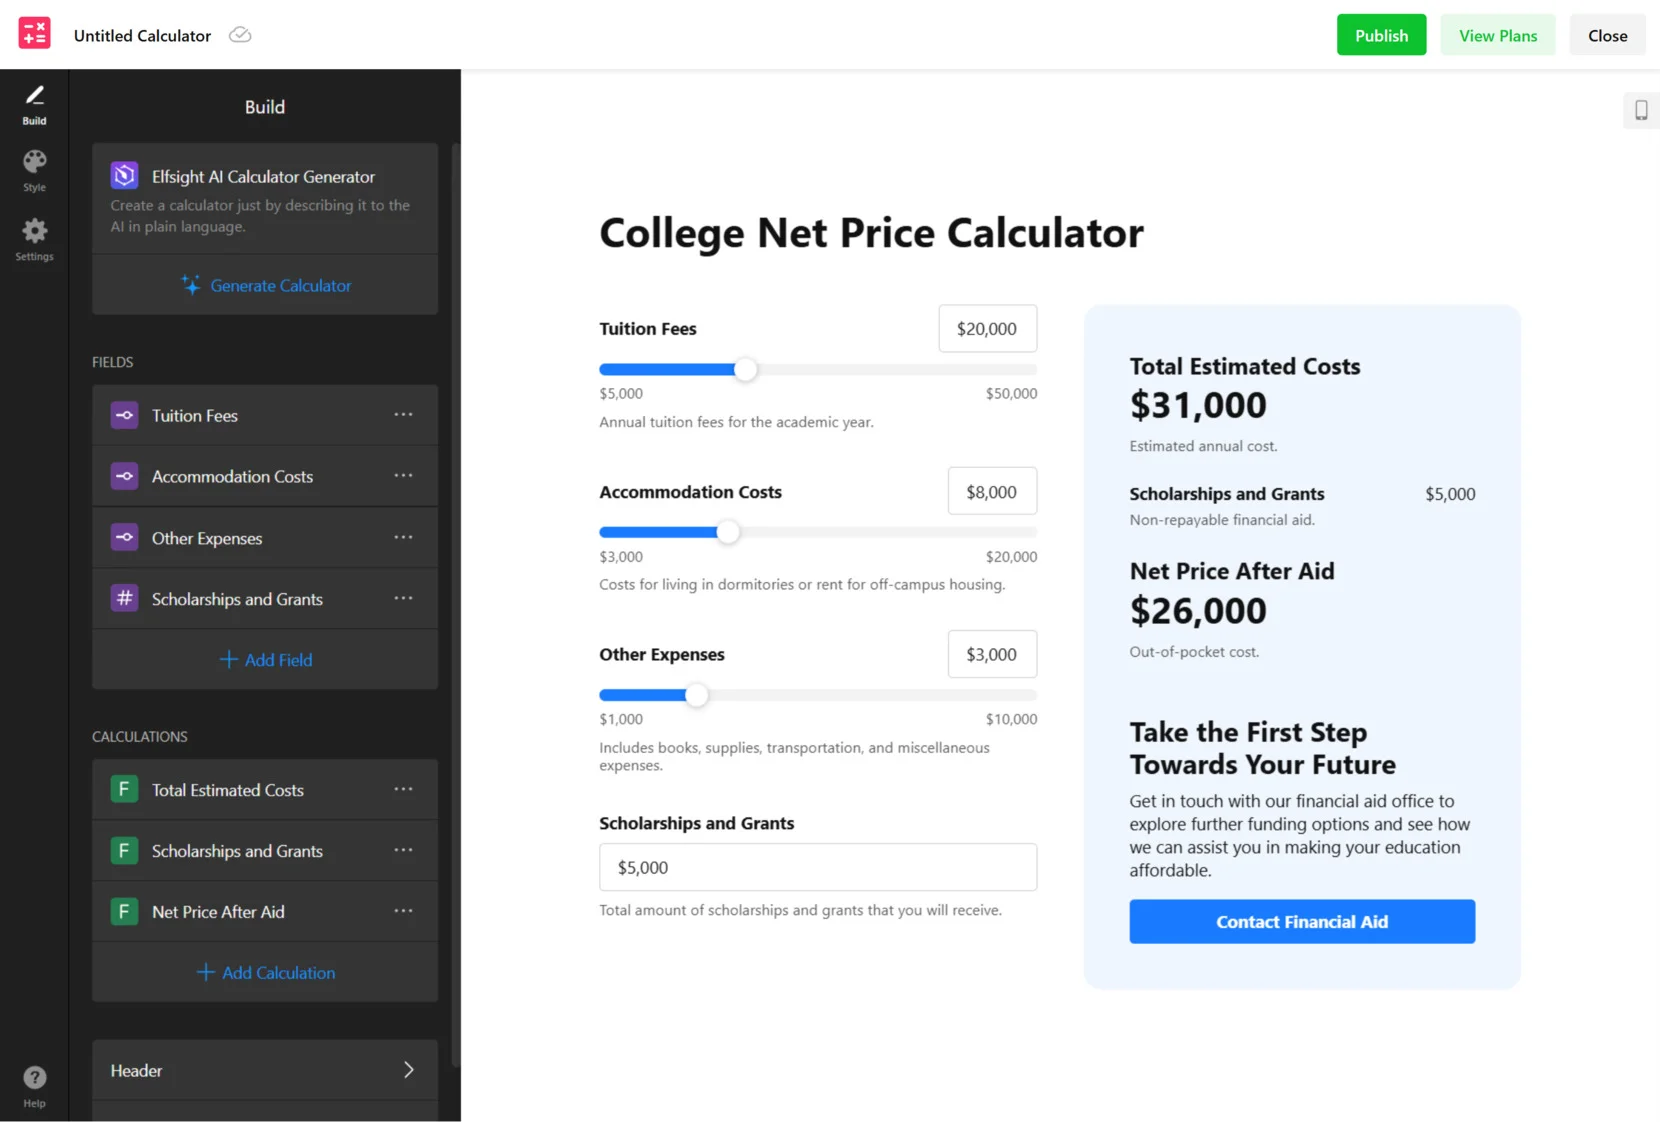
- Build Your Calculator. Use the drag-and-drop interface in the “Build” section to add fields like sliders, dropdowns, and input boxes. Configure labels and values to reflect your service or product details. You can also use the AI Generator to build the structure by describing it in plain language.
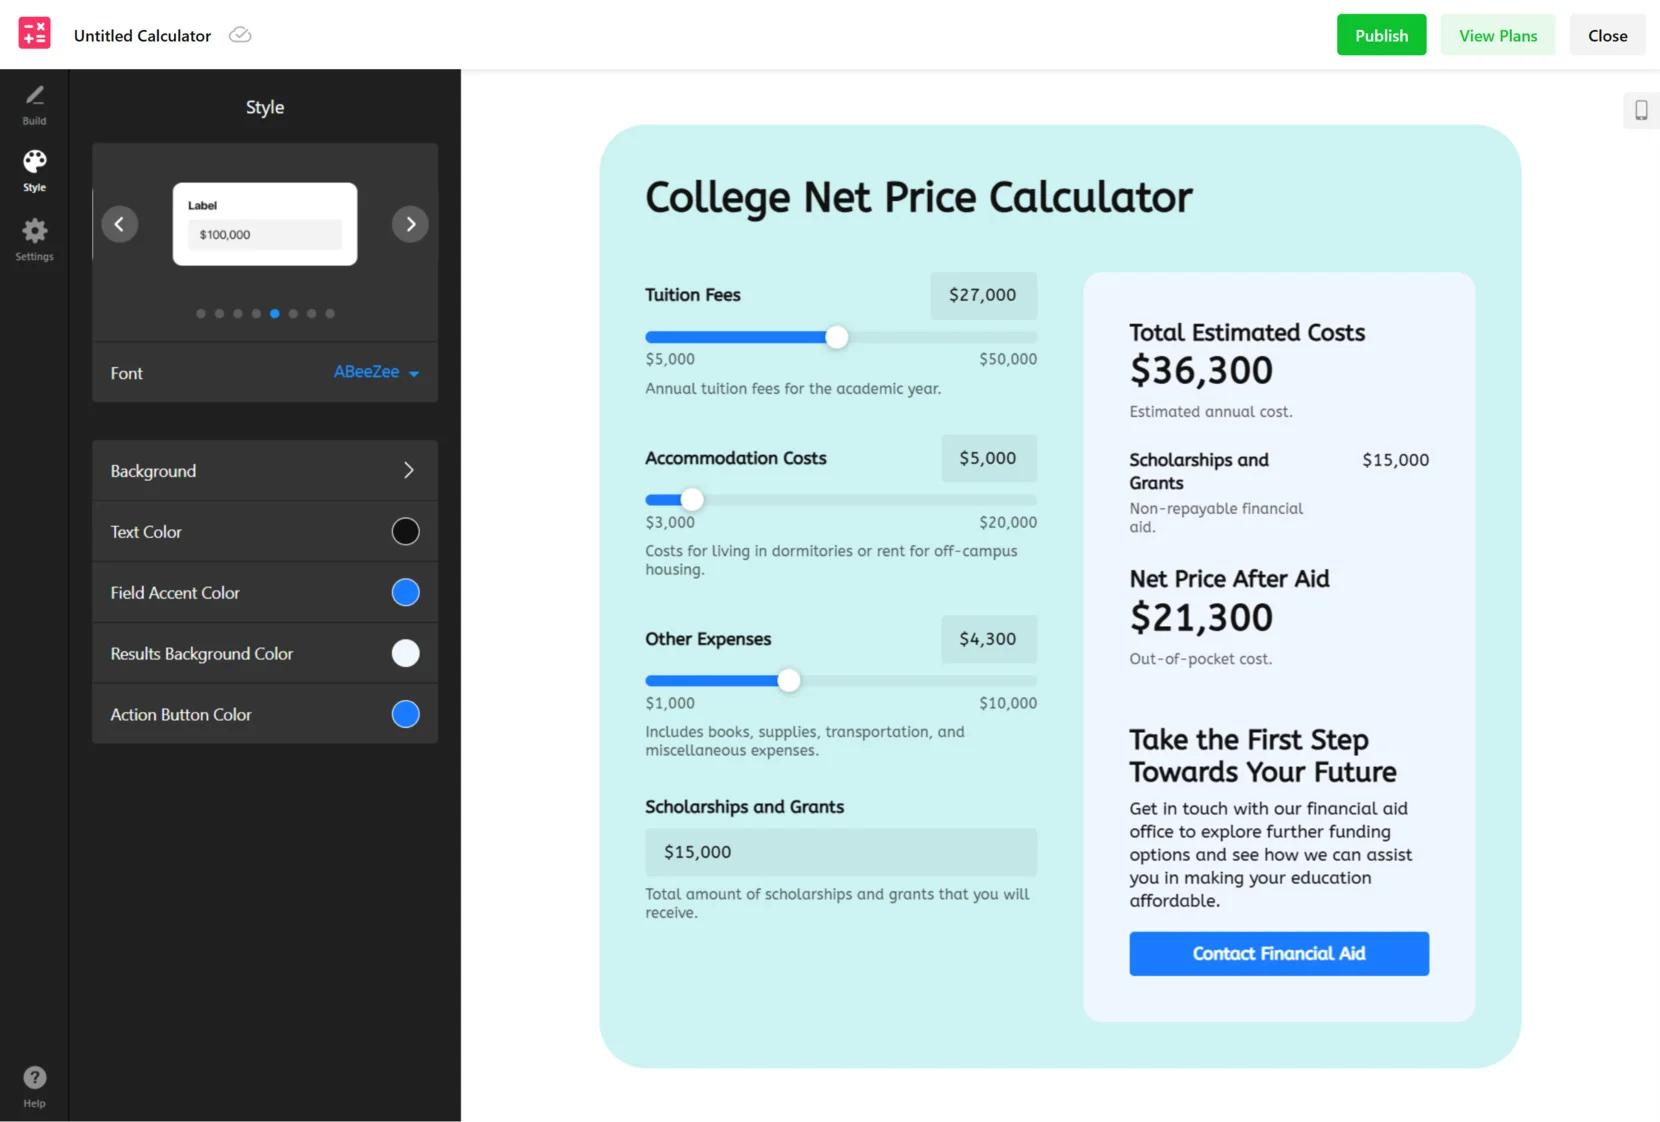
- Style the Calculator. Go to the “Style” tab to fine-tune your calculator’s look. Choose background colors, font types, button styles, and adjust layout spacing. You can match it with your branding to ensure visual consistency across your website.
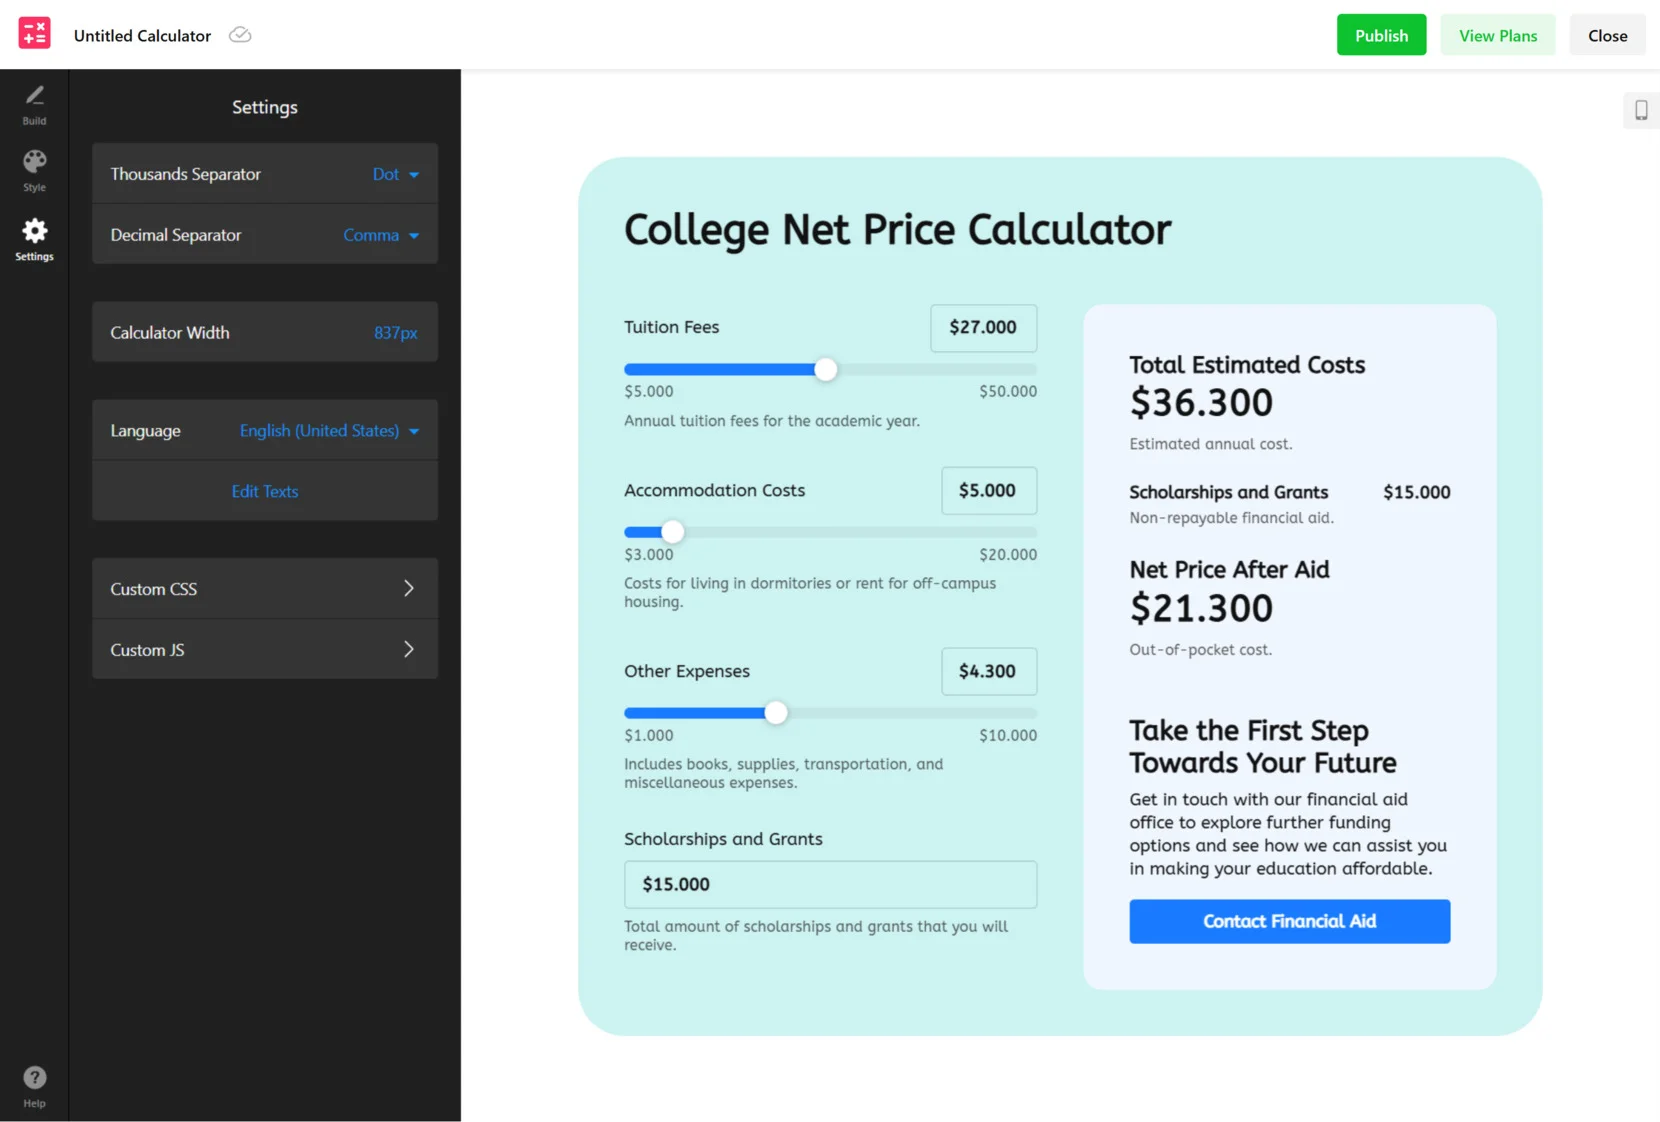
- Set Up Display and Interaction. Head to the “Settings” tab to control number formatting, adjust the widget’s width, and pick the display language. You can also edit field titles or embed custom scripts to enhance the calculator’s behavior.
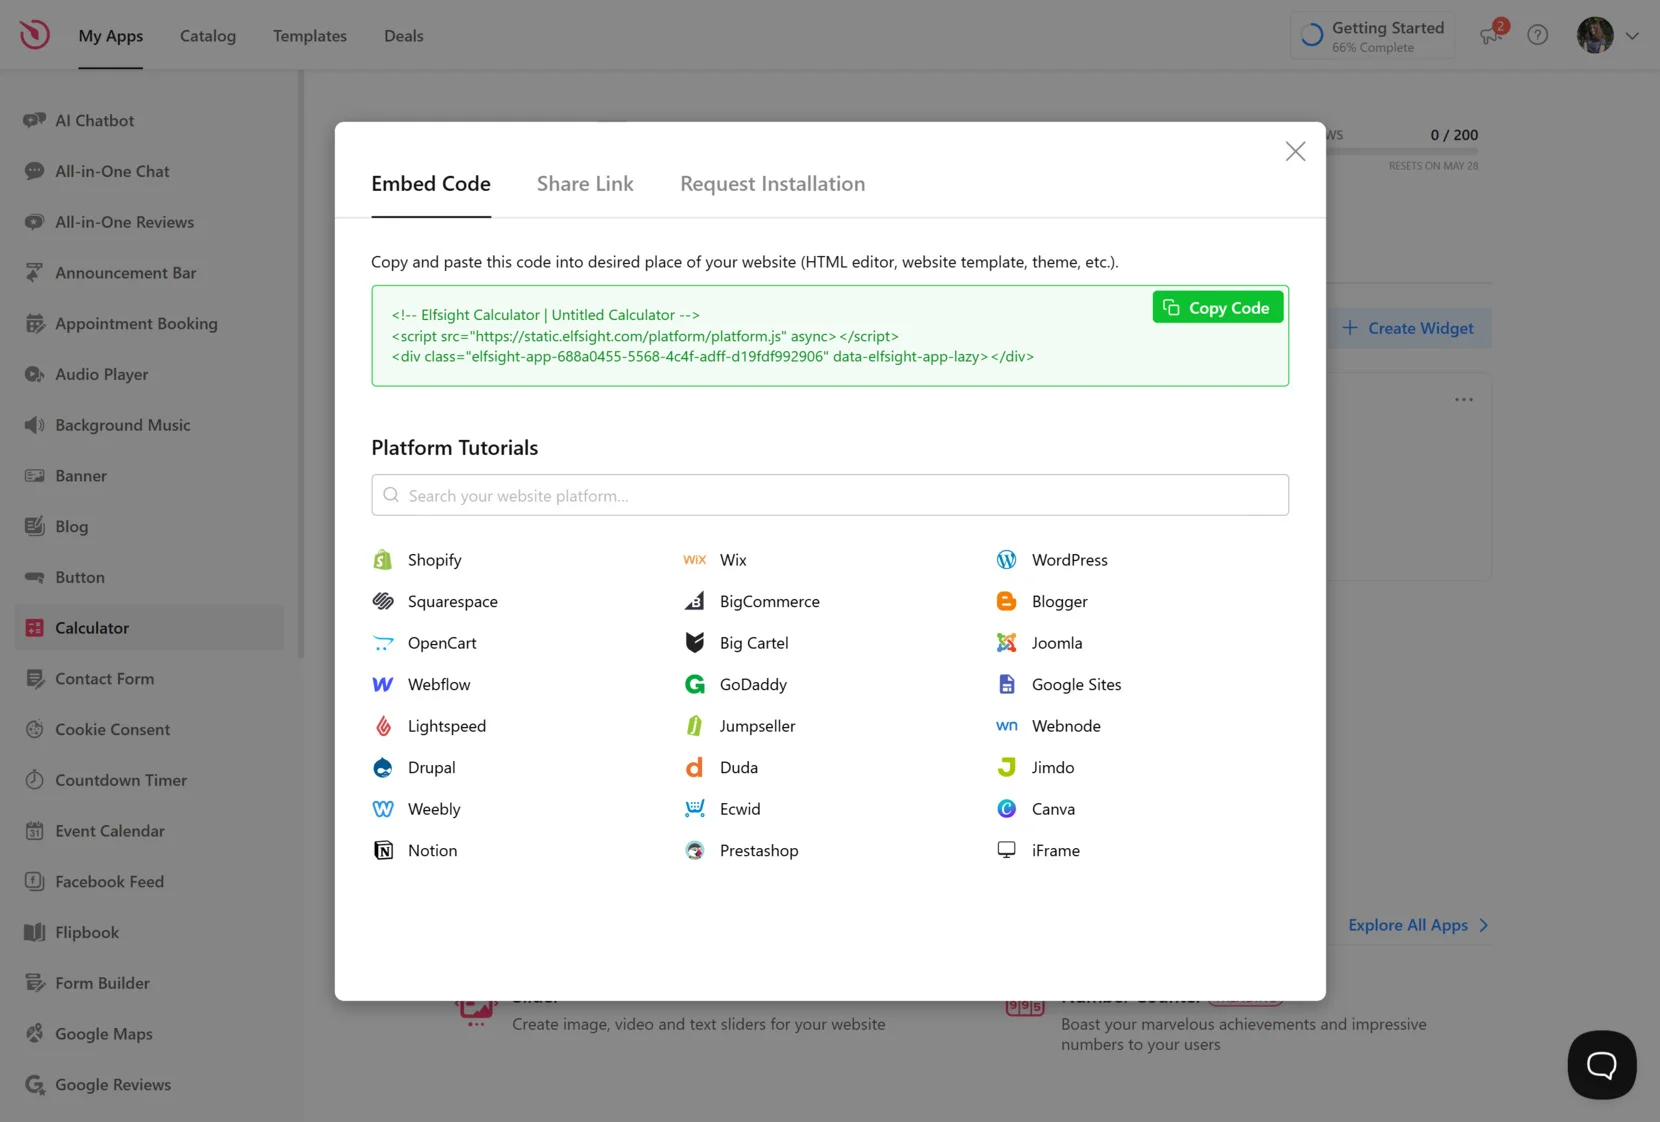
- Publish and Embed. Once ready, click “Add to website for free”. Copy the auto-generated embed code, go to your website builder or CMS, and paste the code into the HTML section where you want the widget to appear. Elfsight supports platforms like WordPress, Webflow, Shopify, and many others.
Each step is designed to help you deliver real-time value to visitors, capture data efficiently, and streamline decision-making — all without touching a single line of code.
Next, we’ll take a quick look at alternative ways to add similar calculators using other platforms or methods, in case you’re comparing solutions or working with custom-built websites.
Other Ways to Add a Calculator to a Website
While Elfsight is the fastest and easiest way to launch a lead generation calculator, there are other ways to implement similar functionality on your website. These methods include using tools like Google Sheets for spreadsheet-based logic or building a fully custom calculator with HTML and JavaScript. Each offers different levels of flexibility, control, and technical complexity depending on your needs.
Embed a Google Sheets Calculator
This approach works well for businesses already using spreadsheets for calculations like ROI, conversion estimates, or service cost breakdowns. It allows you to publish your sheet as a live calculator by using the built-in embed function. While the interface isn’t interactive in the modern UX sense, it’s highly practical and quick to implement for internal use or external presentation.
- Create your calculator in Google Sheets. Enter the variables your audience will input, such as number of leads, average deal size, or conversion rate. Use built-in formulas like =A1*B1 to perform calculations automatically.
- Designate input and output areas. Color input fields with a light background (e.g., yellow) and use bold formatting for result cells so users know where to focus.
- Go to “File” → “Publish to the web”. In the dialog box, select either the full document or a specific sheet, and choose to publish as a web page or embed.
- Click “Embed” and copy the iframe code provided. This HTML code will generate a live view of your calculator within a frame on your website.
- Insert the embed code into an HTML block. Use your website builder or CMS to paste the iframe where you want the calculator displayed. Save and preview to ensure functionality.
This method is a great option for quick setup without custom code. It’s especially useful when your calculations are already tested and managed in a spreadsheet format.
Build a Custom Calculator with JavaScript
For full control over appearance, logic, and interaction, coding a calculator with HTML, CSS, and JavaScript is a powerful option. It’s best suited for developers or teams with technical experience who need to build custom workflows — like multi-step ROI evaluations or dynamic business case calculators for B2B sales enablement.
- Set up your HTML structure. Create input fields and labels to gather user data. Here’s a basic example:
<input type="number" id="leads" placeholder="Leads per month"> <input type="number" id="conversion" placeholder="Conversion rate (%)"> <button onclick="calculateROI()">Calculate - Write your JavaScript logic. Use functions to calculate and display results dynamically when users enter data:
function calculateROI() { const leads = document.getElementById("leads").value; const conversion = document.getElementById("conversion").value; const roi = leads * (conversion / 100) * 200; // Example formula document.getElementById("result").innerText = "Estimated ROI: $" + roi; } - Style the form with CSS. Apply padding, font styles, and background colors to make the calculator visually appealing and consistent with your branding.
- Test input validation and user interaction. Make sure values are required, and error messages are shown if fields are empty or invalid.
- Embed the complete code on your website. Paste the HTML, CSS, and JS into a code block or directly into your template. Test across devices to ensure responsiveness.
This method gives you full freedom to shape logic, integrate with APIs, and apply complex behaviors — ideal for advanced marketing funnels or engineering-driven websites.
Comparison: Elfsight vs Other Calculator Methods
Here’s a side-by-side comparison of the key strengths and limitations of each method. Elfsight provides a balanced solution, offering flexibility, ease of use, and visual control — all without writing a single line of code.
| Method | Pros | Cons |
|---|---|---|
| Elfsight Calculator Widget | Offers a no-code visual editor with smart logic, full customization, and built-in lead capture — all in one dashboard. | Requires you to use the Elfsight platform to make updates or changes. |
| Google Sheets Embed | Quick to implement using familiar spreadsheet tools, especially useful for internal logic already built in Sheets. | Limited styling options and lacks interactive input features unless paired with separate tools. |
| Custom JavaScript | Enables full control over design, logic, and data handling for unique lead generation scenarios. | Requires coding skills and time investment to build, test, and maintain the widget. |
Each method has its strengths, but if you want the fastest and most versatile way to publish a professional calculator that captures leads and delivers real-time value, Elfsight remains the top choice. Next, we’ll show you how to fine-tune the design and logic of your widget for better results.
Smart Tips to Customize Your Web Calculator
Once your calculator is embedded, the next step is tailoring it to fit your marketing goals and customer expectations. Smart customization not only enhances visual appeal but also improves data accuracy, usability, and conversion performance. Below are essential tips to help you fine-tune your calculator for better engagement and lead generation.
- Keep input fields clear and limited. Don’t overload users with too many variables. Focus on 3–5 key inputs that matter most for your calculate lead value logic, such as volume, budget, or conversion rate.
- Use dynamic result fields to display value immediately. Show the output as soon as the user enters data — this creates instant feedback and keeps the user engaged.
- Label everything with real-world context. Use descriptive labels like “Monthly Visitors” or “Average Deal Size” instead of generic ones like “Input 1”. This helps users understand how their entries affect the conversion funnel analysis.
- Apply tooltips or helper text near complex fields. If your calculator uses advanced metrics like CAC or ROI multipliers, add short explanations so users know what to enter.
- Match design with your website’s brand. Use consistent font styles, button shapes, and accent colors to integrate the widget seamlessly into the overall layout.
- Use sliders or dropdowns for better UX. Where possible, avoid manual input fields. Predefined ranges simplify entry and reduce the chance of errors.
- Test mobile usability thoroughly. Make sure input areas, buttons, and result blocks display cleanly on smartphones and tablets. This improves conversions from mobile traffic.
- Customize final messages and CTAs. After results appear, show a short summary like “You could gain 250 leads per month!” along with a call-to-action that leads the user to the next step (e.g., a contact form or booking page).
Once you’ve fine-tuned your layout and logic, it’s time to explore what types of calculators work best for specific industries and goals. Let’s look at practical examples you can create based on your use case.
Types of Lead Calculators You Can Build
Lead calculators can serve different goals depending on the industry you’re in. Elfsight offers ready-made templates to help you quickly deploy widgets tailored for ecommerce, services, or real estate. Below are three powerful examples of how interactive calculators can be implemented using pre-built configurations.
Application in E-commerce
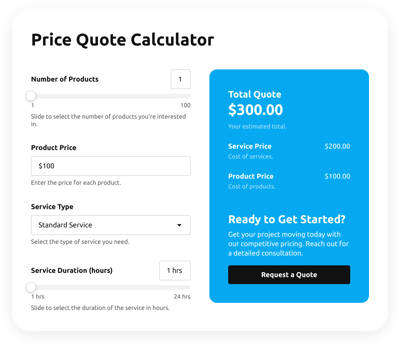
For online stores, price transparency is key. A calculator that gives users a breakdown of costs — including variables like product options, quantity, or custom requests — can significantly increase buyer confidence. The Product Price Calculator template is a great option. It allows users to select what they need and instantly see the final amount they’ll pay.
For best results, place the calculator near pricing sections or bundle it with promotional offers. This encourages users to interact and visualize savings or value right away.
Application in Professional Services
Service-based businesses often deal with value-driven prospects who need to understand their potential ROI. The ROI Calculator template helps illustrate exactly that. It enables users to input variables like investment amount, expected return, and timeframe to estimate gains — perfect for consultants, SaaS providers, or marketing agencies.
Don’t forget to align the inputs with real service parameters. This not only adds credibility but also helps filter out unqualified leads early in the funnel.
Application in Real Estate
Home buyers and renters are always trying to calculate what they can afford before reaching out. The Rent Affordability Calculator template makes this easy. It lets users input income, debt, and other key financial data to estimate their monthly rent range.
Whether embedded on property listings or lead capture pages, calculators like these deliver value first — encouraging users to take the next step with confidence.
Explore 115+ Calculator templates


Fixing Common Issues
Once you’ve created and installed your leads calculator, you may encounter certain technical or usability challenges. This section covers common problems and how to fix them to ensure your leads calculation process remains smooth and effective.
Why is the calculator not displaying on my website?
The inputs or results are not updating. What’s wrong?
How can I make sure the cost-per-lead breakdown is accurate?
Can the calculator widget work on mobile devices?
Why am I getting a lot of submissions but low conversions?
With these issues in check, your calculator should work smoothly across devices and deliver measurable results.
Final Thoughts
Adding a lead generation calculator to your website is a strategic move that enhances engagement, qualifies users, and provides instant value — all while streamlining your conversion funnel. Whether you’re in ecommerce, real estate, or professional services, tools like a B2B ecommerce lead calculator or profit margin estimator help bridge the gap between visitor interest and actionable outcomes. With flexible templates and built-in logic, you can adapt the calculator to your unique needs and customer journey.
From capturing input data to visualizing the visitor-to-lead ratio, calculators deliver both utility for your users and insights for your business. Whether you choose a no-code tool like Elfsight or build one manually, the key is to keep the experience intuitive, mobile-ready, and results-driven. With the right setup, a lead calculator can become one of the highest-converting assets on your website.
Need Help Getting Started?
We hope this walkthrough gave you everything you need to launch a successful calculator widget. If you have questions or want to explore more use cases, don’t hesitate to reach out to us. At Elfsight, our goal is to offer reliable, no-code solutions that help your business thrive online.
We also invite you to be part of our Community — share ideas, connect with other users, and help us shape the future of our widgets. Got a feature idea? Drop it in our Wishlist — we’re always listening.