

When customers have questions about pricing, shipping, or product details, they expect instant answers. Long contact forms and delayed email replies create friction that sends potential buyers to competitors who respond faster. Every unanswered question is a missed opportunity to build trust and close a sale.
Adding live chat to your website solves this problem by letting visitors reach you instantly through their preferred messaging apps—WhatsApp, Messenger, Telegram, and more. The All-in-One Chat widget brings every conversation into one clean interface that installs in minutes, adapts to any website platform, and keeps all customer messages organized in one place.
- Add chat to your website without writing code.
- Choose between Elfsight’s all-in-one solution and native platform options.
- Optimize your chat widget with 9 proven strategies.
- Troubleshoot common installation and display issues.
To help you get started quickly, we’ve organized this tutorial into two parts: a fast 4-step setup for immediate implementation and a comprehensive walkthrough with advanced customization tips.
How to Get Your Widget Live Fast:
This quick guide shows you how to add live chat to website pages in four simple steps:
- Open Elfsight’s editor and pick a template.
- Customize your chat widget by adding messaging channels and content.
- Click ‘Add to website for free’ and copy the live chat embed code for website.
- Paste the code into your website’s backend.
Start building your live chat widget in the free editor now!
Everything All-in-One Chat Can Do — At a Glance
Understanding what makes a chat widget effective helps you configure settings that drive real engagement. Here are the core features that transform website visitors into active conversations:
| Key Feature | Why it Matters |
|---|---|
| Multi-messenger aggregation | Visitors reach you through WhatsApp, Messenger, Telegram, Instagram, or email—all from one chat box interface. |
| Smart display triggers | Chat windows appear at optimal moments based on time spent, scroll depth, or exit intent to maximize engagement. |
| Complete brand customization | Match colors, fonts, icons, and layouts to your website design for seamless visual integration. |
| Mobile-responsive design | The chat box adapts perfectly to all devices without overlapping critical content or navigation elements. |
| Targeted display rules | Show chat only on specific pages or to particular audience segments to maximize relevance and conversion rates. |
These features work together to create a natural communication channel that feels like an essential part of your website. For the complete feature list and advanced capabilities, visit the widget’s Features Page.
From Start to Finish: Configure Your All-in-One Chat Like a Pro
This section breaks down every step for creating, customizing, and embedding live chat on your website, with practical guidance for tailoring chat channels and appearance to your specific business needs.
1. Choose a Chat Template
Start by opening the Elfsight editor and selecting a pre-built template that matches your business type. Available templates include Booking, Support, Onboarding, and Feedback Chat, each designed for specific customer interaction patterns. You’ll choose from three layout options: Floating Button, Chat Bubble, or Embed Chat Window—each optimized for different engagement styles.
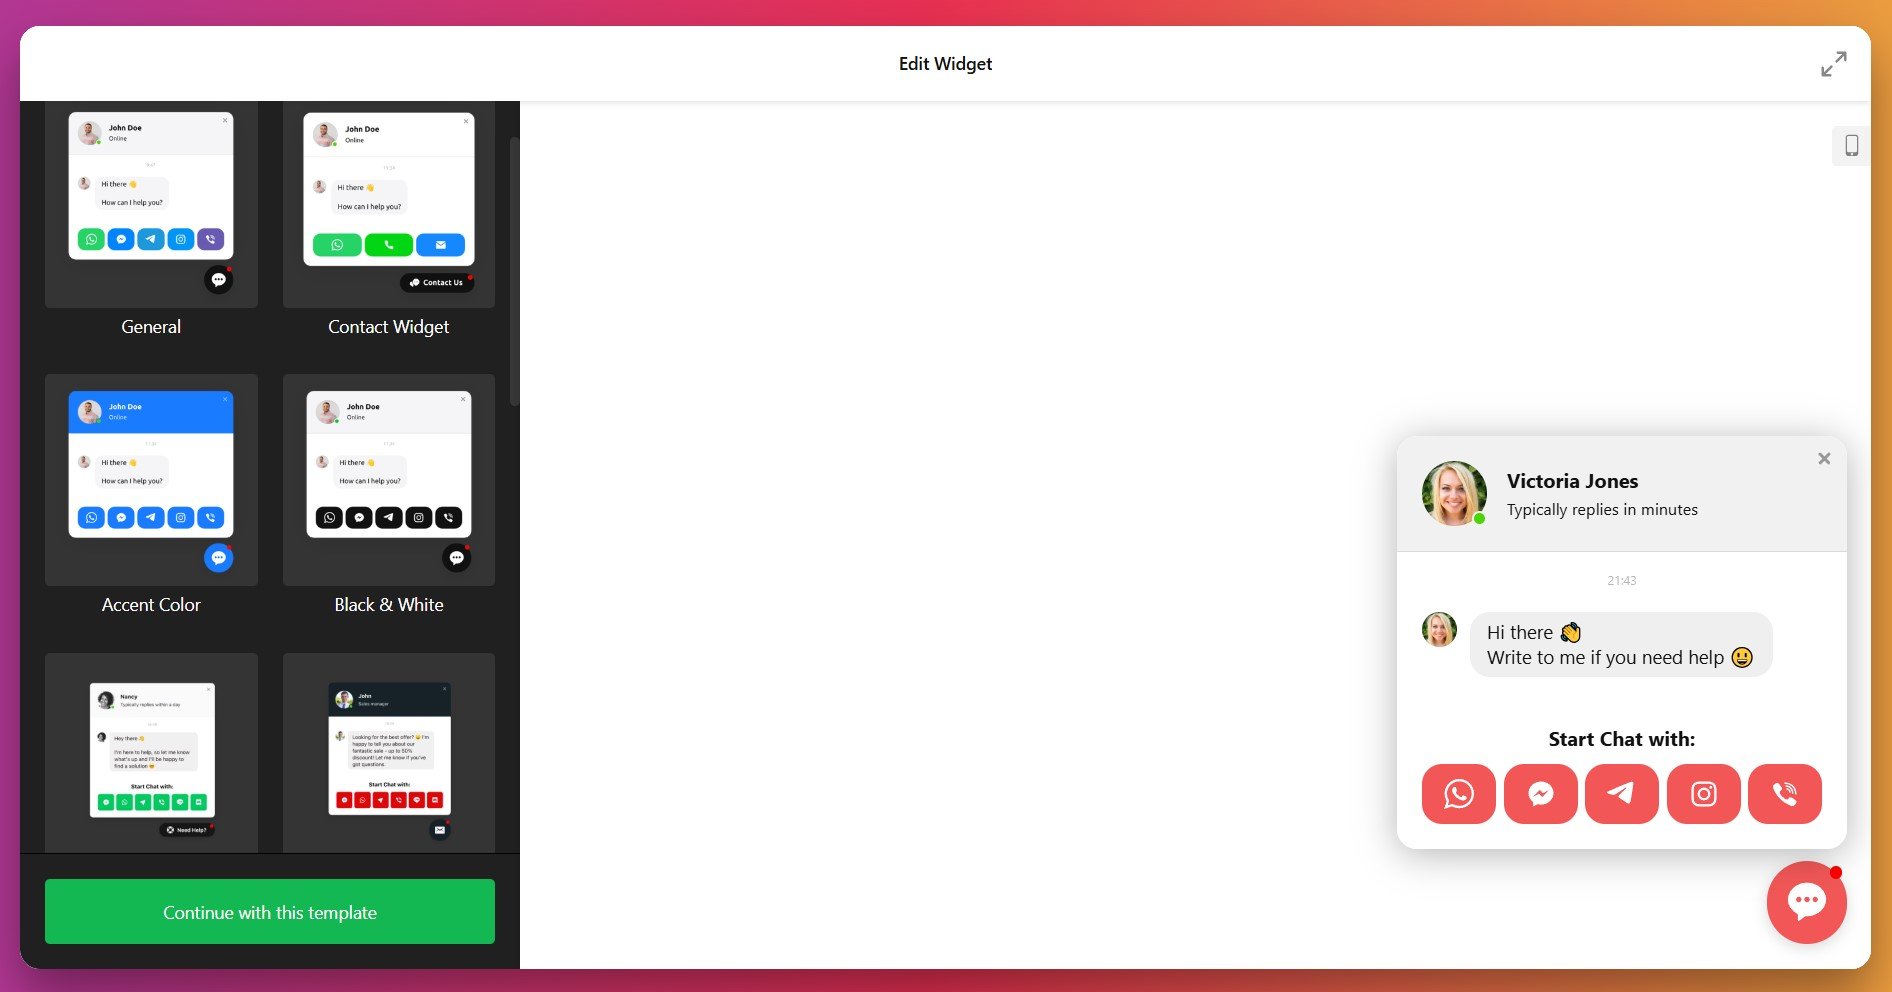
Once you’ve selected your template, click “Continue with this template” to move to the customization phase.
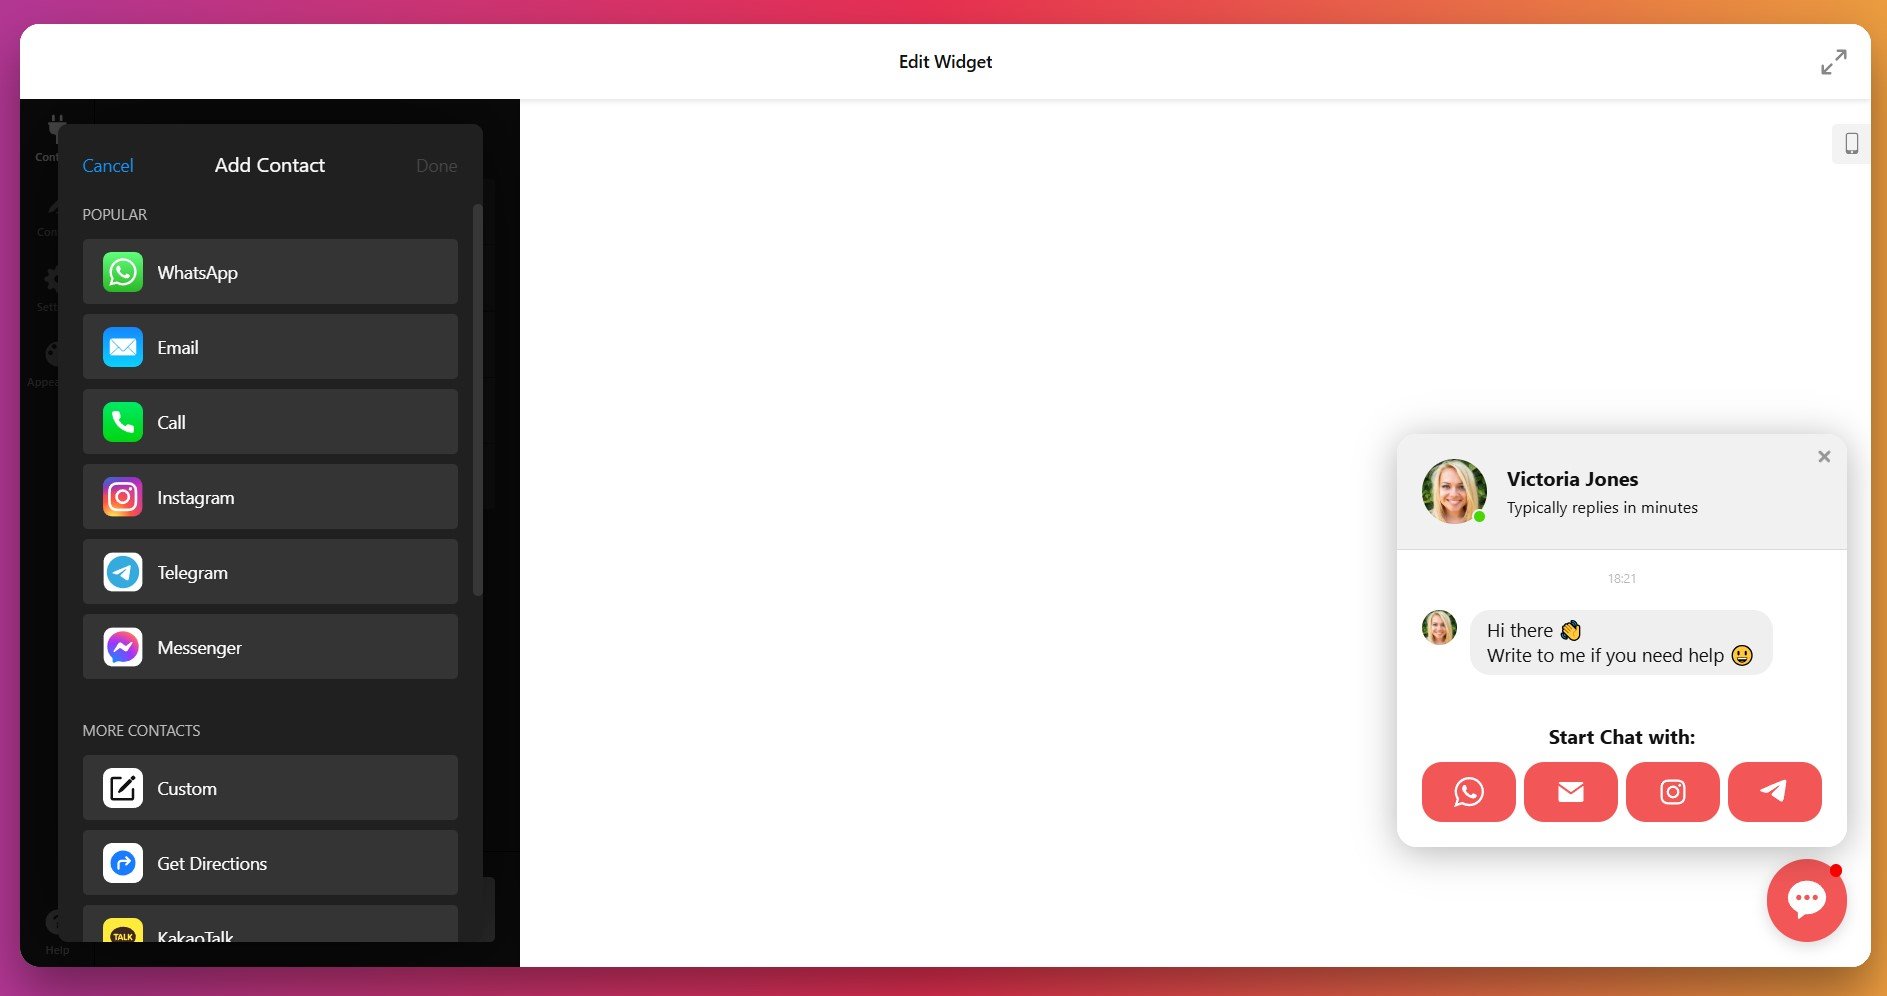
2. Add Your Chat Channels
In the “Contacts” tab, connect your preferred messaging platforms to add chat to a website. Options include WhatsApp, Facebook Messenger, Telegram, Instagram, Viber, Email, and utility buttons like “Get Directions” or “Call”. Click “Add Contact” to include multiple messengers, allowing visitors to choose their preferred communication method.
3. Personalize Agent Info and Messages
Open the “Content” tab to configure your chat agent’s name, profile photo, and status (online, estimated reply time, or custom message). Add a concise, friendly greeting that appears when users open the chat—for example, “Hi! Need help with sizing?” Personal, contextual messages significantly increase engagement rates.

You can also customize your chat bubble by selecting an icon from the library or uploading your company logo.
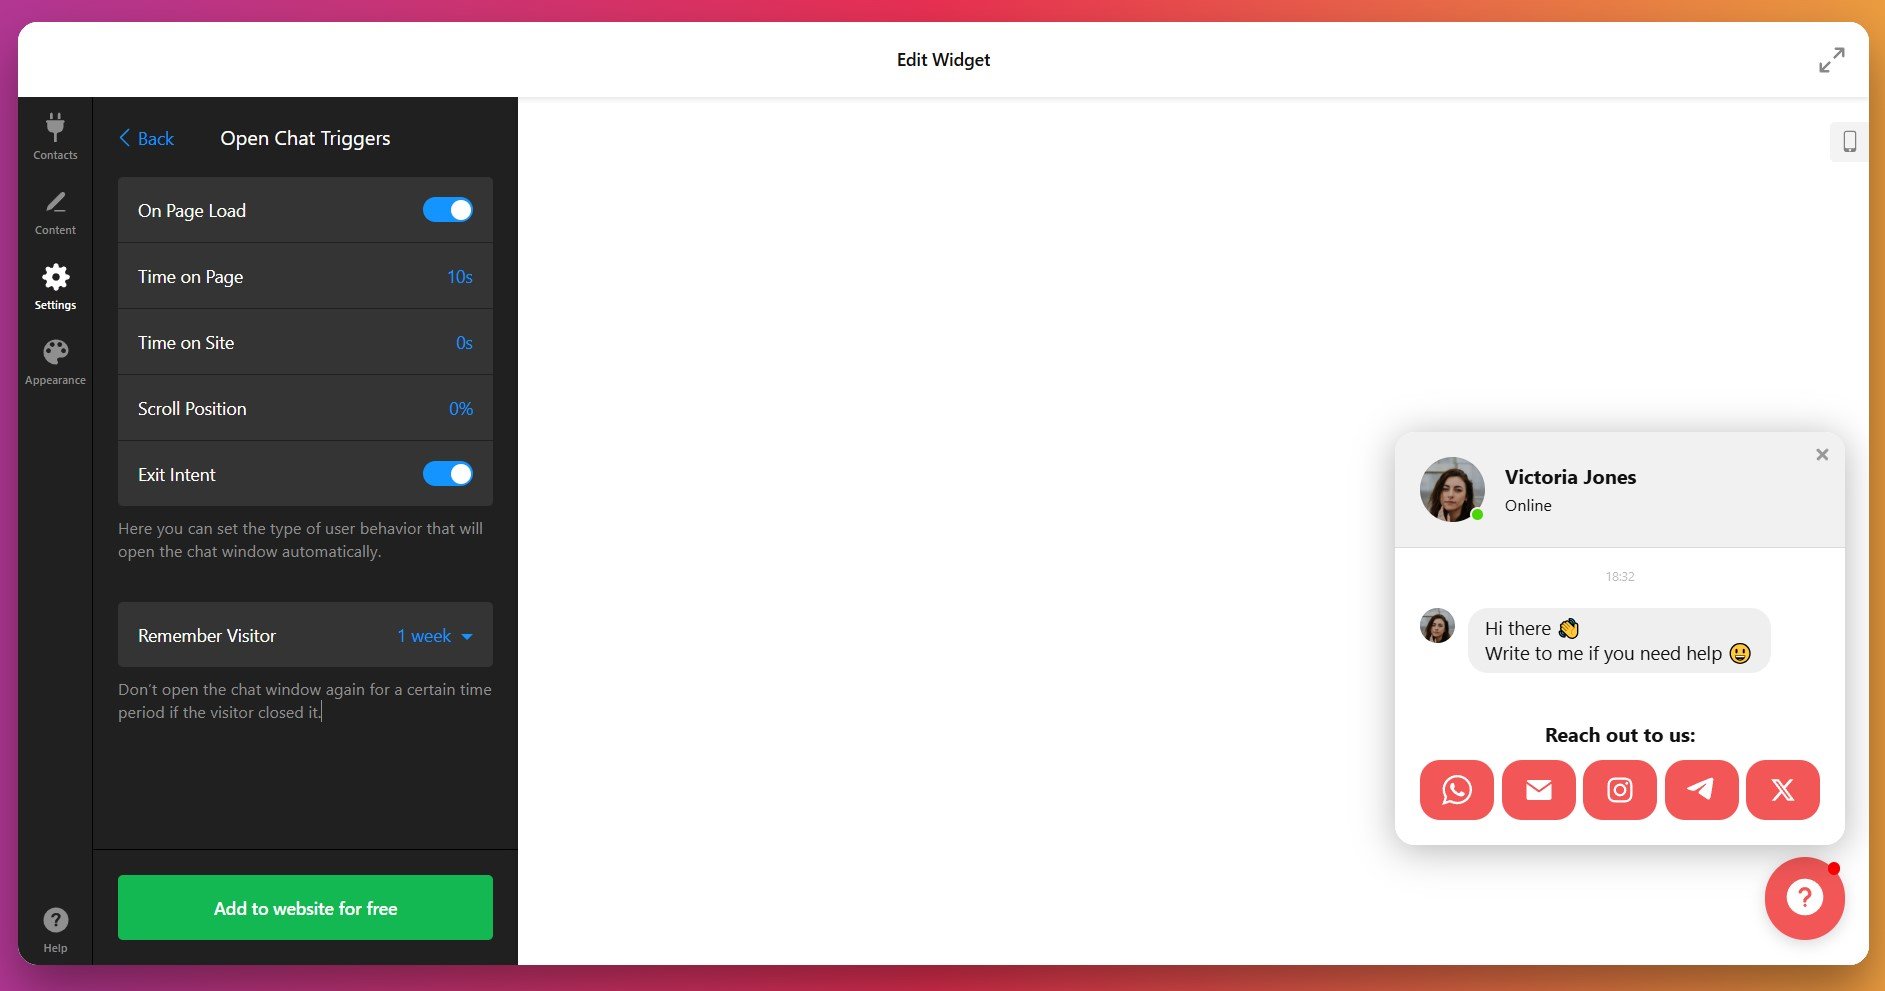
4. Adjust Chat Behavior and Display Triggers
In the “Settings” tab, define when and how your chat widget appears on your website. Available triggers include page load, time-based delays, scroll percentage, exit intent, and page-specific targeting. Configure which pages display the chat box to maximize relevance—ideal for support, pricing, or checkout pages.
If your website uses Google Analytics or Google Tag Manager, enable Events under Google Analytics to track visitor interactions with your chat widget.
5. Customize Chat Appearance
Navigate to the “Appearance” tab to integrate chat into website design seamlessly. Customization options include:
- Chat bubble styling: Adjust background color, icon design, and notification badge appearance.
- Header and background: Modify the widget backdrop to create visual consistency with your site.
- Typography and animations: Select message fonts and entrance/exit animation styles.
- Messenger button colors: Fine-tune individual messenger button colors for visual distinction while maintaining cohesive branding.

For advanced control, use the CSS and JavaScript code fields to embed chat in website with custom styling.
6. Embed Live Chat on Your Website
Once configuration is complete, click “Add to website for free” to generate your unique live chat embed code for website installation.
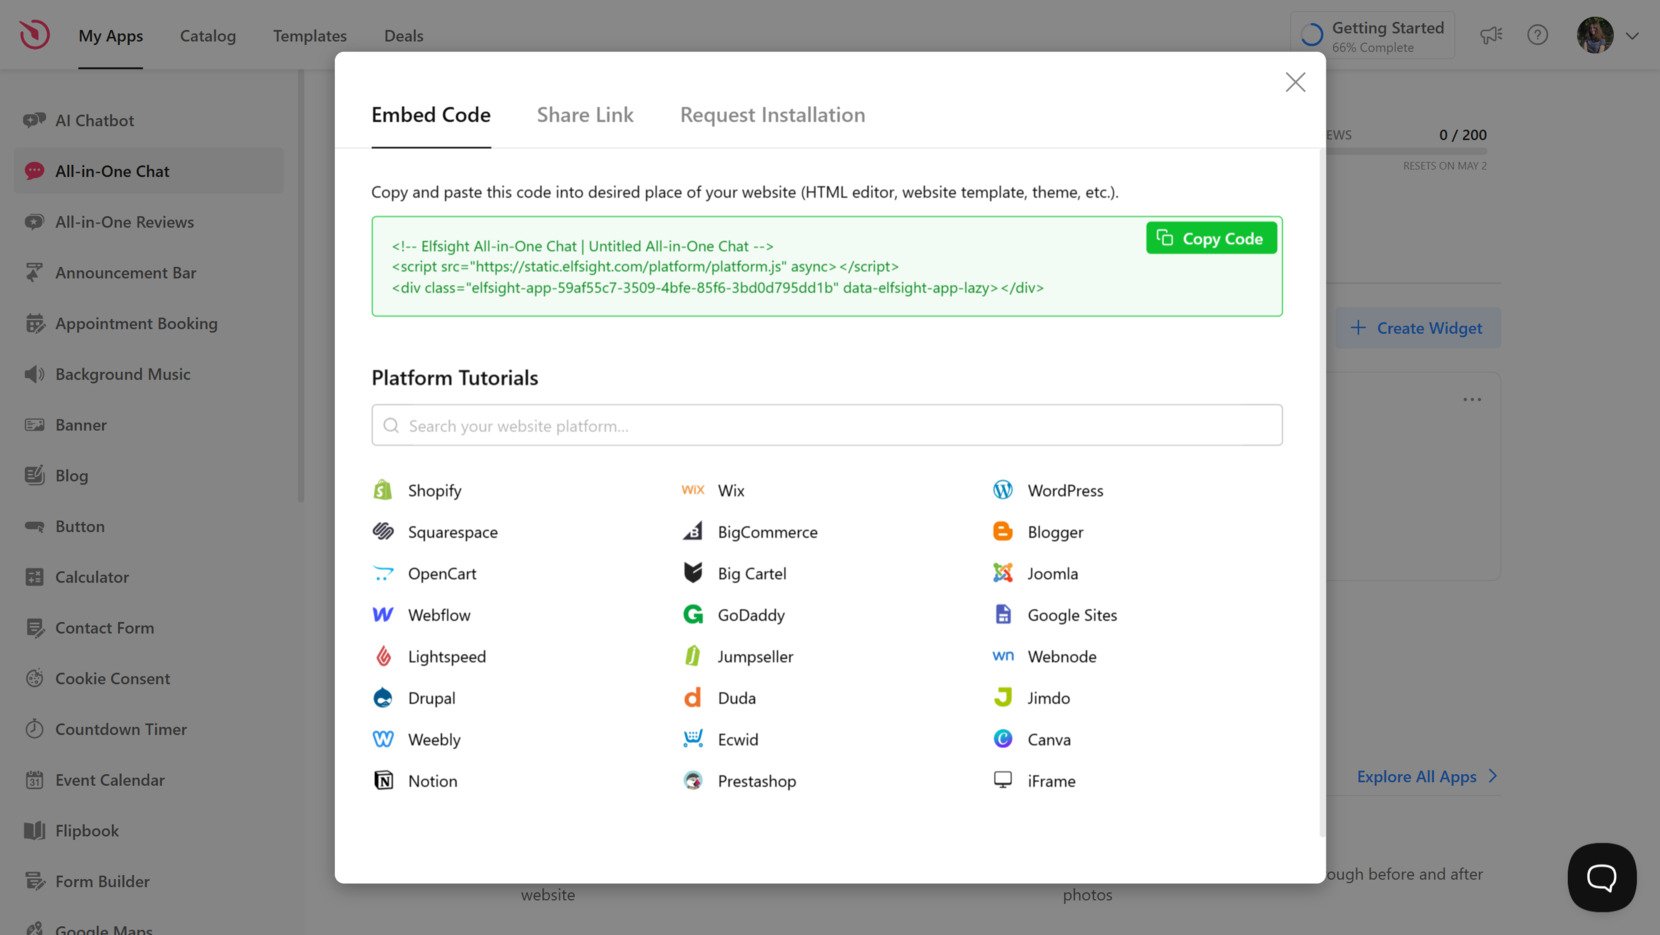
Below are three installation methods to add live chat to your website:
Option 1: Add chat inline on specific pages
Quick workflow: Page Editor → Add Custom HTML block → Paste code → Publish page
- Open your website’s page editor and navigate to the page where you want to add chat box to website.
- Insert a Custom HTML block or code injection area.
- Paste the All-in-One Chat embed code into the block.
- Click Save or Publish to make changes live.
This method works best for contact, pricing, or support pages where chat access should feel contextual rather than persistent across your entire site.
Option 2: Display chat site-wide on all pages
Quick workflow: Theme Settings → Code Injection → Paste before </body> → Save
- Access your website’s theme settings or global code injection area.
- Locate the footer code injection section or Custom HTML field.
- Paste the widget embed code right before the closing
</body>tag. - Save changes and refresh your site—your chat will now appear on every page.
This global installation method is perfect for 24/7 customer support or any website where consistent chat availability improves user experience.
Option 3: Floating chat button (always visible)
Quick workflow: Widget Editor → Layout → Floating → Choose Position → Save
- Open your widget in the Elfsight editor.
- Go to Layout → Positioning and select Floating placement.
- Choose your corner position—bottom-right or bottom-left.
- Click Save and copy your updated embed code.
- Install the code using one of the above methods.
This setup keeps your chat bubble visible as visitors scroll through content, encouraging spontaneous conversations without interrupting their browsing experience.
For those exploring different integration approaches, the following section outlines platform-specific and native chat methods.
Available Alternatives: How to Add Chat to Website Without Elfsight
Several native and platform-specific methods exist for adding chat to a website. While each offers unique benefits, implementation complexity and ongoing maintenance requirements vary significantly.
Facebook Messenger Chat Plugin
Facebook provides an official Messenger plugin that enables direct communication through users’ Facebook accounts.
- Access Facebook Page Settings. Navigate to your Facebook Business Page and open Messaging preferences.
- Configure the Chat Plugin. Use Facebook’s setup wizard to customize appearance and automated responses.
- Copy the embed code. Facebook generates a JavaScript snippet for website integration.
- Paste into your website. Add the code before the closing
</body>tag on pages where you want chat visible.
Visit Meta for Developers for detailed implementation instructions.
WhatsApp Business Click-to-Chat
WhatsApp’s Click-to-Chat creates direct message links that instantly open WhatsApp conversations with your business number.
- Create a WhatsApp link. Use the format
https://wa.me/<your-number>with your full phone number including country code. - Add to your website. Insert the link as a button or text link using standard HTML.
- Style with CSS. Customize button appearance to match your website design.
Navigate to the WhatsApp Help Center for complete setup guidance.
Telegram Web Widget
Telegram offers web integration that allows visitors to message your Telegram account or bot directly from your website.
- Create a Telegram bot. Use BotFather to generate API credentials and bot token.
- Implement Telegram API. Configure the official API to receive and respond to customer messages.
- Embed link or widget. Add a direct link like
https://t.me/your_botor implement JavaScript-based custom widgets.
Explore implementation options at Telegram Widgets documentation.
How Do These Methods Compare?
| Method | Major Pro 👍 | Major Con 👎 |
|---|---|---|
| Elfsight All-in-One Chat | Combines WhatsApp, Messenger, Telegram, and more in one widget with no coding required. | Requires Elfsight account for dashboard management. |
| Facebook Messenger Plugin | Official Meta solution with direct Page inbox integration. | Limited to Messenger; requires Facebook login from visitors. |
| WhatsApp Click-to-Chat | Simple link-based method with instant mobile WhatsApp app launch. | No customizable UI widget; WhatsApp-only communication channel. |
| Telegram API/Widget | Ideal for developer-focused custom integrations and bot automation. | Requires API configuration; limited visual customization options. |
For practical optimization strategies that maximize chat widget performance, continue to the next section’s actionable checklist.
📝 9 Steps to Make Your Live Chat Work Smarter
Based on extensive testing across diverse website types and industries, these proven strategies transform basic chat installations into powerful engagement tools that drive conversions.
- Connect all key messaging channels. Enable WhatsApp, Facebook Messenger, Telegram, Instagram, and other relevant apps so visitors can reach you through their preferred platform.
- Set up display triggers thoughtfully. Use time-on-page, scroll percentage, or exit-intent triggers to show chat when engagement probability is highest—avoid interrupting users immediately upon arrival.
- Customize visually to match your brand. Upload your logo, select appropriate bubble images, and adjust colors, fonts, and button shapes to create seamless visual integration with your website.
- Craft warm, relevant welcome messages. Personalize greetings based on page context or visitor segment to make each chat invitation feel intentional and helpful rather than generic.
- Test positioning on all devices. Preview the widget on desktop, tablet, and mobile devices, adjusting placement so it never blocks important content or gets lost on smaller screens.
- Fine-tune notification settings. Balance visibility with subtlety—configure sound and visual alerts to capture attention without overwhelming visitors or disrupting their browsing experience.
- Use audience targeting rules. Display the widget only to specific visitor groups or on selected pages (checkout, pricing, support) to maximize relevance and avoid cluttering every page.
- Integrate with your CRM or helpdesk. Connect chat messages to your existing support or sales workflow so conversations flow to one centralized place and nothing slips through the cracks.
- Review and test before going live. Double-check all channels, triggers, and customizations in a staging environment to identify and fix any bugs or broken integrations early.
Next, discover how one outdoor adventure business transformed customer engagement and increased bookings by adding live chat to their website.
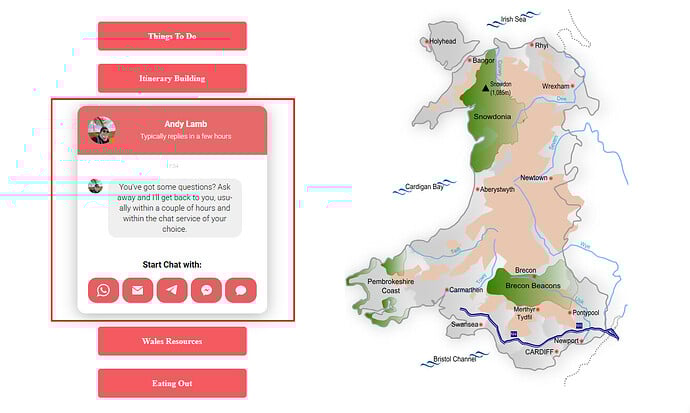
Real Use Case: Live Chat in Action
Wales Outdoors is a hiking and adventure tour business operated by Andrew Lamb. After integrating multiple Elfsight widgets, the All-in-One Chat became a critical communication tool that converts website visitors into confirmed tour bookings through instant messaging.
Before Using Elfsight
Potential customers frequently had questions about trail difficulty, fitness requirements, necessary gear, and tour availability. Traditional contact forms and email inquiries created delays that introduced friction into the booking process, causing hesitation and abandoned purchases.
- No instant communication option available on the website
- Missed booking opportunities due to delayed response times
- Difficulty building trust without real-time customer interaction
With All-in-One Chat
“Elfsight has been a game changer with widgets that work, work well, and are visually attractive.”
Andrew Lamb, Wales Outdoors
By adding the All-in-One Chat widget to the website, Andrew enabled instant communication via WhatsApp, Messenger, and Telegram directly from tour pages. Visitors now ask quick questions and receive immediate responses without leaving their browsing session, significantly reducing booking hesitation.
Real Results
This straightforward change created a measurable shift in customer behavior. Visitors who previously left without booking now initiate conversations, get immediate answers, and complete tour reservations.
- Increased lead generation directly from website traffic
- Faster response times leading to higher conversion rates
- Trust-building conversations that feel personal and reassuring to potential customers
Other Widgets in Use
Wales Outdoors also implements All-in-One Reviews, AI Chatbot, Photo Gallery, Store Locator, and additional widgets. Together, these tools keep the website interactive, trustworthy, and conversion-focused.
If you encounter setup challenges or common display issues, the troubleshooting section below provides straightforward solutions to frequent problems.
Widget Display Issues? Try These Fixes
Adding live chat to website platforms typically takes only minutes, but occasionally users encounter installation or visibility issues. Below are practical fixes for the most common problems:
Why isn't my chat widget showing on my website?
Chat button is hidden or overlaps website elements—how to fix?
z-index: 9999;) to keep the chat on top of other elements. Check both mobile and desktop views for layout conflicts.How do I add a chat to your website on specific pages only?
Can I show the chat only on my homepage?
How do I set chat availability hours or schedule?
Where do I find my WeChat ID for the widget?
My widget works on desktop but not mobile—why?
Why does my chat widget load slowly?
Got Questions or Ideas? Let’s Connect
This comprehensive guide provides everything needed to successfully add live chat to your website and optimize it for maximum customer engagement. Your feedback helps us improve these tutorials, so if you have suggestions or questions, we’d love to hear from you. Stay connected with the Elfsight team on X, Facebook, or LinkedIn for product updates and digital marketing insights.


