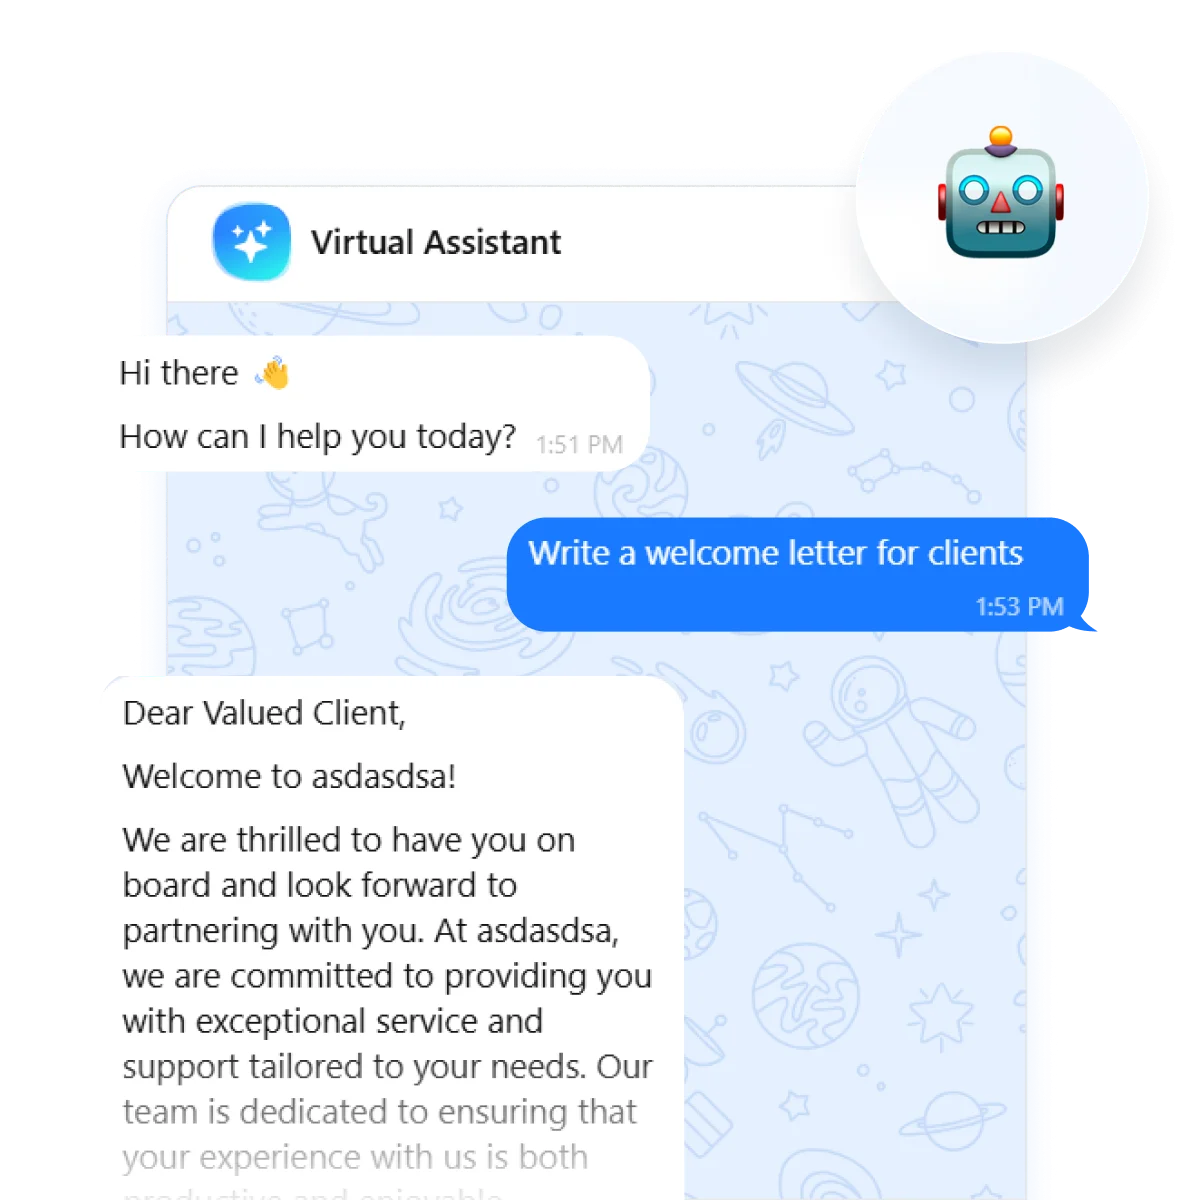
Adding a chatbot to your website is a powerful way to streamline support, enhance customer interactions, and drive engagement. The set up process may seem complex, but with the right tool, you can create and customize your AI chatbot in no time.
In this guide, we’ll show you how to add an AI chatbot to your website, step by step. From setting up the assistant and customizing its behavior to embedding it on your site, you’ll learn how to create a utility that provides 24/7 support for your visitors.
How to Add a Chatbot to Your Website: Quick Guide
Elfsight now offers a new AI Chatbot widget, a great solution for enhancing customer interactions and support on your website. It’s easy to set up and ready to use — here’s a brief guide to help you get started:
- Launch the widget’s editor. Enter your website URL or business details to set up your assistant.
- Configure bot’s behavior, greeting, and additional instructions.
- Customize the widget’s appearance, settings, and theme to align with your website’s design.
- Publish the chatbot and copy the embed code. Insert it into your website. You’re done!
Build your own AI chatbot with the easy-to-use editor and enhance customer engagement!
How to Add an AI Chatbot to a Website: Detailed Guide
Let’s get into more detail of how you can customize your AI chatbot widget.
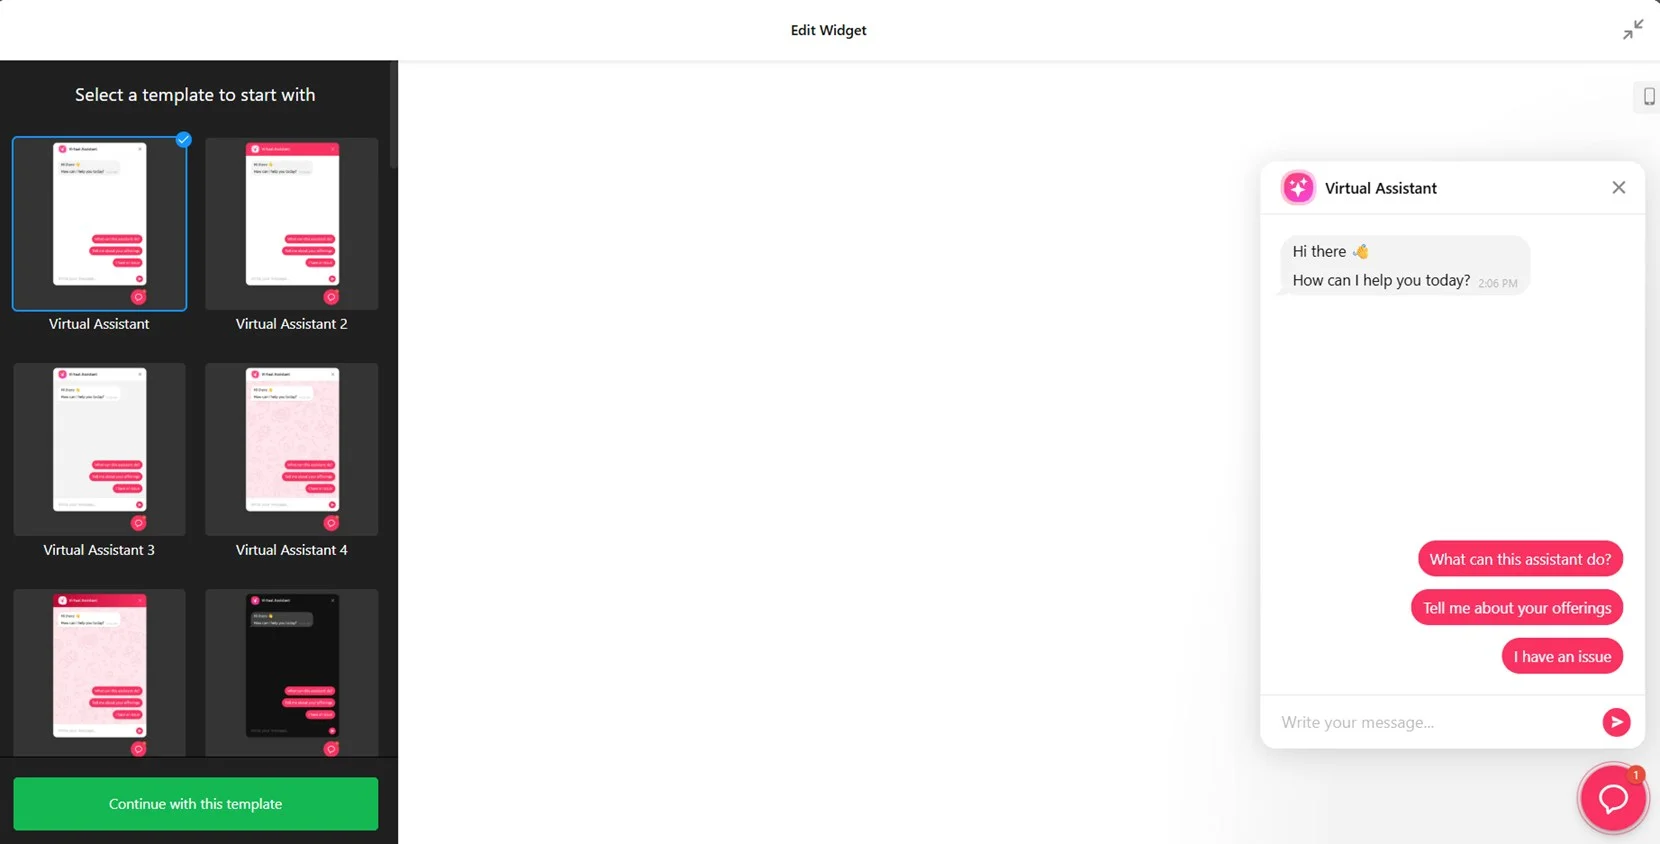
- Launch the editor. Open the chatbot editor and choose a suitable template. Hit ‘Continue with this template’.
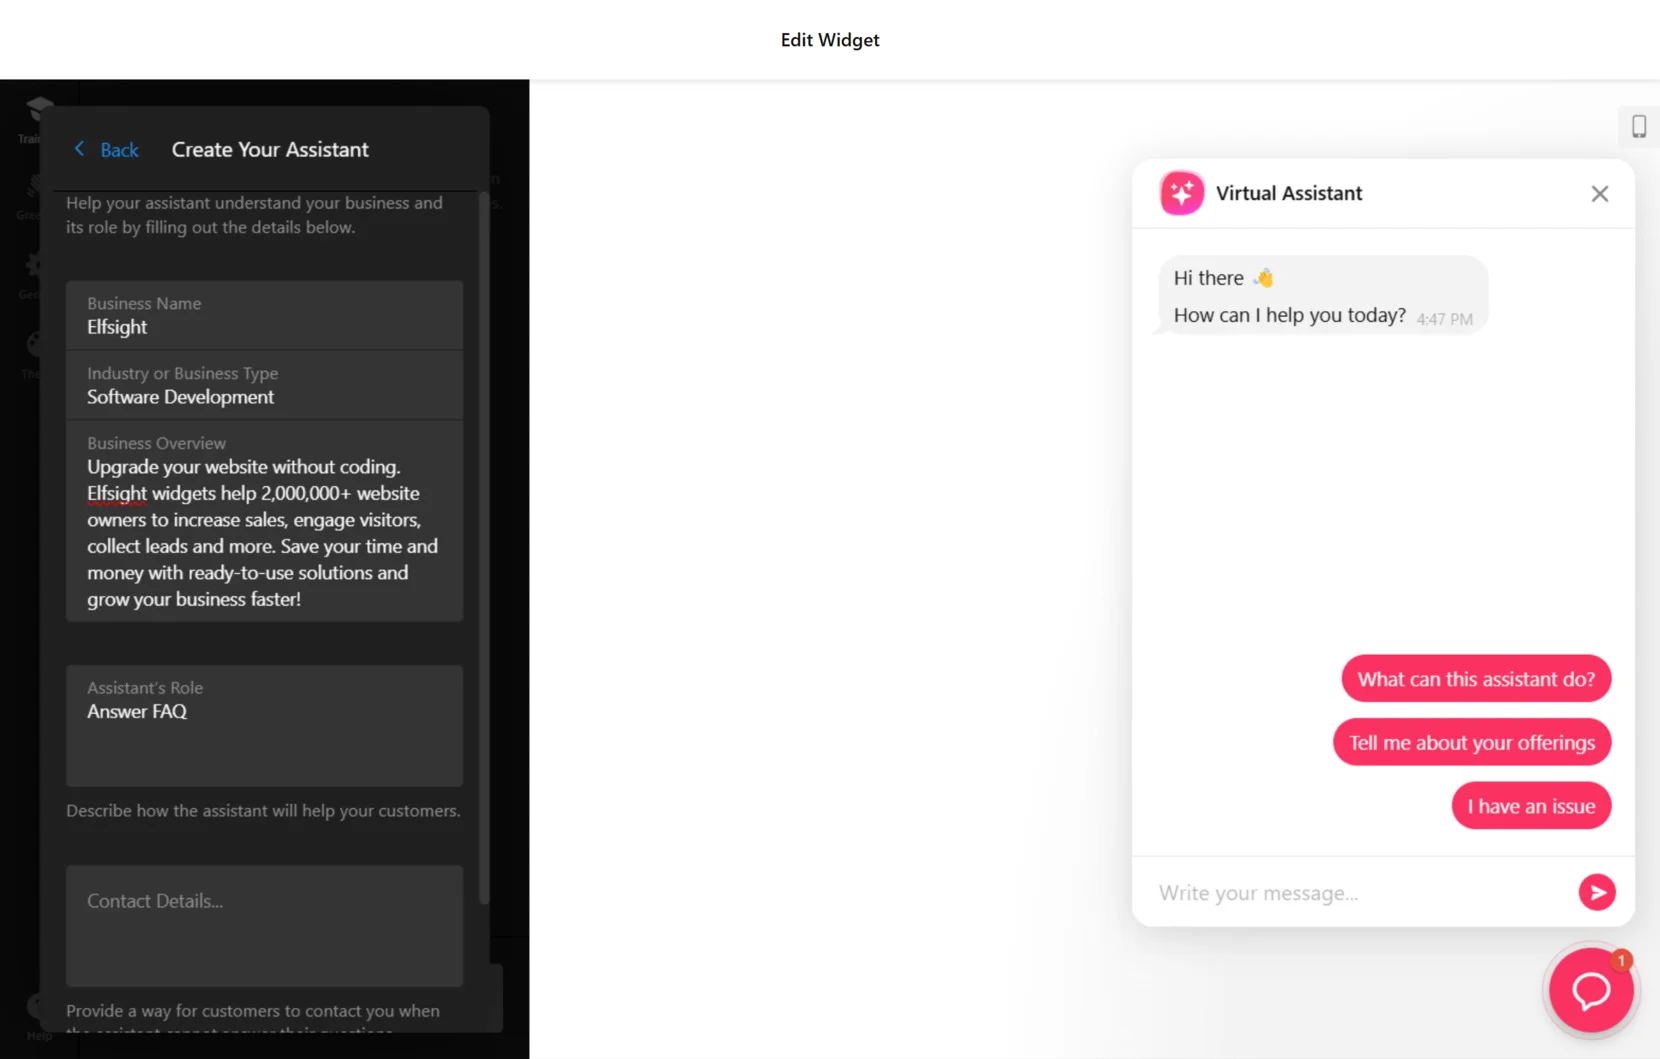
- Create your assistant. Enter the URL for your website or manually enter the business’s details such as name, industry, contact details, etc. Once you’ve filled in all the info, you’ll see the message ‘Your assistant is ready!’ Click the ‘Add knowledge’ button below it.
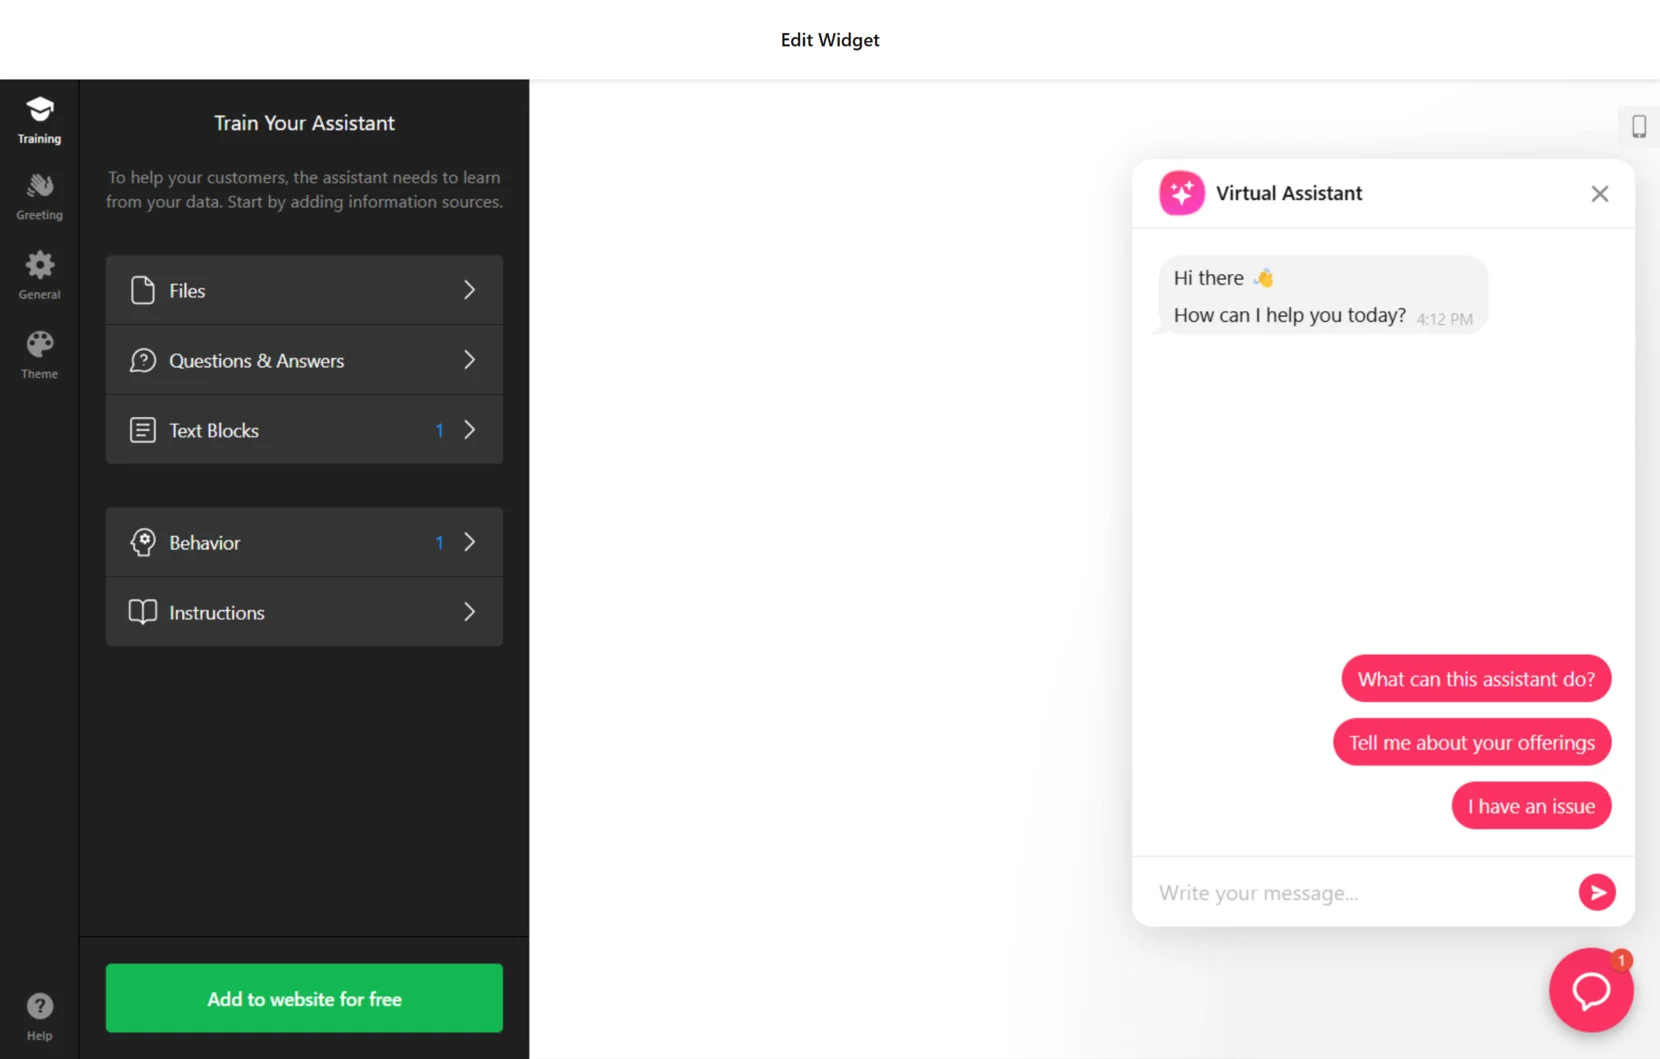
- Teach the AI chatbot. Now, you need to add the information your website chatbot needs to know. You can upload files (text or document file in PDF, TXT, JSON, DOCS, PPTX, HTML, MD), write different Q&A manually, or just provide the text block. You can also set specific behavior for follow-ups and give additional instructions.
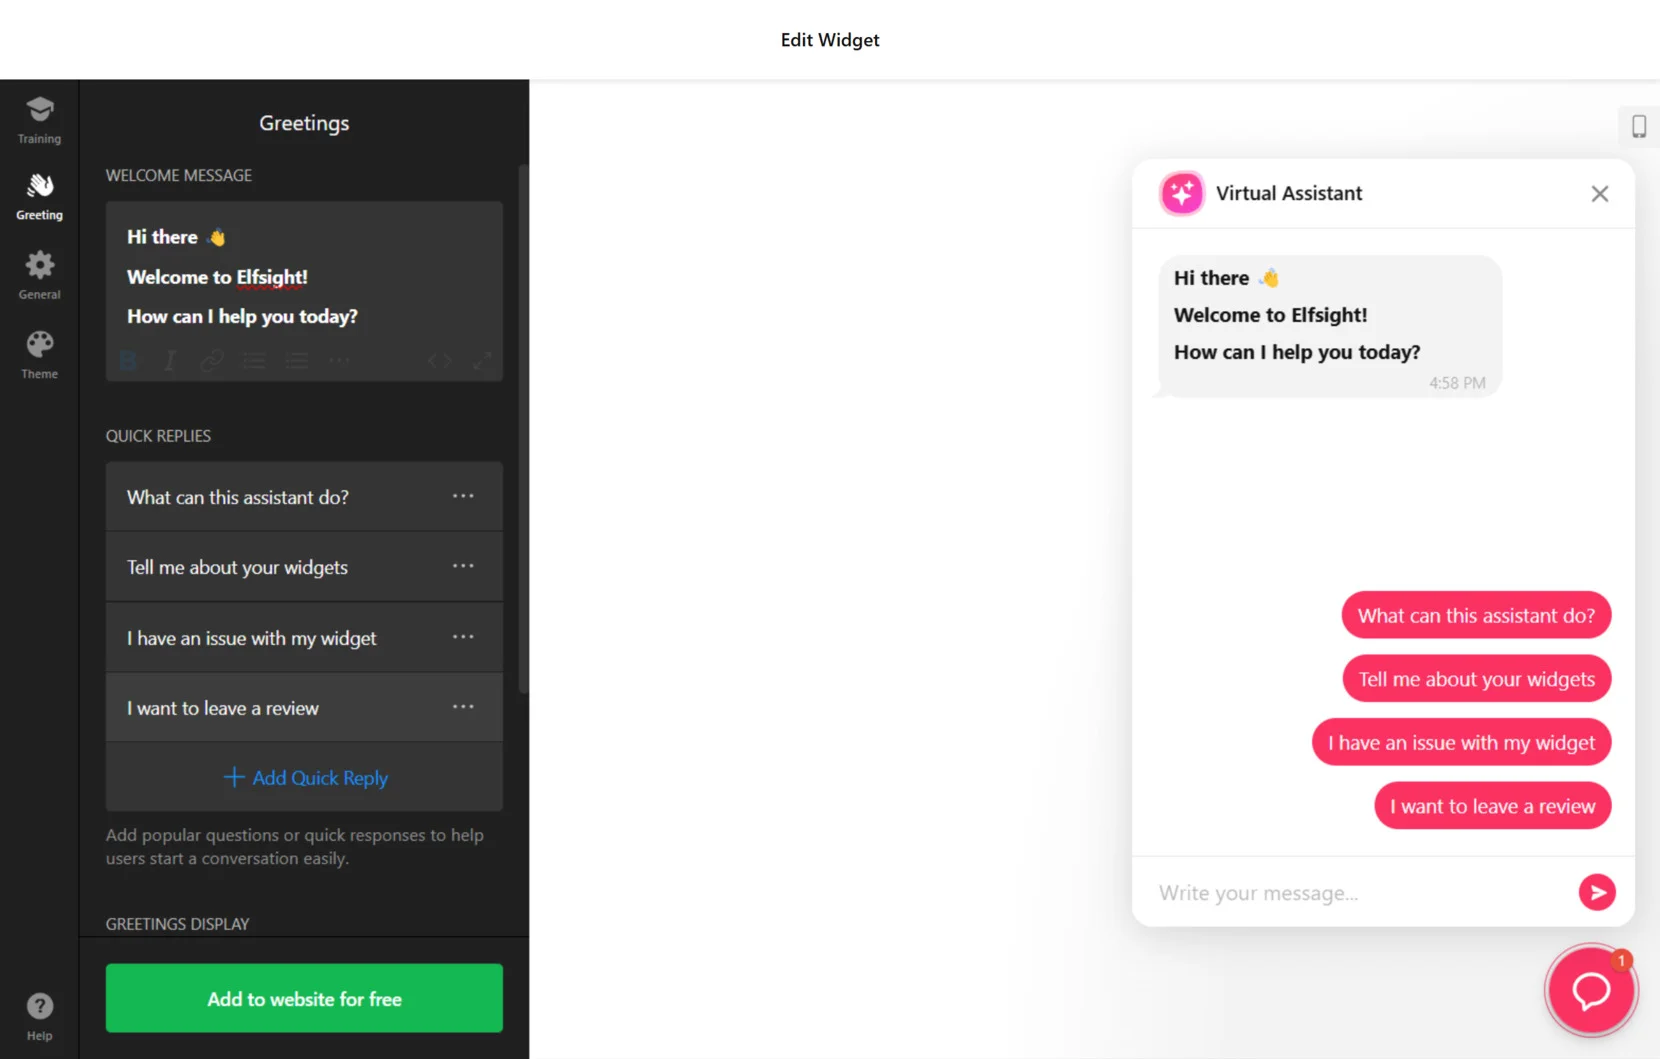
- Customize the greeting. Set up the welcome message as well as some quick replies for customers to start the conversation with the chatbot.
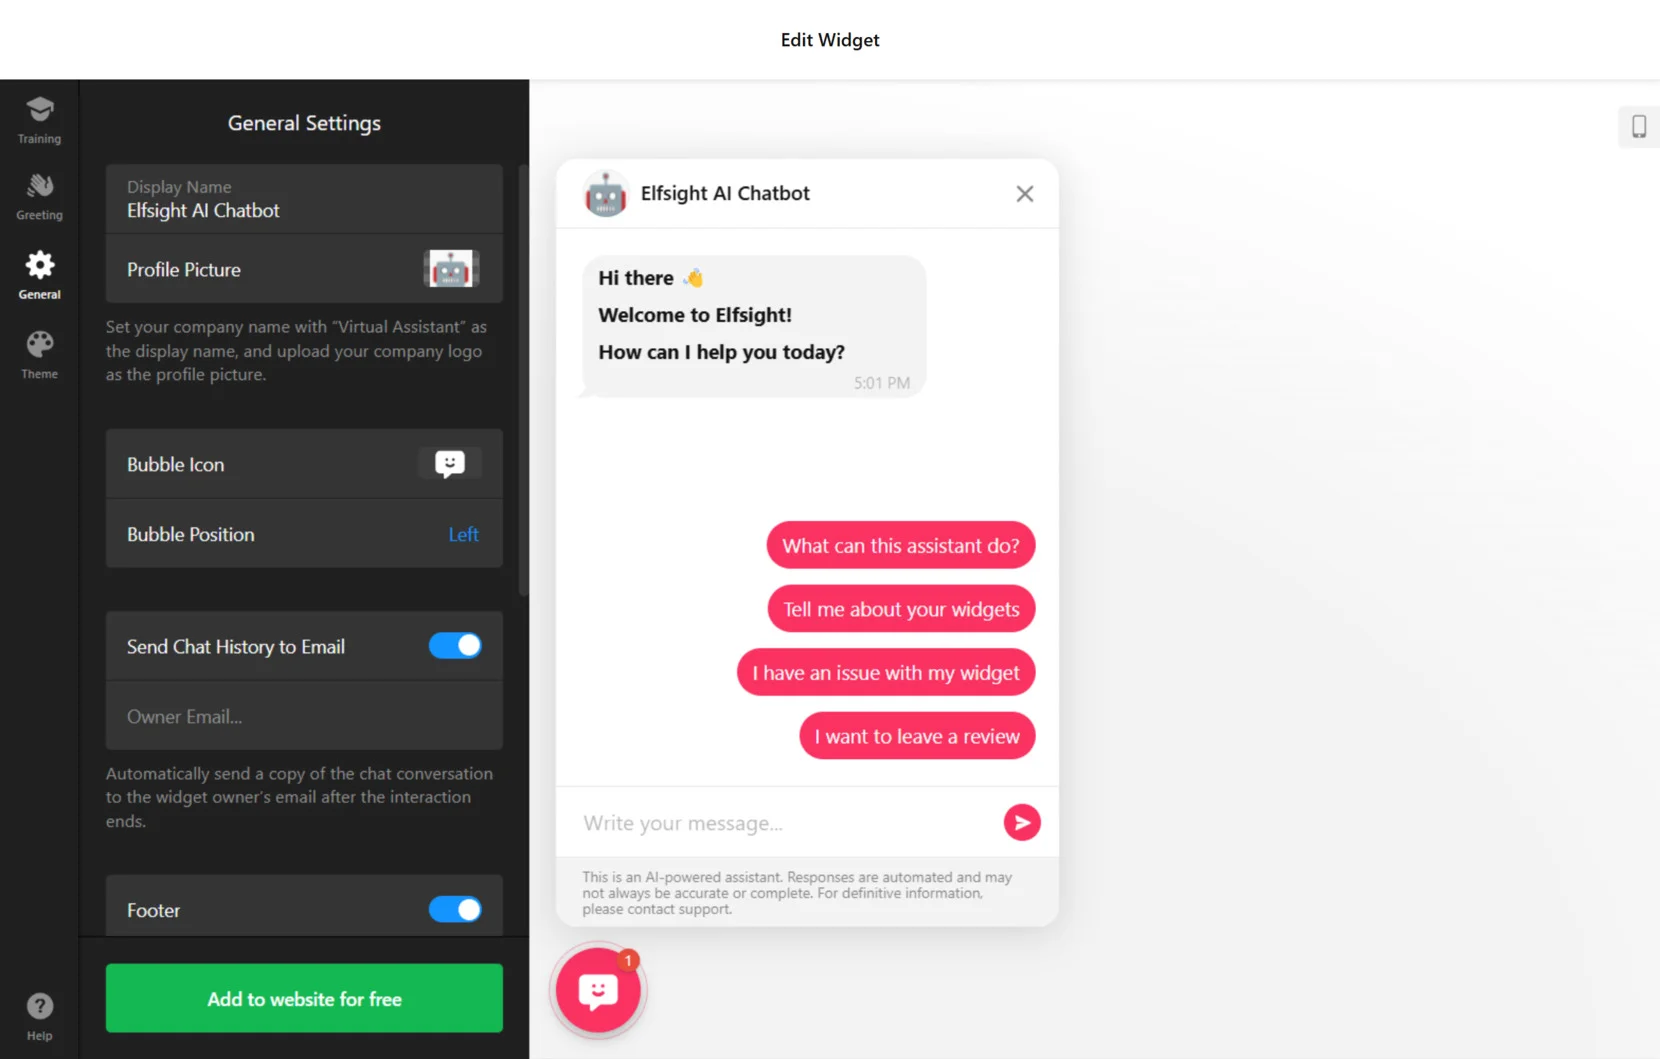
- Adjust the general widget’s settings. Write the displayed name for your assistant and add a profile picture if you wish. You can also select the bubble icon for your widget and choose the position for the chat on the screen. Additional settings include the inclusion of footer info, sending the chat to an email, picking a language and a time zone. Custom CSS and JS elements are also available.
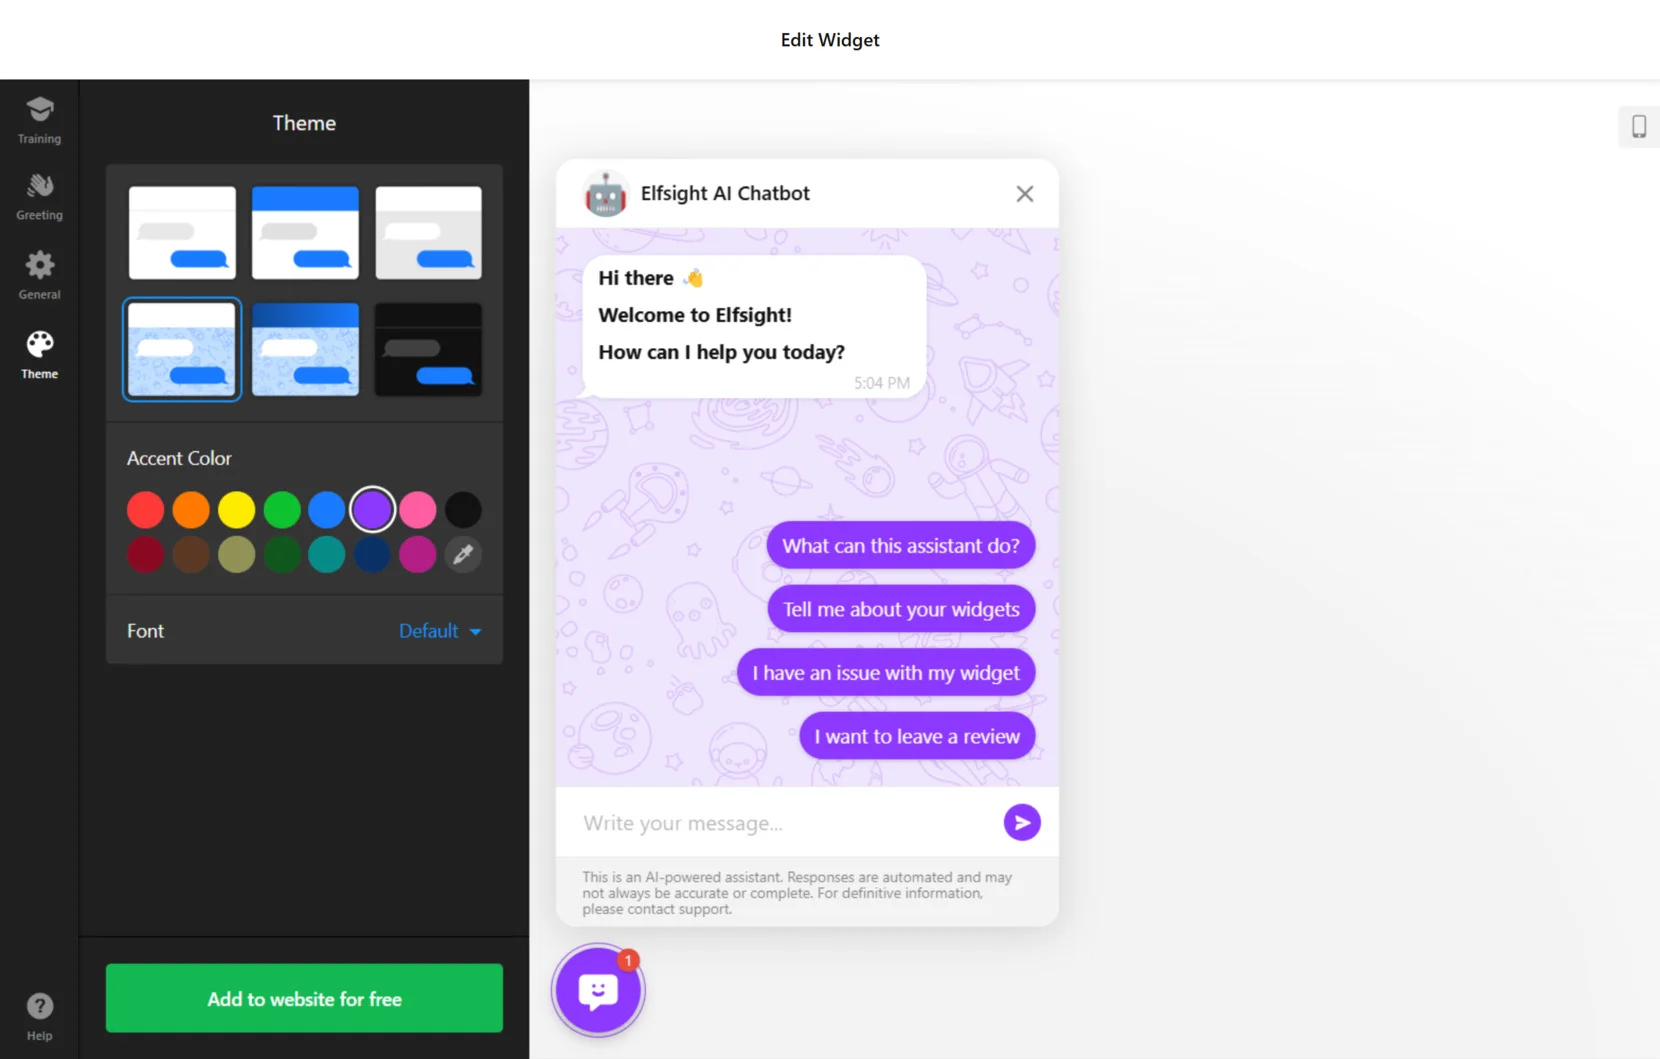
- Pick the theme. Choose the color theme for your chatbot, font, and accent colors to ensure the widget integrates smoothly with your website’s design.
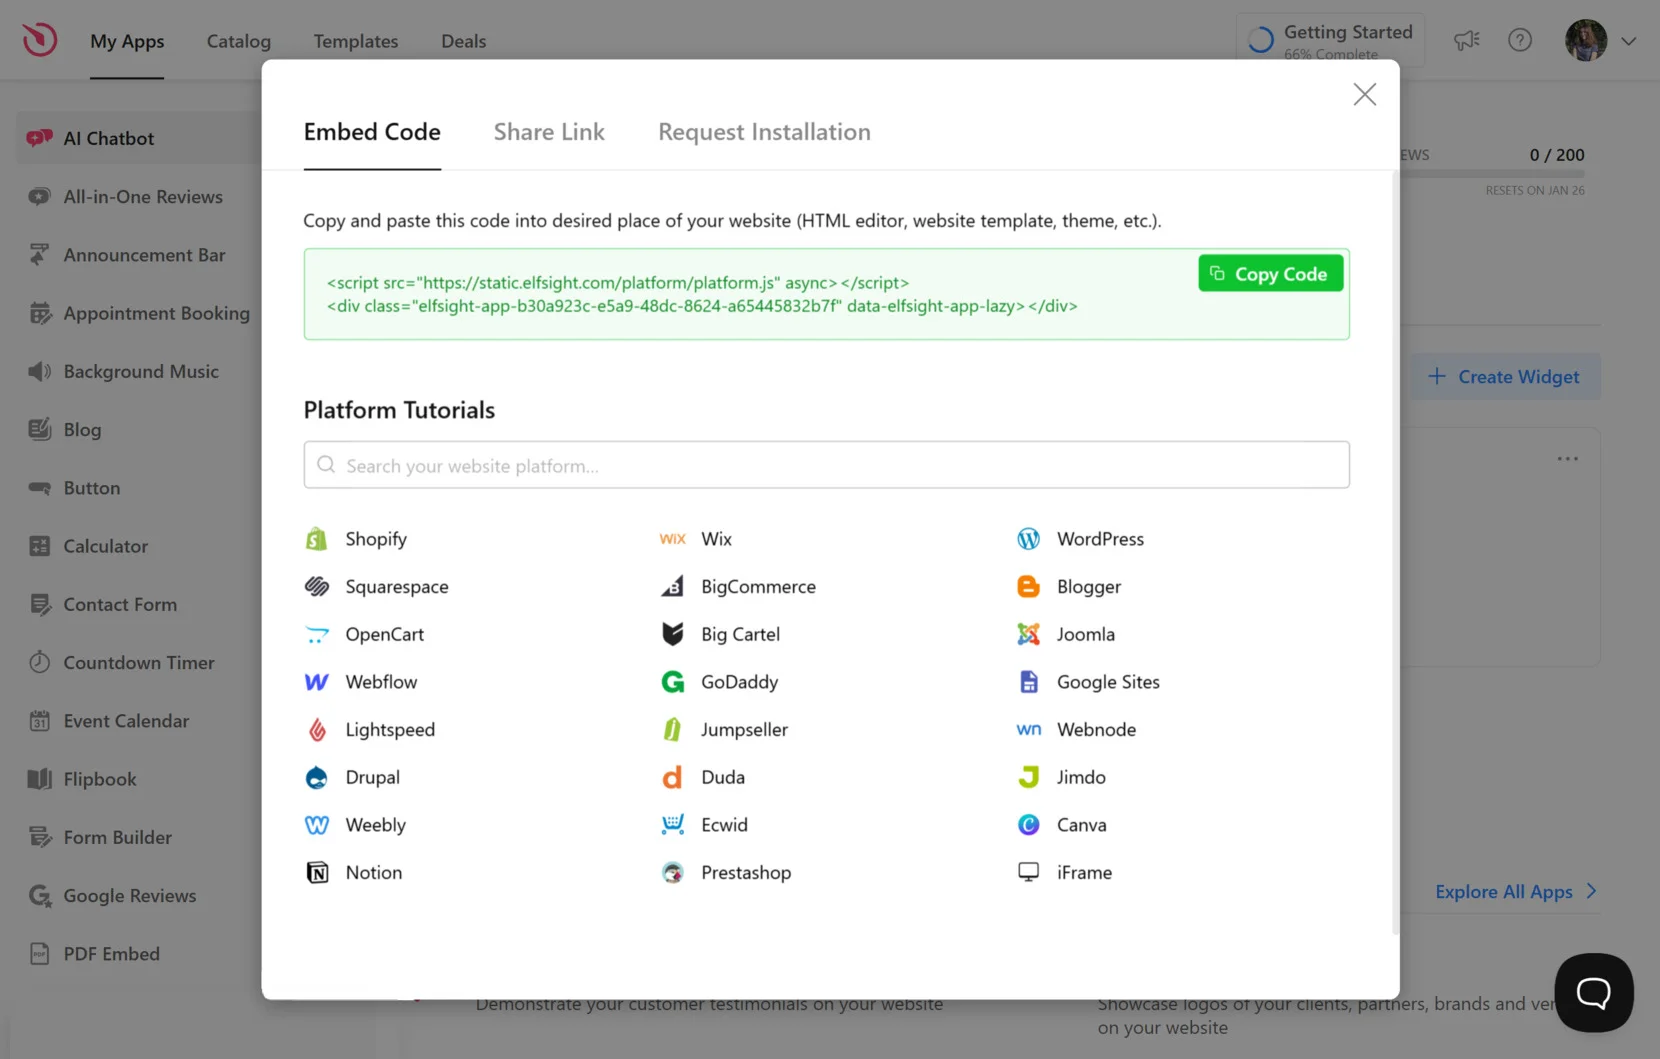
- Add the chatbot to your website. After all modifications are made, click ‘Add to website for free’ and then ‘Publish’. Copy the embed code and insert it into your website’s builder. Make sure to test the chatbot, so you know it works the way you want it to.
Adding a Chatbot to Your Website’s Builder
The AI Chatbot widget can be seamlessly integrated into a wide range of website builders and content management systems, making it a versatile solution for any site.
Below, we’ve provided detailed instructions for adding the chatbot to the seven most popular platforms.
How to add AI chatbot to HTML website

Integrating the AI Chatbot widget into your HTML website is simple and quick. Just copy the code generated in Elfsight and paste it into the desired location on your site.
- Access your website’s backend. Ensure you have the necessary permissions to edit the HTML code through your admin panel for a smooth integration.
- Place the AI Chatbot code. Select the spot on your webpage where you want the chatbot to appear and paste the code into the HTML.
- Save your changes. Verify that everything is working properly and that the chatbot is displaying correctly on the page.
How to add AI chatbot to WordPress website

You can easily embed the no-code AI Chatbot widget into your WordPress site by inserting the provided code into a custom HTML block.
- Log in to your WordPress account. Head to the admin panel to gain access to your site’s editing options.
- Navigate to ‘Pages’. Choose the page where you want to display the AI Chatbot, ensuring it aligns with your website’s goals.
- Add a custom HTML block. Place the HTML block in the area where you want the chatbot to appear on your page.
- Paste the code. Insert the generated code into the block and click ‘Update’ to confirm that the chatbot is working properly on your site.
Add chatbot to WordPress website →
How to implement AI chatbot in Shopify website

Adding the AI Chatbot to your Shopify store is a straightforward process. Simply insert the provided code into the appropriate section of your site.
- Access your Shopify admin panel. Open the admin area and go to the ‘Online Store’ section.
- Click ‘Customize’. From the options, choose ‘Add Section’ to add a new area for the chatbot.
- Select ‘Custom HTML’. This option appears under ‘Add Content.’ Feel free to remove any pre-existing elements if necessary.
- Insert the AI Chatbot code. Paste the generated code into the HTML section and save your updates.
Add chatbot to Shopify website →
How to add AI chatbot to Wix website

Integrating the AI Chatbot into a specific page on your Wix website is easy. Simply use the custom code provided by Elfsight to smoothly embed the chatbot into your chosen location.
- Open your Wix editor. Log into your Wix account, select the website you want to edit, and click ‘Edit Site’ from your dashboard.
- Add an HTML Block. Click the Plus icon on the left-hand menu, go to the ‘Embed’ section, and select ‘Embed a Widget’ to add a new HTML block.
- Insert the AI Chatbot code. Paste the generated code into the ‘Enter Code’ section and click ‘Update’.
- Customize the settings. Adjust the size and position of the chatbot to ensure it looks great and fits well within your page layout.
How to integrate AI chatbot in Weblow website

Integrating the AI Chatbot into your Webflow pages is effortless — simply add an ‘Embed’ element and paste the code provided.
- Log into Webflow. Access your Webflow account and select the project where you want to add the chatbot.
- Insert the ‘Embed’ element. In the Webflow editor, click the ‘Plus’ button and drag the ‘Embed’ element to the desired spot on your page.
- Paste the AI Chatbot code. Insert the code into the ‘HTML Embed Code Editor’ and click ‘Save & Close’.
- Adjust settings and publish. Make any necessary changes to the widget settings and click ‘Publish’ to launch the chatbot on your website.
Add chatbot to Webflow website →
How to add AI chatbot to Squarespace website

To embed the AI Chatbot widget on a specific page of your Squarespace site, simply paste the generated code into the relevant block.
- Log in to Squarespace. Access your account and select the site you want to edit from your dashboard.
- Navigate to the ‘Website’ section. Choose the page where you’d like to add the AI Chatbot.
- Click ‘Edit’ and ‘Add Section’. Add a new blank section, then select ‘Add Block’ to insert the ‘Code’ block.
- Insert the AI Chatbot code. Paste the generated code into the ‘Edit’ box and adjust the block’s width to ensure the chatbot is properly positioned and visually appealing.
Add chatbot to Squarespace website →
How to embed AI chatbot to Elementor website

Embedding the AI Chatbot widget in Elementor is straightforward. Just insert the provided widget code into an empty block on your page.
- Log in to WordPress. Go to ‘Pages’ in your WordPress dashboard and select the page where you want to add the AI Chatbot.
- Edit with Elementor. Click on ‘Edit with Elementor’ to start customizing the page layout.
- Use the HTML Element. Drag and drop the HTML element onto the page where you want the chatbot to appear.
- Insert the AI Chatbot code. Paste the provided code into the ‘HTML Code’ box.
- Update and review. Press ‘Update’ to save your changes and preview the AI Chatbot on your page.
Add chatbot to Elementor website →
AI Chatbot for a Website: Use Cases & Benefits
AI chatbots have become indispensable tools for businesses across various industries. These intelligent assistants adapt to your specific needs, delivering personalized support, automating routine tasks, and improving engagement.
🛒 E-commerce
AI chatbots in e-commerce provide an elevated shopping experience by helping customers find products, answering frequently asked questions about orders or returns, and offering personalized product recommendations. With their ability to handle order tracking and common inquiries, they ensure a smoother shopping process.
Benefits:
- Increase customer engagement. Personalized responses keep shoppers interested and more likely to return.
- Reduce support costs. Handles repetitive inquiries, reducing the workload for support teams.
🔧 Service-based businesses
For service-based companies, website chatbots enhance customer interactions by instantly addressing service-related queries, offering detailed information about services, and delivering follow-up messages to keep customers informed. The chatbot’s ability to learn specific details makes it a valuable virtual assistant for these businesses.
Benefits:
- Improve accessibility. Ensures clients get the information they need, even outside business hours.
- Enhance professionalism. Provides clear and consistent communication tailored to your services.
💻 IT companies
AI chatbots are invaluable for IT companies, simplifying customer support by answering technical queries, providing step-by-step guidance for setup or troubleshooting, and escalating complex issues to the appropriate teams. They help streamline interactions while ensuring accuracy.
Benefits:
- Boost efficiency. Automates repetitive support queries, freeing up time for developers.
- Build trust. Consistently delivers accurate, reliable information to users.
Elfsight AI Chatbot Widget’s Features
Elfsight’s new AI chatbot widget is packed with features to enhance your website’s functionality and deliver exceptional customer experiences. Here’s a quick look at what makes it a must-have tool for your business:
- Automate customer interactions to save time and effort
Streamline sales and support tasks with a fully automated chatbot. Handle chats without human intervention, ensuring fast, round-the-clock service. - Deliver personalized customer experiences
Provide a human touch with features like name recognition, saved chat histories, and follow-up messaging. Offer tailored communication that feels meaningful. - Train the AI for accurate, brand-specific responses
Customize the chatbot using your business data. Upload files, FAQs, and detailed text to teach the assistant your brand’s tone and services. - Enhance customer satisfaction with instant, quality replies
Offer customers immediate, clear, and accurate answers to their queries in multiple languages. The chatbot ensures smooth and professional interactions that boost trust and satisfaction. - Gain actionable insights to optimize performance
Receive detailed chat transcripts directly in your inbox. Leverage these insights to refine the chatbot’s knowledge and improve customer experiences even more. - Customize your widget to match your brand
Maintain a cohesive look and feel for your website with the fully customizable chatbot widget. Personalize every element, from avatar to themes, without needing any coding skills.
AI Chatbot for Website: Pros & Cons
While a chatbot on a website can be a game-changer, you have to be aware of its limitations. Below we describe the manor pros and cons that you need to consider when you add the chatbot to your site.
| Pros | Cons |
|---|---|
| Automates repetitive tasks, saving time and reducing costs. | Lacks emotional intelligence for complex or sensitive issues. |
| Provides 24/7 customer support with instant responses. | Requires ongoing training and maintenance to stay accurate. |
| Offers multilingual support to reach a global audience. | May struggle with nuanced customer queries or unique cases. |
| Improves customer satisfaction with personalized experiences. | Can lead to frustration if no human support option is available. |
An AI chatbot is an excellent tool to enhance customer support, streamline processes, and improve overall website engagement. However, human involvement is essential to ensure the assistant is well-trained, accurate, and up-to-date. Providing customers with the option to connect with human agents for more complex needs ensures a balanced approach, combining the efficiency of AI with the empathy and adaptability of human interaction.
Alternative Solution: ChagGPT API
For businesses seeking an advanced chatbot solution, integrating the ChatGPT API directly into their website is an excellent alternative. This method allows for greater flexibility and scalability, enabling businesses to design a conversational assistant tailored to their specific needs and workflows.
By leveraging OpenAI’s powerful natural language processing technology, the ChatGPT widget can handle complex interactions, adapt to various use cases, and integrate seamlessly with existing systems.
Key features of the ChatGPT API
- Advanced AI capabilities. Handles nuanced conversations and complex queries with contextual understanding and coherence.
- Powerful AI engine. Offers state-of-the-art language understanding, ensuring high-quality and engaging interactions.
- Developer control. Gives businesses full control over how the chatbot interacts with users, integrates with other tools, and evolves over time.
How to add the Chat GPT widget to your website
- Sign up for OpenAI API access. Create an account on OpenAI and generate your API key.
- Set up your backend. Use a server-side language (like Node.js or Python) to send API requests to ChatGPT.
- Create a chat interface. Design a chatbox on your website where users can send queries and display the AI’s responses.
- Connect frontend and backend. Use JavaScript to send user input from the chat interface to your server, which queries the API and sends back the response.
For a more detailed guide on integrating the ChatGPT API, refer to OpenAI’s detailed instruction.
Adding the ChatGPT widget into your website offers a powerful, flexible way to engage with your audience. By following these steps, you can create a highly customized chatbot experience that leverages advanced AI technology to provide instant, personalized support.
FAQ
Can I create a chatbot for my website for free?
What other AI tools can I add to my website?
Conclusion
In conclusion, adding an AI chatbot to your website can greatly enhance customer engagement by automating interactions, providing personalized support, and streamlining communication. With Elfsight’s easy-to-integrate widget, you can quickly deploy an AI assistant tailored to your business needs.
While chatbots offer great efficiency, it’s important to maintain human oversight for training, quality control, and offering customers the option to connect with human agents when necessary. Balancing AI automation with human interaction ensures an optimal experience for your website visitors.
Need More Info?
We hope this guide has been helpful. Get in touch with us to explore how to create an AI Chatbot for your website. Our mission is to ensure you have a seamless and successful experience. At Elfsight, we aim to provide a complete, no-code widget solution for your business.
Join our active Community, where you can share ideas and insights. We welcome your suggestions for enhancements, so feel free to add them to our Wishlist.


