When pricing isn’t on the page, visitors don’t ask — they guess high and click away. The faster they reach a number, the less likely they are to bounce to a competitor’s contact form first.
When your pricing depends on variables — square footage, hours, add-ons, quantity — a static table can’t show it, and a “request a quote” form is too slow. The most reliable fix for a price calculator on your website is an embeddable widget: set your fields and formula in a visual editor, then paste one code snippet into the page. No developer, no spreadsheet hacks.
The Elfsight Calculator does exactly that: it’s a drag-and-drop website calculator builder with a real formula engine, an optional lead-capture form, and embed code that works on any website. This guide covers how to build a quick quote calculator, configure it to capture leads, and embed it — plus the alternatives, so you can pick the right fit for your use case.
- The fastest way to build and embed a price calculator
- How to turn an estimate into a captured lead
- Which action type fits instant pricing vs. quote requests
- Formula and field setup, step by step
- Alternatives, and where each one breaks down
Quick Start: Create a Price Calculator for Your Website
Here’s the whole process in four steps before we get into the details of each one:
- Open the Calculator editor and pick a template.
- Set up your input fields and the formula.
- Click “Add to website for free” to generate the embed code.
- Paste the code into your site’s backend and publish.
Build your price calculator in the interactive editor below ↓
Popular Ways to Add a Quote Calculator to a Website
There’s more than one way to get a working price calculator for small business onto a page, and they trade off differently on effort, flexibility, and what happens after the visitor sees their number.
| Method | Skill needed | Customization | Lead capture | Cost |
|---|---|---|---|---|
| Calculator widget (Elfsight) | No code | High | Built-in form | Free plan / paid |
| Hand-coded JavaScript | Developer | Unlimited | You build it | Dev time |
| Spreadsheet embed (Google Sheets) | Basic | Low | None | Free |
| Generic form plugin with math | Basic–moderate | Medium | Form only | Free / paid |
The tradeoff here is control vs effort. Hand-coded JavaScript gives you full flexibility but requires ongoing development and maintenance, while a Google Sheets embed is fast and free yet limited and unpolished. Widgets and form plugins sit in the middle — less flexible than custom code, but far easier to manage.
Set Up Your Calculator to Estimate and Capture Leads
Before you build, decide what should happen the moment a visitor sees their price. A website calculator can do three jobs separately: answer a pricing question, capture lead information for follow-up, and redirect to checkout or a booking page. None is better – it depends on whether your aim is transparency, lead capture, or conversion.
No action, lead form, or redirect: which fits your goal
Each action type ends the visitor’s journey differently, so match it to what you actually want them to do next. Here’s how the three compare, including the catch that comes with each:
| Action type | What happens after the result | Use it when | The trade-off |
|---|---|---|---|
| No Action | Visitor sees the price and nothing else | You want transparent self-service pricing and fewer “how much?” emails | You get zero contact info — no way to follow up with anyone who didn’t reach out |
| Lead Form | A popup form appears to collect their details | You want the lead, and a number alone isn’t enough — you follow up to close | Adds friction; some visitors who just wanted a ballpark figure won’t fill it in |
| Redirect | A CTA button sends them to another page | The next step is fixed — checkout, booking, a product page | Sends them off-page; you’re handing them to the next step, not capturing them first |
For a quote calculator specifically, Lead Form is usually the one you want. The visitor gets their estimate, then a form appears in a pop-up overlay to collect their details, so you capture the lead at the exact moment they’re most interested, with their estimated number already in hand.
It’s the same logic behind using a chatbot for lead generation: meet the visitor where their intent peaks.
Explore 300+ Calculator templates


Step-by-Step: Build and Embed Your Price Calculator
With the action type decided, the rest is to assemble the calculator across the editor’s four tabs — Build, Action, Style, Settings — and then embed it. Let’s dive in.
Step 1: Choose a template or generate one with AI
When you create a new Calculator widget, a template screen opens first. There are 100+ templates grouped by use case. For a pricing build, you’ll find ready-made starting points in the Cost Calculators category. Pick the one that’s closest to your use case – you’ll be able to customize it later.
If nothing fits cleanly, the AI Calculator Generator is the faster path. Describe what you’re pricing in plain language, and it will build the fields, labels, and formulas for you. Treat its output as a draft to verify, but it saves you from wiring everything by hand.
Example prompt for a custom calculator:
Create an interactive website price quote calculator for a web design agency. The calculator should estimate project pricing based on user selections and update the total price in real time. Use a clean modern layout suitable for embedding on a business website.

Include these fields and pricing rules:
1. ...
2. ...
3. ...
Step 2: Add your input fields
Start the configuration with Fields — these are what the visitor interacts with, the variables your price depends on. On the Build tab, click +Add Field and choose a type. For pricing work, you’ll mostly reach for these:
- Number (quantity or hours)
- Slider (a range, like square footage)
- Dropdown (tiers or service levels),
- Choice (add-ons as radio buttons or checkboxes)
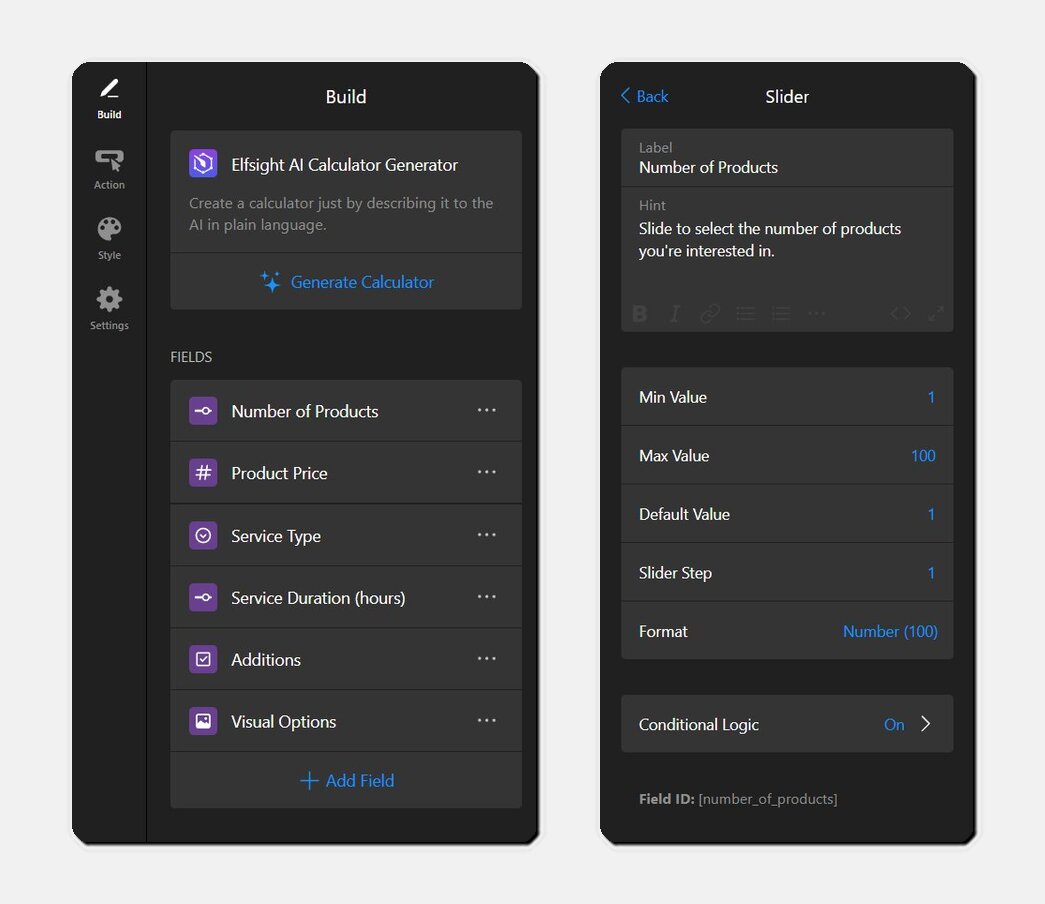
Map your pricing model to fields before adding anything: every number that changes the final price needs its own field. A common early mistake is cramming several variables into one dropdown — keep them separate so the formula can reference each one cleanly.
Each field (except Heading) also supports conditional logic. Use the Heading field to break a long calculator into labeled sections – it’s decorative and carries no value, so it won’t interfere with the math.
Step 3: Build the formula that produces a price
This is the core of an interactive calculator for your website, and the step that takes the longest — budget your time here.
Click +Add Calculation and assemble the formula in the editor by combining fields, operators, functions, and typed numbers. The widget supports SUM, ROUND, MAX, MIN, IF/THEN conditions and logical operators.
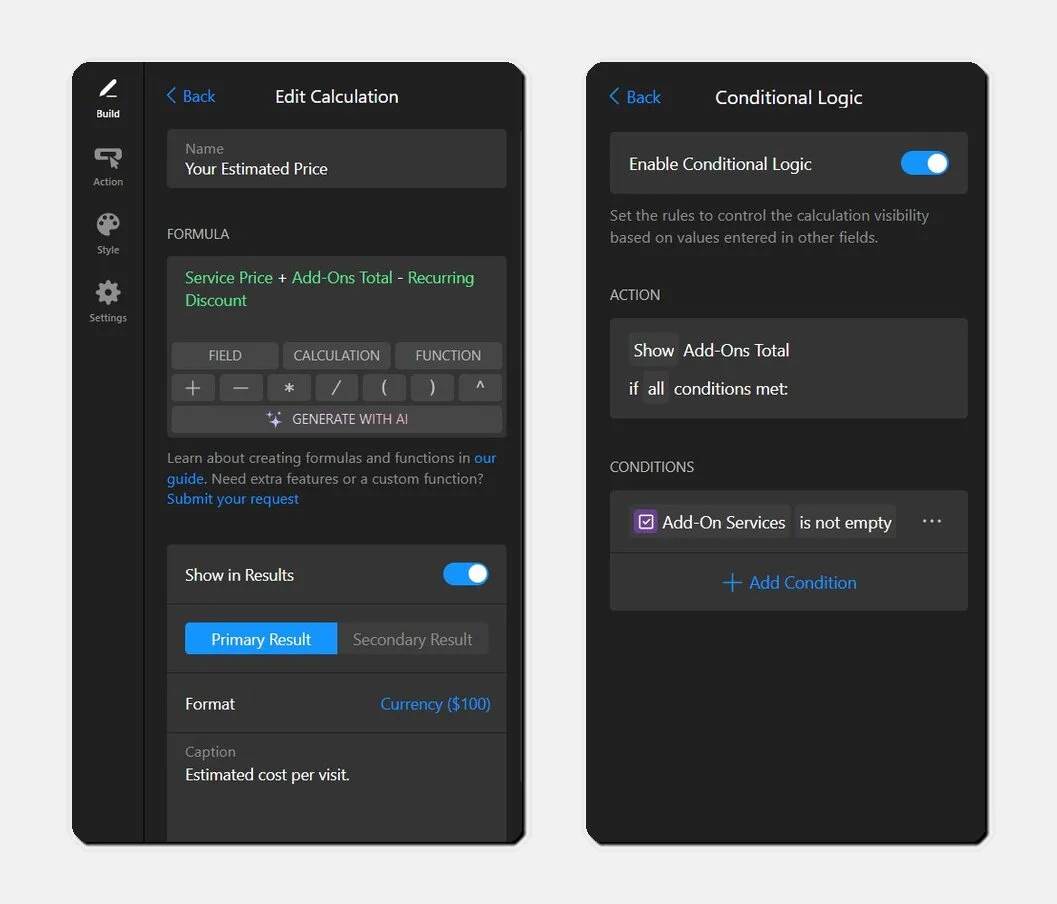
Below the formula, a few controls shape how the result behaves. Toggle Show in Results to display or hide this calculation, flag it as a Primary or Secondary Result (primary is the headline number; secondary is supporting detail). Just like fields, each calculation has its own conditional logic, so you can show a result only when certain inputs are met.
There’s also a Generate with AI button in the formula editor that generates a formula from a plain-language description, but all your fields have to exist first.
Step 4: Format the header and the results section
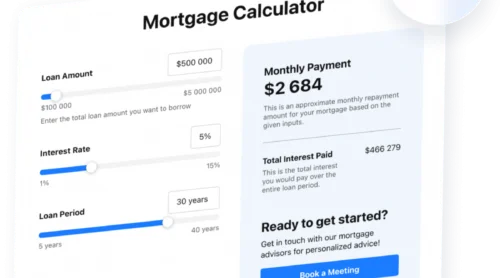
Under Calculations, you can configure your calculator’s header and final estimation. Start with the Header — it holds the calculator’s Title (e.g., “Get Your Cleaning Estimate”) and an optional Caption to set expectations in a single line.
This is also where the quote-document features live. Toggle on Show Print Button and Show Download Button — Print opens the browser’s print dialog, and Download generates a PDF that includes the visitor’s inputs and results.
Under Document Header, add your logo and company info so the output looks like a real branded quote rather than a bare printout:

That matters more than it sounds: a downloadable estimate is something a visitor can forward to a decision-maker, which quietly extends your reach.
Step 5: Configure the Action — capture the lead
Here’s where the earlier decision becomes a setting. The Action tab opens with a three-way toggle — Redirect, Lead Form, and No Action — and for a quote calculator, Lead Form is almost always the right pick.
With Lead Form selected, you set an Open Form Button Text and the form fields. The defaults are all editable: add, remove, or reorder them, and keep it short – every extra required field costs completions. Thirteen field types are available, including Date, File upload, and Hidden (useful for tracking).
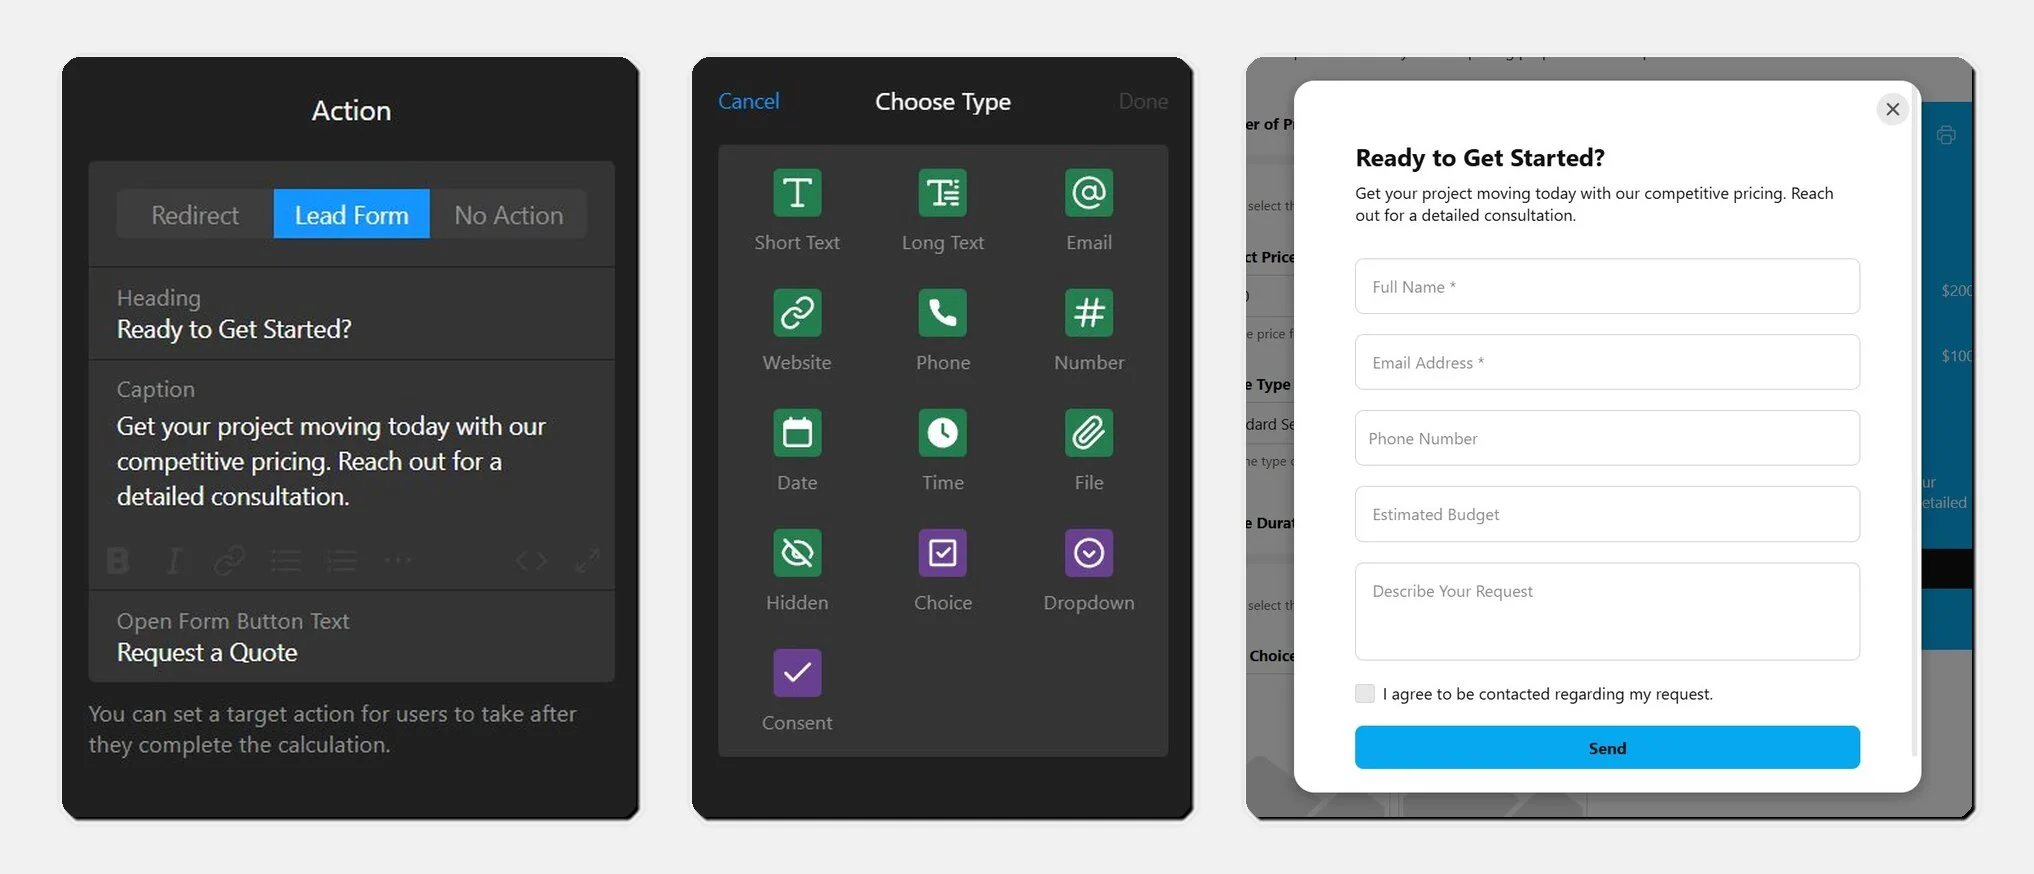
Below the fields sit five configuration sections that do the real work of a lead pipeline:
- Submit Button — set the button text and a Post-Submit Action: show a success message (custom title, text, optional button), redirect to a URL, or nothing.
- Email Notifications — Notify Me alerts you on each submission; Notify Respondents auto-replies to the visitor, with logo and signature support.
- Integrations — push submissions to Google Sheets, Zapier, Make.com, Mailchimp, or Webhooks.
- Payment — connect Stripe to require payment on submit; it works only inside the Lead Form flow and needs a connected account, so it’s a pay-on-submit step, not a standalone checkout.
- Spam Protection — an invisible reCAPTCHA toggle; enabling it adds Google’s required legal text to the widget footer (translatable, but not removable).
Step 6: Style your calculator
On the Style tab, start from one of the visual presets in the carousel at the top — they’re a quick way to get a coherent look before you fine-tune. Six controls handle the rest – match these to your brand, the calculator should read as part of your website, not a bolt-on.
- Font — pick from the dropdown or stay on Default. Use the same family as your website body text so the calculator doesn’t feel like an embedded iframe.
- Background — set a color or image for the whole calculator panel. A solid color that matches your section background usually beats a busy image, which can fight for attention with the input fields.
- Text Color — the global text color for labels and field text. Check it against your background for contrast, especially if you went with a dark panel.
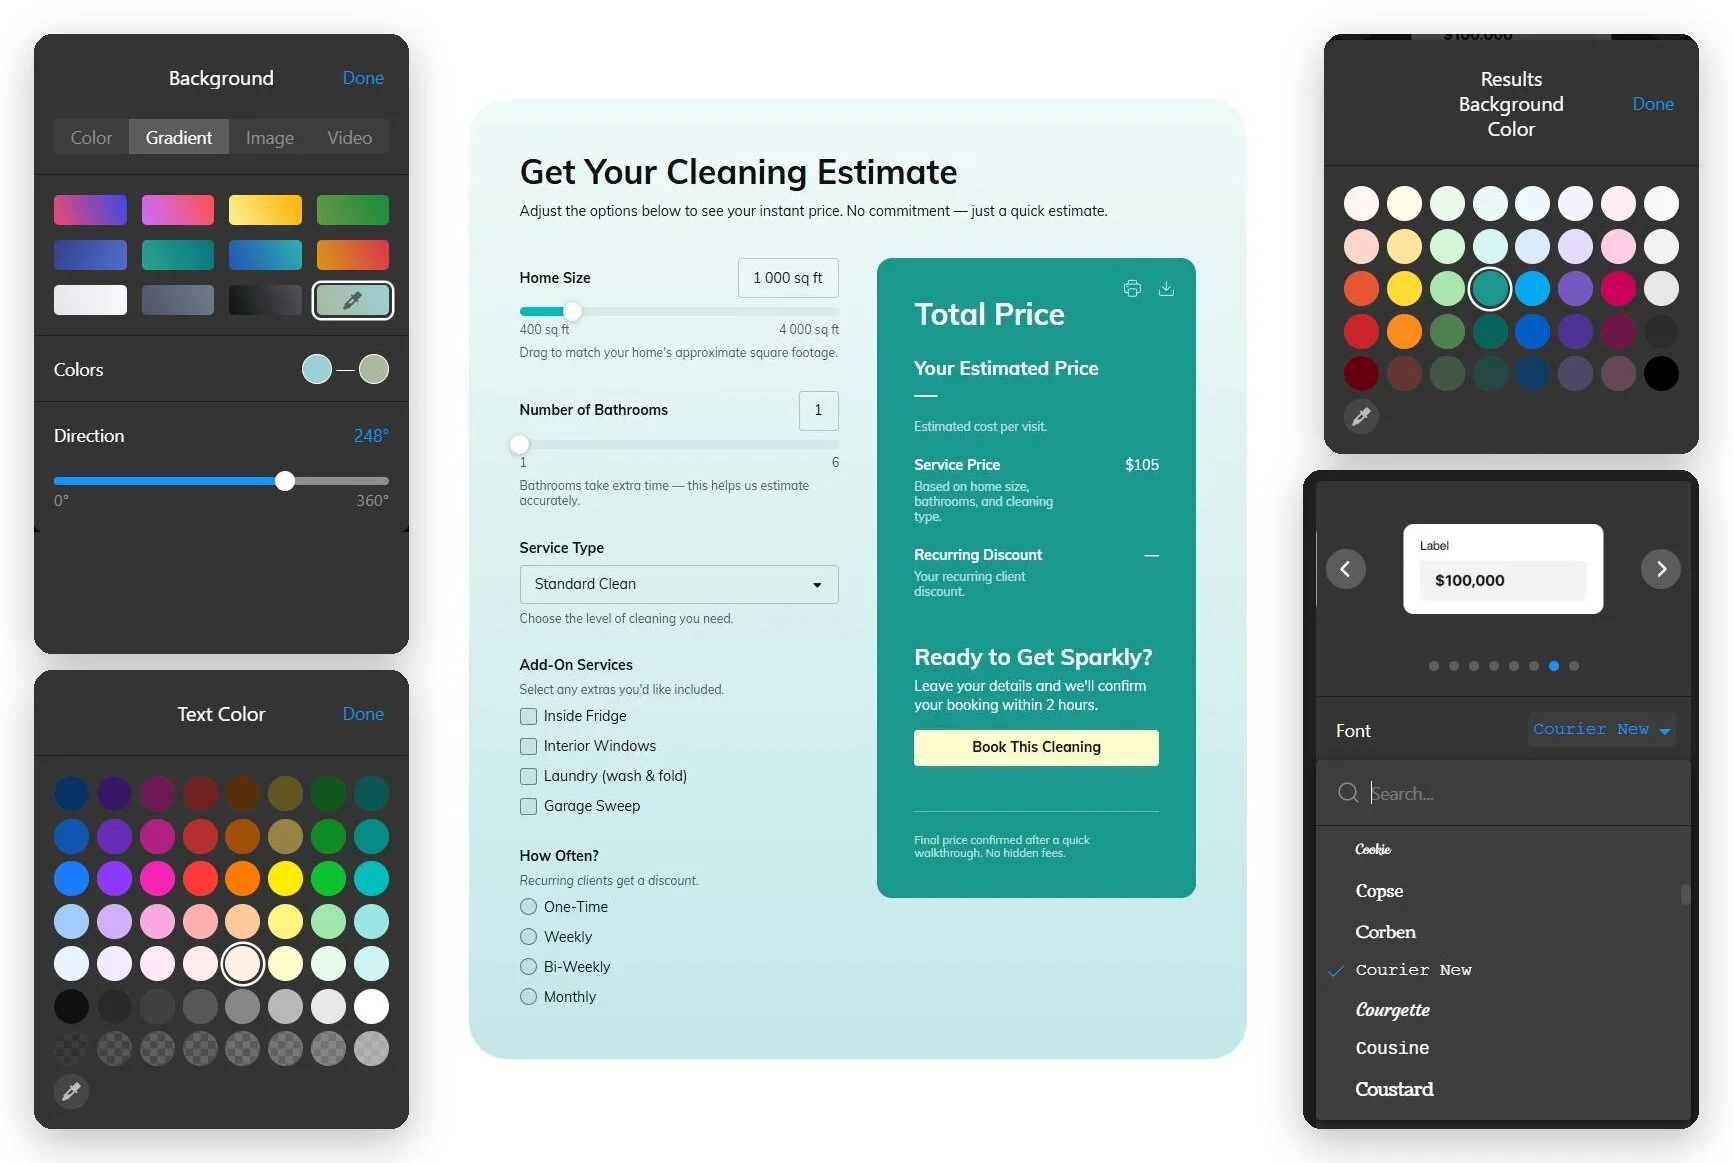
- Field Accent Color — the color of interactive elements like slider tracks and focus states. This is the one that signals “this is clickable,” so make it your brand’s action color, not a muted tone.
- Results Background Color — the panel behind the calculated price. Give it a slight contrast from the main background so the result visually separates from the inputs — it’s the number you want people to notice.
- Action Button Color — the CTA, submit, and redirect button color. Keep it consistent with the primary buttons elsewhere on your website so the calculator’s call to action feels familiar.
Step 7: Adjust calculator settings
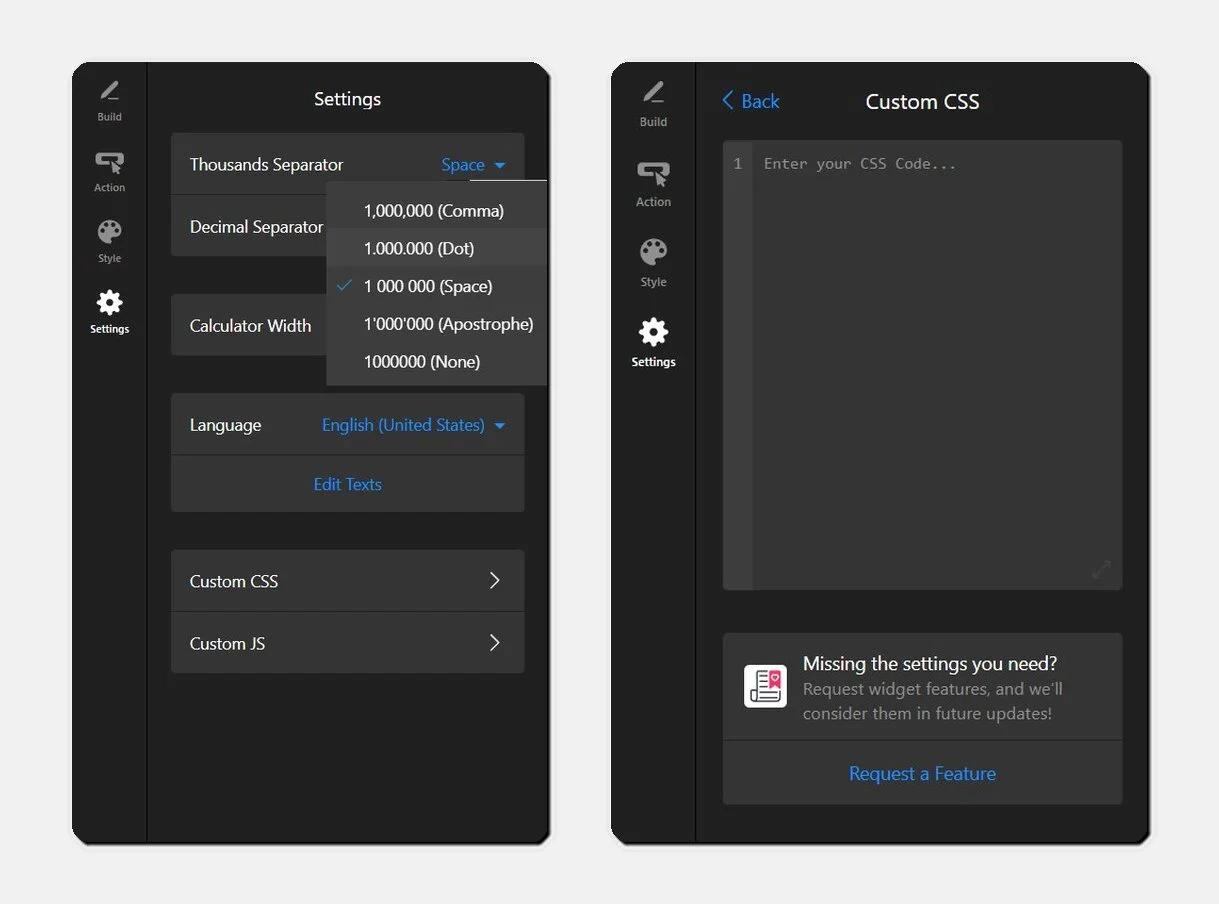
Under Settings, set your thousands and decimal separators (important for non-US pricing formats), the calculator width, and the display language. Custom CSS and JS fields are there for anything the controls don’t cover — though Custom JS only runs on your live website, not in the editor.
For more advanced integrations, there’s also a way to work with the Calculator via API.
Step 8: Embed the calculator on your website
Click Add to website for free, copy the generated embed code, and paste it into a Custom HTML block on your page.
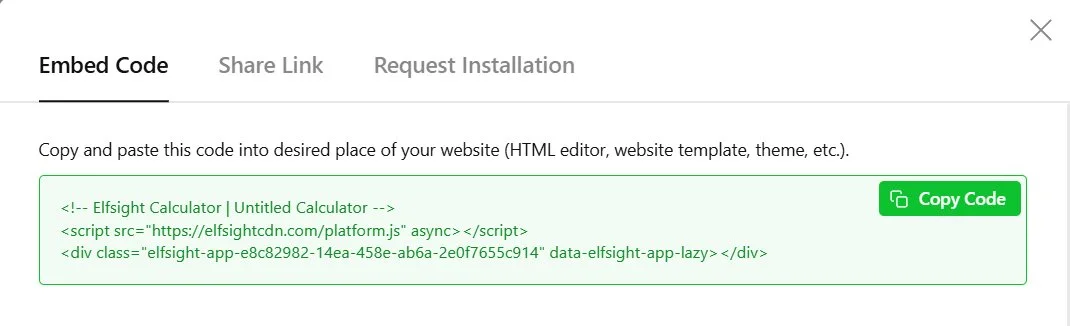
The code works on any platform that accepts custom HTML, including WordPress, Shopify, Wix, Squarespace, and Webflow. Setup differs slightly per platform, so follow the links for CMS-specific steps. Anything you change in the editor afterward goes live automatically — no need to re-paste the code.
Troubleshooting quick check
- Formula won’t validate: You typed a field name instead of selecting it from the dropdown. Re-insert it from the field list.
- Custom JS does nothing: It only runs on the live website, not in the visual editor preview.
- Print output looks broken: Check the Results Section and Document Header settings – print behavior is configured there.
- Widget sizing looks off: Adjust the Calculator Width in Settings and the container width on your platform.
Other Ways to Embed a Calculator in Your Website
If a widget isn’t the right fit, here are the routes people most often take instead, with the honest trade-offs of each.
Hand-coded JavaScript calculator
This approach makes sense when you need capabilities beyond what a widget can provide, such as API integrations, custom logic, or a fully bespoke interface. Building from scratch gives you complete flexibility and no recurring fees, but also means handling all development, maintenance, and updates yourself.
- Write the HTML form for your input fields.
- Write a JavaScript function that reads the inputs and computes the result.
- Style it with CSS to match your website.
- Add it to your page and handle validation and edge cases yourself.
Embedded Google Sheets calculator
If your pricing logic already lives in a spreadsheet, publishing it to the web is a quick, free way to make it available online. It works well as a stopgap, but visitors interact with raw spreadsheet cells, and there’s no built-in way to capture leads.
- Build your formula logic in a Google Sheet.
- Publish the sheet or relevant range to the web.
- Embed it on your page via the generated iframe.
Form plugin with calculation add-on
If you already use a form plugin like Gravity Forms or WPForms, its calculation features can handle simple pricing calculators and keep everything in one tool. The limitation is that these platforms are built for forms first, so more advanced calculation logic quickly becomes cumbersome.
- Install a form plugin that supports arithmetic fields.
- Add number fields and a calculation field.
- Configure the formula within the plugin’s interface.
Optimization Tips for Your Quote Calculator
Setup done, here’s how to get more out of it — these are the things that separate a calculator people abandon from one that converts.
- Front-load the cheap-to-answer fields. Put the easiest inputs first (quantity, a dropdown) so visitors get momentum before they hit anything that requires thought. Drop-off is highest at the first hard field.
- Show a result before asking for contact details. With Lead Form, the estimate appears first, then the popup. Keep that order — gating the number behind the form kills completions.
- Hide internal-only calculations. Use the Show in Results toggle to keep margin or cost-basis calculations out of the visitor’s view while still using them in the final formula.
- Use conditional logic to keep it short. Show advanced fields only when relevant (e.g., reveal “number of rooms” only after “service type = cleaning”), so the calculator never looks intimidating up front.
- Set separators for your market. In Settings, match thousands and decimal separators to your audience — a European visitor reading “1,000” as one expects a different format than a US one.
- Auto-reply with the estimate. Turn on Notify Respondents so submitters instantly get their number by email with your branding — it keeps you top of mind while you prepare a real follow-up.
Frequently Asked Questions
How do I add a price calculator to my website without coding?
Can a quote calculator collect leads before showing the result?
Does the calculator widget work on mobile?
Can I take payments through the calculator?
Why won't my formula calculate correctly?
Conclusion
A price calculator turns a vague “how much would this cost?” into a number the visitor reaches themselves — and, if you set it up that way, into a lead with their estimate already attached. The action type you choose up front (instant result, lead form, or redirect) does most of the work in deciding whether the calculator informs visitors or converts them.
If you’re ready to build, open the Calculator widget and start with a template that matches your pricing model. Set the action to Lead Form, get one formula working end-to-end, and embed it on a single page first — you can refine the rest once you see real submissions coming in.