Webflow Language Switcher widget
Create your Language Switcher widget
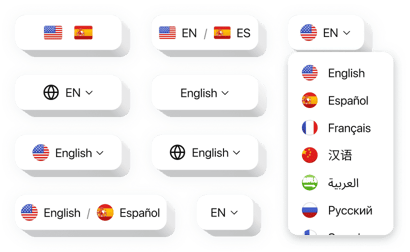
Why People Love Elfsight’s Language Switcher
Want to make your Webflow website welcoming to people around the world? A language switcher is the easiest way to do it. With Elfsight’s widget, you can add multiple language options in minutes. It’s visual, intuitive, and requires no coding or technical setup.
Instead of wrestling with complex tools, you get a straightforward solution that lets visitors choose the language they’re most comfortable with – whether that’s English, Spanish, French, or over a hundred others.
Did you know?
The CSA Research shows that 65% of people prefer websites in their own language, and 40% won’t buy if content is only offered in another one.
Add Elfsight’s Language Switcher to keep all users engaged on your Webflow website.
Key Features of Elfsight Language Switcher
Elfsight’s widget is designed to be simple, flexible, and easy to adapt to any Webflow website:
- Seamless Integration: The widget blends smoothly into your Webflow design, so you can create a multilingual website without extra hassle.
- Customizable Look: Change colors, fonts, layout, and button size to make the switcher match your brand perfectly.
- Supports 100+ Languages: Expand globally with support for over a hundred languages and give every visitor a familiar experience.
- Mobile-Optimized: Built to work on phones, tablets, and desktops – the switcher always looks sharp and functions flawlessly.
- Easy to Use: You don’t need technical skills. Setup takes a few clicks, so you can focus on your content instead of the tech.
👉Try all features in the free editor – no registration required.
How to Add a Language Switcher in Webflow
Adding the widget is quick. You can place it inline on a page or make it float so it’s always visible.
Method 1: Inline Switcher
Use this approach when you’d rather keep the switcher page-specific instead of site-wide.
- Choose the Template: In the Elfsight editor pick a template you like.
- Customize: Select the languages and adjust the design (size, colors, layout).
- Generate the Code: When you have finished the customization click “Add to website for free” to get the embed code.
- Embed & Publish: In Webflow Designer, add an Embed element where you want it to appear, paste the code, and publish.
Now the Language Switcher will be functioning on your Webflow website!
Method 2: Floating Switcher
This setup is great when you’d like a more flexible option that follows users as they scroll.
- Choose the Template: Select a floating template that stays visible as users scroll.
- Customize the Look: Choose languages, personalize the design, adjust the size, colors, and fonts of the switcher.
- Generate the Code: Once you’ve finalized the customization, Elfsight will generate a unique HTML code. Copy it.
- Embed & Publish: In Webflow Project Settings, open Custom Code, paste it into the Footer Code section, save, and publish.
That’s it – the switcher is live, and visitors can change languages anytime.
Need help? Check the Help Center for guides with screenshots, or join the Community Forum for tips, feature requests in the Wishlist, and updates in the Changelog.