Webflow Google Translate widget
Create your Google Translate widget
How Google Translate for Webflow Can Enhance User Experience
Expanding your Webflow website’s reach to international visitors has never been easier with Elfsight. Designed for seamless integration, this widget empowers your users to read your content in their native language without the need to switch platforms. Whether you’re running a business website, a blog, or an online portfolio, providing multilingual support boosts user engagement, improves accessibility, and enhances SEO by catering to a broader audience.
Elfsight offers a professional and user-friendly translation solution, eliminating the need for multiple website versions or complex backend setup. It’s ideal for businesses looking to enter global markets or simply make their content more inclusive. Choose from 100+ languages, customize the widget design to match your website, and enjoy real-time translation – all with no coding required.
Start using the Elfsight Google Translator on your website for free today and make your content available to the world in just a few clicks!
Key Features of the Webflow Google Translate Widget
Elfsight comes packed with powerful features that make language accessibility simple and elegant. Here’s what sets it apart:
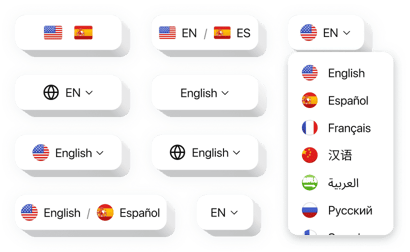
- 100+ Supported Languages: Let users instantly translate your content into over a hundred languages, including Spanish, Chinese, German, Arabic, and more.
- Floating and Inline Layouts: Choose how the widget appears on your site – subtle floating icon, or a dedicated spot in your header, footer, or sidebar.
- Customizable Appearance: Match the widget’s look to your website’s style using customizable colors, font sizes, labels, and icons.
- No Coding Required: The intuitive visual editor makes setup simple for anyone, even without technical skills.
- Fast Loading and Lightweight: Optimized for performance, the widget loads quickly and doesn’t slow down your website.
How to Add Google Translate to Webflow
Embedding the Webflow Google Translate widget takes only a few minutes and requires zero coding knowledge. Just follow these simple steps:
- Select your template: Open Elfsight’s widget editor and pick a template that fits your website’s needs.
- Customize your widget: Adjust the design, colors, layout, and language options to match your branding and user preferences.
- Copy the generated code: Once satisfied with your setup, copy the automatically generated integration code.
- Embed the code: In Webflow, go to the desired page or site-wide settings and paste the code into an Embed element or in the Custom Code section before the closing </body> tag.
If you run into any issues during setup, our support team is always available to help you install and fine-tune the widget on your Webflow website.