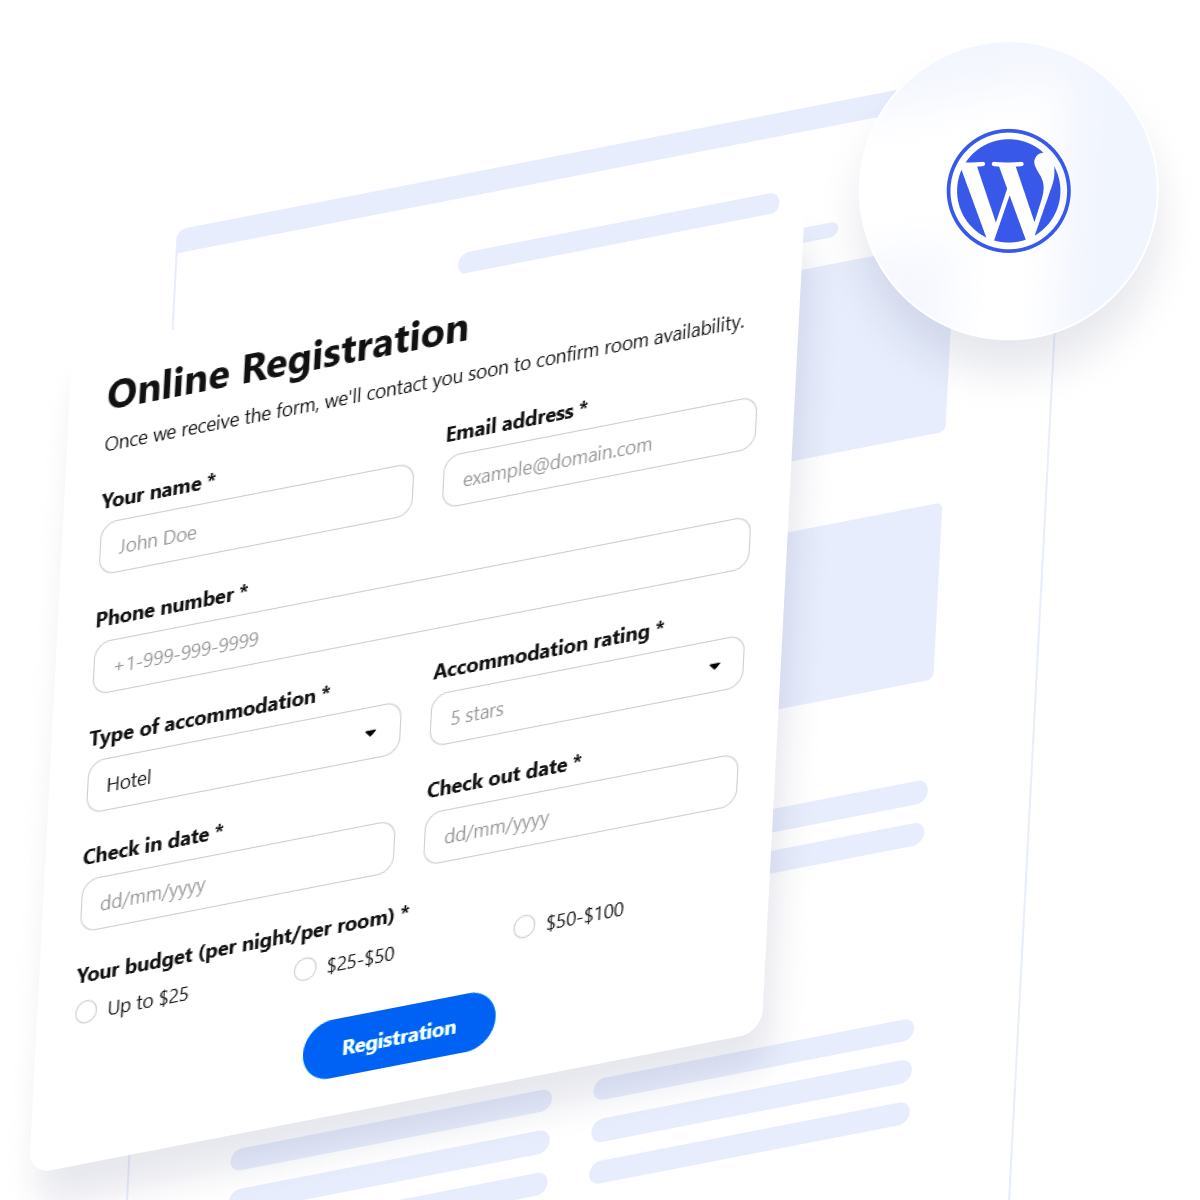
User registration forms play a crucial role in managing access, collecting data, and building a loyal audience on your WordPress website. Whether you’re running a membership platform, hosting events, or offering exclusive content, having a custom user signup interface ensures a seamless and professional experience.
If you’re wondering how to create a registration form in WordPress that looks great, functions smoothly, and matches your brand — you’re in the right place. A well-integrated form isn’t just about collecting names and emails; it’s a powerful account creation feature that helps grow your business online.
- Better user engagement and retention. Giving visitors a quick and easy way to sign up encourages repeat interactions and builds long-term trust.
- Streamlined account creation process. A user-friendly interface makes signing up feel effortless, reducing drop-offs and boosting conversion rates.
- Access control and personalization. Registration enables gated content, user-specific experiences, and role-based permissions to tailor your offerings.
- Improved data collection and insights. With a well-designed form, you can capture relevant user data that helps inform your marketing and product decisions.
- Professional presentation and credibility. A polished form reflects your brand’s quality and creates a trustworthy experience from the first interaction.
Now that you understand the value of adding a user registration form to your WordPress website, let’s explore how you can create one in just a few steps using Elfsight’s no-code solution.
Quick Start: Create a Registration Form in 1-2-3
Now that you know why registration forms are essential, let’s look at how simple it is to set one up with Elfsight. With no coding required, you can have a fully functional frontend signup form on your WordPress website in just a few minutes.
- Open the Elfsight editor and choose the registration form template from the library.
- Adjust the layout, field types, spacing, and alignment to suit your website’s design and user flow.
- Customize fonts, colors, buttons, and other elements to match your branding perfectly.
- Click “Add to website for free”, copy the installation code, and paste it into your WordPress backend.
This streamlined setup makes it easy to create a custom registration form that not only works flawlessly but also looks professional on any device.
Start now – build your own registration form with Elfsight in minutes!
Top Features of Elfsight Form Builder
Once you’ve seen how fast it is to build a form, it’s important to understand why Elfsight stands out from other options. With powerful customization and seamless integration, Elfsight makes it easy to create a user registration form in WordPress that works flawlessly and looks professional.
Below are the core benefits that set Elfsight apart as a dynamic signup layout solution for any visitor login page:
- Seamless WordPress integration. Add the registration form to any page or post using a single embed code — no plugins or technical setup required.
- Custom branding options. Tailor every visual detail to match your website, from fonts and button colors to form spacing and borders.
- Secure and reliable form handling. Ensure data is submitted safely with built-in validation and reliable field processing across all devices.
- Easy user experience. Create forms that are quick to fill out and optimized for conversions, encouraging more visitors to complete registration.
- Real-time editing preview. Instantly see changes as you customize your form in the live visual editor — no back-and-forth required.
- Lightweight and mobile-friendly design. All forms are built to load fast and look great on smartphones, tablets, and desktops alike.
With these advantages, Elfsight provides everything you need to build a visitor login page that’s both functional and visually aligned with your brand. Let’s now walk through the complete process of setting up and embedding your form into your WordPress website.
Create and Add Your Registration Form to WordPress: Full Guide
Now that you’ve seen what the Elfsight Form Builder plugin offers, it’s time to walk through the full setup. Below is a step-by-step guide to help you create a custom registration form in WordPress, configure every detail, and embed it into your website — no coding required.
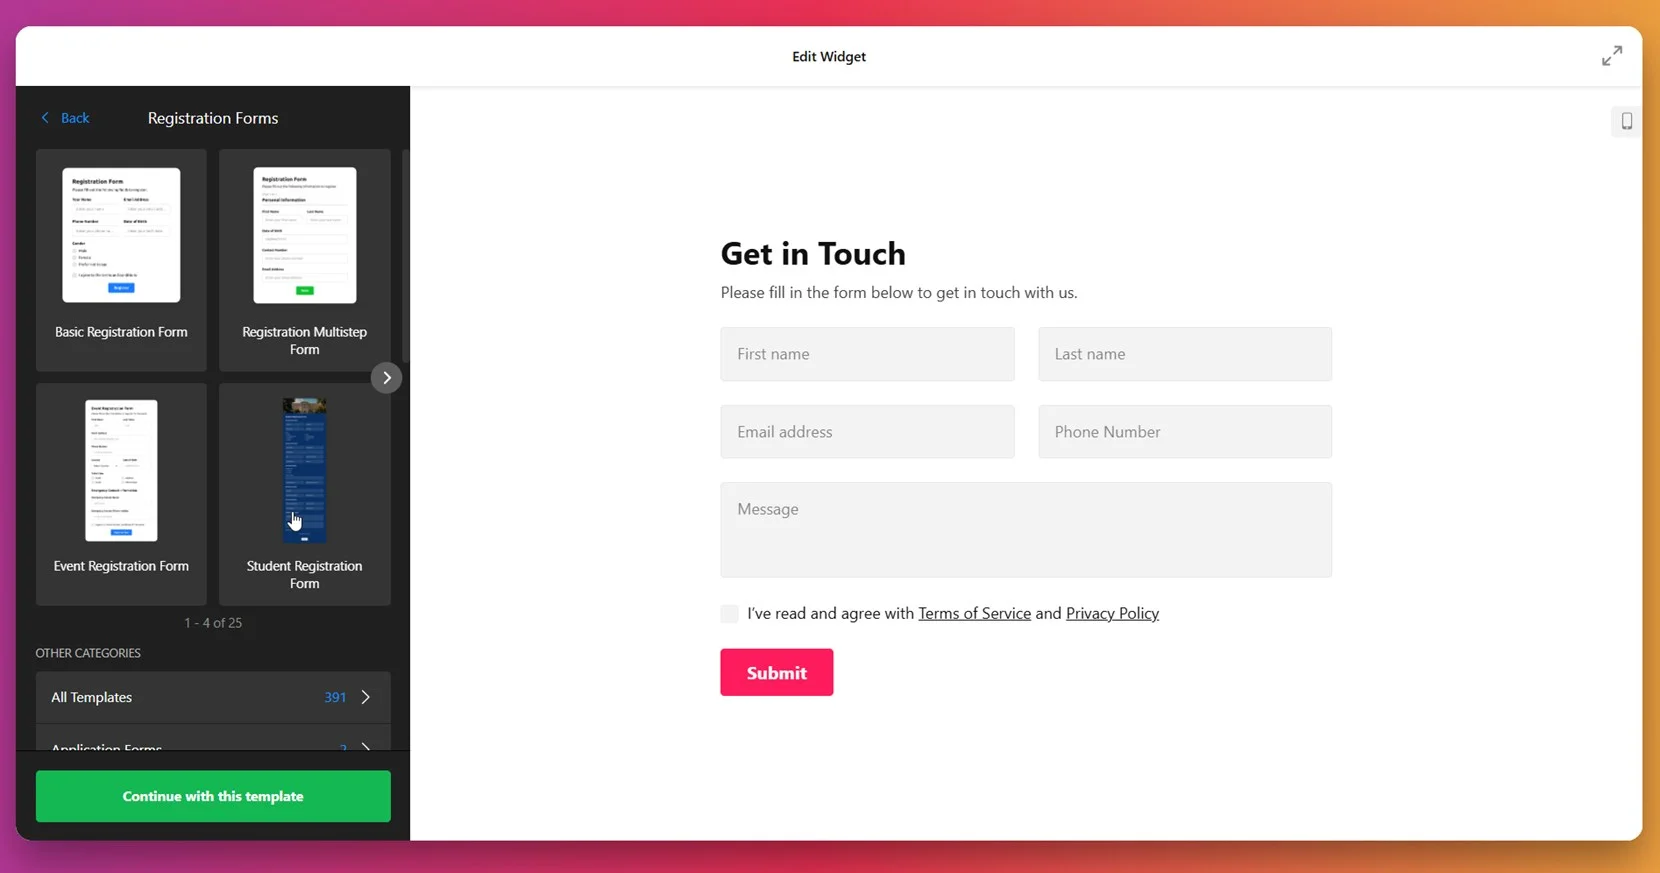
- Choose a template. Open the Form Builder editor and navigate to the “Registration Forms” section. Pick from templates like Basic, Multistep, Event, or Student registration forms, then click “Continue with this template”.

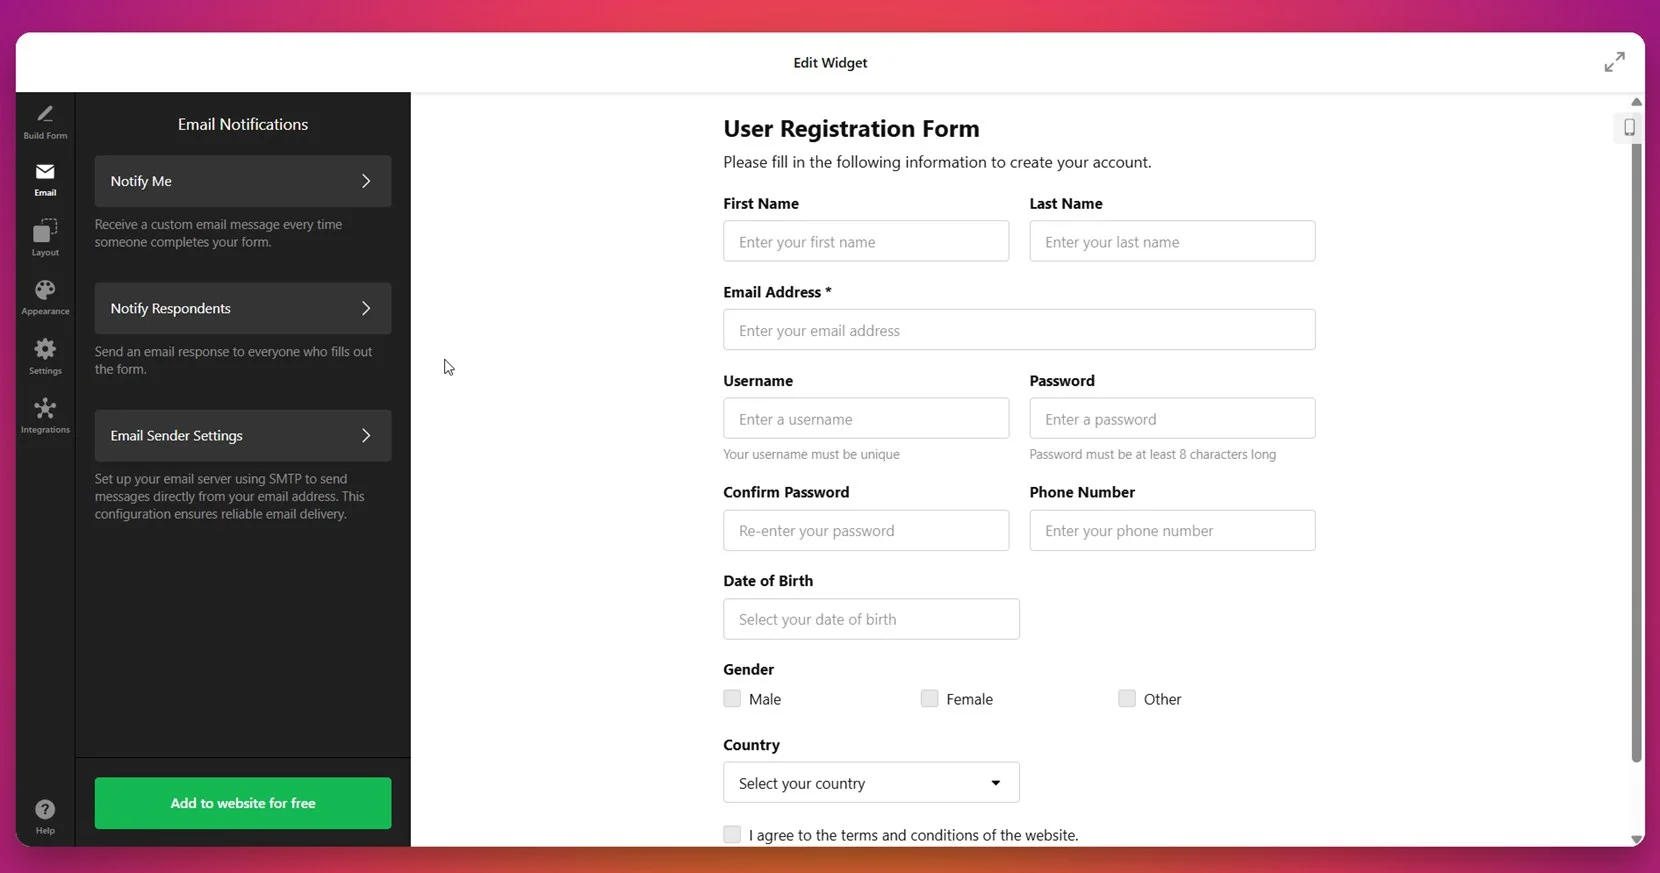
- Build your form. Use the drag-and-drop editor to add and arrange form fields like First Name, Email Address, Phone Number, Username, and Password. You can also use the AI Form Generator to help you create a form even faster.

- Configure email notifications. Go to the “Email” tab to set up automated messages. Choose to notify yourself or your users upon submission and adjust sender settings for reliable delivery.
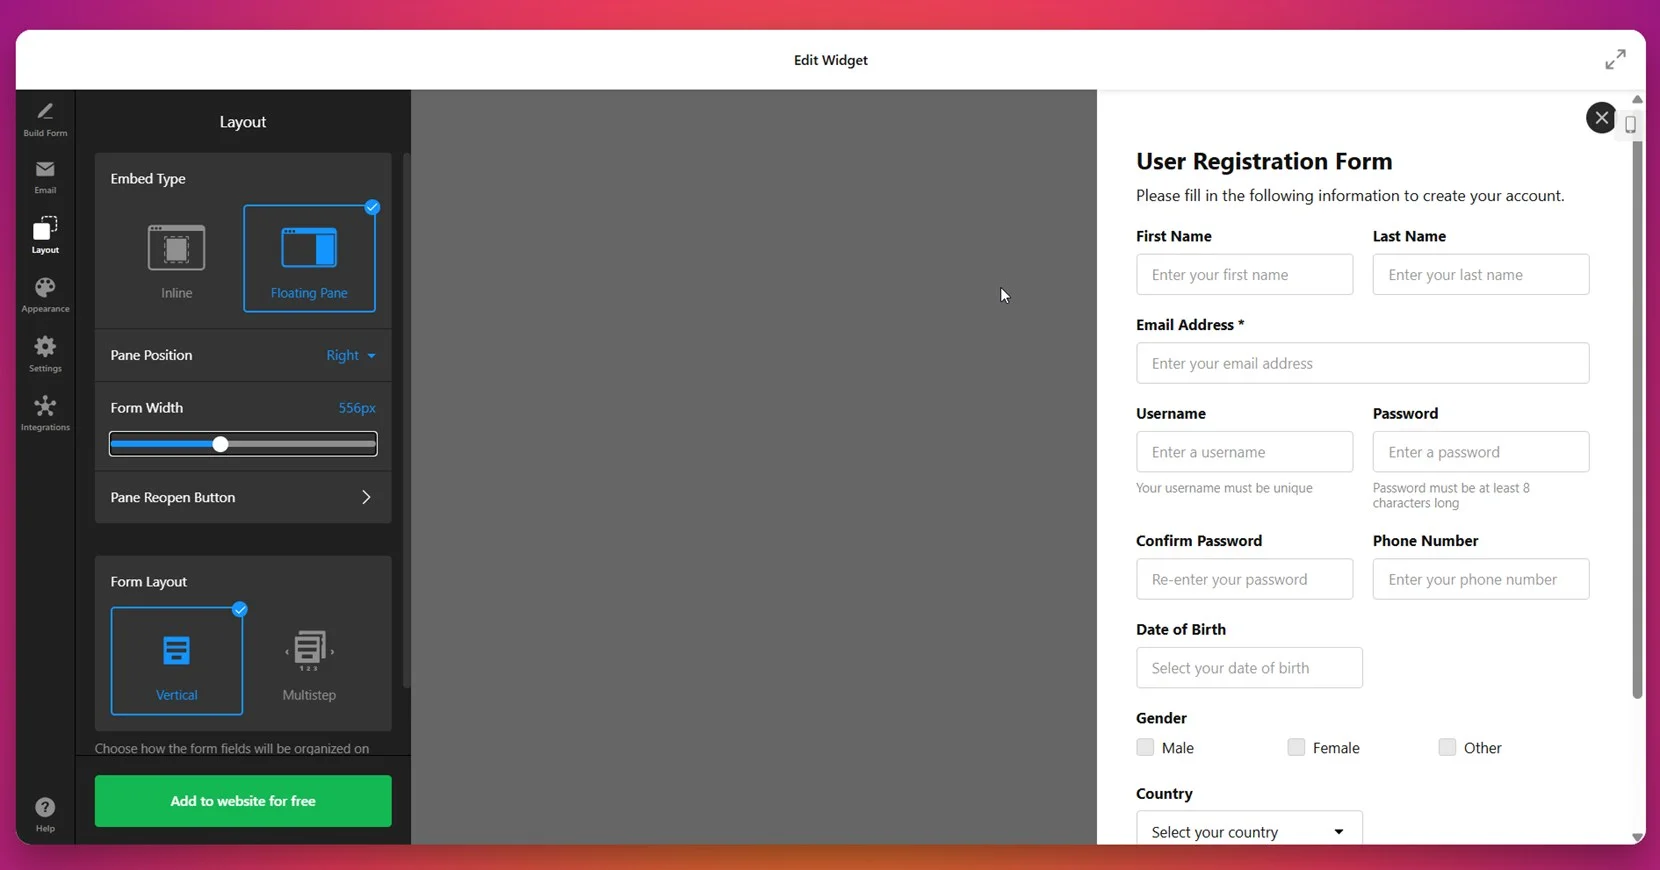
- Set the layout and width. Under the “Layout” section, decide between Inline or Floating Pane. Choose vertical or multistep form structure, and adjust the form width for best fit.

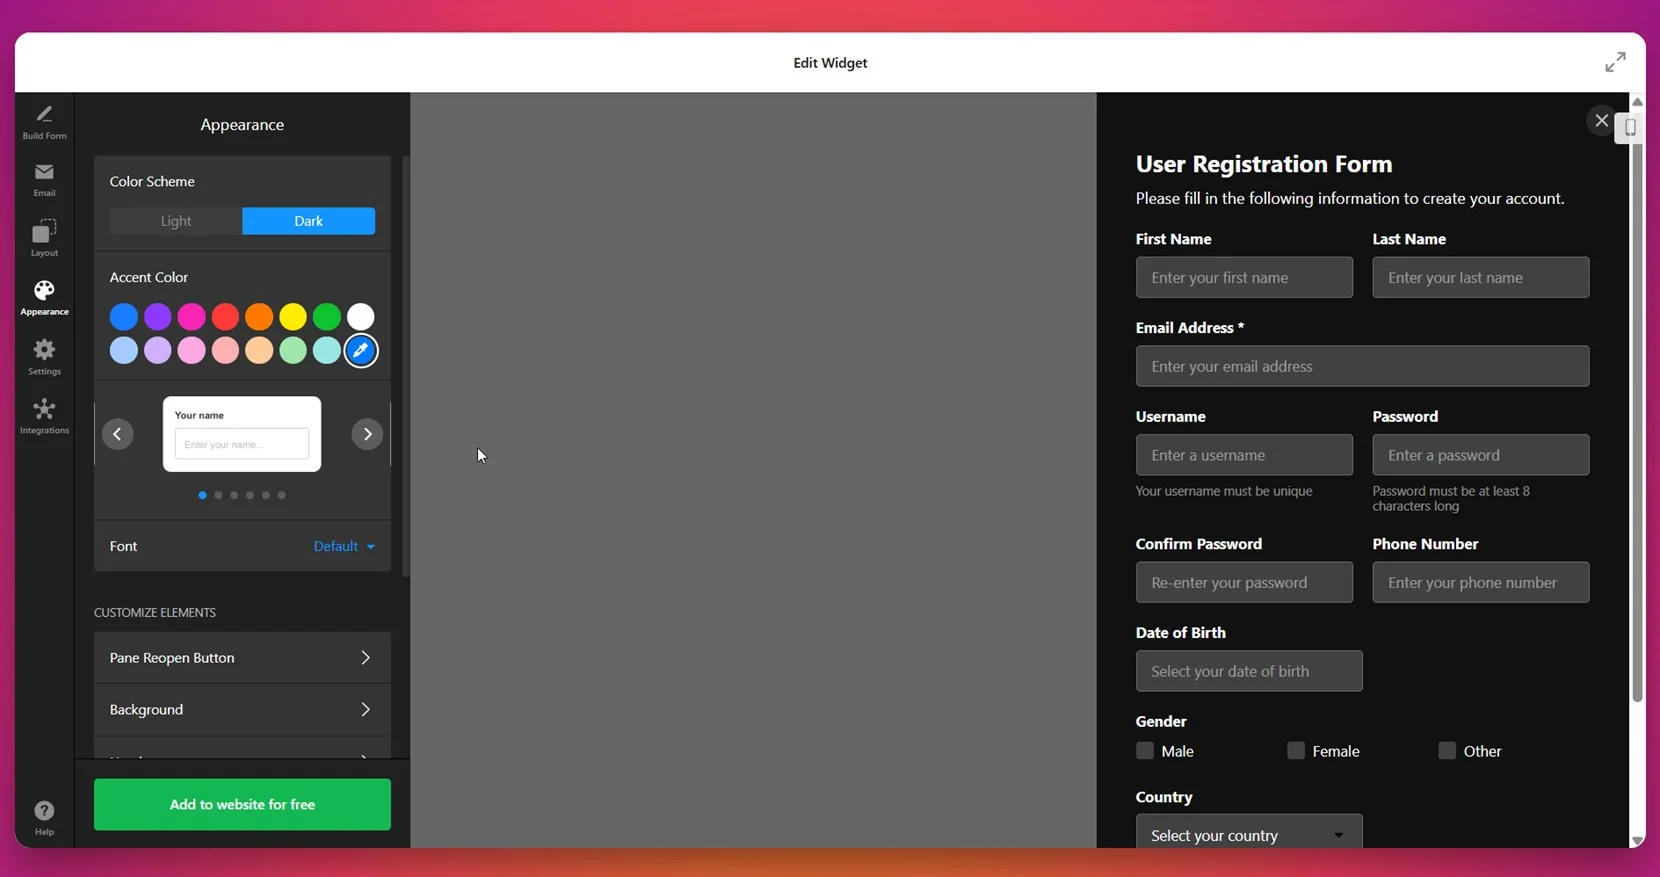
- Customize appearance. In the “Appearance” tab, pick a light or dark color scheme, select an accent color, change the font, and personalize background, buttons, and other design elements to match your website’s look.

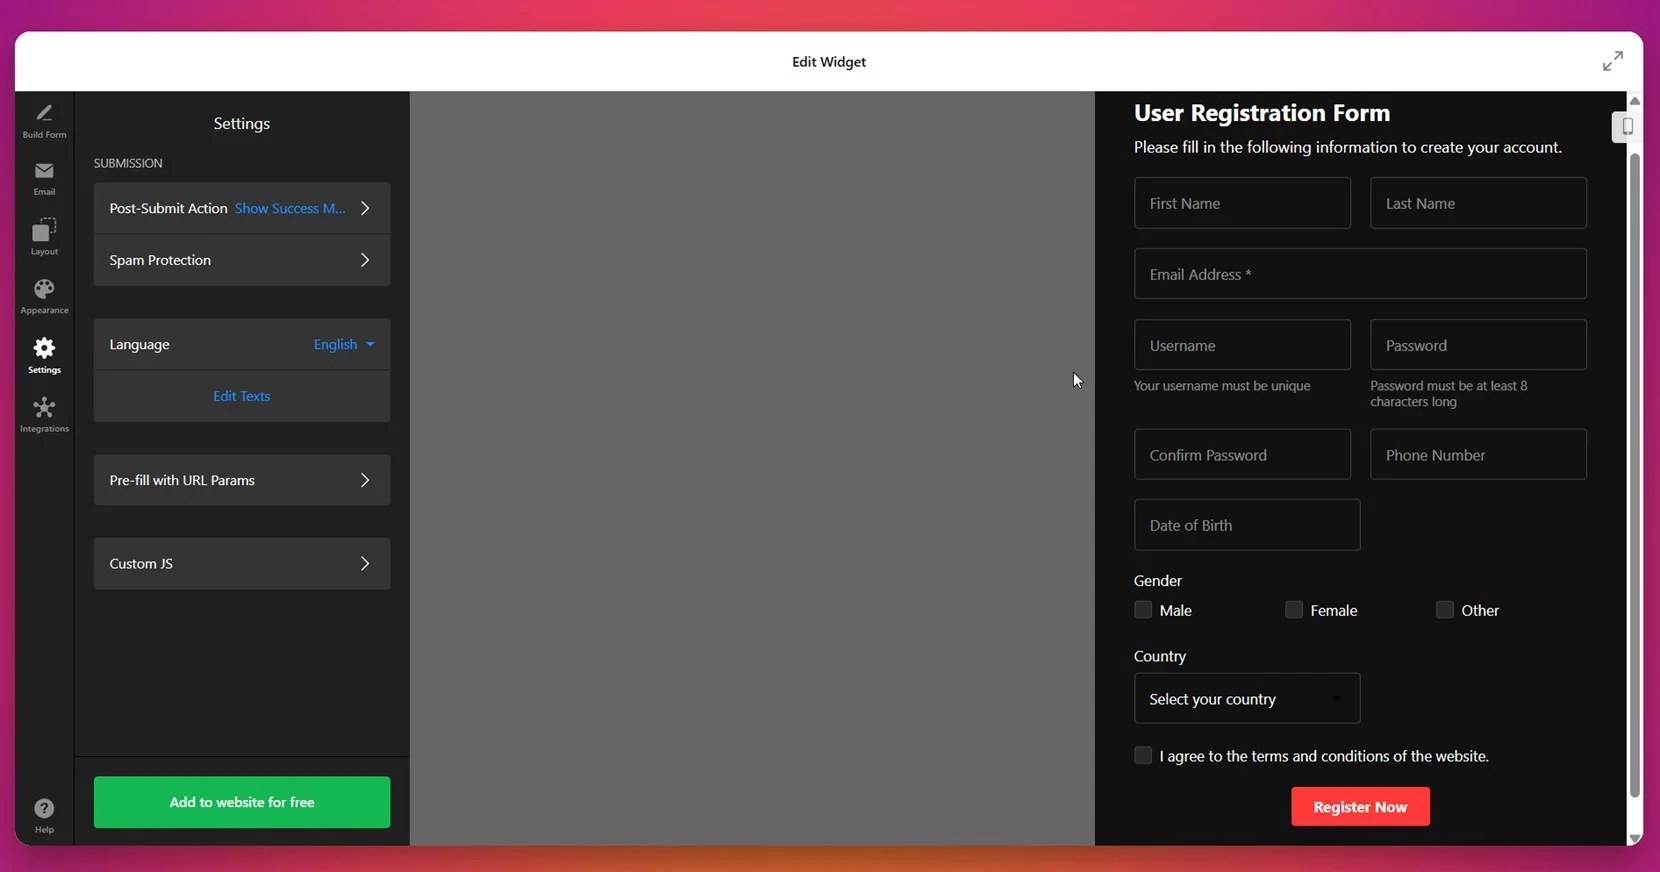
- Configure form behavior. In the “Settings” tab, define what happens after submission (e.g., show a success message), enable spam protection, and fine-tune options like language, URL parameters, or custom JavaScript.

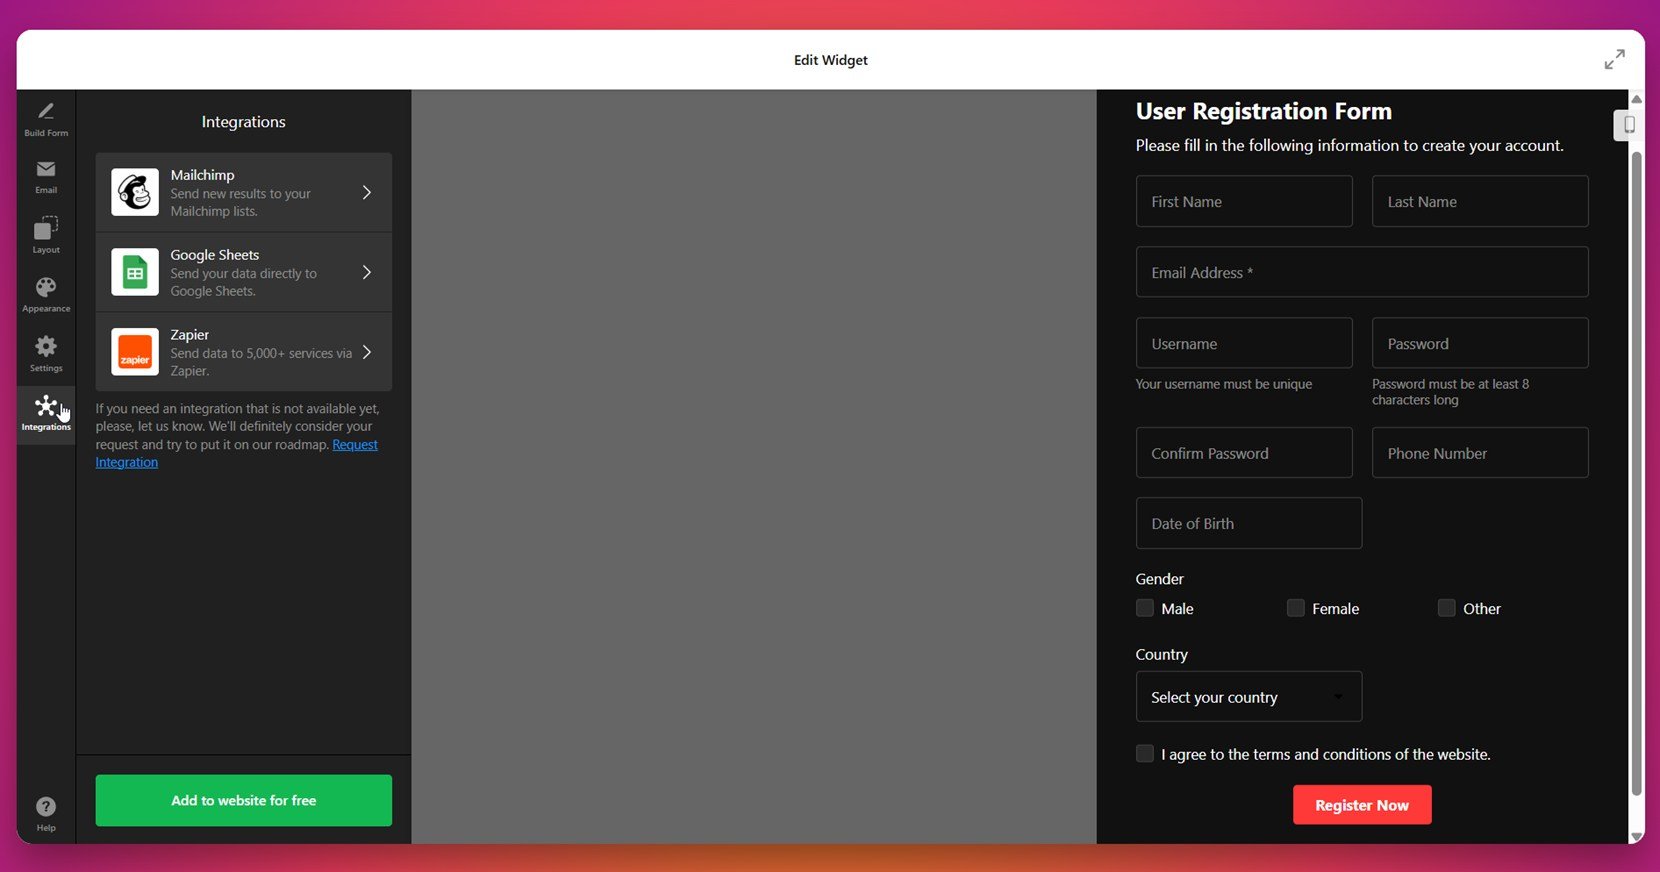
- Add integrations. Go to the “Integrations” section to connect your form with platforms like Google Sheets, Mailchimp, or Zapier to automate data collection and email workflows.
- Embed the form. Click the “Add to website for free” button and copy the generated HTML embed code. Paste it into your WordPress backend where you want the form to appear — inside a block, page, or widget area.


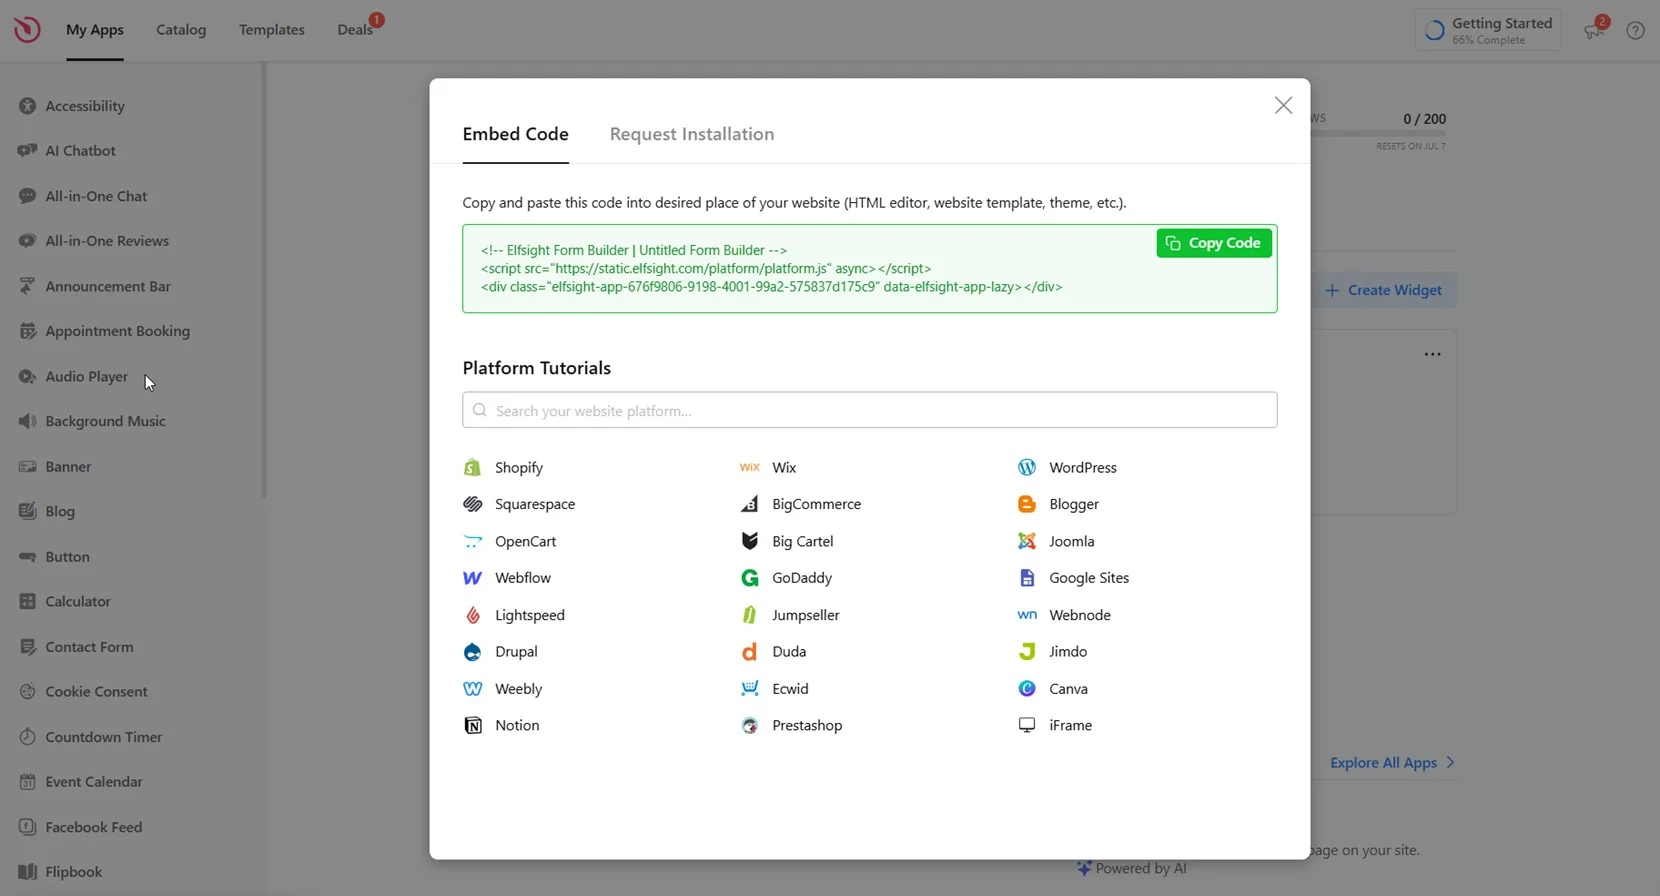
To embed the registration form on your WordPress website, open your WordPress dashboard and navigate to the page or post where you want the form to appear. Add a new Custom HTML block, then paste the Elfsight embed code directly into the field. Update or publish the page to make the form live instantly.
This approach gives you full control over where the form is displayed — whether it’s on your homepage, a dedicated registration page, or across multiple pages for increased visibility.
If you’re looking for other ways to create or embed a registration form, let’s take a quick look at some alternative methods available within the WordPress ecosystem.
Other Ways to Add Forms in WordPress
While Elfsight provides a flexible, code-free setup, there are alternative ways to add a registration form in WordPress — especially if you prefer built-in options or manual configuration. Below are two widely used methods you can try, including a native WordPress feature and a fully manual HTML approach.
Using the Built-in WordPress User Registration Feature
WordPress comes with a simple, built-in registration system that allows users to create accounts using a default signup form. This method is ideal for basic community membership websites, internal portals, or any use case where advanced styling and field control are not essential. It doesn’t require any additional plugins or code and is entirely managed through the admin dashboard.
- Enable user registration in your dashboard. Log in to your WordPress admin panel, navigate to “Settings” → “General”, and scroll down to the “Membership” section. Check the box labeled “Anyone can register” to allow public signups. This setting makes the registration URL active and opens access to new users.
- Set the default user role. Just below the Membership checkbox, locate the “New User Default Role” dropdown. Choose “Subscriber” if you want to give users the lowest level of access. You can also select other roles like “Contributor” or “Author”, depending on your use case, but be cautious as higher roles grant additional permissions.
- Save your changes. Scroll down to the bottom of the General Settings page and click the “Save Changes” button. This activates user registration and applies the role setting you’ve selected.
- Get the default registration link. WordPress uses a built-in registration endpoint available at: yourdomain.com/wp-login.php?action=register. Replace “yourdomain.com” with your actual domain name. This page contains the default form with username and email fields.
- Add the registration link to your navigation menu. Go to “Appearance” → “Menus”, select the menu you want to edit, and click “Custom Links”. Paste the registration URL in the “URL” field and write a descriptive label like “Register” or “Join Us”. Click “Add to Menu”, drag the item to the desired position, and save the menu.
This solution enables a functional, no-cost registration flow directly within WordPress. It’s suitable for basic use cases and ensures new users are added to your database instantly after submitting the form.
Manually Embedding an HTML Registration Form
If you’re comfortable with basic coding and want full creative control, manually embedding an HTML registration form is a powerful option. This method allows you to define the exact structure, layout, and design of the form to fit your branding and user experience goals. It’s most suitable for developers or advanced users who want to implement custom fields and styling without relying on plugins or visual builders.
- Create an HTML form structure. Open the page or post where you want to place the form using the WordPress block editor (Gutenberg) or the Classic Editor. Insert a “Custom HTML” block (or switch to “Text” mode in Classic Editor) and paste the basic HTML <form> structure:
<form action="your-processing-script.php" method="POST"> <!-- Input fields go here --> </form> - Add input fields. Inside the form structure, define the necessary input fields using appropriate HTML tags. Typical fields include first name, last name, email address, username, password, and confirm password. Use inputs like <input type=”text”>, <input type=”email”>, and <input type=”password”>. Wrap them in <label> elements for accessibility:
<label>First Name: <input type="text" name="first_name" required></label> <label>Email: <input type="email" name="email" required></label> <label>Password: <input type="password" name="password" required></label> - Set a form action. The action attribute defines where the form data will be sent upon submission. This should point to a processing script on your server or an external handler. For example: <form action=”/wp-content/themes/your-theme/form-handler.php” method=”POST”> If you don’t have a script in place (e.g., written in PHP), the form won’t be able to process or store the data.
- Include basic validation. Add required attributes to essential fields to ensure the form cannot be submitted without proper input. You may also use the pattern attribute for specific data formats (e.g., for phone numbers). HTML5 validation enhances data quality and usability.
- Style the form using CSS. Customize the visual appearance using inline styles or by assigning class names and writing CSS in your theme’s stylesheet. This allows you to align the form’s design with the rest of your WordPress website. Here’s an example:
<style> form.custom-registration input { padding: 8px; border: 1px solid #ccc; margin-bottom: 10px; width: 100%; } </style>
This method gives you total flexibility in how your form looks and functions. You can control field layout, spacing, grouping, colors, and button behaviors — all from the code level.
Comparison of Registration Form Methods
Here’s a side-by-side comparison of the native, manual, and Elfsight approaches for building registration forms in WordPress:
| Method | Pros | Cons |
|---|---|---|
| Elfsight Form Builder | Offers full customization, drag-and-drop editing, and instant embed code with no technical setup required. | Requires embedding external script code manually into the WordPress backend. |
| Default WordPress Registration | Built into WordPress and doesn’t require any plugins or external tools. | Limited design control and no custom fields or branding options available. |
| Manual HTML Form | Gives full design freedom and complete structural control using HTML and CSS. | Requires separate backend logic or plugin to process form data and create user accounts. |
Each method has its use depending on your level of experience and customization needs. But if you’re looking for a fast, customizable, and no-code solution, Elfsight remains the most accessible and feature-rich option. In the next section, we’ll cover some practical tips to help you get even more out of your registration form setup.
Tips to Improve Registration Form Performance
Once your registration form is embedded, there are a few important tips to follow that can help you improve sign-up rates, simplify user onboarding, and maintain a smooth user experience. These best practices apply to any widget or embedded form, regardless of the platform you use.
- Place the form where it’s easy to find. Your registration form should be positioned in a visible area — such as the homepage, navigation bar, or a dedicated registration page — to make it easy for users to access and fill it out.
- Keep the form short and focused. Only include the fields you truly need. Long forms can overwhelm users and lead to abandonment. Stick to essential information like name, email, and password.
- Use clear and friendly labels. Avoid technical jargon or vague labels. Clear field names like “Email Address” or “Create Password” help users complete the form confidently and without errors.
- Enable autofill and keyboard accessibility. Make sure your form supports browser autofill and can be navigated easily with a keyboard. This improves usability for all visitors, including those with accessibility needs.
- Test your form on mobile devices. Forms that don’t adjust well on smaller screens can drive users away. Use responsive design to ensure fields and buttons look and work correctly on all screen sizes.
- Include confirmation and error messages. Users should see instant feedback after submitting the form. Confirmations reassure them the process worked, and error messages help fix mistakes without confusion.
- Use secure HTTPS protocols for form submissions. Always ensure your website uses an SSL certificate to encrypt submitted data. Forms without HTTPS can lead to security warnings or compromised data.
- Minimize distractions around the form. Avoid placing registration forms near pop-ups, banners, or other elements that could divert attention. Keep the focus on completing the form.
Following these tips will help you build a clean, user-friendly registration experience that encourages action. Now let’s look at where registration forms make the biggest impact — across different industries and types of businesses.
Who Should Use a Registration Form: Use Cases
Registration forms are a versatile tool that can be used across a wide range of industries and business types. Whether it’s about managing user access, segmenting your audience, or collecting customer data, these forms enable more efficient workflows and stronger engagement. Below are three industries where registration forms play a key role.
Application in Education and Online Courses 🎓
Educational platforms and e-learning businesses use registration forms to onboard new students, assign roles (e.g., student, instructor), and collect course preferences. With role-based registration, institutions can automatically direct learners to appropriate course dashboards or restricted content areas. A well-placed registration form streamlines the signup process and improves retention by minimizing onboarding friction.
Application in Events and Conferences 📅
Event organizers can use registration forms to collect participant information, issue tickets, assign attendee roles (e.g., speaker, vendor, visitor), and send out confirmations. Whether it’s a virtual summit or in-person seminar, forms help centralize attendee management and personalize the communication process. With multi-step layouts, event websites can easily guide users through multiple selection points like event sessions, payment tiers, and add-ons.
Application in Fitness and Wellness Services 🏋
Gyms, yoga studios, personal trainers, and health coaches use registration forms to gather member information, schedule sessions, and promote classes. Whether you’re offering a free trial or onboarding new members, a registration form helps structure intake data like fitness level, goals, and health history. Automated responses ensure users know what to expect after they sign up.
From education to events to wellness, a well-designed registration form plays a key role in streamlining access and gathering essential user data. Next, let’s go over some of the common challenges users face and how to fix them effectively.
Fixing Common Issues
Even with the best tools and setup, registration forms may sometimes run into issues. Below are some of the most common problems users face when working with WordPress registration forms — along with practical solutions for each one.
Why isn’t my registration form displaying on the page?
Why are form submissions not going through?
How do I fix field validation errors?
type="email" or type="password") and that your form has the necessary HTML5 validation attributes such as required or pattern where needed.Why are users not receiving confirmation emails after submitting?
Can the form be used by mobile users?
Why is spam getting through my form?
Knowing these common issues helps you stay ahead and maintain a smooth registration process.
Conclusion
Setting up a user registration form in WordPress doesn’t have to be complicated. Whether you choose a flexible solution like Elfsight, rely on native WordPress features, or manually embed an HTML form, each method can help you start accepting signups and create a more interactive experience for your visitors. By following best practices and addressing potential issues early on, you can ensure your form works smoothly and supports your business goals.
From education platforms and fitness services to event registration, a well-built registration form opens the door to better user interaction and streamlined onboarding. With the right setup, your registration process will not only capture leads but also deliver a professional, trustworthy impression to your audience from the very first click.
Looking for More Help?
We hope this guide gave you the clarity you needed to get started. If you’re ready to explore even more ways to improve user experience on your WordPress website, contact us — our team at Elfsight is here to help. We’re committed to offering user-friendly, no-code widget solutions tailored to your needs.
Join our growing Community to ask questions, share your feedback, and connect with others. Got an idea for a new feature? Add it to our Wishlist — we’d love to hear what you have in mind.