Integrating WhatsApp with Webflow allows you to add a direct communication channel to your website, enabling real-time conversations with visitors through a familiar and widely-used app.
Whether you’re running a small business, an online store, or offering services, adding a WhatsApp Chat widget on Webflow can significantly boost user engagement and customer satisfaction.
- Instant access to conversations. Let visitors start a WhatsApp chat directly from your website without needing to fill out forms or switch platforms.
- Real-time customer support. Answer questions and resolve issues instantly within a chat environment your customers already use every day.
- Build trust through familiarity. Using WhatsApp, a globally recognized messaging app, gives users a sense of comfort and credibility when reaching out.
- Boost lead generation and conversions. A fast and convenient communication channel encourages potential customers to take action while interest is high.
As you see, Webflow WhatsApp integration has many benefits. Now, let’s how you can embed a widget with an easy and flexible solution where no coding skills are required.
How to Quickly Add WhatsApp to Webflow
Now that you understand the value of integrating WhatsApp into Webflow, the next step is actually adding the utility to your website. With Elfsight, you can add a WhatsApp Chat widget in just a few clicks — no coding or advanced setup required.
- Open the editor and select the WhatsApp Chat template.
- Customize the layout, position, and behavior to suit your website’s design.
- Adjust colors, text, and icons to match your brand identity and tone of voice.
- Click “Add to website for free”, then copy the provided code and paste it into your Webflow backend.
Try it now – build your WhatsApp Chat widget in minutes!
Elfsight WhatsApp Chat Widget Features
Elfsight’s WhatsApp widget is designed to make communication with customers simple and effective. It offers full control over appearance, behavior, and content, making it a flexible solution for any Webflow website.
Below are the key benefits of using the Elfsight WhatsApp Chat widget:
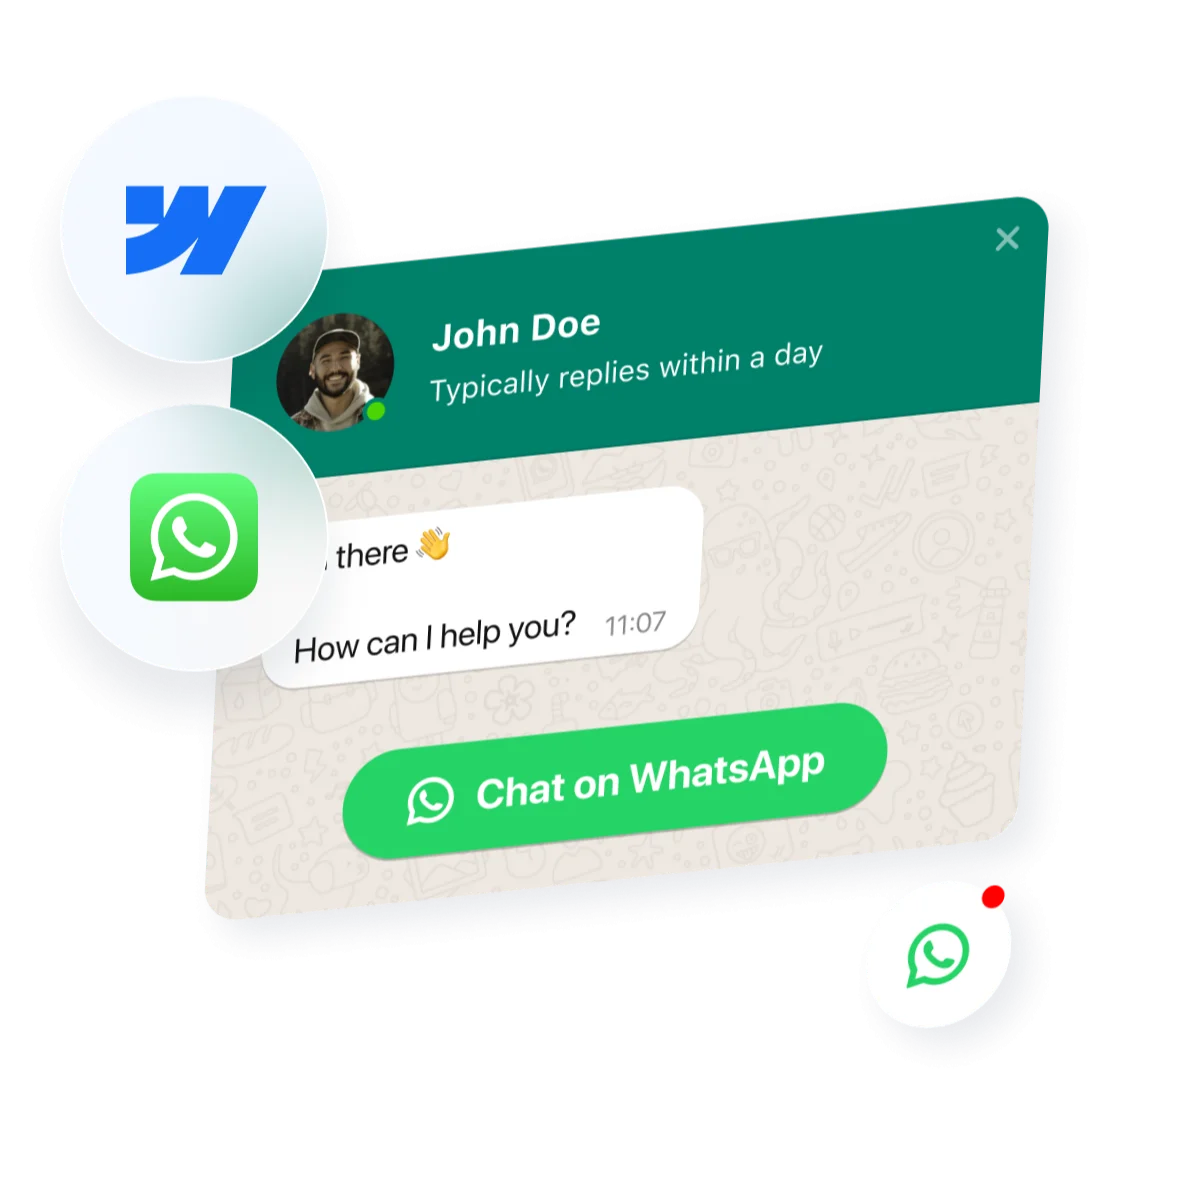
- Floating chat icon or contact button. Display a fully customizable chat trigger on any page of your website to ensure constant visibility and easy access.
- Multiple agent profiles. Add different support reps with unique names, job titles, and profile pictures to personalize user interaction and boost credibility.
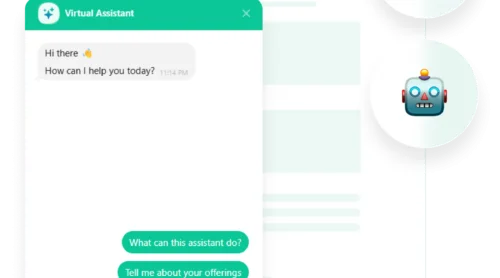
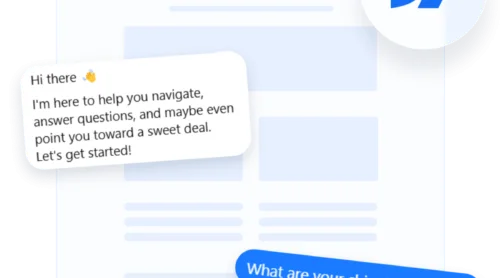
- Custom welcome messages. Greet users with a tailored message that encourages them to start a conversation and sets the tone for engagement.
- Smart availability settings. Define working hours and control when the chat is available, so users get clear expectations of support times.
- Fully adjustable widget layout. Modify position, size, icon style, and appearance to match your branding and website design perfectly.
- Responsive on all devices. The widget runs smoothly across mobile, tablet, and desktop, ensuring optimal performance and user experience everywhere.
With all these customization options and user-friendly settings, Elfsight offers one of the most efficient ways to integrate a WhatsApp Chat into your website. Next, let’s walk through the complete process of creating and embedding the widget into Webflow step by step.
Webflow WhatsApp Integration: Step-by-Step
Now that you’ve seen what the Elfsight WhatsApp widget offers, it’s time to see how to make the most of it. Follow this step-by-step process to customize the widget and embed it to Webflow.
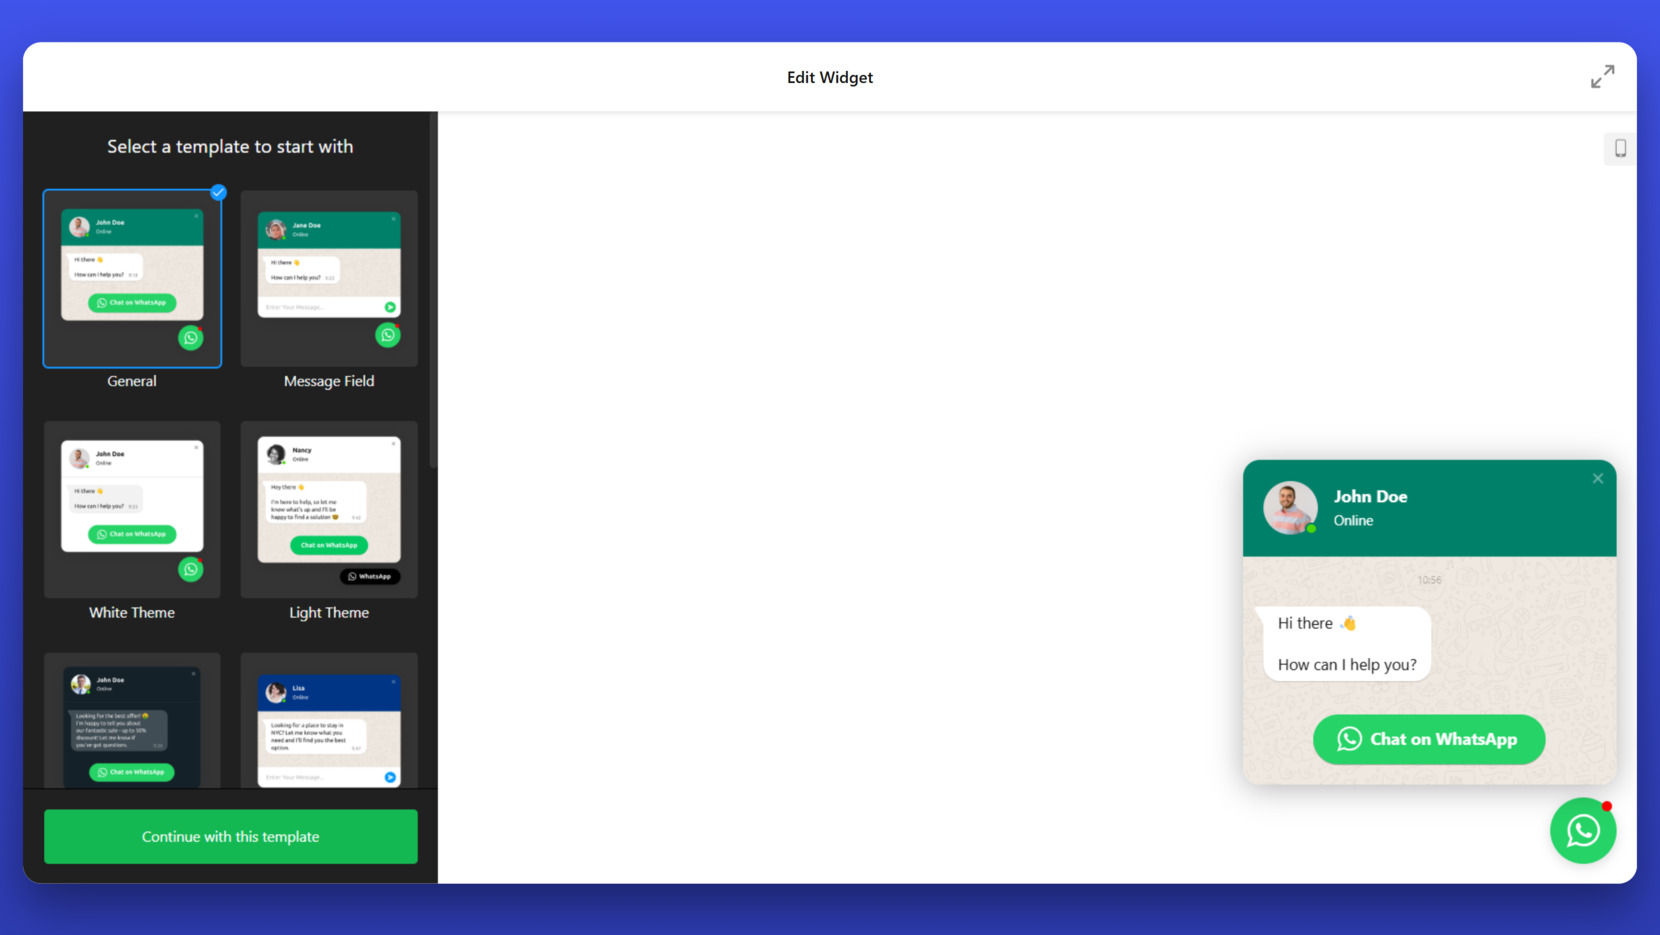
- Choose a Template. Start by selecting your preferred widget template in the editor. You’ll see layout options such as General, White Theme, Light Theme, and more. Click “Continue with this template” to begin customization.

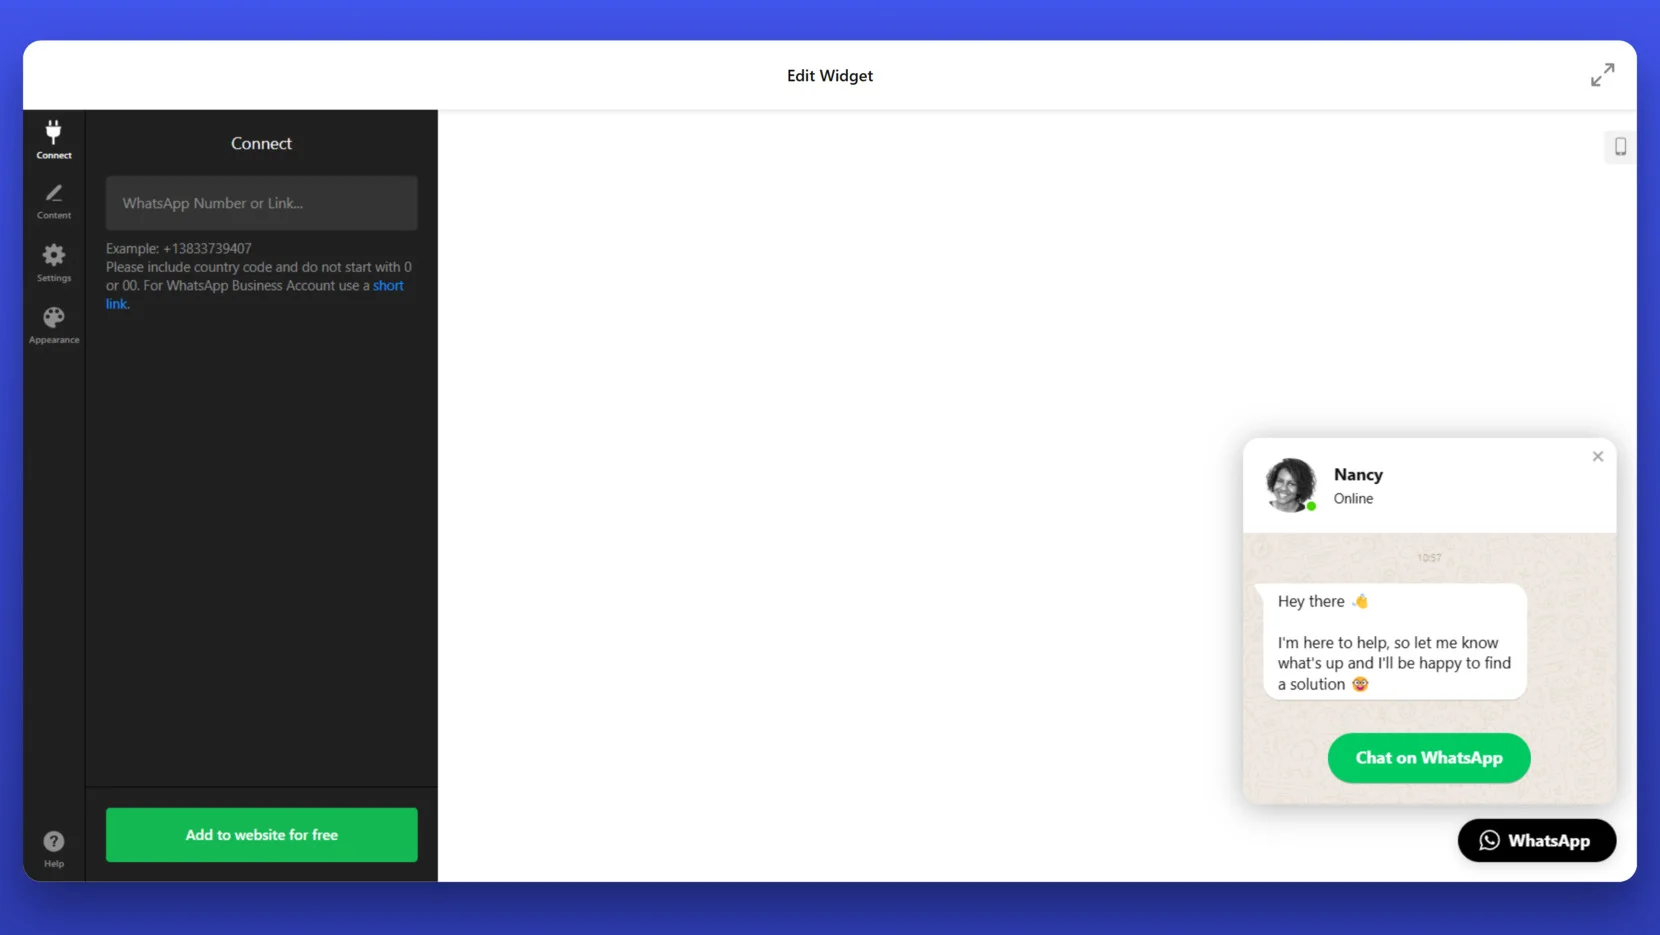
- Connect Your WhatsApp Account. In the “Connect” tab, enter your WhatsApp number or link. Be sure to include the country code and avoid using leading zeros. If you’re using a Business account, you can also enter a short link.
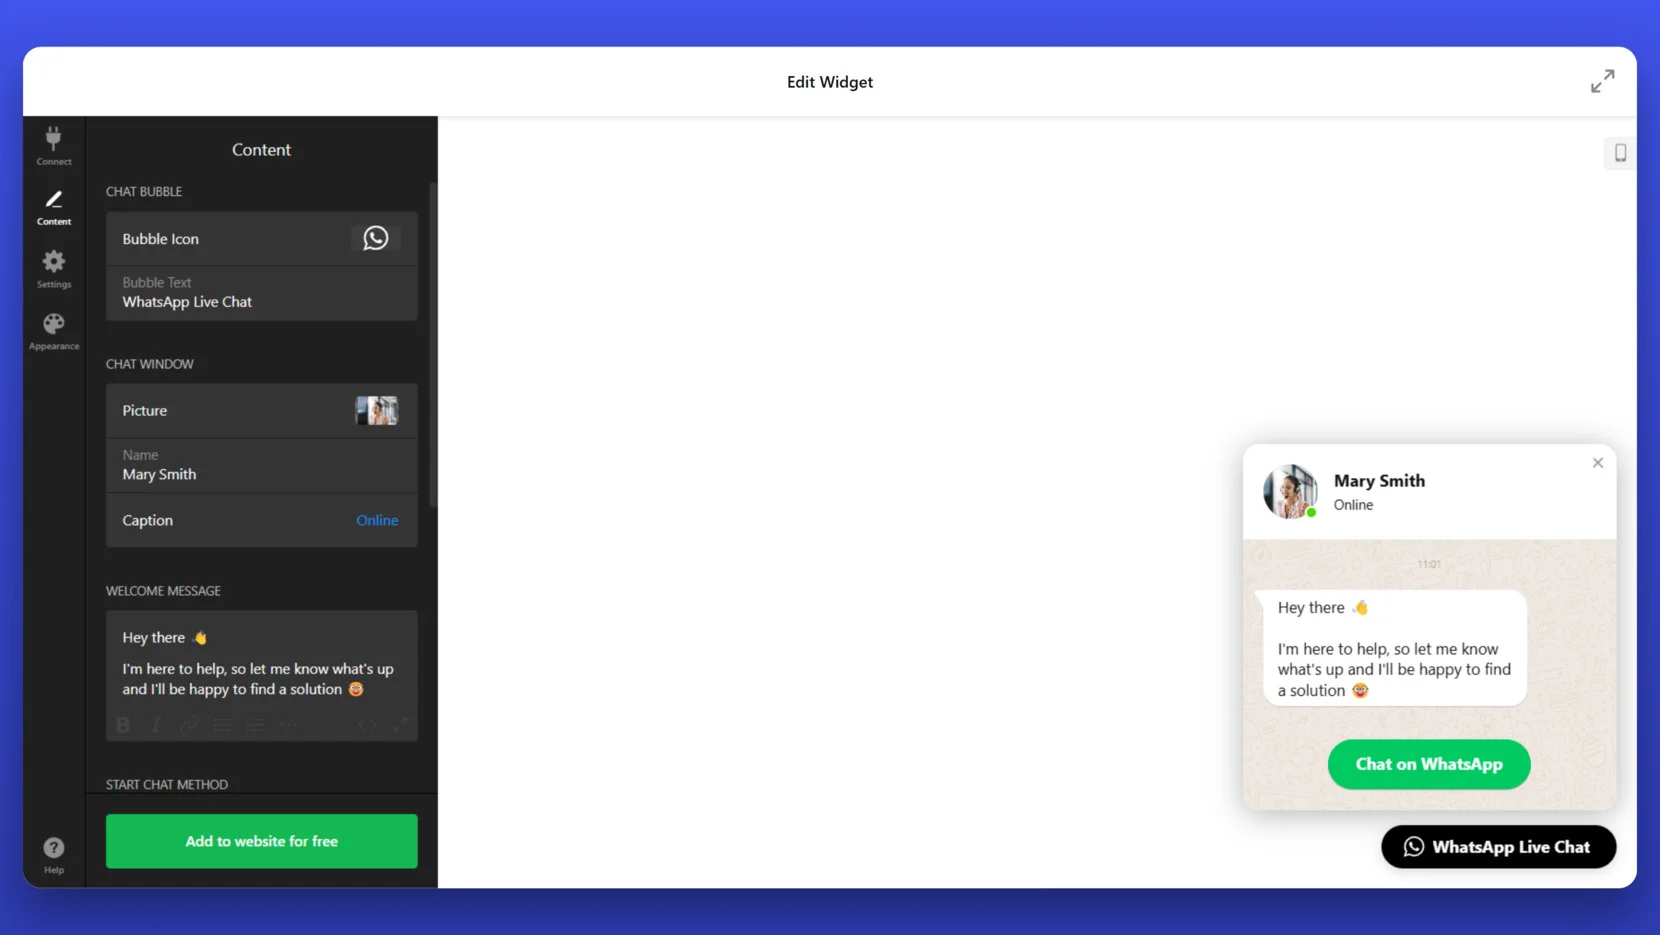
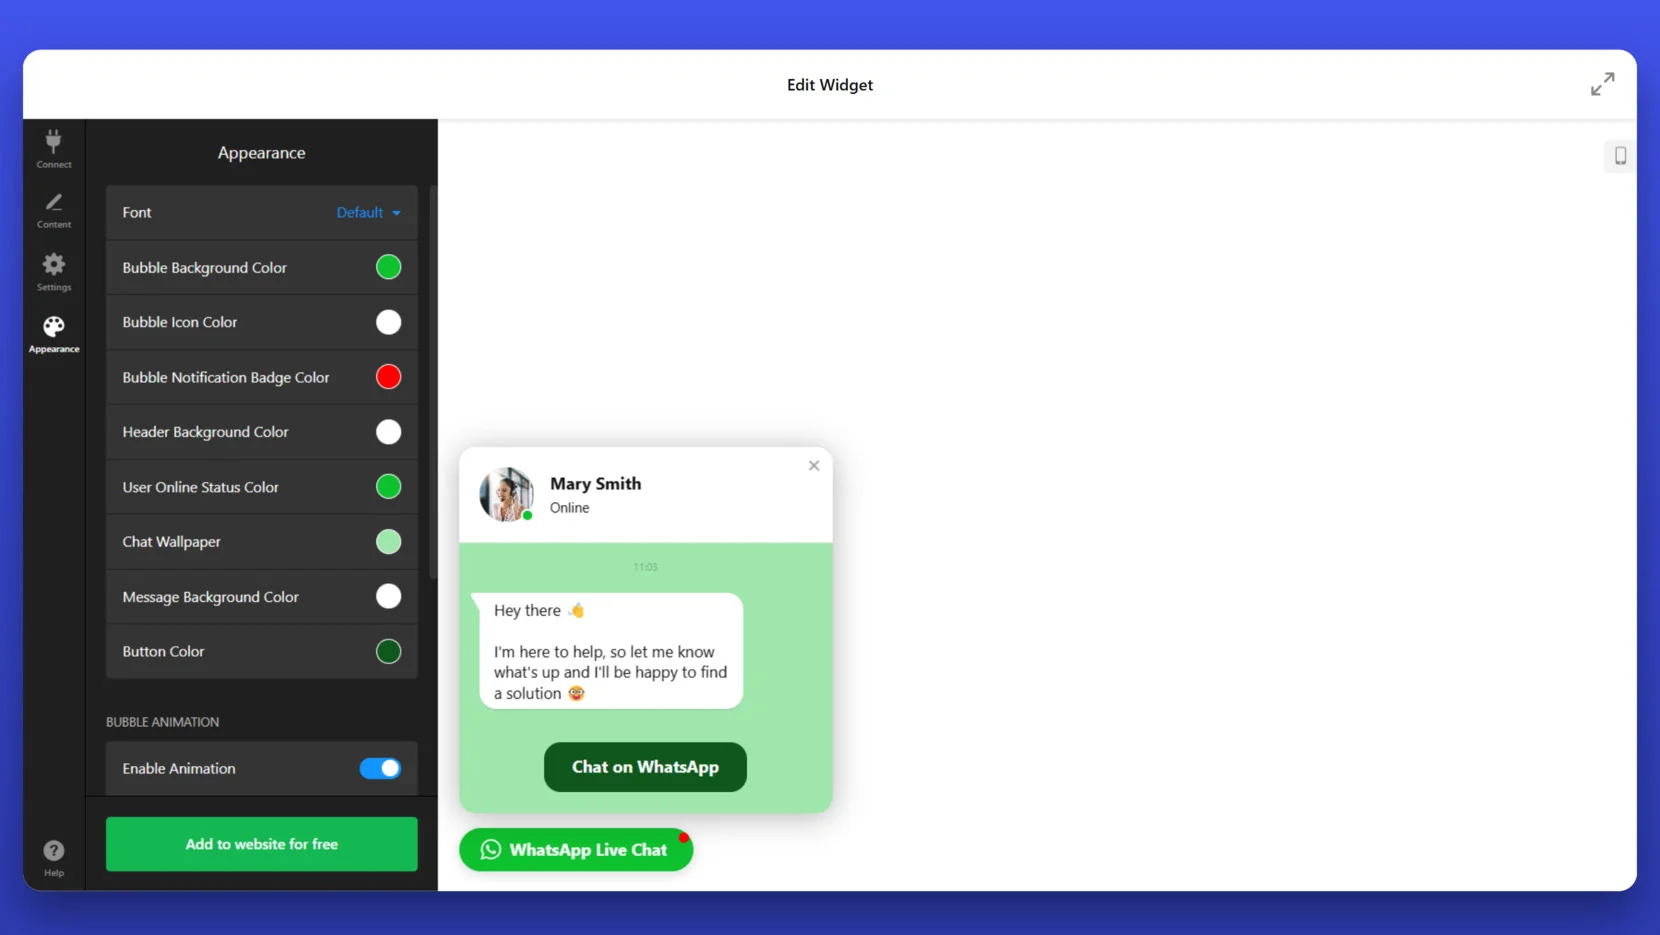
- Customize Chat Content. Go to the “Content” tab to adjust visible elements such as the bubble icon, bubble text, profile picture, user name, and welcome message. This is where you define how the widget appears when opened by a visitor.
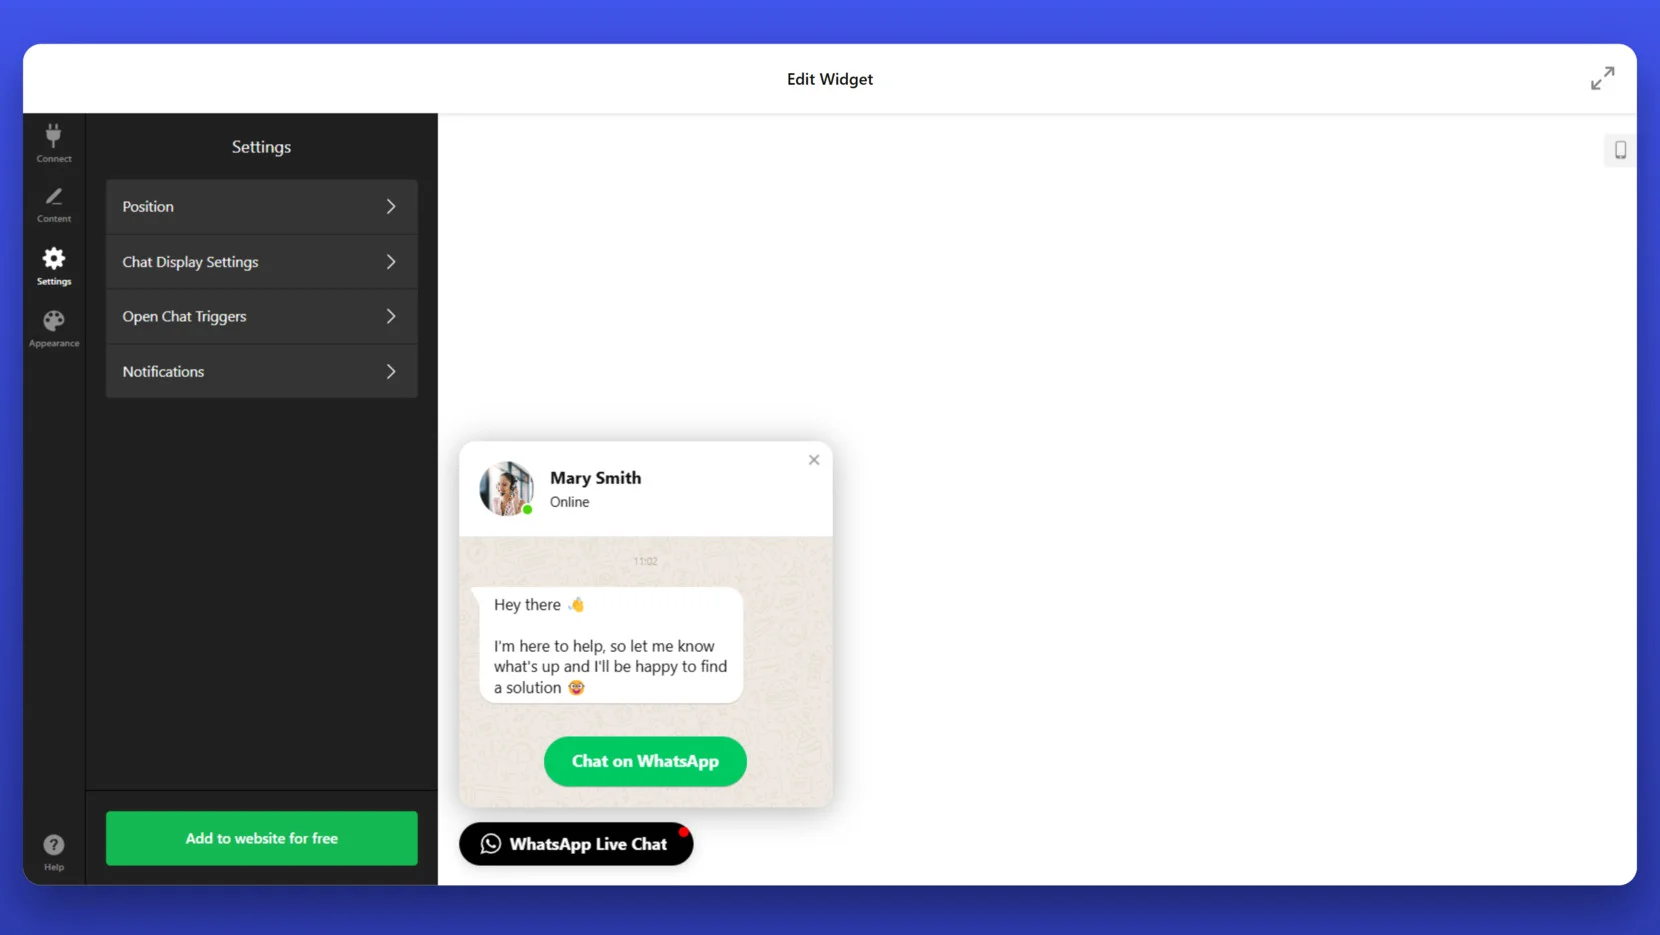
- Adjust Chat Behavior and Settings. Open the “Settings” tab to configure position, display rules, open triggers, and notification options. This helps you control exactly how and when the chat appears on your website.
- Style the Widget Appearance. Under the “Appearance” section, change the look and feel of the widget. You can customize background colors, icon colors, animation, fonts, and more to ensure it matches your branding.
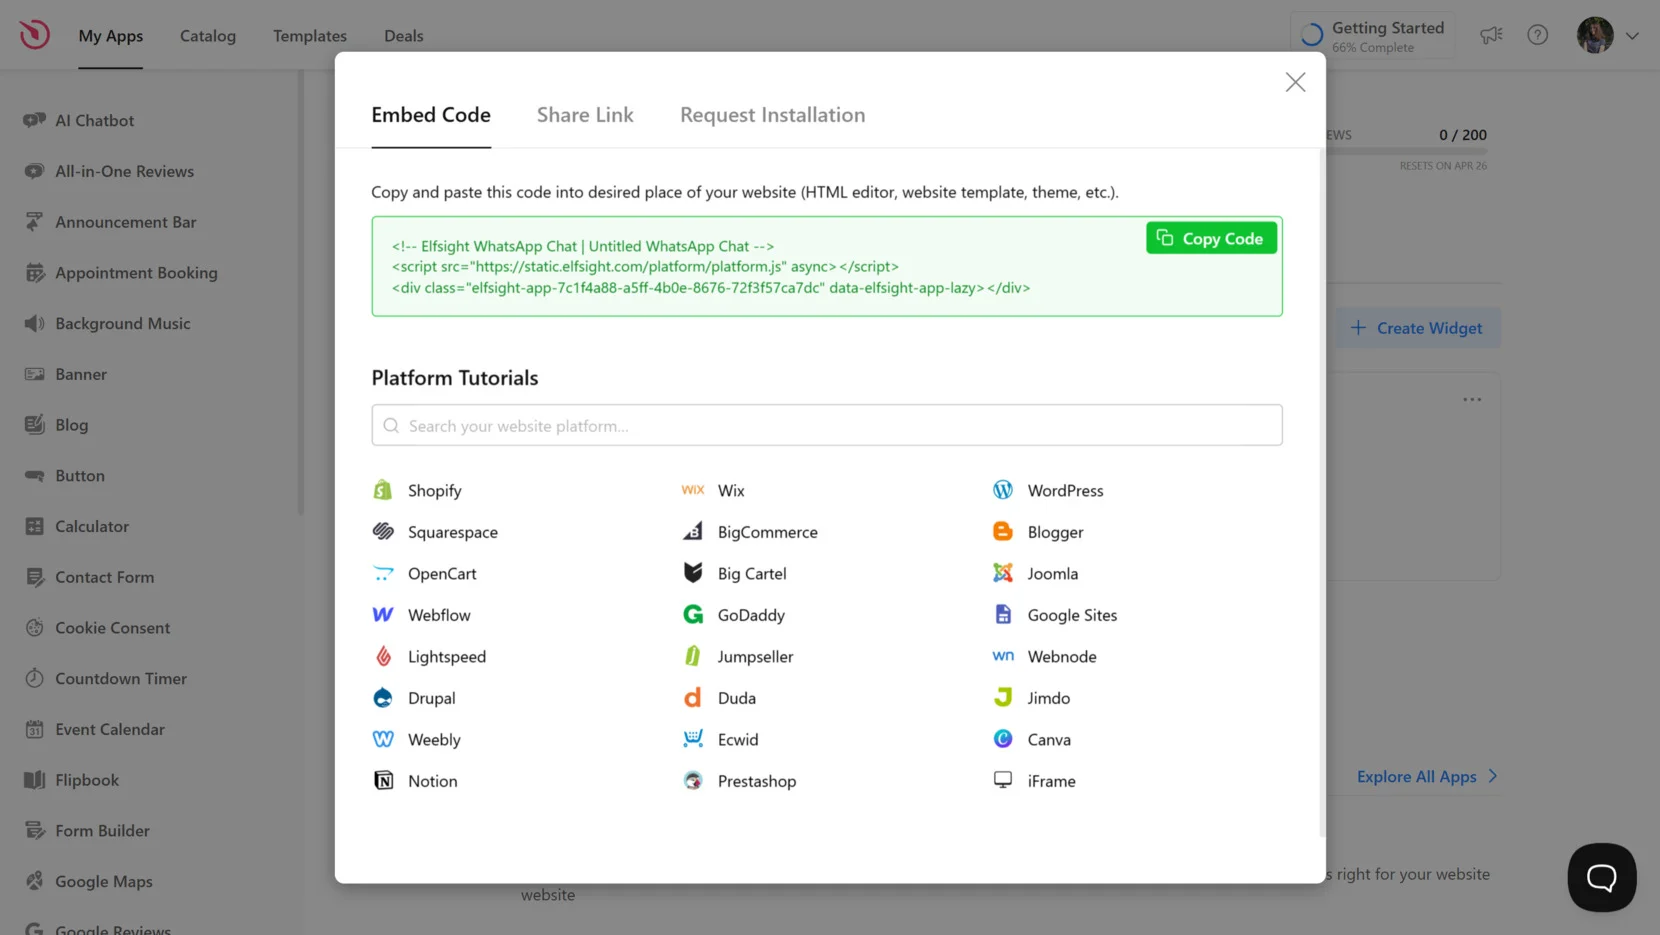
- Embed the Widget on Your Website. Once everything looks right, click “Add to website for free”, then copy the generated code. Open your Webflow project, paste the code into the appropriate embed block, save, and publish the changes.
This simple process lets you embed WhatsApp in Webflow and start engaging with visitors in real time through a branded, flexible Chat Button.
To make this solution work, your Webflow website should be on a paid plan that allows custom code. After adding the code, publish your website and check how the chat appears. If it’s hidden behind other elements, adjust the z-index or layout settings in Webflow.
Alternative Way to Add WhatsApp Chat
If you’re looking for a simple, code-free way to integrate WhatsApp with Webflow without relying on external widgets, the official Click to Chat method from WhatsApp is a great option. This method uses a direct link to open a chat with your number via WhatsApp and can be easily embedded into your Webflow website as a button or link.
Here’s the detailed instruction:
- Create your chat link. Use the format https://wa.me/1234567890. Replace 1234567890 with your full phone number in international format. Do not use symbols, brackets, or spaces — just the country code and number (e.g., https://wa.me/15551234567 for a U.S. number).
- Add a default message (optional). If you want users to see a pre-filled message in the chat box, append ?text= followed by your message. For example: https://wa.me/15551234567?text=Hello%20I%20have%20a%20question. Use %20 for spaces and encode any special characters properly.
- Open your Webflow project. Log in to Webflow and open the project where you want to add the WhatsApp button. Navigate to the specific page and section where you want the chat button to appear.
- Insert a Link Block or Button. From the Webflow Designer panel, drag a “Button” or “Link Block” component into your layout. You can place it in the footer, contact section, or as a fixed element for better visibility.
- Paste the WhatsApp link. Select the button or link, then open the settings panel (gear icon). In the “Link Settings”, choose “URL” and paste your full WhatsApp click-to-chat link. Enable the option to open the link in a new tab to avoid navigating users away from your website.
- Style the button. Customize the text to something like “Chat on WhatsApp” or “Message Us”. Change the button’s color to green or add a WhatsApp icon to make it recognizable. Use Webflow’s design tools to position it and make it stand out.
- Publish your changes. Click the “Publish” button in Webflow to update your website. Then visit the live site and test the button to ensure it opens WhatsApp with the correct number and pre-filled message, if added.
Comparison: Elfsight vs Click to Chat
Below is a comparison of the Elfsight WhatsApp Widget and the official WhatsApp Click to Chat method to help you decide which fits your Webflow project best.
| Method | Major Pro | Major Con |
|---|---|---|
| Elfsight WhatsApp Widget | Offers advanced customization, scheduling, and multi-agent support — all without code. | Requires embedding a script from the Elfsight platform into your Webflow project. |
| WhatsApp Click to Chat Link | Quick and easy setup using only an official WhatsApp URL — no tools or platforms required. | Limited design flexibility and lacks advanced features like agent profiles or availability settings. |
Both approaches will connect WhatsApp to your site, but if you’re looking for a feature-rich, visually polished, and easily manageable solution, Elfsight offers more value.
Now, let’s explore a few practical tips to help you get the most from your WhatsApp integration on Webflow regardless of the method you choose.
Tips for Using WhatsApp Chat on Website
Once your WhatsApp Chat is active on Webflow, optimizing its setup can make a big difference. These tips will help you enhance usability, match your website’s design, and improve visitor interaction.
- Keep the button always visible. Place the WhatsApp Chat Button in a fixed position — usually at the bottom-right corner — so it stays accessible as users scroll through your content. This ensures visitors can reach out at any moment without hunting for contact options.
- Write a warm welcome message. A short, friendly intro like “Hi! Need help?” or “How can we assist you today?” encourages users to start a chat.
- Match widget style to your website. Adjust the button color, fonts, and background to align with your website’s design. A consistent look builds trust and avoids making the widget feel like a third-party element.
- Set chat availability hours. Enable working hours to show when support is online. This helps manage user expectations and gives clarity on response times.
- Optimize for mobile users. Use Webflow’s responsive tools to preview how the button or widget looks on different screen sizes. Make sure it doesn’t overlap menus or key content, especially on smaller screens.
- Use clear visuals and labels. Add the official WhatsApp icon and a short label like “Chat on WhatsApp” to make the button easily recognizable and avoid confusion.
- Open chats in a new tab. When setting up the link, make sure it opens in a new browser tab. This allows users to continue browsing your website while chatting, which keeps them engaged longer.
Fine-tuning the WhatsApp Chat widget’s behavior and design will help you encourage more direct interactions. Now let’s explore who benefits most from integrating WhatsApp into their Webflow websites and where it drives real results.
Who Should Integrate WhatsApp Widget: Cases
WhatsApp Chat integration is valuable across many industries. Whether you run a digital business or manage in-person services, adding a messaging channel to your Webflow website helps create faster, more personalized customer interactions. Below are key industries where WhatsApp integration brings the most impact.
🎓 Education and eLearning
Educational institutions and online learning platforms can use WhatsApp to provide quick support for course selection, enrollment queries, and technical issues. It also serves as a channel for sending class reminders, updates, or learning materials directly to students.
🤝 Service-Based Businesses
Businesses like wellness clinics, consulting firms, salons, and repair services benefit from WhatsApp by offering real-time appointment scheduling, availability updates, and quick pre-service consultations. It removes friction from the booking process and improves client trust.
🏠 Real Estate
Real estate companies, rental platforms, and property managers can use WhatsApp to handle inquiries about listings, schedule tours, or provide pricing details instantly. It shortens the sales cycle by enabling direct, real-time communication with potential buyers or renters.
These industries all rely on timely, human communication — making WhatsApp Chat widget an ideal solution.
To keep it working smoothly, you’ll need to know how to solve common technical or setup issues. Let’s go over the most frequent problems and how to fix them.
Troubleshooting Common Issues
Even with a smooth setup, there may be occasional issues when you embed WhatsApp in Webflow. Below are common problems users encounter during integration and how to fix them quickly.
Why isn’t the WhatsApp Chat button showing on my Webflow website?
Why is the widget loading on desktop but not on mobile?
What should I do if the chat button opens but doesn’t start a conversation?
Why does the widget appear behind other content?
These common fixes can help you get your WhatsApp Widget running smoothly on Webflow.
Final Thoughts
Integrating WhatsApp into your Webflow website is one of the most effective ways to build real-time connections with your visitors. Whether you’re using a fully customizable WhatsApp Chat widget from Elfsight’s or opting for a native link-based setup, this integration helps you enhance communication, drive conversions, and create a more engaging user experience.
Looking for More Help?
We hope this guide made the process clearer. If you need additional support or want to explore more options, don’t hesitate to reach out to us. At Elfsight, we’re committed to helping you build a high-impact, no-code widget experience that works perfectly for your business needs.
Join our active Community to exchange ideas, share your use cases, and connect with other creators. Have a feature request? Drop it in our Wishlist — we’re always listening and improving!