A registration form is a web-based interface that allows visitors to enter their details — such as name, email, and password — to gain access to services, content, or accounts on a website. Whether you’re managing an event, building a membership portal, or collecting user data, a registration form streamlines the process of turning visitors into registered users.
If you’re looking to improve engagement, collect valuable user information, or offer personalized experiences, adding a registration form to your website is exactly what you need. It’s a fast, efficient way to build stronger connections with your audience and boost conversions.
- Improves user experience and accessibility. A well-placed registration form makes it easier for visitors to sign up without unnecessary clicks or redirects.
- Collects user data securely and efficiently. Gather emails, preferences, or custom inputs to power newsletters, onboarding flows, or CRM tools.
- Enables user sign-up form integration. Seamlessly connect your form with third-party services like email marketing or customer support platforms.
- Supports online registration process customization. Tailor the fields, layout, and logic to match your business goals and branding.
- Boosts conversion rates. Direct registration on the website removes friction and helps convert casual visitors into active participants or customers.
Now that you know why a registration form is essential, let’s explore the quickest and easiest way to create one using Elfsight.
Quick Way to Add a Registration Form to a Website
Creating a registration form with Elfsight is a fast and hassle-free process. You don’t need coding skills — just a few clicks in the editor, and your interactive form is ready to go live. Here’s how to make an online registration form and embed user input fields in minutes:
- Open the Elfsight editor and choose a ready-made registration form template.
- Adjust layout, field types, and spacing to create a smooth interactive web form experience.
- Customize colors, fonts, and labels to match your website’s branding.
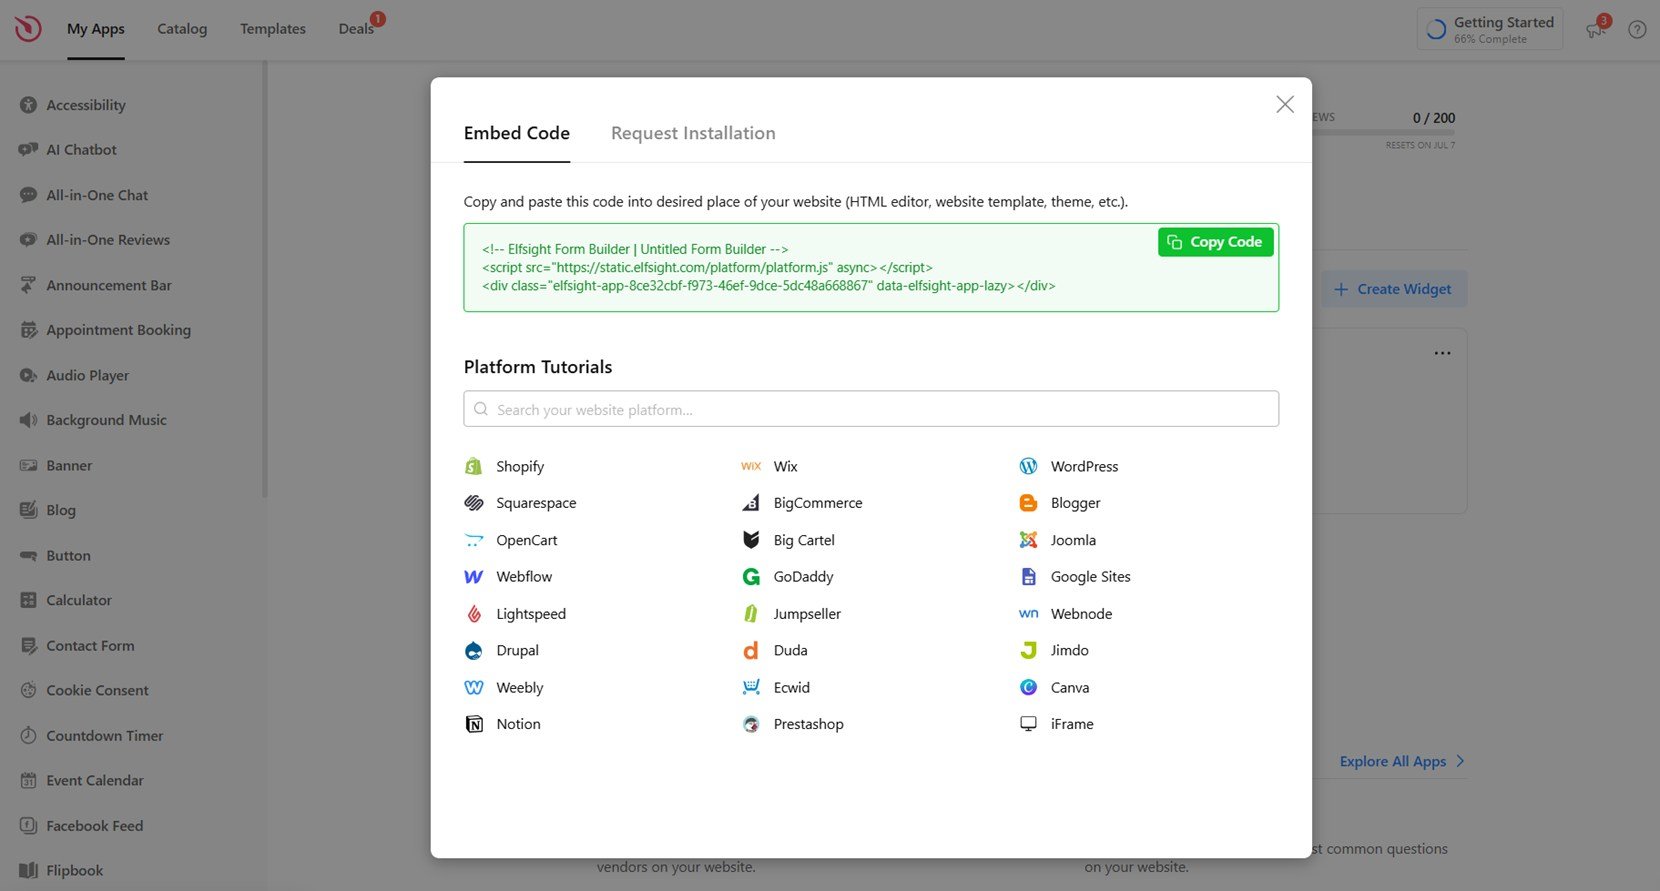
- Click “Add to website for free“, copy the code snippet, and paste it into your website’s backend.
This method ensures you can launch a fully functional and visually consistent form in no time. Whether you’re collecting sign-ups, subscriptions, or user details, the editor allows for easy customization and seamless integration.
See how easy it is – build your own Registration Form now!
Features of the Elfsight Form Builder
Once you’ve seen how easy it is to build a registration form with Elfsight, it’s worth understanding what makes this solution stand out. Elfsight offers powerful features that help you set up a registration form on your website that’s not only functional but also beautifully styled and fully responsive.
Here are the core features and benefits that make Elfsight a smart choice:
- Drag-and-drop editor. Build and customize your form in minutes without any coding. Simply pick fields, drag them into place, and adjust settings visually.
- Flexible field types. Use a wide variety of fields like text, dropdowns, checkboxes, and file uploads to collect exactly the data you need.
- Fully responsive design. Your registration form will look and work perfectly on desktops, tablets, and smartphones with zero extra effort.
- Smart email notifications. Get notified instantly when someone submits a form, or send auto-confirmation emails to users after registration.
- Custom thank-you messages. Show a personalized message or redirect users after form submission to create a smooth onboarding experience.
- Style customization options. Apply responsive form styling tips by adjusting fonts, colors, borders, spacing, and buttons to match your branding.
- Data export and integrations. Easily export submissions or connect your client onboarding forms to services like Google Sheets, Mailchimp, or CRMs.
These features give you everything needed to create a professional-looking, conversion-focused registration form. Now let’s go deeper and walk through each step of building and embedding your form using Elfsight.
How to Create a Website Registration Form: Step-by-Step
Now that you know the features and advantages of using Elfsight’s registration form, let’s go through the full setup process. This guide walks you through creating a fully functional, customized registration form that you can embed directly into your website — no technical skills required.
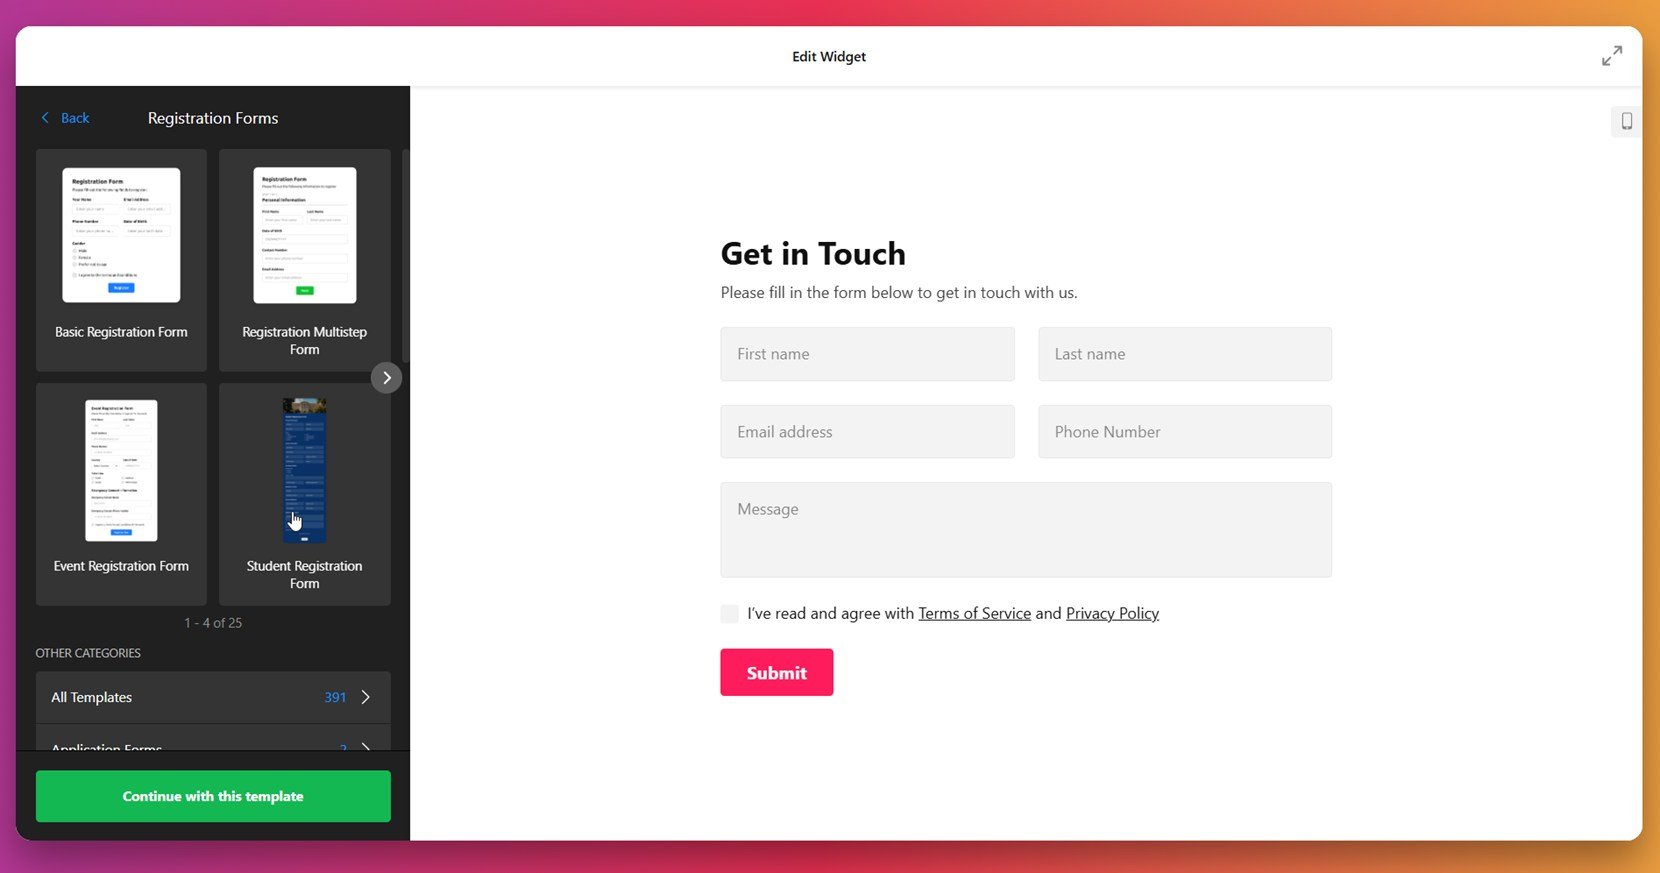
- Choose a template. Open the Elfsight Form Builder and navigate to the “Registration Forms” section. Select a template that fits your needs — like a basic form, multistep layout, event registration, or student sign-up — and click “Continue with this template“.

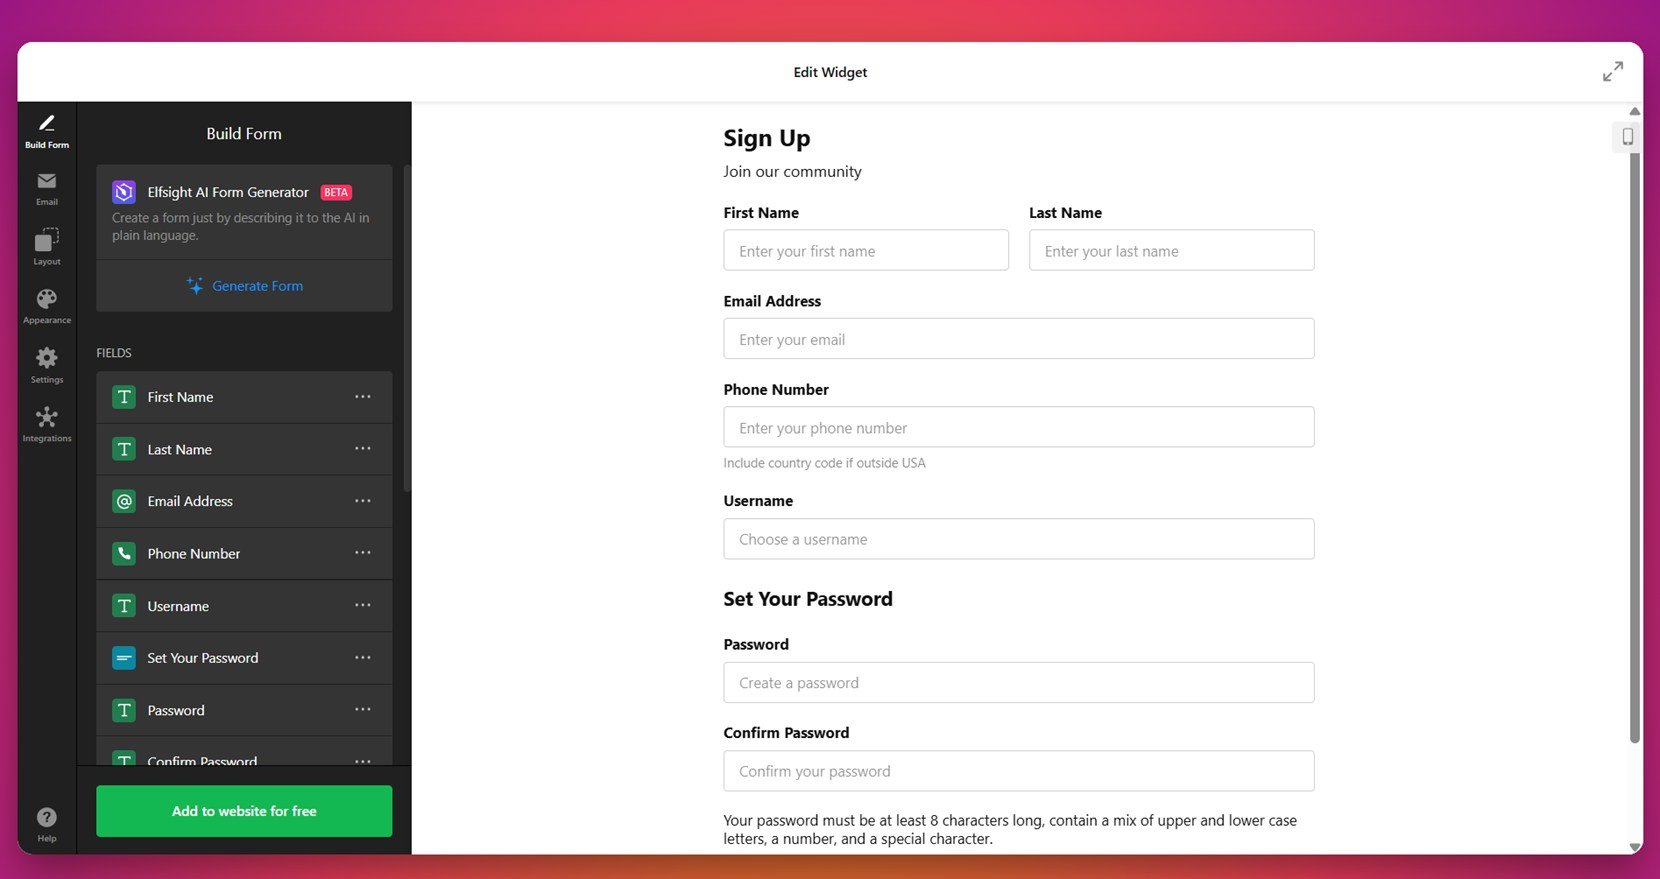
- Build your form. In the “Build Form” section, add the fields you need: names, email, phone number, passwords, dropdowns, and more. You can also use the AI Form Generator to create the layout using a plain-language prompt.

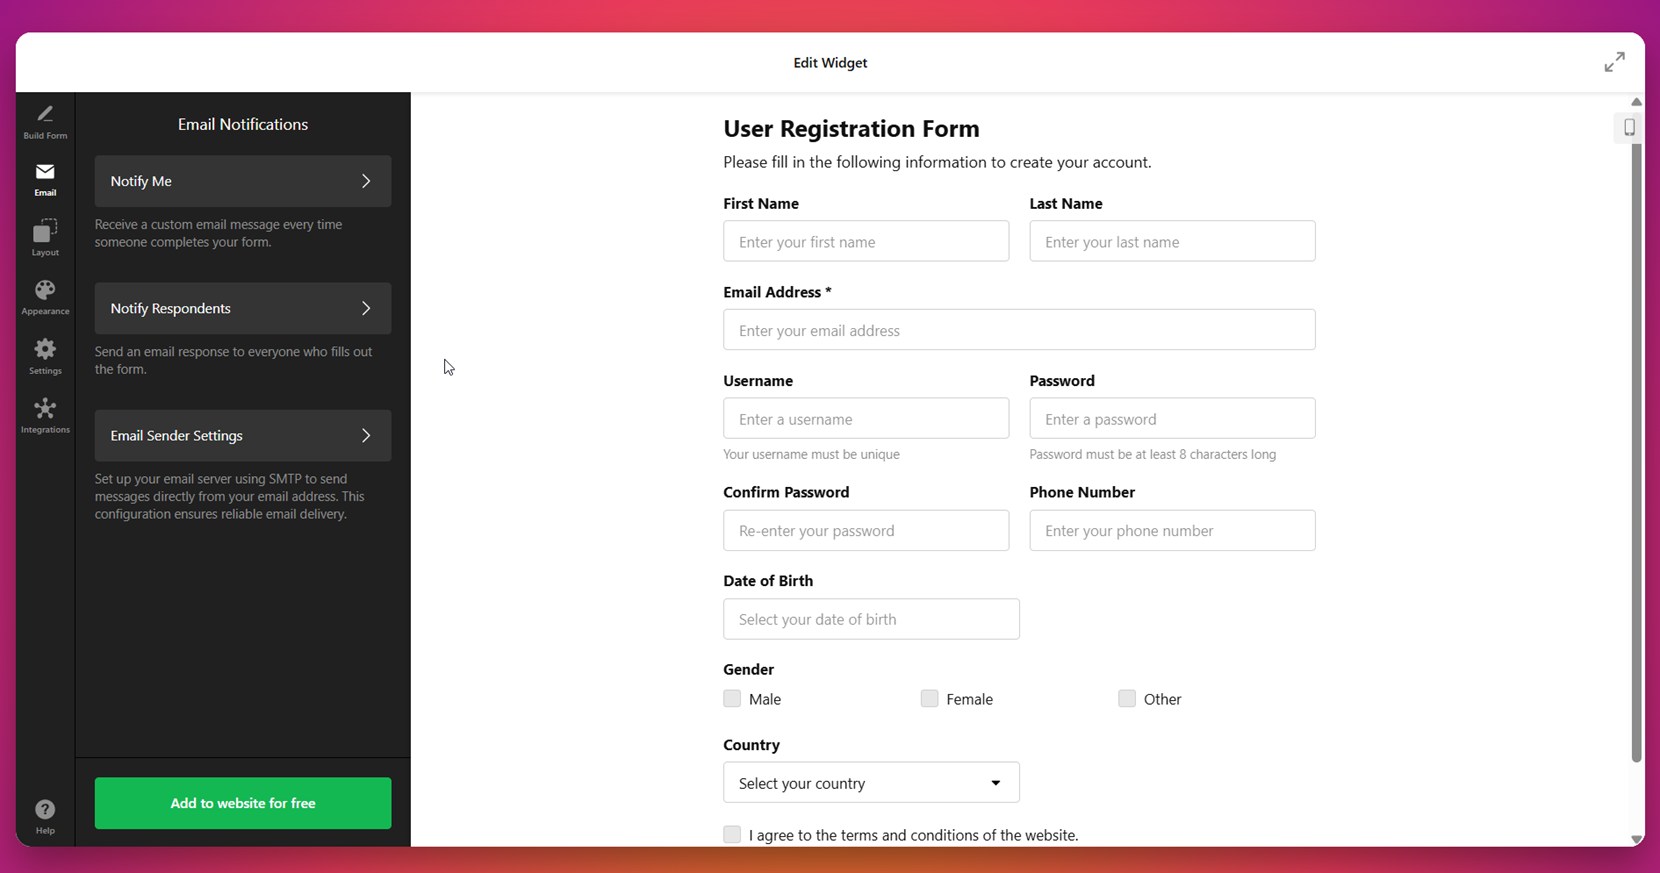
- Enable email notifications. Go to the “Email” tab to activate notifications for yourself and/or the user. This ensures you receive each submission and users get confirmation messages.
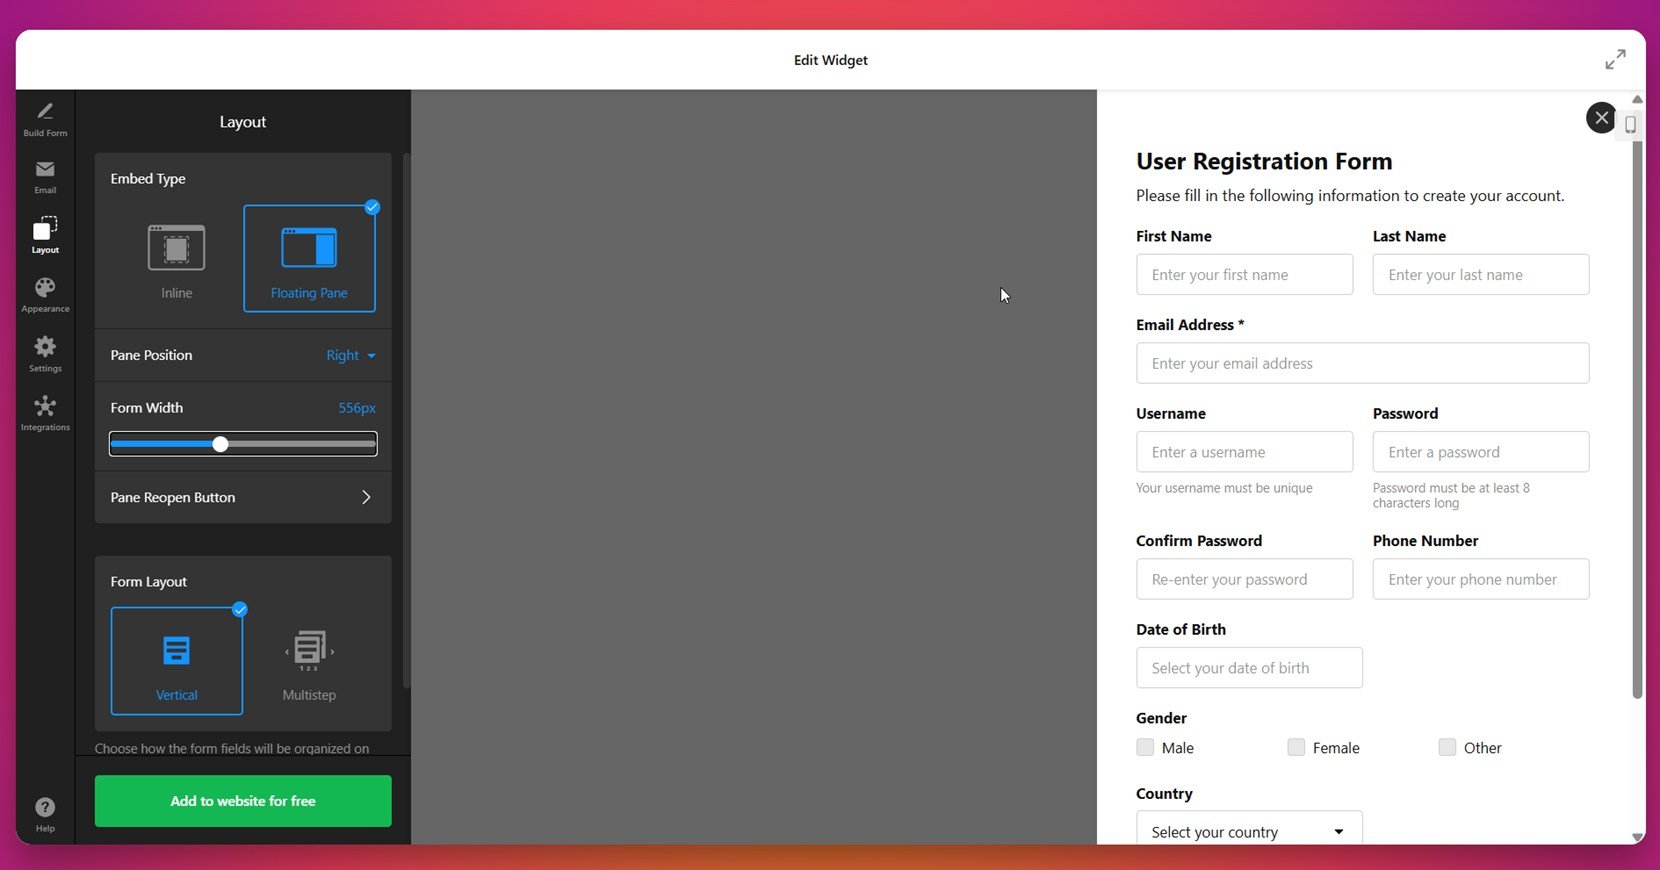
- Set your layout preferences. Head to the “Layout” section to choose between inline or floating formats. Adjust the pane position, form width, and field arrangement (vertical or multistep) as needed.

- Style the form appearance. Under the “Appearance” tab, pick between light or dark modes, apply your brand’s accent color, and fine-tune font, background, and button styles to match your website’s look.

- Adjust settings and behavior. In the “Settings” tab, define what happens after submission, enable spam protection, set the form language, or add advanced options like URL pre-fill and custom JavaScript.

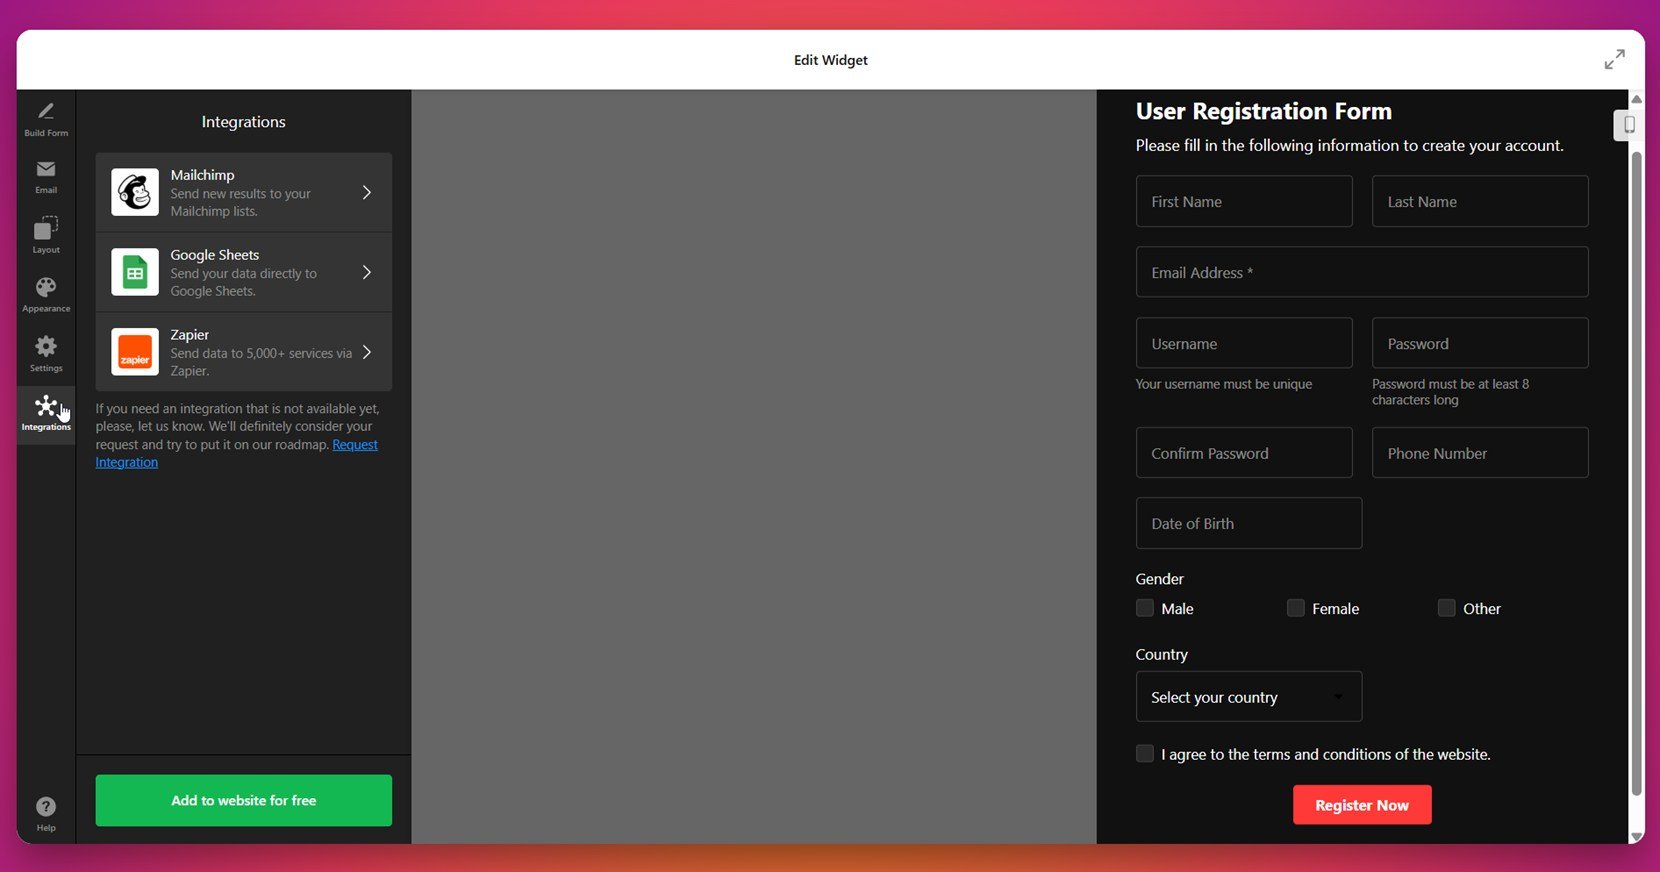
- Connect integrations. Navigate to the “Integrations” section to connect your form with Mailchimp, Google Sheets, or Zapier. This automates data processing and improves your registration workflow.
- Publish the form. Click “Add to website for free” to copy the generated HTML code. Paste it into your website’s backend (HTML editor or template) and publish the changes.


This setup allows you to create a fully branded, responsive registration form that supports both front-end usability and back-end automation — perfect for any business workflow.
With your form now live, you can start collecting user registrations instantly. Whether you’re onboarding new members, organizing event sign-ups, or capturing leads, Elfsight gives you all the tools you need to handle the process smoothly. Next, let’s take a look at alternative ways to build and add registration forms to your website.
Other Ways to Build Registration Forms
While Elfsight is a fast and user-friendly solution for adding a registration form to your website, there are other ways to create and embed forms depending on your experience level and customization needs. Below, you’ll find two widely used methods: Google Forms and manual HTML/PHP integration. Each provides a different level of control, setup complexity, and flexibility.
Embed Form with Google Forms
Google Forms is a free, reliable option for creating registration forms, especially for events, surveys, or collecting contact details. It connects directly to Google Sheets, so you can easily manage and export your submissions in real-time. However, it’s primarily designed for function, not form — so it won’t blend visually with most websites.
- Go to Google Forms and sign in with your Google account. Visit forms.google.com and click on the “Blank” template to create a new form from scratch or select a pre-designed registration template if you prefer.
- Add fields for user registration. Use the “+” button to insert form elements. Add fields such as First Name, Last Name, Email Address, Phone Number, and other required registration inputs. You can choose from short answer fields, multiple choice, dropdowns, or paragraph inputs.
- Configure form settings for registrations. Click on the gear icon in the top right. Enable “Collect email addresses” and “Limit to 1 response” if needed. You can also add confirmation messages and set whether users can edit responses.
- Get the embed code. Click the “Send” button in the top-right corner of the screen. Choose the “<>” icon to open the embed options. Adjust the width and height if necessary, and copy the iframe code provided.
- Embed the form into your website. Paste the iframe code into the HTML editor or embed block of your website’s builder. This will display the form exactly as it appears in Google Forms.
This method is ideal for quick, functional forms without worrying about layout or branding. It’s a reliable choice for basic internal registrations or small-scale projects.
Manual Integration Using HTML and PHP
For developers and those who want full control, building a registration form using HTML and PHP offers unlimited customization. This method lets you define field behavior, integrate databases, and apply backend logic exactly how you want it. It requires technical knowledge but provides the most flexible and scalable outcome.
- Write the HTML form. Create a basic HTML file using any code editor. Define your form using <form> tags with fields like <input type=”text”> for names, type=”email” for email addresses, and type=”password” for secure password inputs. Add labels for accessibility.
- Create the PHP processing file. In a new .php file, write the server-side logic to collect the form data using $_POST. Validate the input to ensure fields are filled, and sanitize to prevent security issues like XSS or SQL injection. You can connect it to a MySQL database or send form data via email.
- Add form validation and spam protection. Include CAPTCHA or honeypot fields to prevent bot submissions. Use JavaScript or PHP to check that users enter required fields before allowing submission.
- Upload to your server. Use an FTP client or hosting control panel to upload the HTML and PHP files to your web hosting server. Place them in the appropriate folder (e.g., /public_html or /www).
- Embed or link to the form. You can either embed the form directly into a page using an iframe or link to the HTML file from a button or navigation menu on your website. Test the form to make sure all fields and email/database connections are working properly.
<form action="register.php" method="POST">
  <h2>Register</h2>

  <label for="first-name">First Name:</label><br>
  <input type="text" id="first-name" name="first_name" required><br><br>

  <label for="last-name">Last Name:</label><br>
  <input type="text" id="last-name" name="last_name" required><br><br>

  <label for="email">Email Address:</label><br>
  <input type="email" id="email" name="email" required><br><br>

  <label for="password">Password:</label><br>
  <input type="password" id="password" name="password" required><br><br>

  <label for="confirm-password">Confirm Password:</label><br>
  <input type="password" id="confirm-password" name="confirm_password" required><br><br>

  <input type="submit" value="Sign Up">
</form>
This method allows you to design a completely unique registration experience, from the interface to the backend logic. However, it also requires you to manage hosting, updates, and security on your own.
Comparison of Elfsight and Other Methods
Here’s how Elfsight compares with Google Forms and manual HTML/PHP in terms of usability, customization, speed, and setup complexity. While each method has its strengths, Elfsight is designed to deliver the best overall experience with no coding required.
| Method | Pros | Cons |
|---|---|---|
| Elfsight Registration Form | It offers a visual drag-and-drop builder with full design customization and native integrations. | It requires you to copy and paste the generated code into your website’s backend to embed the form. |
| Google Forms | It allows you to quickly launch a functional registration form and log all submissions into Google Sheets automatically. | It does not support visual styling, branding adjustments, or embedding advanced logic into the form flow. |
| Manual HTML & PHP | It provides complete control over form layout, logic, validation, and backend processing. | It requires developer-level knowledge, hosting access, and security implementation, making it unsuitable for most casual users. |
Each approach has its place depending on your technical skill level and goals. However, if you’re looking for a clean, professional-looking registration form that works right out of the box — with no plugins, no backend setup, and full customization — Elfsight remains the best choice. Let’s now go over some practical tips to make your form even more effective.
Tips to Make Your Website Form More Effective
Once you’ve embedded your registration form, it’s important to ensure it functions smoothly, matches your website’s design, and provides the best user experience. These practical tips apply to any type of form widget, regardless of the platform or provider you use.
- Place the form where it’s easy to find. Use a dedicated registration page or embed the form in high-traffic areas like headers, footers, or homepage sections. Visibility drives conversions.
- Keep the layout clean and distraction-free. Stick to essential fields only. Every additional field can lower completion rates, especially on mobile devices.
- Use clear and descriptive field labels. Avoid placeholder-only input guidance. Labels ensure accessibility and reduce form submission errors.
- Make sure your form is fully responsive. Test how it appears on different screen sizes, especially mobile. Use percentage-based widths and vertical stacking for compact screens.
- Enable inline validation where possible. Let users know immediately if a field has been entered incorrectly. This improves form usability and reduces submission friction.
- Use a strong, single CTA button. Instead of multiple buttons, one clear action like “Sign Up” or “Register Now” helps users focus and complete the task.
- Connect your form to your data tools. Whenever available, integrate with Google Sheets, CRMs, or email platforms to automate follow-up and keep your data organized.
- Confirm successful submissions. Redirect to a confirmation page or show a thank-you message so users know their registration went through successfully.
- Keep an eye on loading speed. External scripts from widgets can slow down your page. Optimize other assets to balance performance.
- Check for accessibility standards. Use proper color contrast, tab navigation, and ARIA labels so your form is usable by all visitors.
Make your registration form easy to complete, visually aligned with your website, and functionally smart to improve sign-ups. Next, let’s see who can benefit most from adding registration forms and explore real-world use cases.
Who Benefits from Registration Forms: Use Cases
Registration forms are essential for streamlining client onboarding, managing event participation, and collecting user information. They can be effectively used across various industries to enhance online registration process customization and align with specific workflows. Below are three detailed examples where registration form widgets prove highly valuable.
Application in Education 🎓
Educational institutions — including online academies, private schools, and tutoring platforms — use registration forms to simplify enrollment. These forms typically collect student details, course preferences, and contact data. Advanced designs allow for dynamic fields based on student type or selected programs, significantly improving the registration flow and data accuracy. Language academies and private schools often embed registration forms directly into their course detail pages, helping students register for programs instantly without navigating to a separate platform.
Application in Event Management 🎭
Events — such as conferences, seminars, or local workshops — benefit from customized registration forms that support attendee segmentation and content personalization. Forms may include ticket categories, company names, job titles, and session preferences. This helps organizers prepare materials, manage capacity, and streamline communications. Business expos and networking forums use customized registration forms with segmented fields for VIP, general, or press access levels.
Application in Fitness and Wellness 🏋
Fitness centers, yoga studios, and wellness retreats rely on registration forms for client onboarding, class sign-ups, and wellness tracking. These forms often include emergency contact fields, session preferences, and health declarations. They minimize manual entry, allowing staff to focus on customer service and personalized plans. Wellness retreats often integrate registration forms with booking calendars to reserve session slots in real-time.
Whether you’re managing a classroom, hosting an event, or running a wellness business, a flexible and well-designed registration form can transform how you gather and manage user data. Next, let’s take a look at common issues and how to resolve them effectively.
Fixing Common Issues
Even with the most intuitive tools, creating and embedding a registration form can involve challenges. Below are some of the most common questions users face during setup, design, or integration — along with clear answers to help resolve them quickly.
Why doesn’t my form appear after embedding the code?
How do I make my form mobile responsive?
How can I prevent spam or bot submissions?
What if my form submissions aren’t being received?
How can I redirect users after they register?
Why does the form look misaligned or broken on the page?
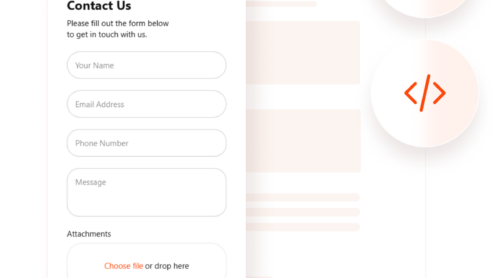
Can I edit submissions or collect attachments?
Understanding these common problems and how to solve them ensures your registration form runs smoothly and supports a great user experience.
Conclusion
Adding a registration form to your website is one of the most effective ways to streamline the user onboarding process and collect essential information. Whether you choose a visual no-code solution like Elfsight, a manual HTML setup, or an external tool like Google Forms, the key is to ensure your form is easy to use, visually integrated with your design, and functionally reliable. A well-crafted form not only captures data but also improves user trust and engagement.
Throughout this guide, we’ve explored how to create, customize, and embed user input fields, adapt form design for different industries, and troubleshoot common setup challenges. By following these steps and best practices, you can launch a responsive, professional registration form tailored to your goals. Now you’re ready to start enhancing your online registration process with confidence.
Need More Help?
We hope you found this guide useful. If you have questions or want tailored guidance on creating the perfect registration form for your website, contact us — our team at Elfsight is here to support you. We specialize in no-code widget solutions that help businesses grow without technical overhead.
Join our growing Community to exchange ideas, learn from others, and contribute your feedback. Have a feature request or improvement in mind? Add it to our Wishlist and help shape the future of Elfsight widgets.