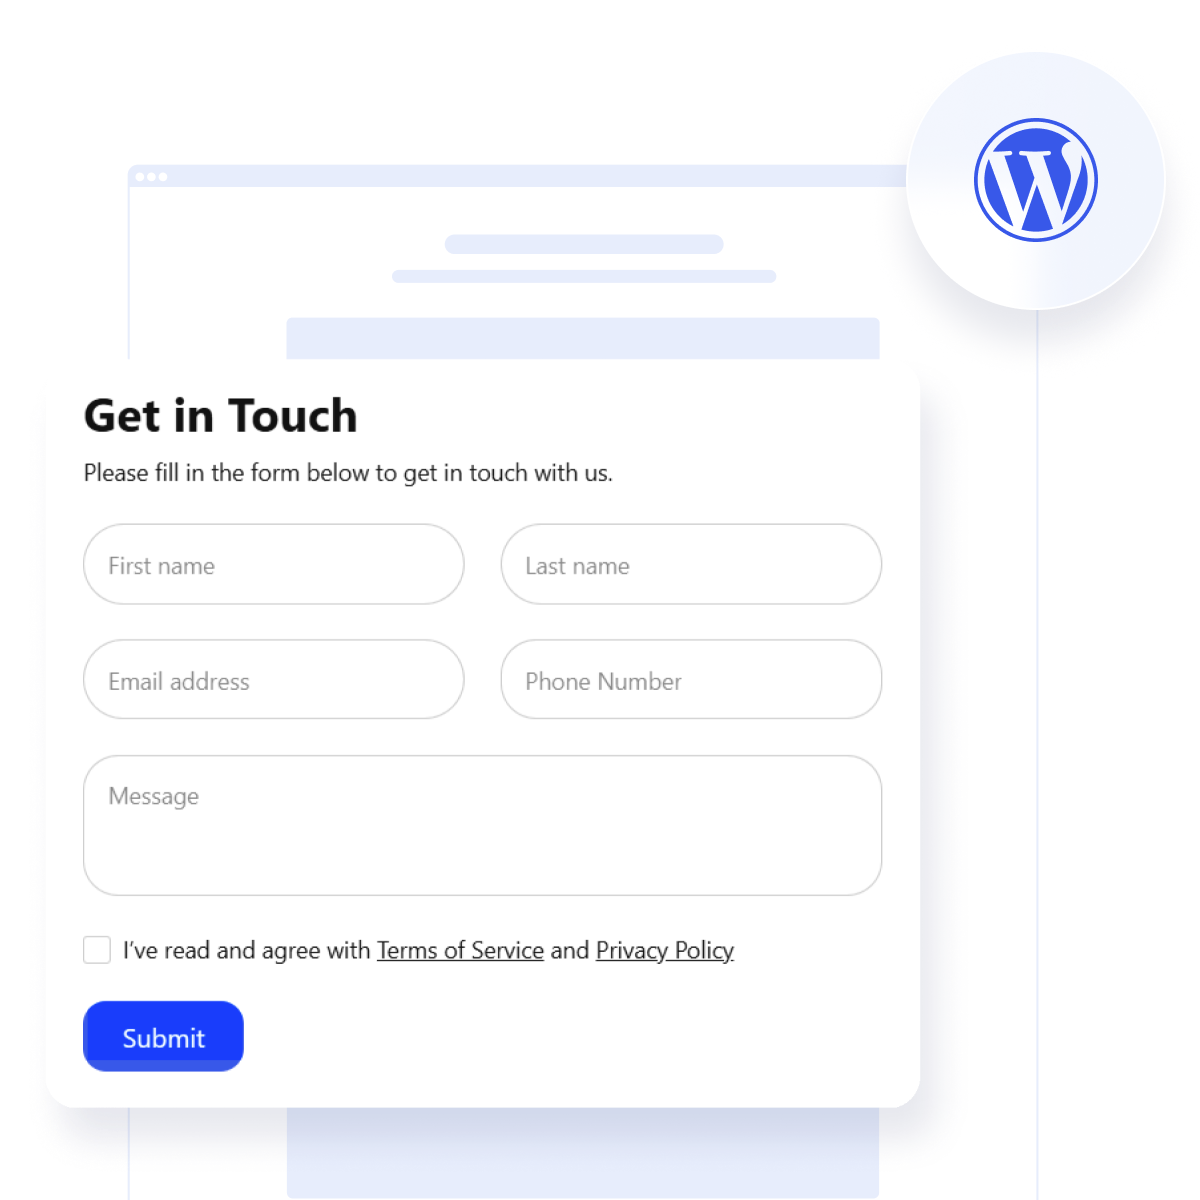
Setting up a popup form in WordPress is a smart way to capture attention, collect leads, and drive user engagement at the right moment. By displaying interactive forms that float above your content, you can prompt action without interrupting the overall browsing experience.
If you’re looking to create a popup form on WordPress that looks professional, functions smoothly, and blends into your design, this solution is exactly what you need. It’s easy to implement, versatile in purpose, and proven to increase conversions across all types of websites.
- Boosts lead generation effortlessly. Turn visitors into subscribers or customers with targeted floating input boxes that appear when users are most likely to engage.
- Improves user interaction. Interactive popups encourage visitors to engage with your content, making your website more dynamic and conversion-focused.
- Perfect for promotions and feedback. Use popup forms to announce offers, run surveys, or gather feedback without redirecting users elsewhere.
- Customizable for different goals. Whether you want to collect emails, register users, or run a contact form, popup forms adapt to your business needs.
Now that you know why having a popup form is a smart move, let’s see how you can quickly create one with a no-code plugin solution from Elfsight.
Quick Way to Build a WordPress Popup Form
Now that you understand the value of adding a popup form to your WordPress website, let’s look at how easy it is to get started using Elfsight. With just a few steps, you can build and display a fully functional form pop-in tailored to your goals.
- Open the Elfsight editor and choose a popup form template that fits your purpose.
- Set up your form fields, triggers, and behavior – such as showing on scroll, delay, or exit intent.
- Adjust the design: change colors, fonts, spacing, and layout to match your website’s look.
- Click “Add to website for free“, copy the embed code, and paste it into your WordPress backend.
This quick setup process gives you a flexible and attractive popup form without touching any code. Whether you’re aiming to increase newsletter signups or collect user feedback, the tool makes it effortless to launch a triggered form on your WordPress website.
Ready to see it live? Build your own popup form in minutes!
What You Get with Elfsight Forms
Once you’ve created your popup form plugin using Elfsight, you’ll get access to a wide range of features designed to enhance functionality, improve design, and integrate smoothly with your WordPress website. These options allow you to fully customize modal windows and build contact widgets that truly convert.
Here are the core features and benefits that make Elfsight’s solution worth trying:
- Pre-made popup form templates. Start faster with professionally designed layouts built for lead capture, surveys, registration, and more.
- Flexible display triggers. Show your popup form on page load, scroll, click, exit intent, or after a custom time delay to match your strategy.
- Visual customization options. Change fonts, colors, spacing, button styles, and animation to make your popup form match your website’s branding.
- Multi-step form support. Create engaging experiences with step-by-step questions to improve user focus and boost completion rates.
- Email alerts and integrations. Get notified of each form submission and connect your form to platforms like Mailchimp, Google Sheets, and more.
- Mobile-responsive design. Ensure your popup looks and works great on all screen sizes without extra effort.
- Real-time editing and preview. Instantly see changes as you build your form, so you know exactly how it will look live.
With all these features, your WordPress popup with form integration becomes a powerful asset. Now, let’s walk through the full setup process in detail — from start to publish.
How to Set Up a WordPress Popup Form: Step-by-Step
If you’re ready to make a popup form for your WordPress website, Elfsight offers a complete solution with intuitive setup, flexible design, and instant embedding. Below is a full walkthrough based on the exact settings inside the widget editor to help you launch your first popup form with ease.
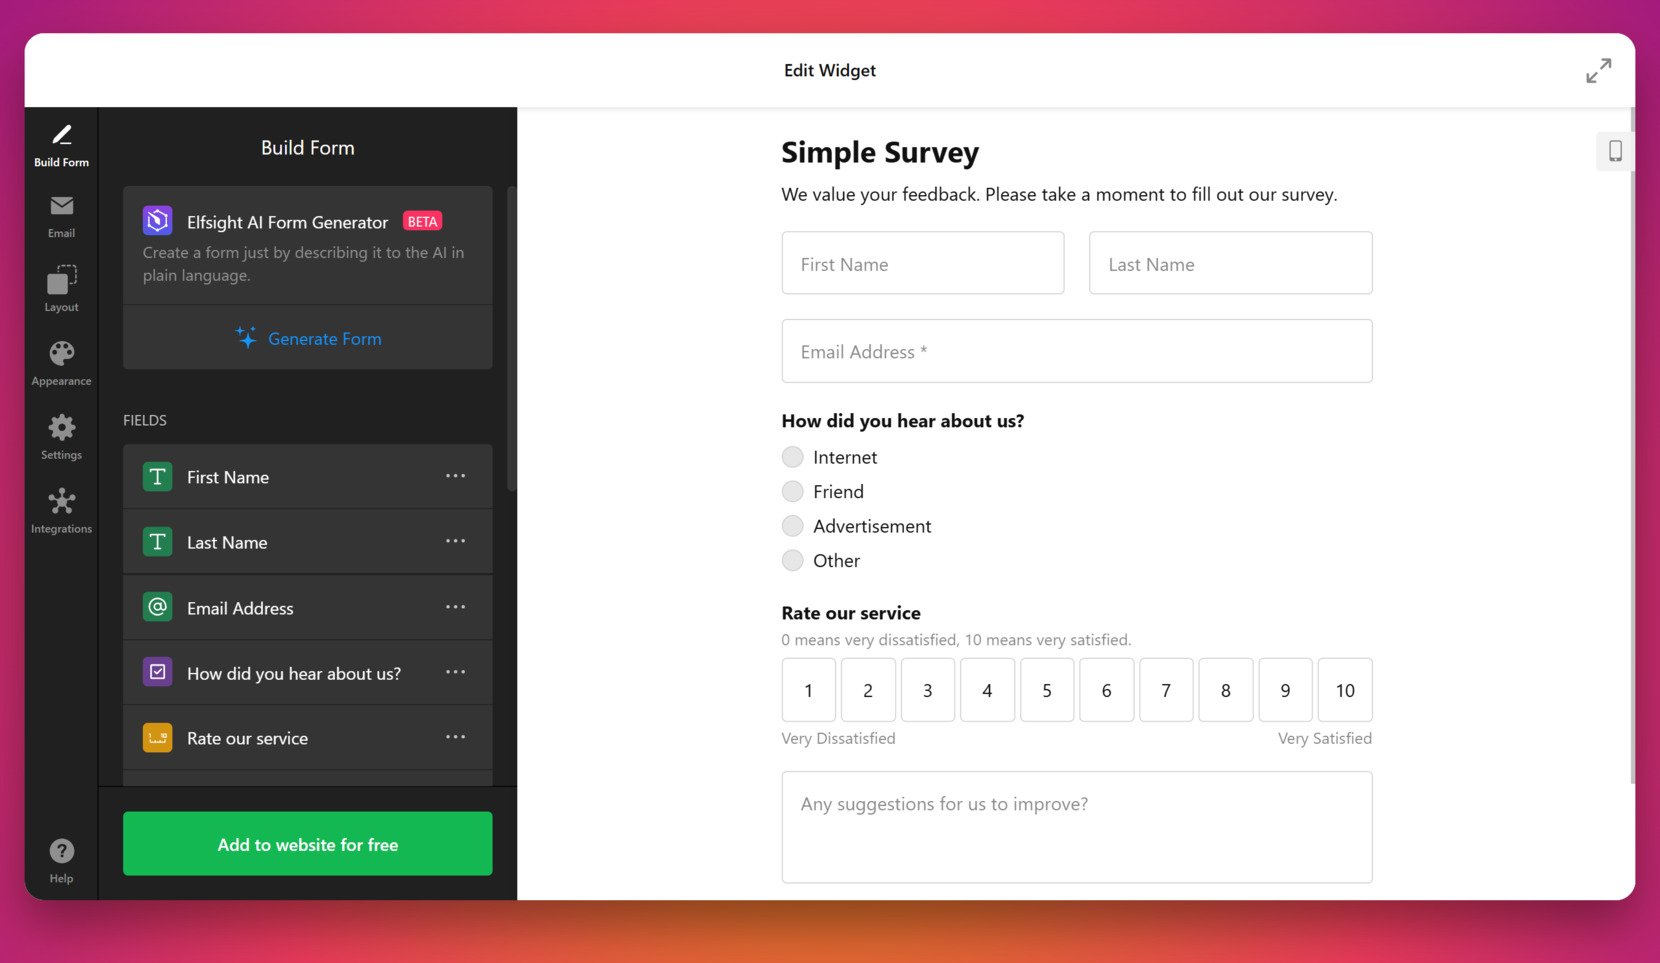
- Choose a Template. Open the Elfsight Form Builder and browse the templates until you find the one that matches your goal. Click “Continue with this template” to start editing.

- Build the Form. In the “Build Form” tab, add and customize fields like name, email, dropdowns, scales, or checkboxes. You can also use the AI Form Generator to create a form by describing it in plain language.
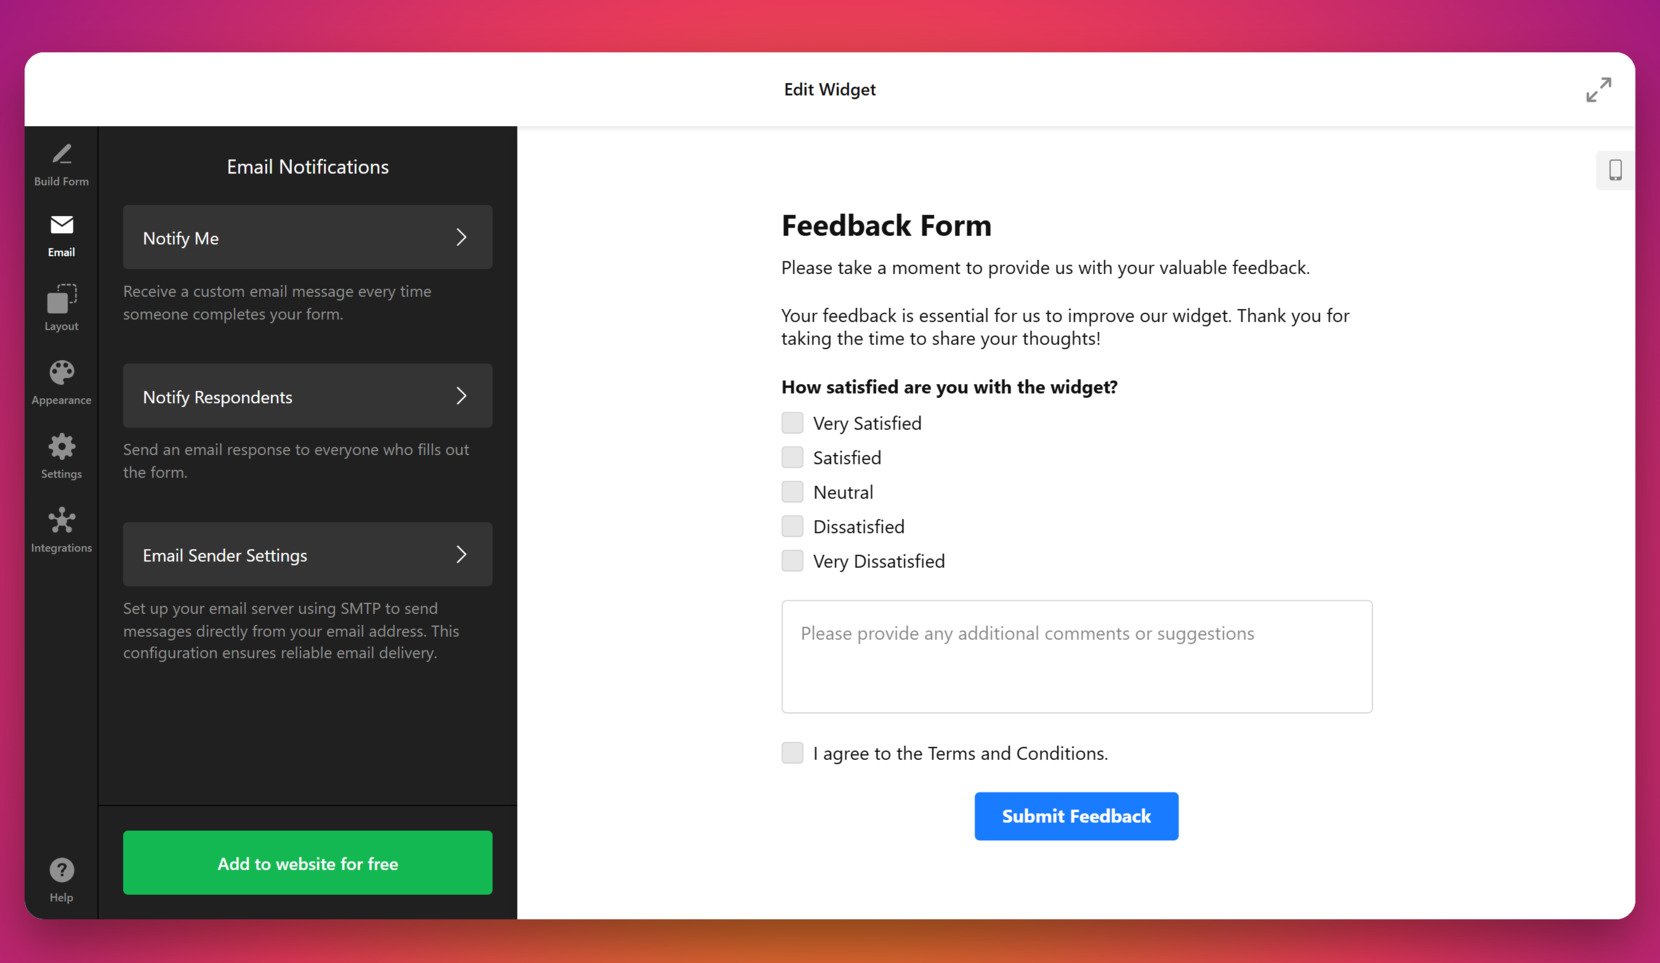
- Set Up Email Notifications. Go to the “Email” section to configure notification rules. Choose who gets notified and customize messages for both admins and respondents.
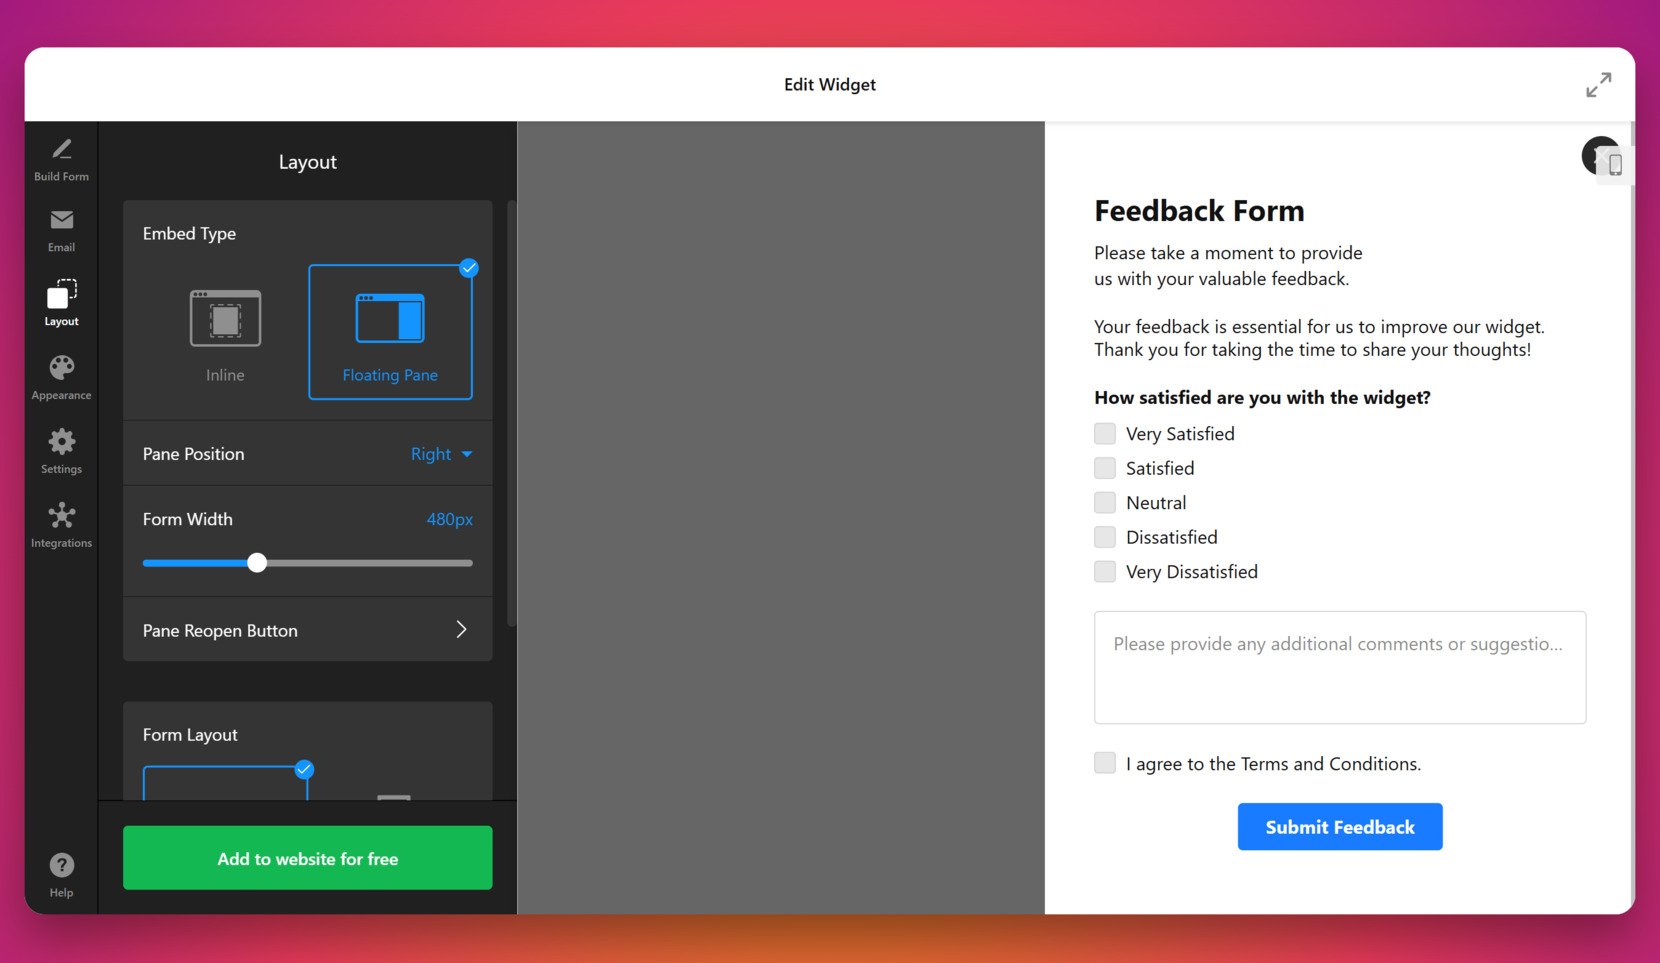
- Adjust the Layout. Open the “Layout” tab and set the form to appear as a floating pane. You can position it on the left or right side, define form width, and enable the reopen button if needed.
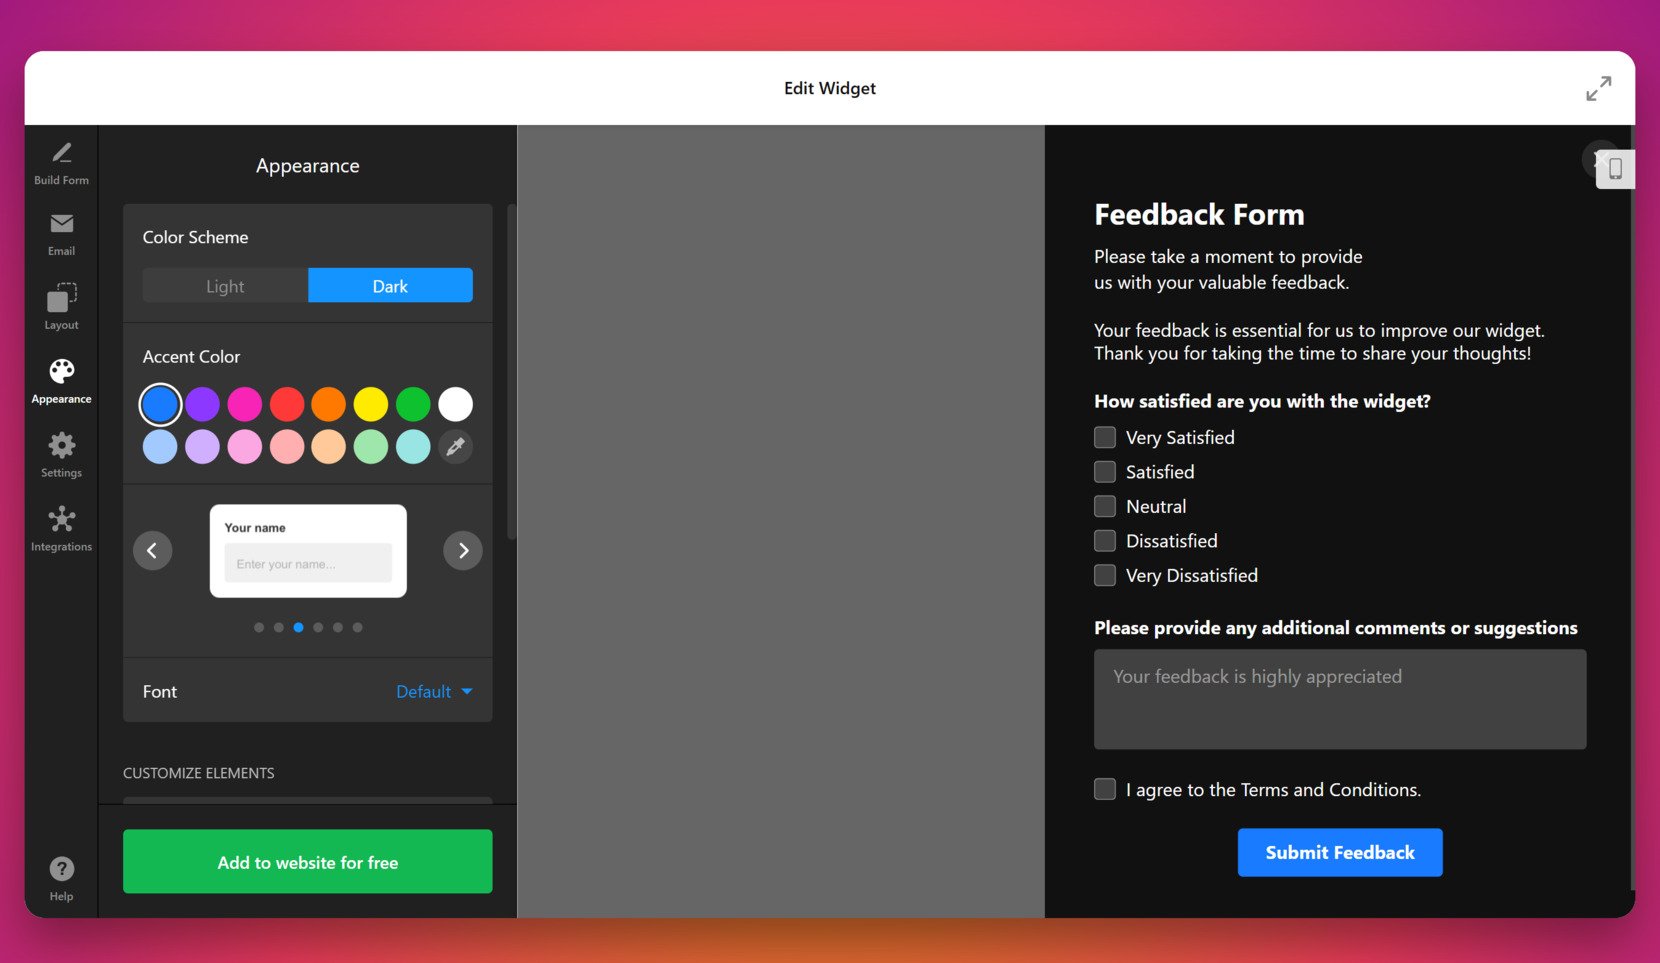
- Customize Appearance. Under “Appearance,” select a color theme (light or dark), pick an accent color, choose a font, and fine-tune the overall visual style to match your website branding.
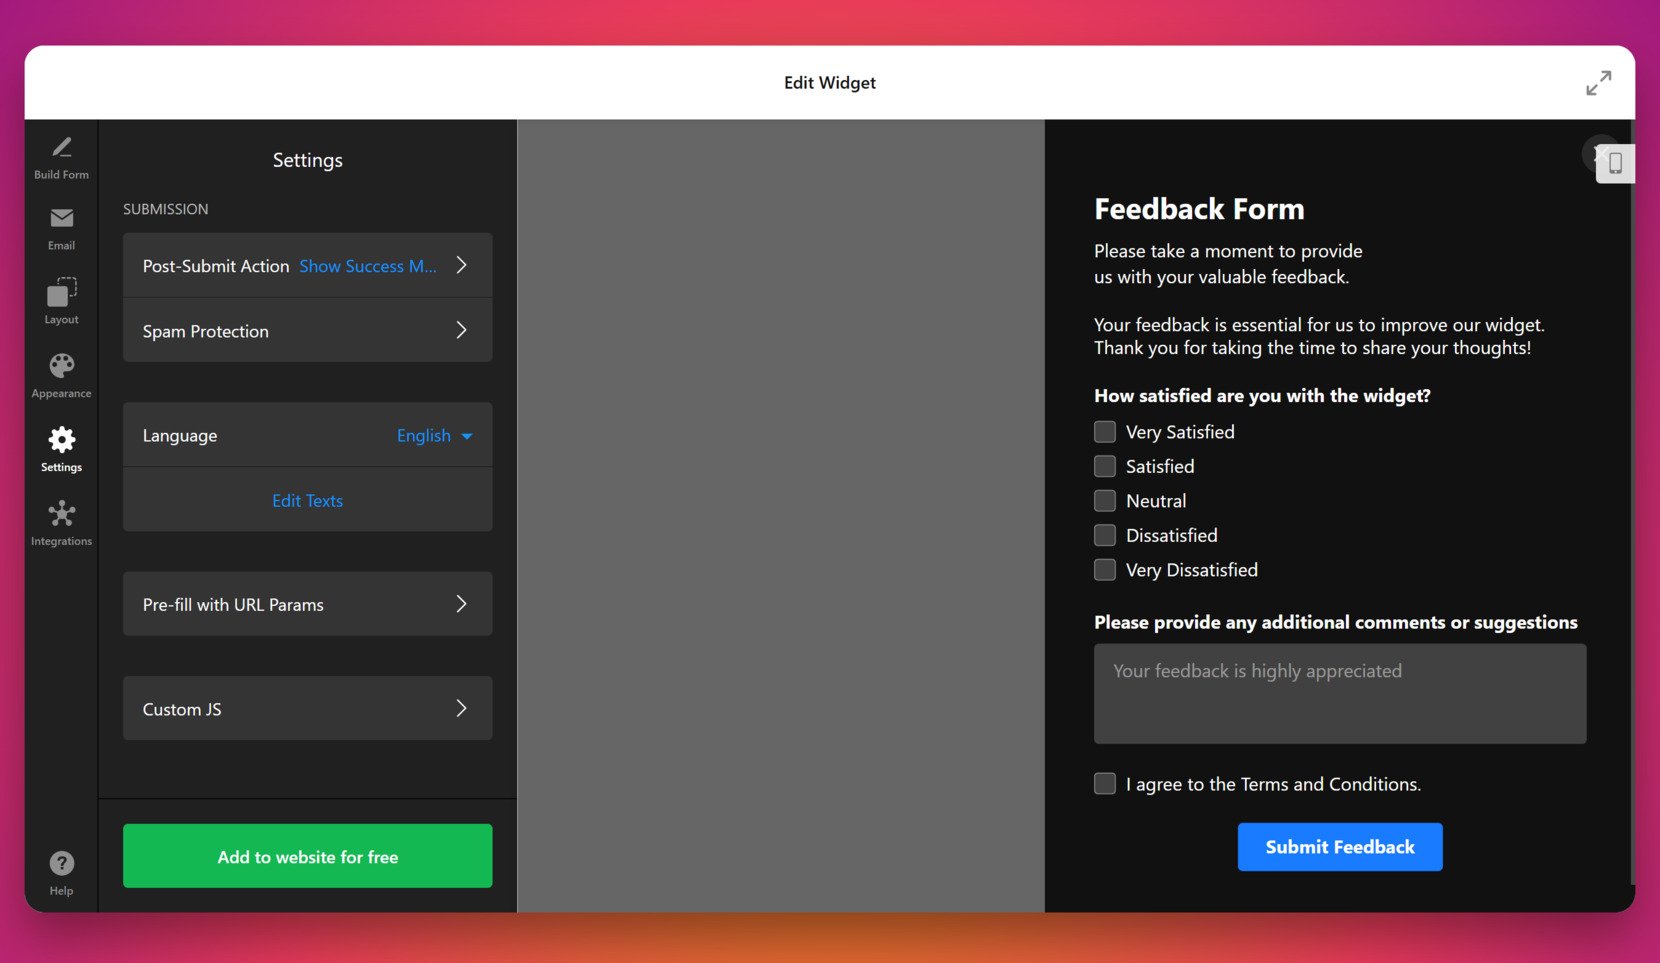
- Configure Form Behavior. In the “Settings” tab, define what happens after form submission, enable spam protection, set language preferences, or pre-fill fields using URL parameters.
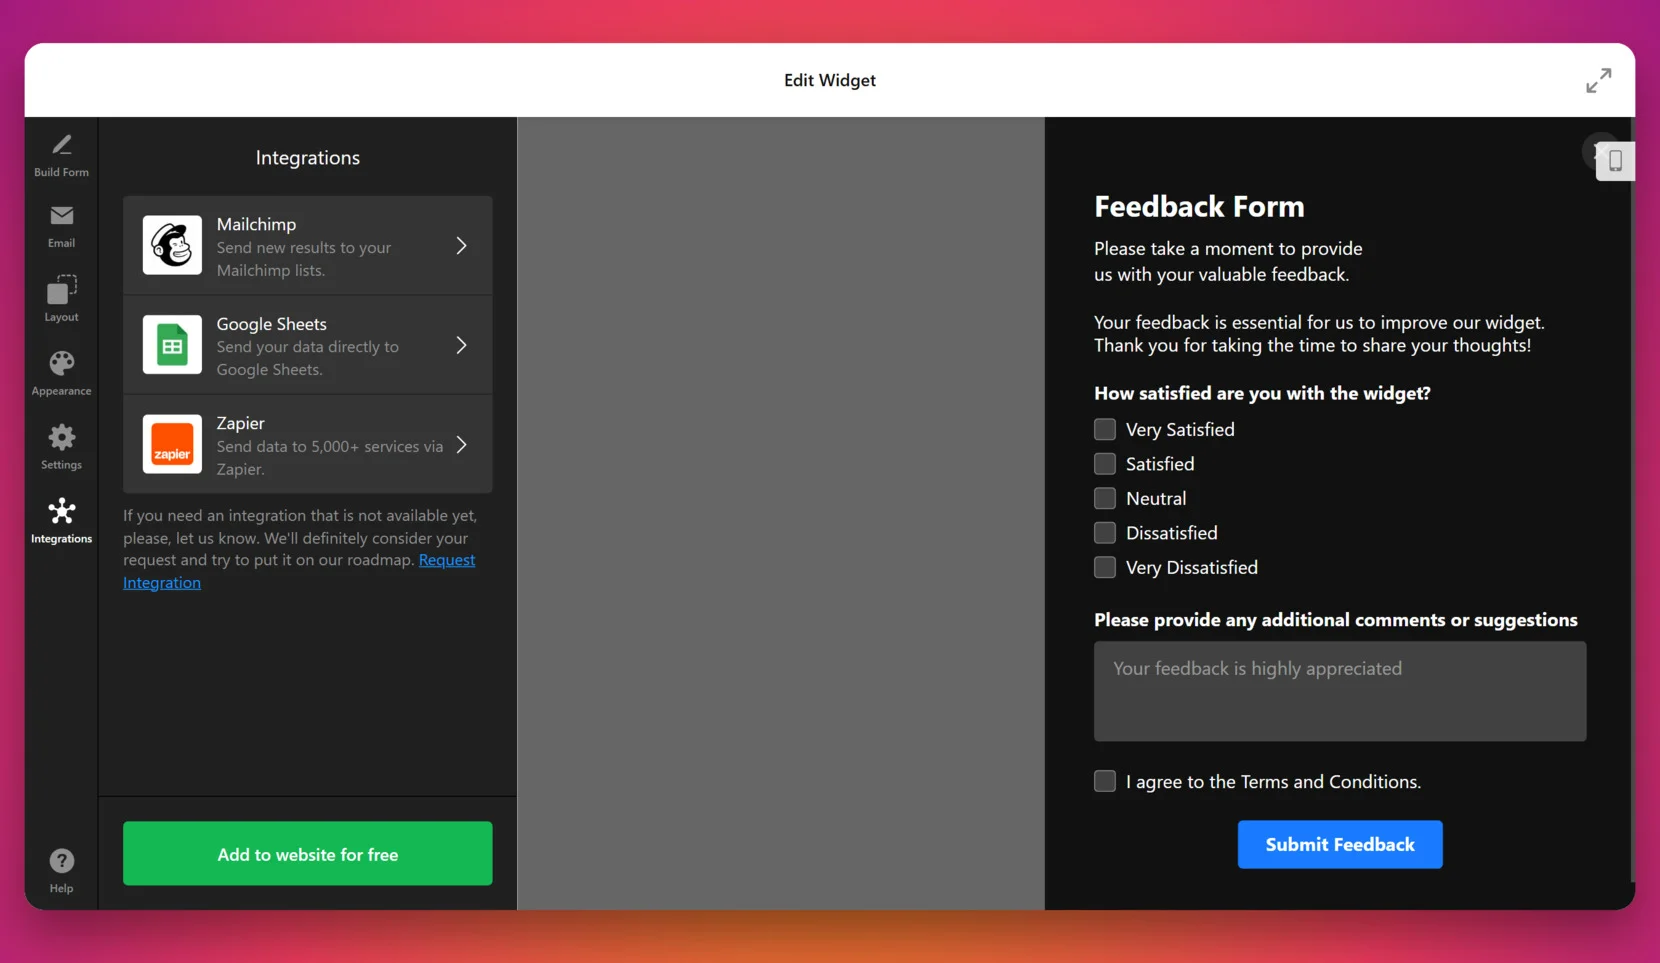
- Connect Integrations. Navigate to “Integrations” to connect services like Mailchimp, Google Sheets, or Zapier, allowing you to automate workflows and manage submissions more effectively.
- Embed the Code on Your Website. Click “Add to website for free” and copy the embed code. Paste it into your WordPress editor, widget area, or footer — wherever you want the popup to appear — and save the changes.

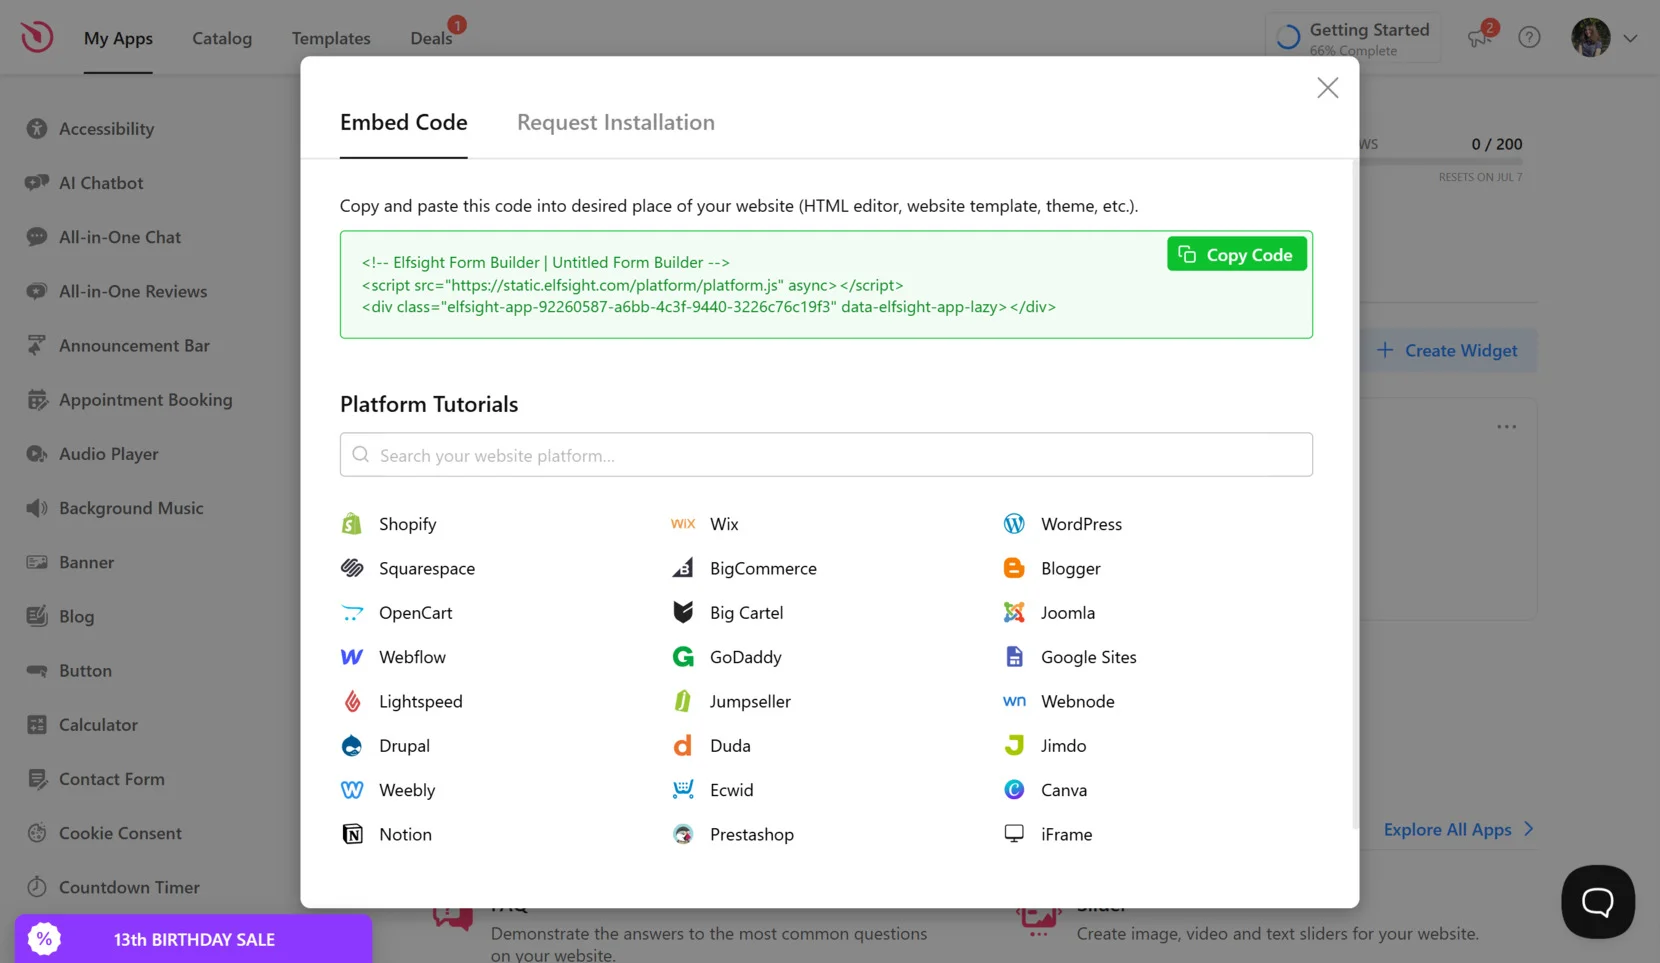
To add your Elfsight popup form specifically to a WordPress website, head to your WordPress dashboard and open the page, post, or widget area where you want the form to appear. Switch to the HTML view (or use a Custom HTML block if you’re using the block editor), then paste the Elfsight embed code you copied earlier. Save and update the page — your popup form is now live and ready to collect responses.
This method gives you complete control over both the appearance and behavior of your pop-up contact form. You’ll be able to trigger it on scroll, exit intent, or after a delay — ensuring it reaches your visitors at the perfect moment.
If you’re curious about other ways to add forms to your WordPress website, let’s explore a few alternative methods next.
Other Ways to Add a Form to WordPress
While Elfsight offers one of the simplest and most customizable ways to add popup forms to a WordPress website, there are a few native or alternative methods you can also explore. These options work directly within the WordPress ecosystem and can serve basic form-building needs without third-party widgets. Below are the most practical non-competitive methods available for WordPress users.
Using the WordPress Block Editor with HTML or JavaScript
WordPress gives you the flexibility to manually embed a popup form using the block editor and a Custom HTML block. This approach is helpful if you have custom embed code or a JavaScript-based trigger for a form overlay. It requires some basic technical familiarity but offers full control over placement and behavior.
- Open the WordPress editor for your page or post. Go to your dashboard, click on “Pages” or “Posts”, and choose the page where you want the popup to appear. If you’re starting from scratch, click “Add New”.
- Add a Custom HTML block. In the block editor, click the “+” icon to add a new block. Search for “Custom HTML” and select it. Insert the block where the popup script should be embedded — typically in the body of the content or near a trigger element.
- Paste your form code. Paste the complete HTML and/or JavaScript code for your popup form. This could include inline HTML for the form itself and a script that triggers it on load, scroll, or click. Make sure to include any required external script references.
- Preview and test. Click “Preview” to see how the form behaves on the frontend. Confirm that it loads correctly, triggers as intended, and doesn’t interfere with other page elements. Adjust code or position if needed.
This method gives you control over the placement and structure of your popup form, but it requires manual testing to ensure proper behavior and compatibility with your theme and plugins.
Using the WordPress Form Block (for inline display)
If you’re working with a WordPress theme that supports the Jetpack plugin or has access to native block-based form functionality, the built-in “Form” block is a simple way to add inline forms. While it doesn’t support popup behavior, it’s ideal for quickly placing contact or lead capture forms directly into content areas.
- Edit the page using the WordPress block editor. Log into your WordPress dashboard, navigate to “Pages” or “Posts”, and select the one where you want the form to appear. Click “Edit” to open the block editor.
- Insert the Form block. Click the “+” button to add a new block. Search for “Form” in the block selector (requires Jetpack or Gutenberg extensions) and insert it where the inline form should go.
- Choose a form type. Select a predefined layout such as a contact form, newsletter subscription, registration, or feedback form to save time on setup.
- Edit form fields. Customize each field to match your needs — change labels, placeholders, and add or remove fields like name, email, message, or dropdowns.
- Adjust notification settings. Set the destination email address for submissions and optionally configure confirmation messages or auto-responses.
This method is efficient and user-friendly for static forms, but it does not offer any overlay behavior or advanced trigger controls like scroll or exit intent.
Comparison: Elfsight vs. Native WordPress Methods
Here’s how Elfsight’s solution compares to the native and manual form options within the WordPress environment:
| Method | Pros | Cons |
|---|---|---|
| Elfsight Form Builder | Offers fully customizable popup forms with visual design, smart triggers, and integrations. | Requires embedding an external script via Custom HTML block or widget area. |
| WordPress HTML Block | Allows complete control over form behavior and embed logic through raw code. | Requires HTML/JavaScript knowledge and lacks visual configuration options. |
| WordPress Form Block | Extremely easy to insert and use directly within the WordPress editor. | Limited to inline display and lacks popup triggers or styling flexibility. |
Now that you’ve seen what alternatives exist and how they work, let’s move on to the best ways to use popup forms effectively on your WordPress website.
Tips to Make Your Form More Effective
Now that you know how to embed a popup form on your WordPress website, it’s important to make sure it works smoothly and delivers the best results. Below are practical tips that apply to any widget integration, helping you avoid common issues and enhance usability.
- Use a delay or scroll trigger. Avoid showing your popup immediately after page load—give users a few seconds or wait for scroll interaction. This reduces bounce rates and makes the form feel less intrusive.
- Test the popup on multiple devices. Before publishing, make sure your form displays correctly on desktop, tablet, and mobile. Responsive behavior is crucial for capturing leads on all devices.
- Match the popup design to your branding. Use your website’s fonts, colors, and button styles. A consistent design improves trust and increases the chances of form completion.
- Keep forms short and focused. Ask for only the most important information. Long forms can overwhelm users and reduce submission rates.
- Position strategically. Floating panes on the right or bottom corners usually perform better than centered popups, especially on mobile screens.
- Enable spam protection. Always use CAPTCHA or similar measures to block spam submissions without annoying real users.
- Check load performance. Too many widgets or large scripts can slow down your page. Embed popups asynchronously to avoid delays in loading core content.
- Use exit-intent triggers wisely. These are effective for capturing abandoning users but should not fire too frequently or too early.
Following these practices will help your popup form look professional and perform reliably. Next, let’s look at real use cases and who can benefit most from using popup forms on their WordPress websites.
Who Benefits Most from Popup Forms: Use Cases
Popup forms are a versatile solution that can be used across a wide range of industries. Whether you’re collecting leads, feedback, or bookings, these triggered forms help increase engagement and drive action on your WordPress website. Below are some of the most common and effective applications by sector.
Application in eCommerce 💰
Online stores can use popup forms to capture email subscriptions, offer discount codes, collect cart abandonment feedback, or promote limited-time deals. A well-timed popup on exit intent or after a few seconds of inactivity can be the difference between a lost visitor and a new customer.
Application in Education and Online Courses 🎓
Educational platforms and course providers use popup forms to register students, collect interest in new programs, or offer downloadable resources like eBooks and syllabi. The interactive format makes the experience feel more dynamic and less like a static registration page.
Application in Real Estate 🏠
Real estate companies can integrate interactive popup forms to let potential buyers schedule viewings, request callbacks, or submit interest in specific properties. Triggers based on scroll depth or time spent on a property listing can effectively prompt inquiries.
As you can see, popup forms can be tailored to match the unique goals of many industries. Now let’s look at possible issues you might encounter — and how to solve them quickly.
Fixing Common Issues
Even though creating a popup form for your WordPress website is straightforward, you might still face occasional issues during setup or display. Below are the most common problems users encounter, along with clear solutions to help you troubleshoot form behavior and ensure smooth interaction.
Why isn't the popup form showing up on my website?
Why is the popup overlapping other elements or breaking the layout?
Why doesn’t the form work on mobile devices?
Why am I not receiving form submissions or email alerts?
Can other plugin conflicts affect the popup form?
Addressing these common issues ensures your popup form performs reliably across all devices and user scenarios.
Conclusion
Adding a popup form to your WordPress website is one of the most effective ways to engage visitors, capture leads, and drive action — all without disrupting the browsing experience. Whether you’re using it for promotions, feedback, or contact purposes, a properly timed and well-designed form can make a measurable difference. We’ve covered everything from choosing the right setup to customizing form behavior and solving common integration issues.
With solutions like Elfsight, the process becomes incredibly intuitive — even for non-technical users. From drag-and-drop editing to advanced trigger controls and visual styling, creating a triggered popup form is faster and more accessible than ever. By following the best practices and real-world use cases shared above, you’re now ready to implement your own popup experience that fits your business goals and enhances interaction.
Need More Help?
We hope this guide gave you a clear path to building a popup form for your WordPress website. If you still have questions or need personalized support, feel free to reach out — we’re here to help you succeed. At Elfsight, we’re committed to delivering an all-in-one, no-code widget experience designed for real results.
Want to contribute? Join our Community to exchange insights and explore widget enhancements together. Have a feature in mind? Add it to our Wishlist — we’d love to hear from you.