Embedding Google Reviews into your Webflow website is one of the fastest and most effective ways to build trust with potential customers. These reviews act as real-time social proof, showing new visitors what others think about your business.
Whether you’re a small local brand or a growing online business, displaying customer feedback directly on your Webflow website helps establish authenticity and credibility. It’s not just a design choice — it’s a strategic advantage.
- Boosts credibility with real customer feedback. Visitors are more likely to trust your business when they see authentic reviews from Google displayed directly on your pages.
- Strengthens conversion rates through social proof. Positive reviews influence decision-making and increase the chance that users take action, whether it’s contacting you or making a purchase.
- Enhances user engagement and dwell time. Displaying fresh, dynamic content like reviews encourages users to stay longer and explore more of your content.
- Improves SEO with relevant, trust-building content. Embedded reviews contribute to keyword relevance and freshness, helping with search visibility over time.
Now that you know the value of adding Google Reviews, let’s take a look at how you can set this up quickly using Elfsight’s no-code solution.
Quick Way to Embed Google Reviews to Webflow
Let’s go over how to add Google Reviews to Webflow quickly with a widget from Elfsight. The platform offers a simple, code-free way to display client testimonials and highlight customer experiences directly on your website.
- Open the Elfsight editor and select the Google Reviews template.
- Connect your Google Business account to automatically pull in reviews.
- Customize layout, review style, and design settings to match your branding.
- Click “Add to website for free”, then copy the installation code. Paste it into your Webflow project.
See the widget in action – build Google Reviews with the easy-to-use editor!
Features of the Elfsight Reviews Widget
Once you’ve seen how easy it is to set up, it’s worth understanding why the Elfsight widget stands out. This solution is more than just a simple embed — it offers smart, customizable features that help you integrate Google Reviews with Webflow and make the most of user-generated content on your business website.
Here’s what makes Elfsight a powerful tool for displaying testimonials:
- Automatic review syncing from Google. The widget connects directly to your Google Business profile and keeps your reviews updated automatically, so you always show the latest feedback.
- Custom layout and design options. You can fully tailor the appearance: choose from list, grid, slider, and other layouts to best match your website’s style.
- Filter and moderation tools. Show only the reviews you want by filtering by rating or keyword, or hide any unwanted content to keep your display clean.
- Multiple sources and language support. If your business has multiple locations, you can show reviews from several profiles at once and even display them in different languages.
- Responsive and mobile-friendly design. The widget works smoothly on all devices and screen sizes, ensuring a professional look across desktop and mobile views.
- SEO-friendly and lightweight. It’s optimized to load fast and doesn’t impact performance, while still contributing to business reputation display and SEO value.
With these features, the widget offers everything you need to present your customer feedback with style and flexibility.
Let’s now walk through the full step-by-step instructions to embed your Google Reviews in Webflow, so you surely know how to make the most of its functionality.
Webflow Google Reviews Integration: Step-by-Step
The setup process is simple and user-friendly, even if you have no technical background. Below is a detailed guide to help you create, customize, and install the widget correctly.
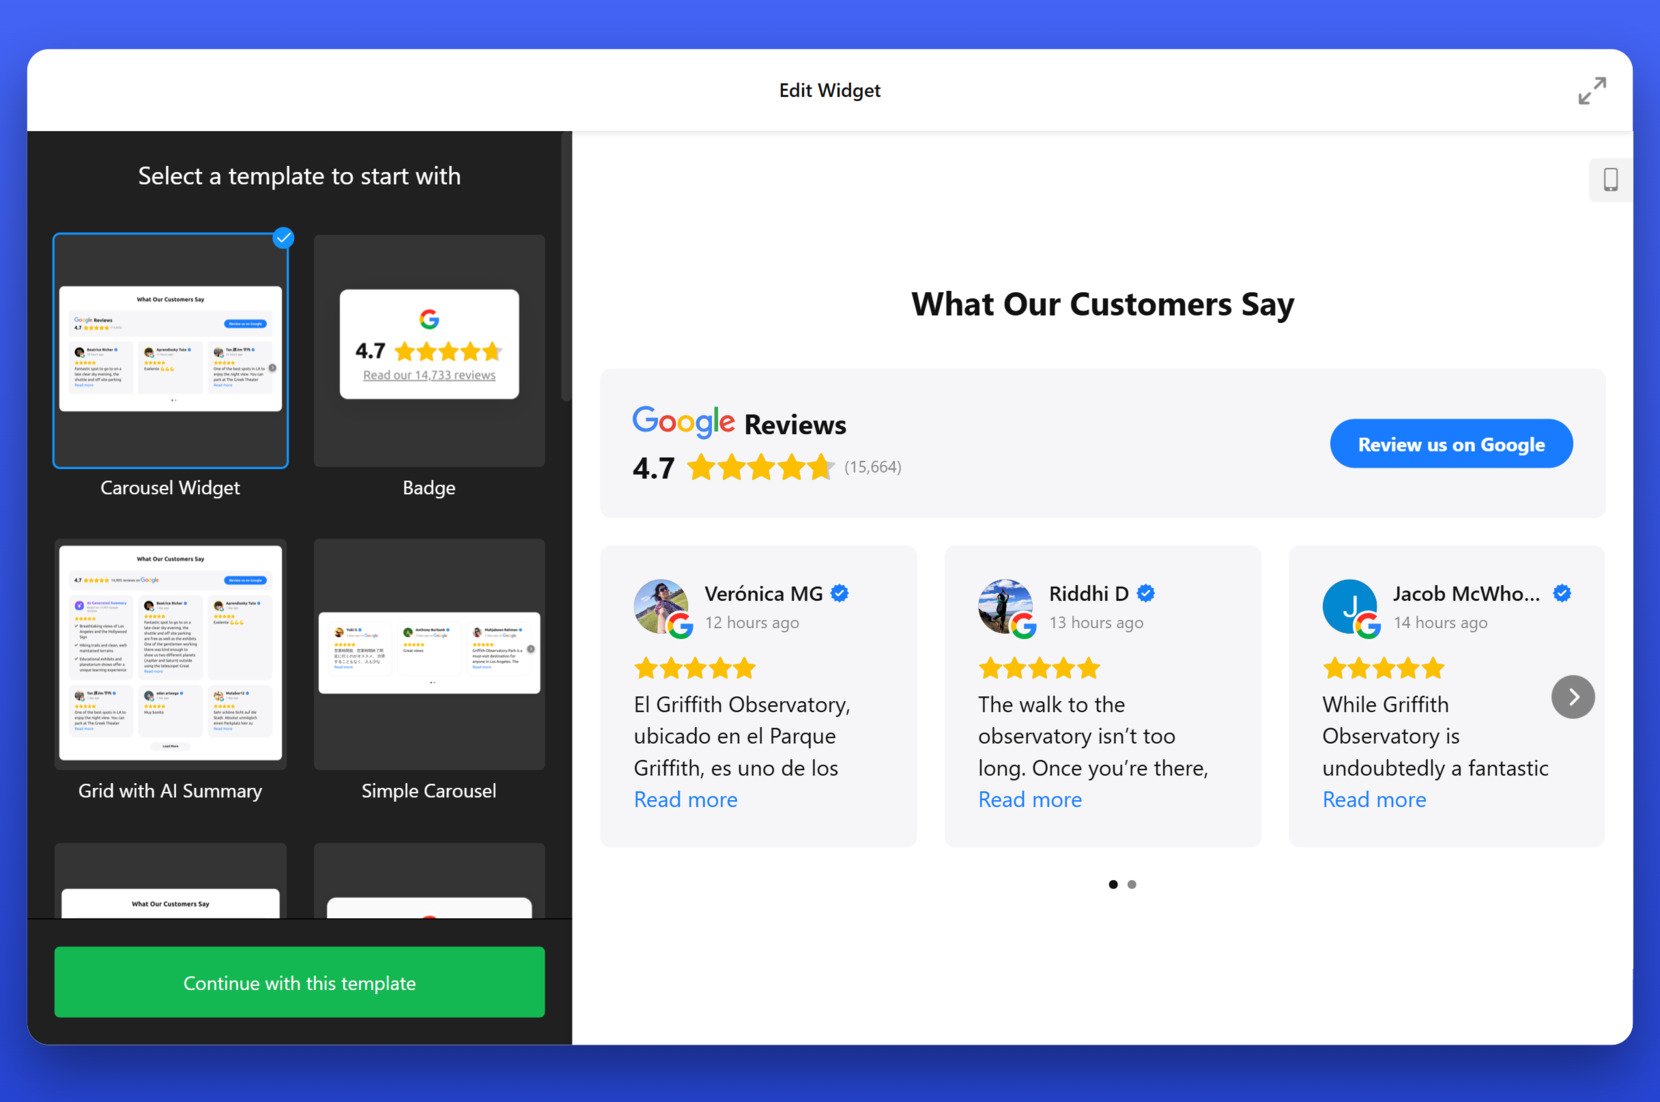
- Select a Template. Open the editor and choose your preferred layout. Click “Continue with this template” to proceed.

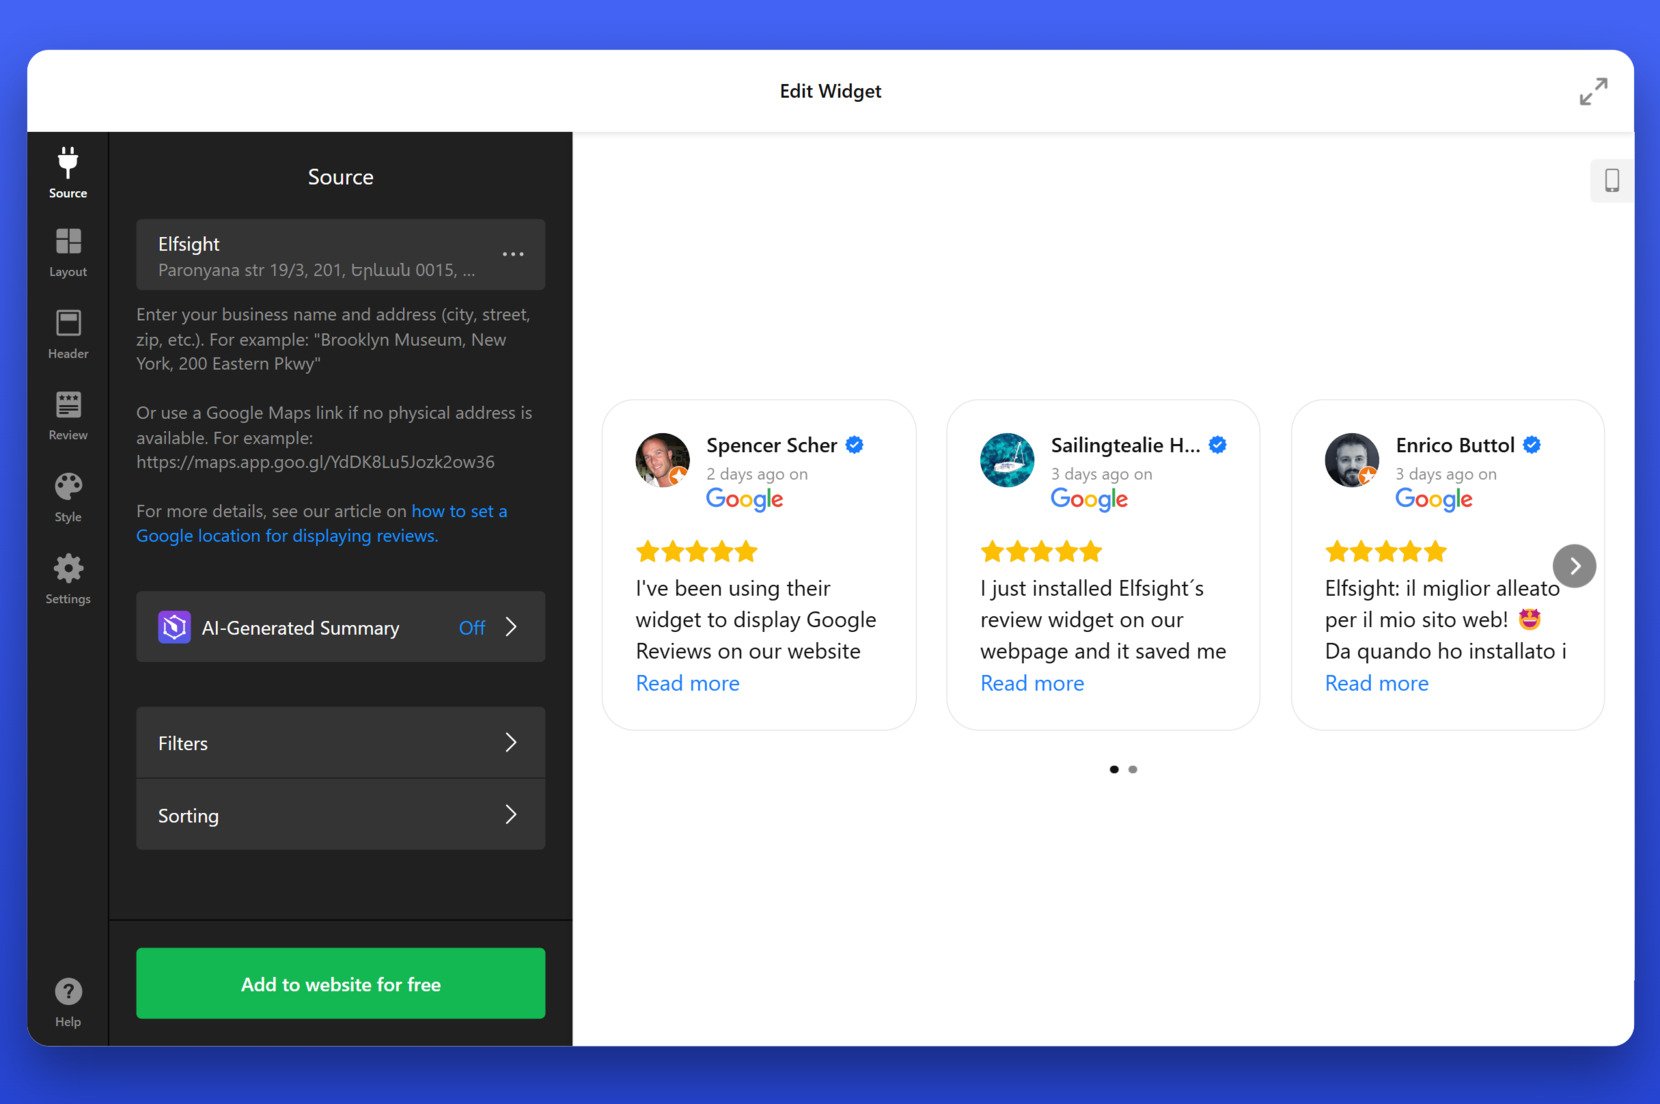
- Add Your Business Source. Navigate to the “Source” tab on the left and enter your business name or paste a direct link to your Google profile. If your business has no physical address, you can use a public Google Maps URL.

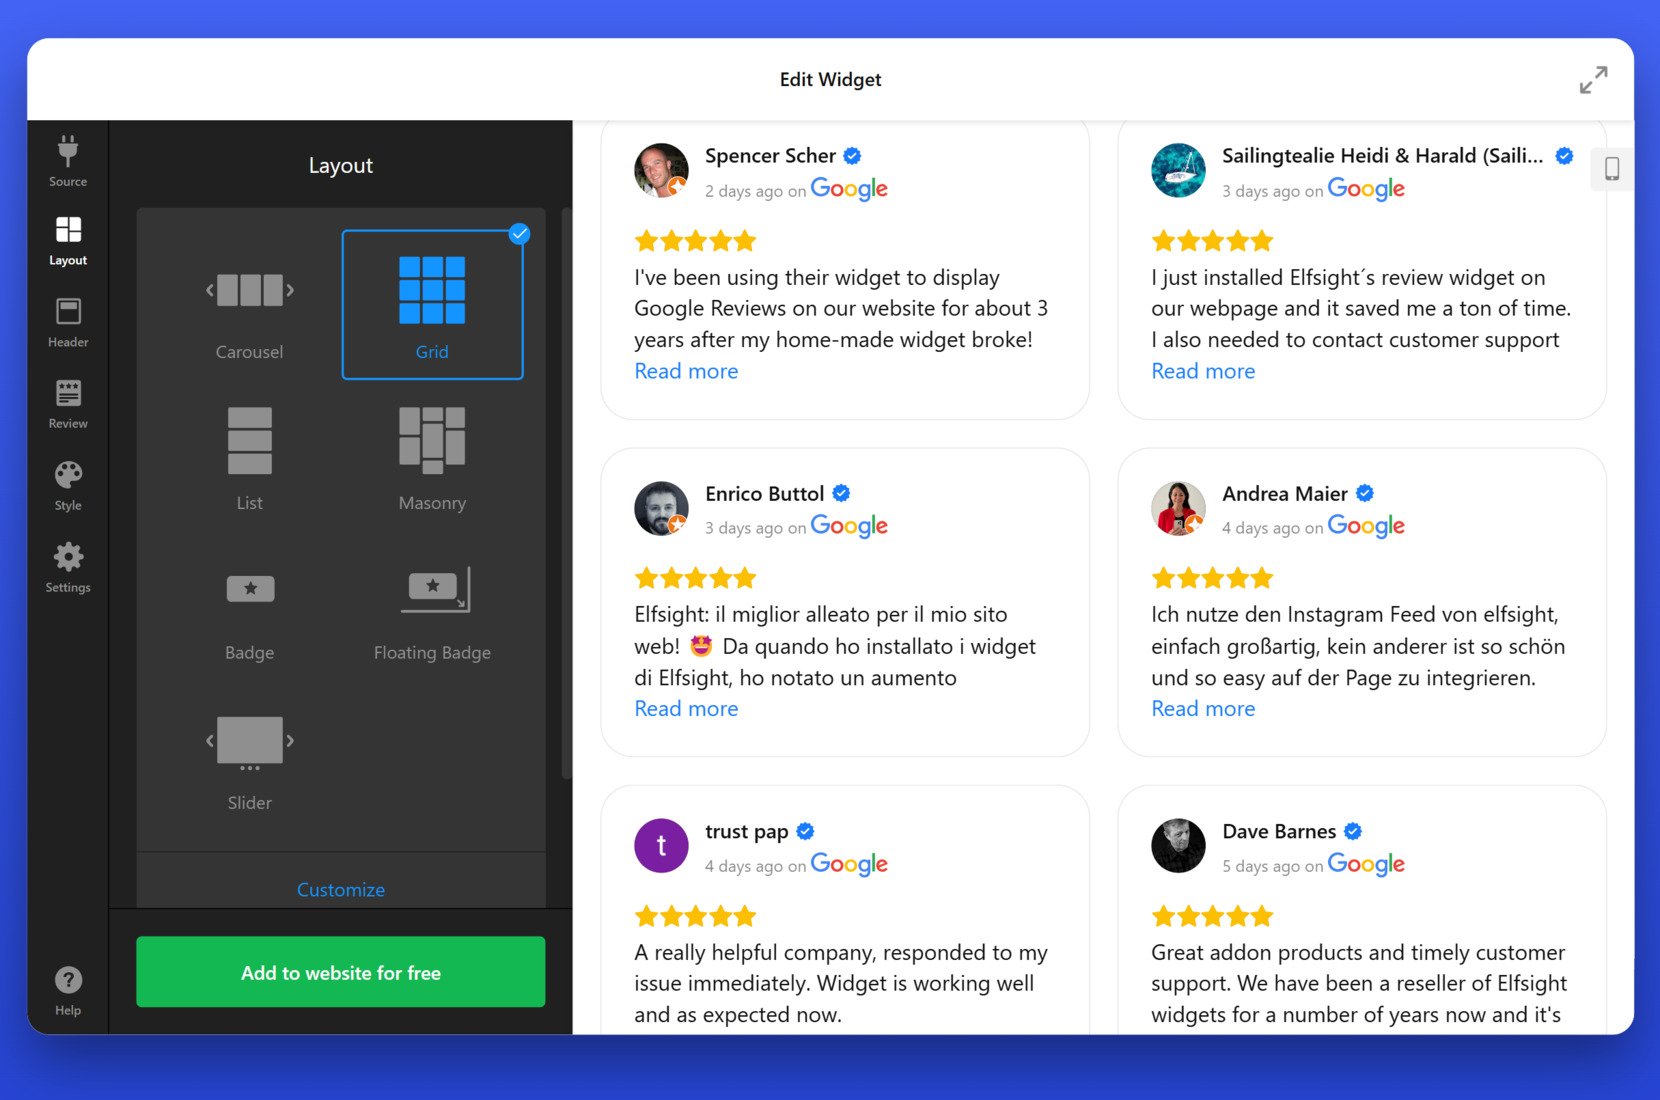
- Customize the Layout. Switch to the “Layout” section to choose how your reviews are arranged — Grid, List, Masonry, Slider, or Floating Badge. This step controls how your reviews will look on desktop and mobile devices.

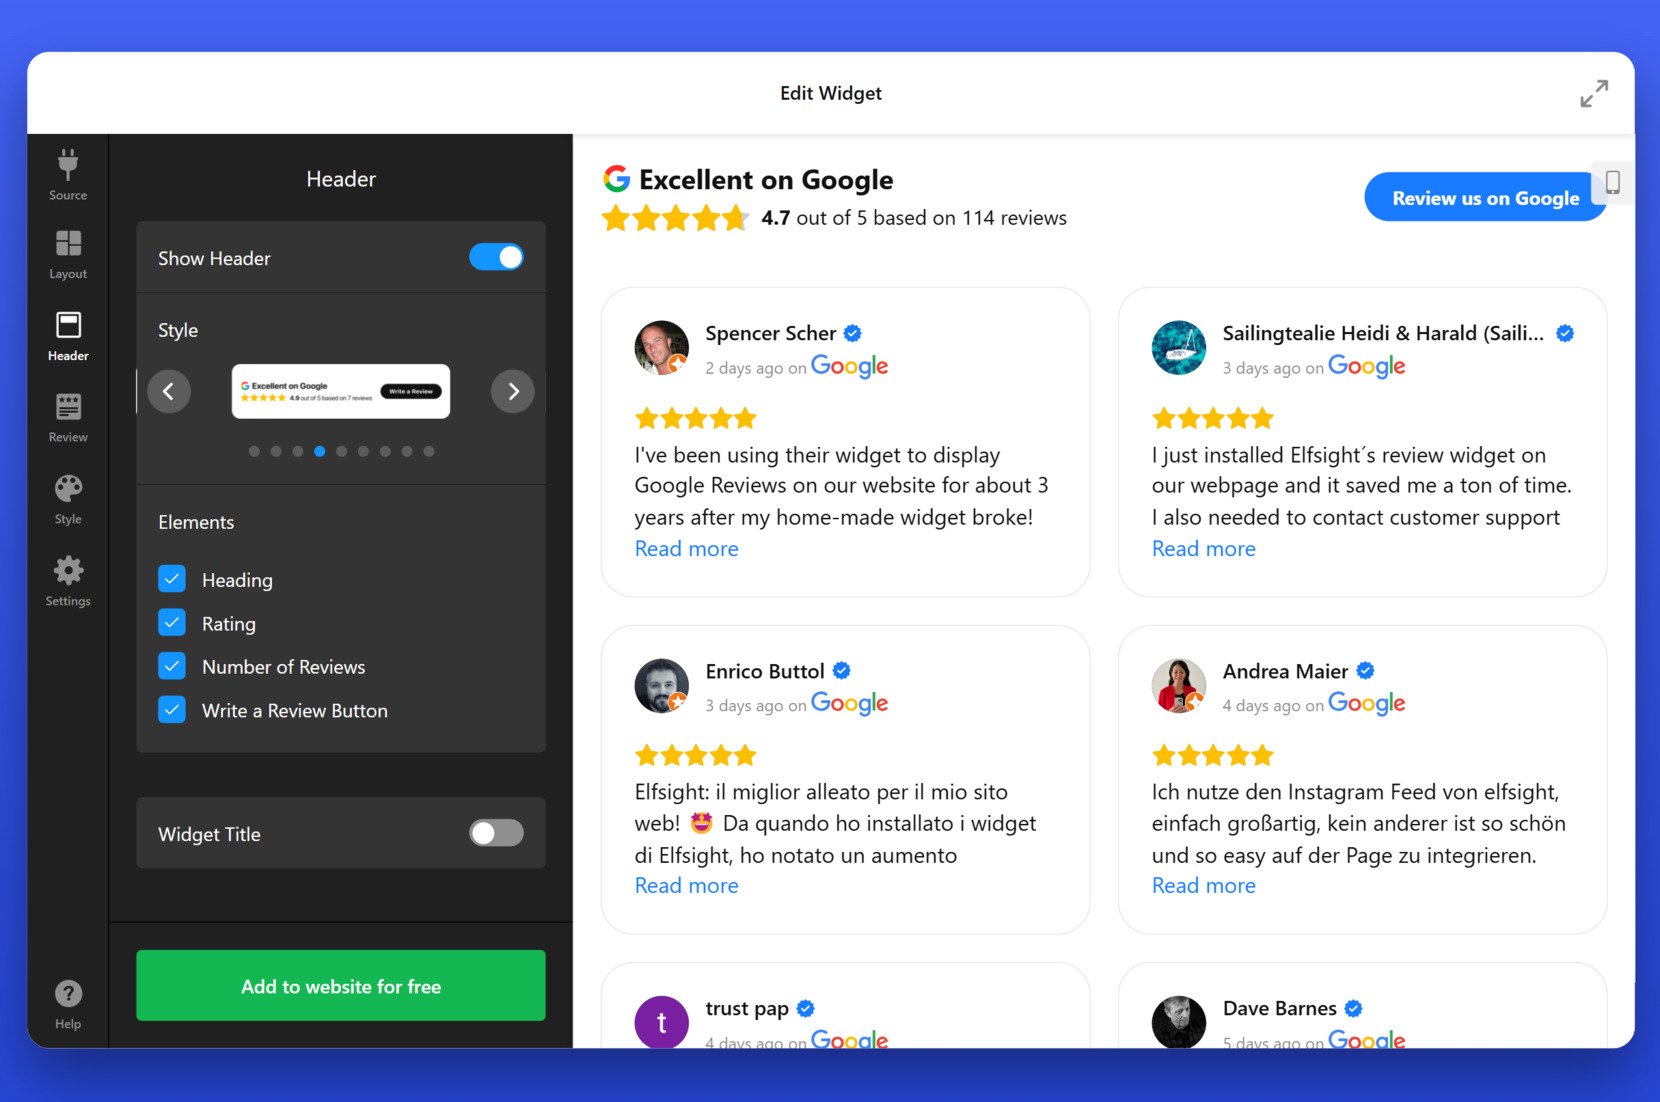
- Adjust Header Display Options. In the “Header” tab, you can enable or disable elements like the title, star rating, number of reviews, and a button linking to your Google review page.
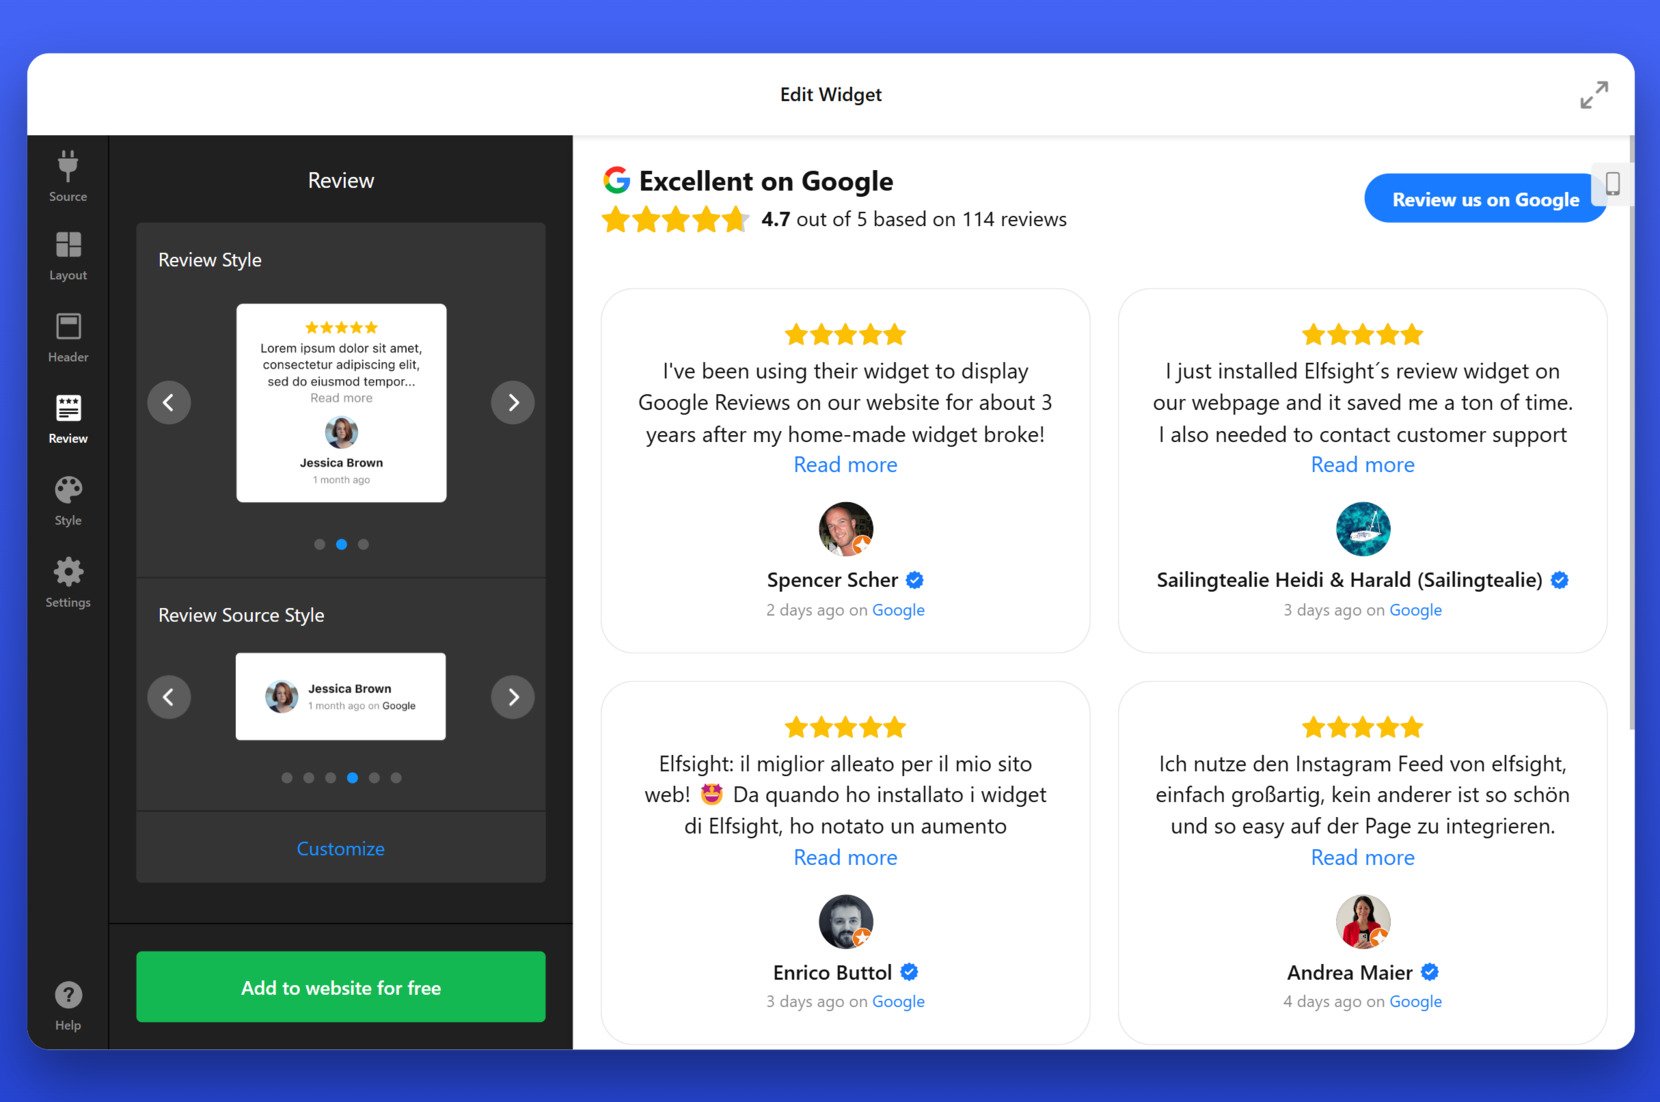
- Set Review Card Styles. Go to the “Review” tab to choose the visual style of your review cards. You can configure how the reviewer’s name, image, text length, and review source appear.
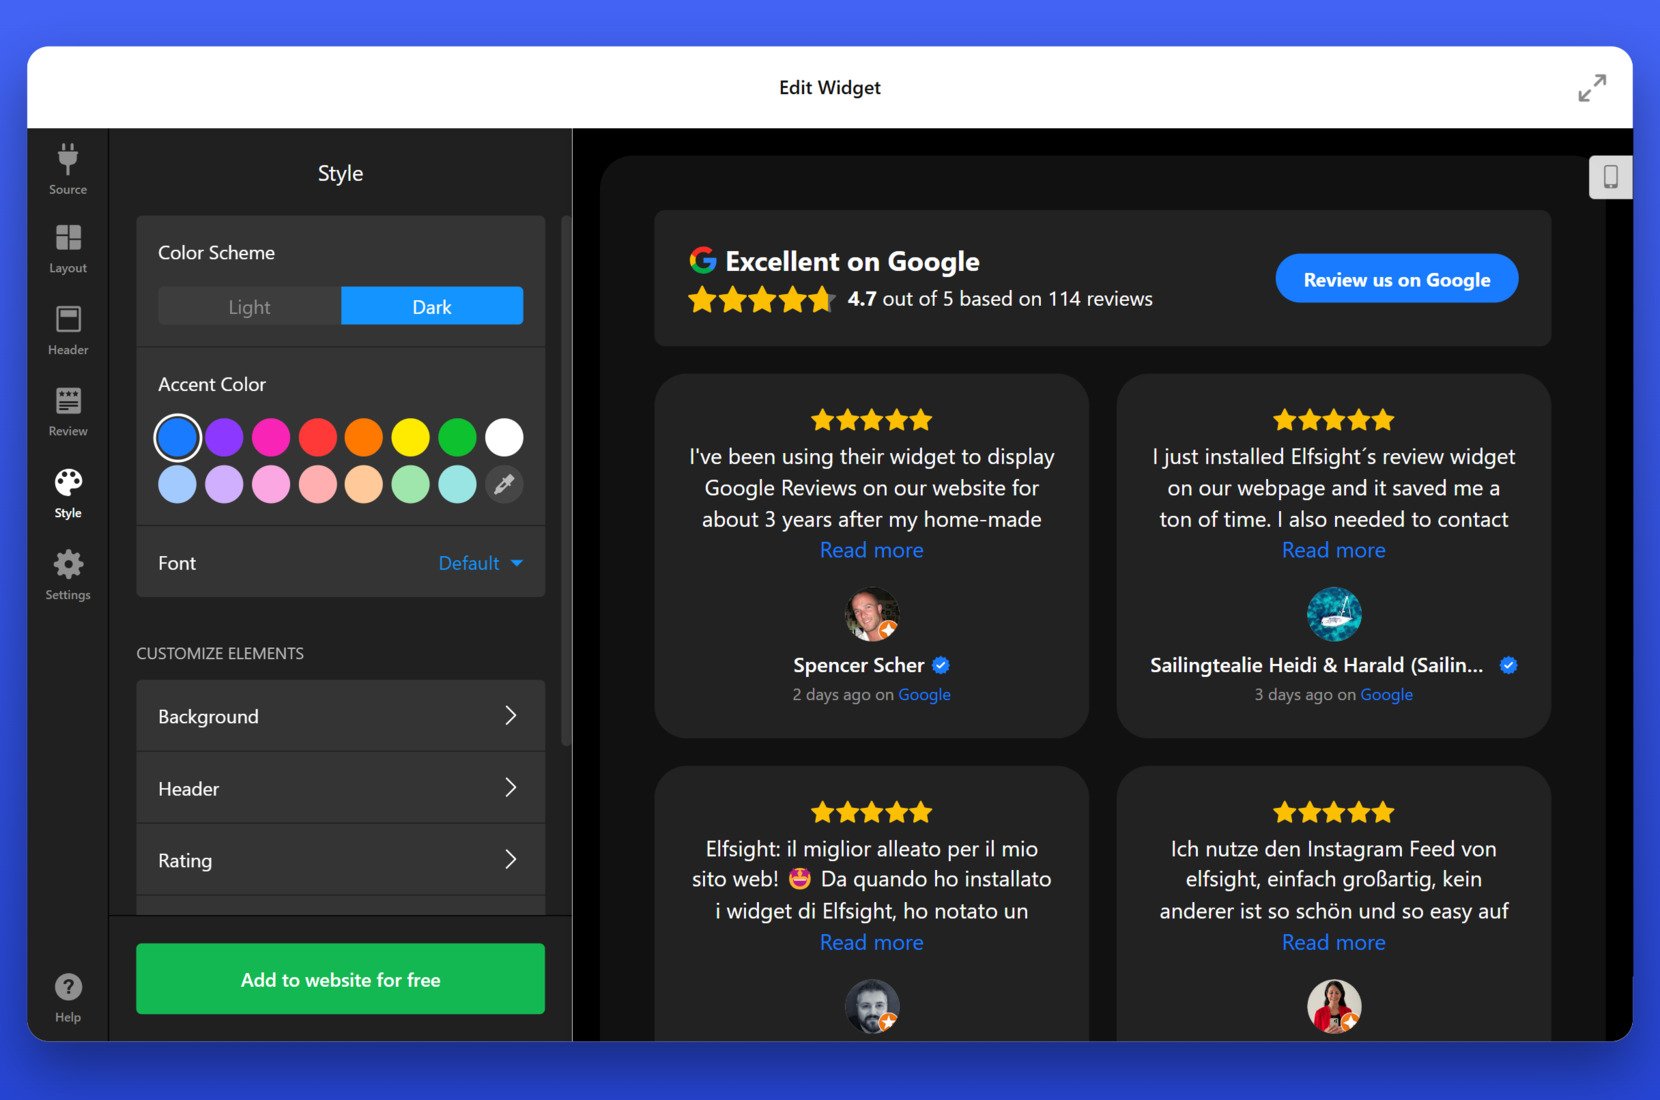
- Style the Widget Appearance. Under the “Style” tab, select a light or dark theme, define an accent color, and adjust fonts. You can also tweak background and border styles to match your branding.
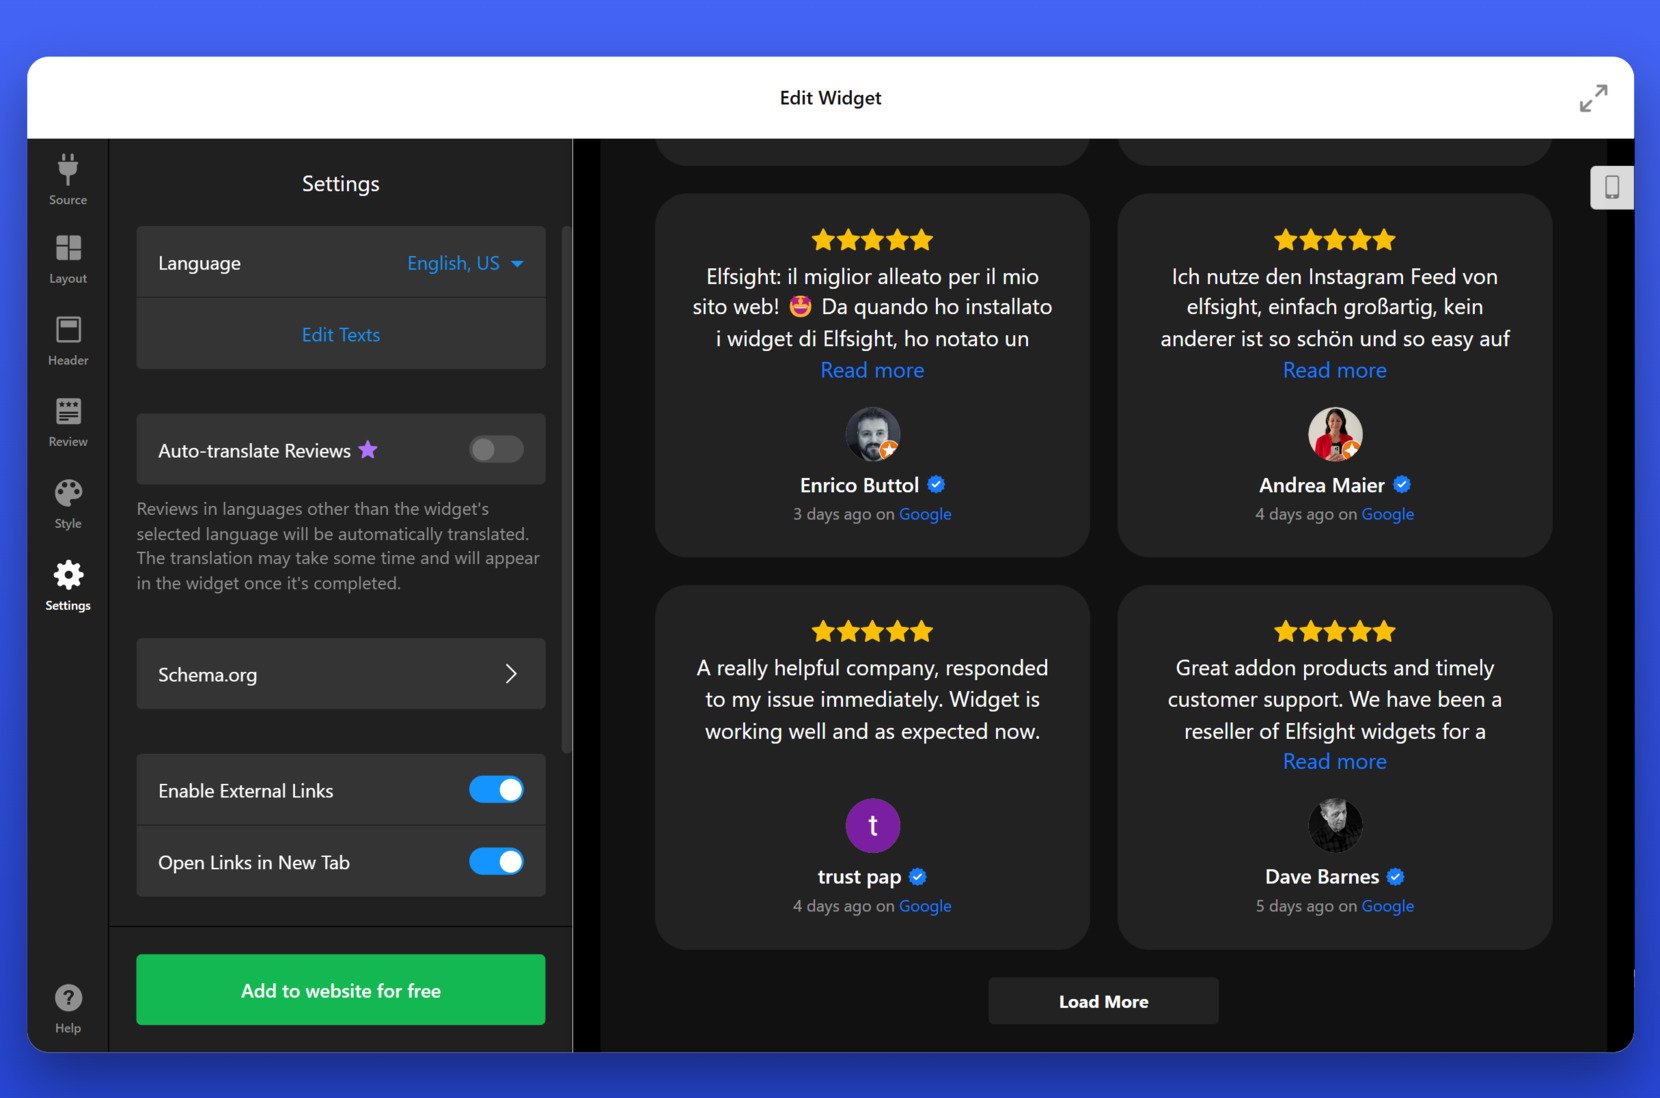
- Configure Settings and Extras. Visit the “Settings” tab to adjust widget language, schema markup, review translation, and whether links open in a new tab. This section also controls advanced display behavior.

- Copy the Embed Code and Add It to Webflow. Once you’re satisfied with the design, click “Add to website for free”. Copy the generated code.
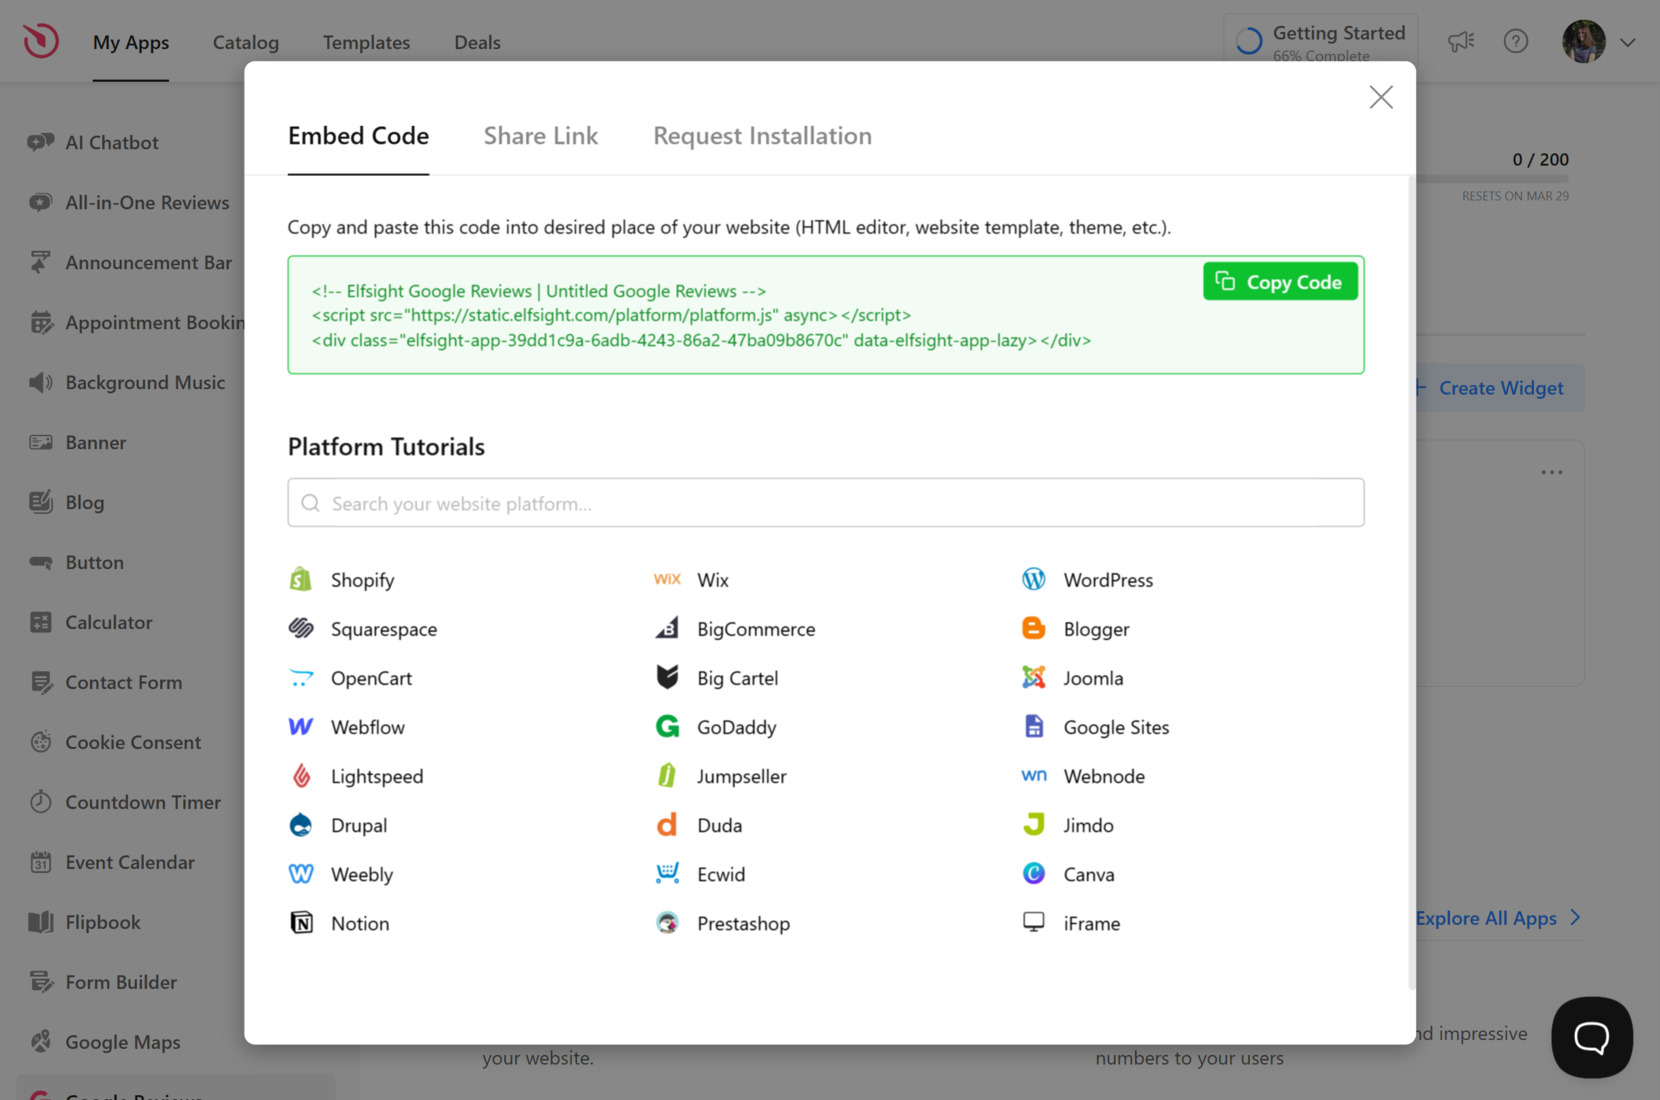
To add the widget to your Webflow website, head to the “Designer” and open the page where you want the reviews to appear. Drag an “Embed” element from the components panel into your layout. Then, paste the embed code from Elfsight directly into the code field of the “Embed” block. Click “Save & Close”, publish your website, and your Google Reviews will appear instantly.
Once added, the widget will automatically pull in reviews from your connected Google Business profile and display them as part of your client review section. You can return to the editor anytime to adjust settings or refresh the feed.
Other Ways to Show Reviews on Webflow
While using the Elfsight widget is one of the simplest and most flexible ways for Webflow Google Reviews integration, there are other methods you can explore. Below, we’ll talk about two alternative solutions.
Embedding Google Reviews Manually Using Google Maps
This method allows you to display a Google review snippet or your business location using the native Google Maps embed feature. While it doesn’t provide full customization or auto-syncing, it’s a basic way to show some credibility elements without third-party tools.
- Choose a Template. Open the Elfsight Google Reviews editor. From the left panel, select a layout like “Carousel Widget”, “Grid with AI Summary”, or “Badge”. Then click “Continue with this template” to move into the widget editor.
- Add Your Business Source. Go to the “Source” tab. Enter your full business name and address as it appears on Google, or paste your Google Maps link if needed. This will connect your widget to your Google Business profile and start pulling in reviews.
- Customize the Layout. Open the “Layout” tab. Choose your preferred display style such as “Grid”, “List”, “Masonry”, “Carousel”, or “Floating Badge”. Click “Customize” to modify spacing, alignment, and column settings for desktop and mobile views.
- Adjust Header Elements. In the “Header” tab, enable or disable components like “Heading”, “Rating”, “Number of Reviews”, and the “Write a Review Button”. Choose from various header styles to match your website’s tone.
- Set Review Display Options. Go to the “Review” tab to pick a “Review Style” and “Review Source Style”. You can show or hide elements such as reviewer names, profile pictures, and post dates. Use the “Customize” button to fine-tune formatting.
- Style the Widget. Open the “Style” tab to define the overall look. Select a “Color Scheme” (Light or Dark), choose an “Accent Color”, and adjust the “Font”. Expand “Background”, “Header”, or “Rating” sections for deeper customization.
- Configure Additional Settings. In the “Settings” tab, set your preferred “Language”, enable “Auto-translate Reviews”, add “Schema.org” markup, and choose whether links open in a new tab. You can also allow external links to show in reviews.
- Embed the Widget in Webflow. Click the green “Add to website for free” button. In the pop-up, press “Copy Code”. Then, go to your Webflow Designer, drag an “Embed” element into the section where you want the widget to display, paste the code, click “Save & Close”, and publish your changes.
Displaying Reviews Using Google Places API
The Google Places API gives developers access to business data, including customer reviews. This method allows for dynamic review fetching, but it requires coding and a Google Cloud account with billing enabled.
- Set up a Google Cloud project. Visit the Google Cloud Console, sign in with your Google account, and click “Create Project”. Give your project a name, then navigate to the “API Library” section. Search for “Places API” and click “Enable” to activate it for your project.
- Generate an API key. Go to “APIs & Services” in the left menu, select “Credentials”, then click the “Create Credentials” button. From the dropdown, choose “API Key”. A key will be generated — copy and store it somewhere safe for later use.
- Enable billing and secure your API key. Google requires billing to be enabled to use the Places API. Set up a billing account if prompted. Then, under “API Key Restrictions”, apply domain or IP restrictions to prevent unauthorized access and manage quota usage securely.
- Fetch place details using the API. Retrieve your business’s Place ID using the official Google Place ID finder tool. Then, use the Place Details endpoint to make a request that returns reviews in JSON format. You’ll need to include your API key and Place ID in the request URL.
- Use JavaScript to render the reviews. Create a custom JavaScript function to parse the JSON response and extract the review content. Then, in your Webflow Designer, drag in an “Embed” element, paste your JavaScript and HTML into the code block, and publish the changes to display the live review content.
Comparison: Elfsight vs. Other Methods
Here’s a quick comparison of Elfsight and the alternative methods available for embedding Google Reviews into a Webflow website:
| Method | Pros | Cons |
|---|---|---|
| Elfsight | Offers a user-friendly, no-code setup with full customization and auto-syncing of Google reviews. | Requires creating a free Elfsight account and copying a code snippet into Webflow. |
| Manual Embed | Quick and free way to display your business presence using native Google features. | Only shows a static map—no individual reviews or customization options available. |
| Google Places API | Allows full control over data and real-time review retrieval directly from Google. | Requires developer skills, an active Google Cloud account, and handling API usage limits. |
While other methods have their uses, Elfsight stands out as the most practical and efficient choice for most Webflow users — especially those looking for a professional-looking reviews widget without the complexity of coding or API management.
Next, we’ll go over helpful tips to make the most out of your Google Reviews integration.
Tips to Get the Most from Reviews
After choosing your preferred method to embed Google Reviews on your Webflow website, it’s time to fine-tune how you use them. The following tips will help you optimize the visibility, layout, and overall impact of your review section to increase credibility and user trust.
- Place reviews near decision-driving elements. Add your reviews widget close to contact forms, service descriptions, or pricing sections to influence user decisions at key moments.
- Use real customer names and photos when available. This adds authenticity and helps visitors trust the feedback more quickly. Displaying reviews with full details strengthens their credibility.
- Keep the design consistent with your branding. Match fonts, colors, and card styles with your website’s theme to create a seamless user experience.
- Display only relevant or recent reviews. Prioritize 4-5 star ratings and timely feedback to keep the content fresh and appealing. This can be done manually or via filters.
- Make sure reviews are mobile-optimized. Check that the review section is readable and interactive on all screen sizes, including tablets and smartphones.
- Update your widget’s content occasionally. Even if the feed is automated, reviewing your layout and filters periodically ensures the section stays effective and relevant.
Once you’re familiar with the best ways to showcase reviews, it’s helpful to look at how other businesses use them effectively. Let’s explore some examples across different industries.
Showcasing Google Reviews: Use Cases
Below are key sectors where customer feedback plays a critical role in driving trust, conversions, and customer engagement on a Webflow website.
Application in the Hospitality Industry 🍳
Hotels, cafes, restaurants, and event venues can benefit significantly from showcasing Google testimonials. Featuring reviews near booking forms, menus, or event details helps visitors feel confident before making a reservation or inquiry. Trust-building visuals like star ratings and detailed customer experiences add transparency to the decision-making process.
Application in the Healthcare Industry 💊
Medical clinics, dental offices, wellness centers, and therapy providers can increase trust and transparency by integrating authentic patient feedback. Placing a reviews widget near service listings, new patient information, or appointment forms reassures visitors of professional credibility and care quality.
Application in the E-commerce and Retail Industry 🛒
Online shops, product brands, and boutique retailers can improve product trust by displaying star ratings and customer comments directly on product pages, category sections, or during the checkout process. Google testimonials serve as social proof that helps boost buyer confidence and reduce cart abandonment.
By tailoring review integration to your industry, you can deliver more relevant, persuasive experiences to your audience. Let’s now explore potential issues you might face during setup — and how to resolve them quickly.
Troubleshooting Issues
Even though adding Google Reviews to your Webflow website is generally smooth, there are occasional issues and technical nuances worth knowing. Below are common problems users encounter and how to address them effectively.
Why aren’t my Google Reviews appearing after embedding the widget?
How can I fix review sync delays or missing updates?
What causes the widget to not load at all on my Webflow page?
Can I filter out negative or irrelevant reviews from showing?
Understanding these common problems helps you prevent potential errors and manage your review display more effectively.
Final Thoughts
Adding Google Reviews to your Webflow website is a smart move for businesses looking to build trust, boost conversions, and present authentic customer experiences. Using a testimonial widget displaying real feedback directly on your pages can significantly influence visitor decisions and elevate your brand’s credibility.
Thanks to flexible solutions like Elfsight Google Reviews widget, integrating customer reviews has never been more accessible — even without coding skills. With customizable layouts, real-time syncing, and responsive designs, you can tailor your review section to match your branding and business goals.
Need More Info?
We hope this guide made your integration process easier. If you’d like support or ideas for customizing a review widget on your Webflow website, contact us — our team at Elfsight is here to help. We offer easy-to-use, no-code solutions designed to enhance your business online.
Join our growing Community to connect with other users, share feedback, and submit your ideas. Got a feature in mind? Add it to our Wishlist — we’d love to hear from you!