

Adding a form to your GoDaddy website is one of the most effective ways to collect user input, generate leads, and improve interaction with your audience. Whether you need a contact page, feedback option, or registration form, having a structured and responsive form in place is essential for modern websites.
If you want an easy, professional, and highly functional way to capture visitor information without complex coding or design, using a form builder is the ideal solution. It works directly on your website and helps you manage submissions efficiently.
- Boosts user engagement. Interactive forms encourage visitors to leave feedback, ask questions, or make inquiries right on your website.
- Improves data collection. Structured fields allow you to collect emails, phone numbers, and other details in an organized and reliable way.
- Supports responsive design. A mobile-ready form ensures your visitors can fill out fields easily, no matter the device they use.
- Simplifies contact page setup. A form eliminates the need to display email addresses publicly and streamlines communication.
- Enhances professionalism. A clean, embedded form makes your website look more complete and trustworthy.
Now that you understand why adding a form is essential for your GoDaddy website, let’s take a quick look at how you can get started with a simple, fast setup.
Quick Way to Add a Form to GoDaddy Website
Now that you know why forms are important, let’s walk through how you can create and add one to your GoDaddy website quickly using Elfsight’s Form Builder. This method requires no coding and offers a fully customizable setup tailored to your branding and user needs.
- Open the editor and select a template that fits your form’s purpose.
- Customize fields like name, email, phone number, dropdowns, checkboxes, and more.
- Adjust font style, background color, and other design elements to match your website’s style.
- Click “Add to website for free“, copy the installation code, and paste it into your web editor.
This simple process lets you publish a fully functional, branded form in minutes. It’s ideal for business owners who want fast, reliable form integration without hiring a developer or dealing with complex setup tools.
Create your own form for GoDaddy in just a few clicks – no tech skills needed!
Features of the Elfsight Form Builder
Once you’ve seen how easy it is to create a form, it’s time to explore what makes this solution truly stand out. The Elfsight Form Builder offers powerful features that help you integrate a form into your GoDaddy website and achieve professional results without hassle.
Here are the key features and benefits that make it worth trying:
- Multiple form types in one widget. Choose from contact, feedback, survey, quiz, and other formats without switching tools.
- Fully customizable design. Adjust spacing, fonts, colors, and button styles to match your website branding precisely.
- Flexible field options. Add dropdowns, checkboxes, file uploads, and custom text areas to collect exactly the data you need.
- Email notifications and autoresponders. Receive instant alerts and set up auto-replies to stay responsive and professional.
- Responsive form design. Your form looks and works great on mobile, tablet, and desktop without any additional setup.
- Third-party integrations. Connect with platforms like Mailchimp and Google Sheets to manage submissions efficiently.
- Built-in spam protection. Protect your form with CAPTCHA and other tools to reduce unwanted submissions.
With these features, you get everything needed to build forms that are not only functional but also conversion-focused. Next, let’s go step-by-step through the full process of creating and embedding your form on a GoDaddy website.
How to Create Forms in GoDaddy Website Builder
To get the most out of your GoDaddy website, follow this detailed step-by-step guide to build and embed a custom form using the Elfsight Form Builder. You’ll be able to create your form visually, adjust it to your needs, and publish it in just a few minutes — no coding required.
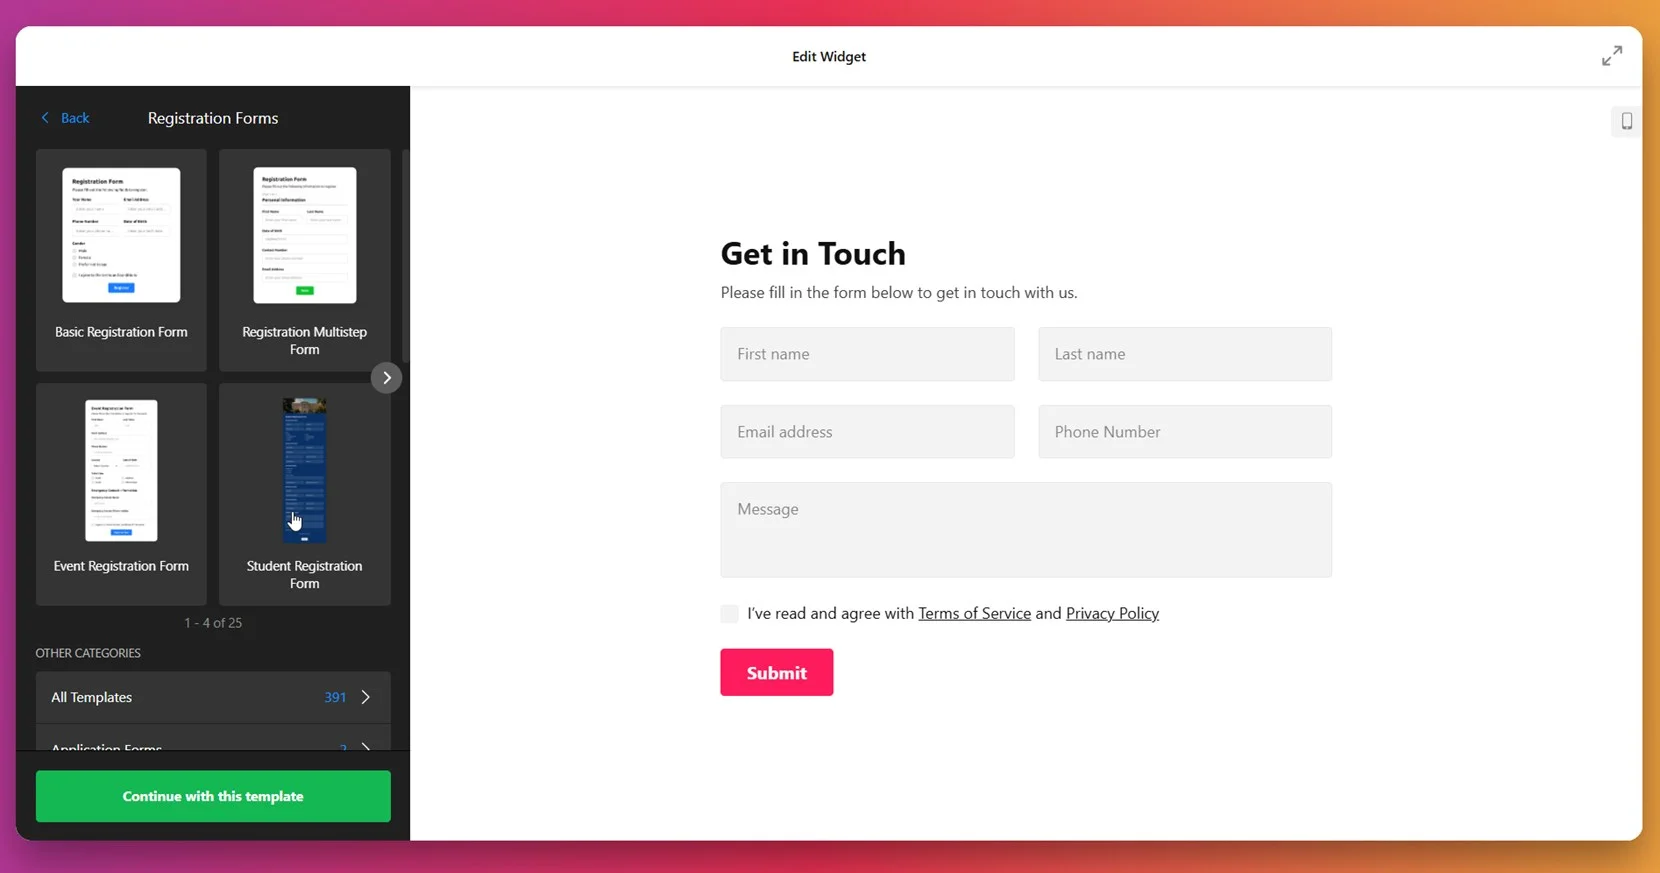
- Select a template. Start in the widget editor by choosing one of the ready-made form templates that suits your needs. Click “Continue with this template” to open the editor.

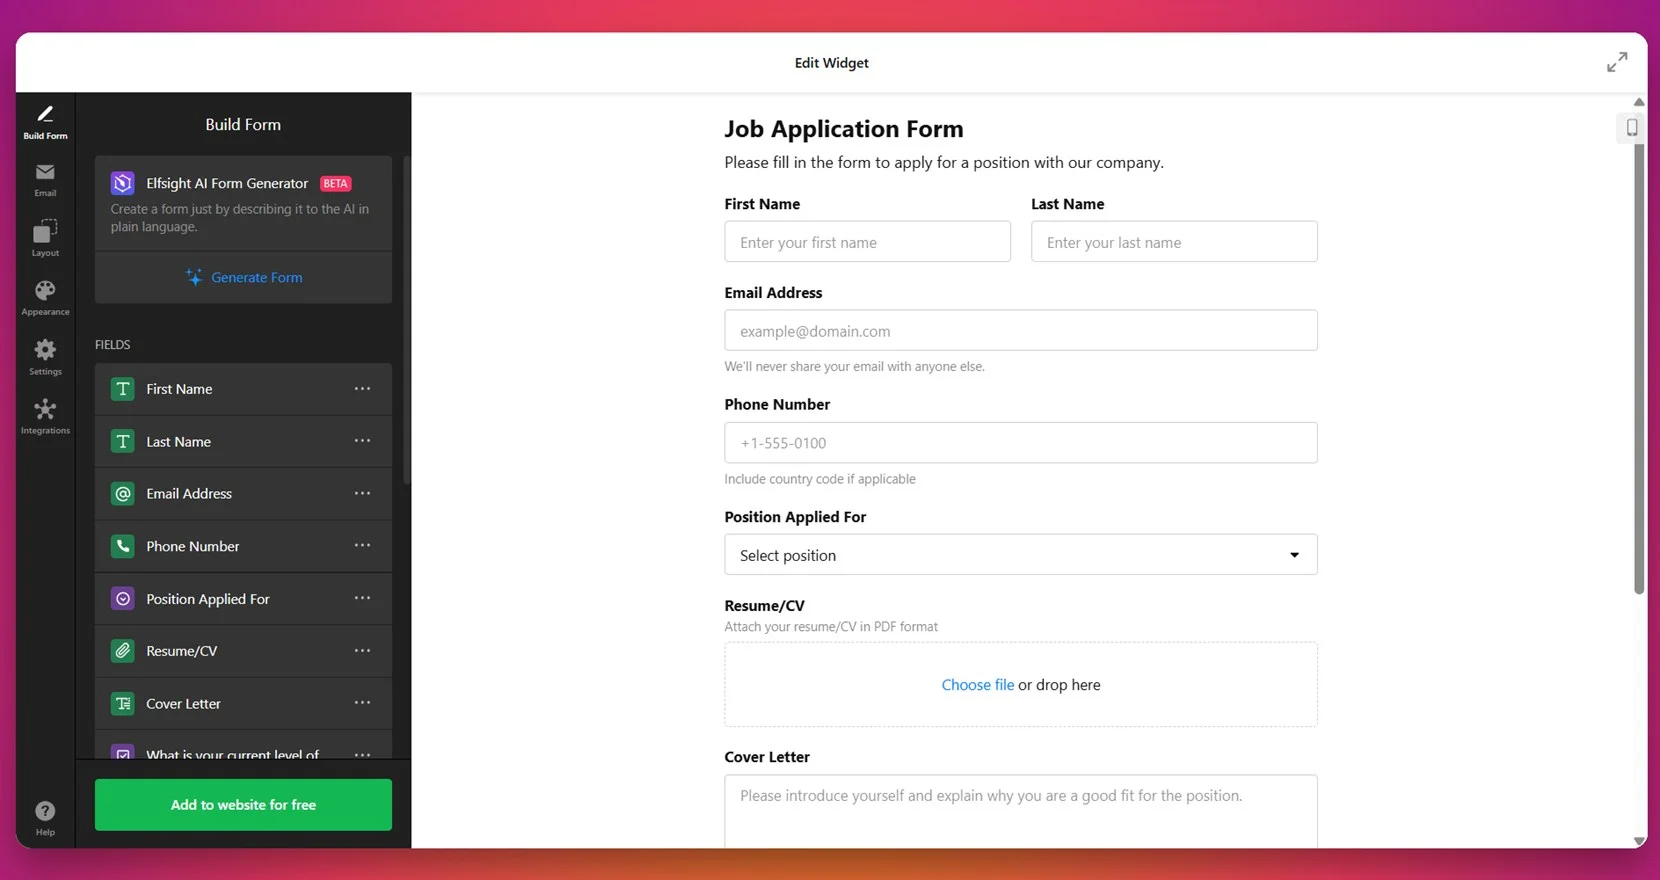
- Build your form. Use the drag-and-drop builder to add and arrange fields like name, email, phone number, checkboxes, dropdowns, or consent checkmarks. You can also enable the AI Form Generator to generate a layout based on a plain text prompt.

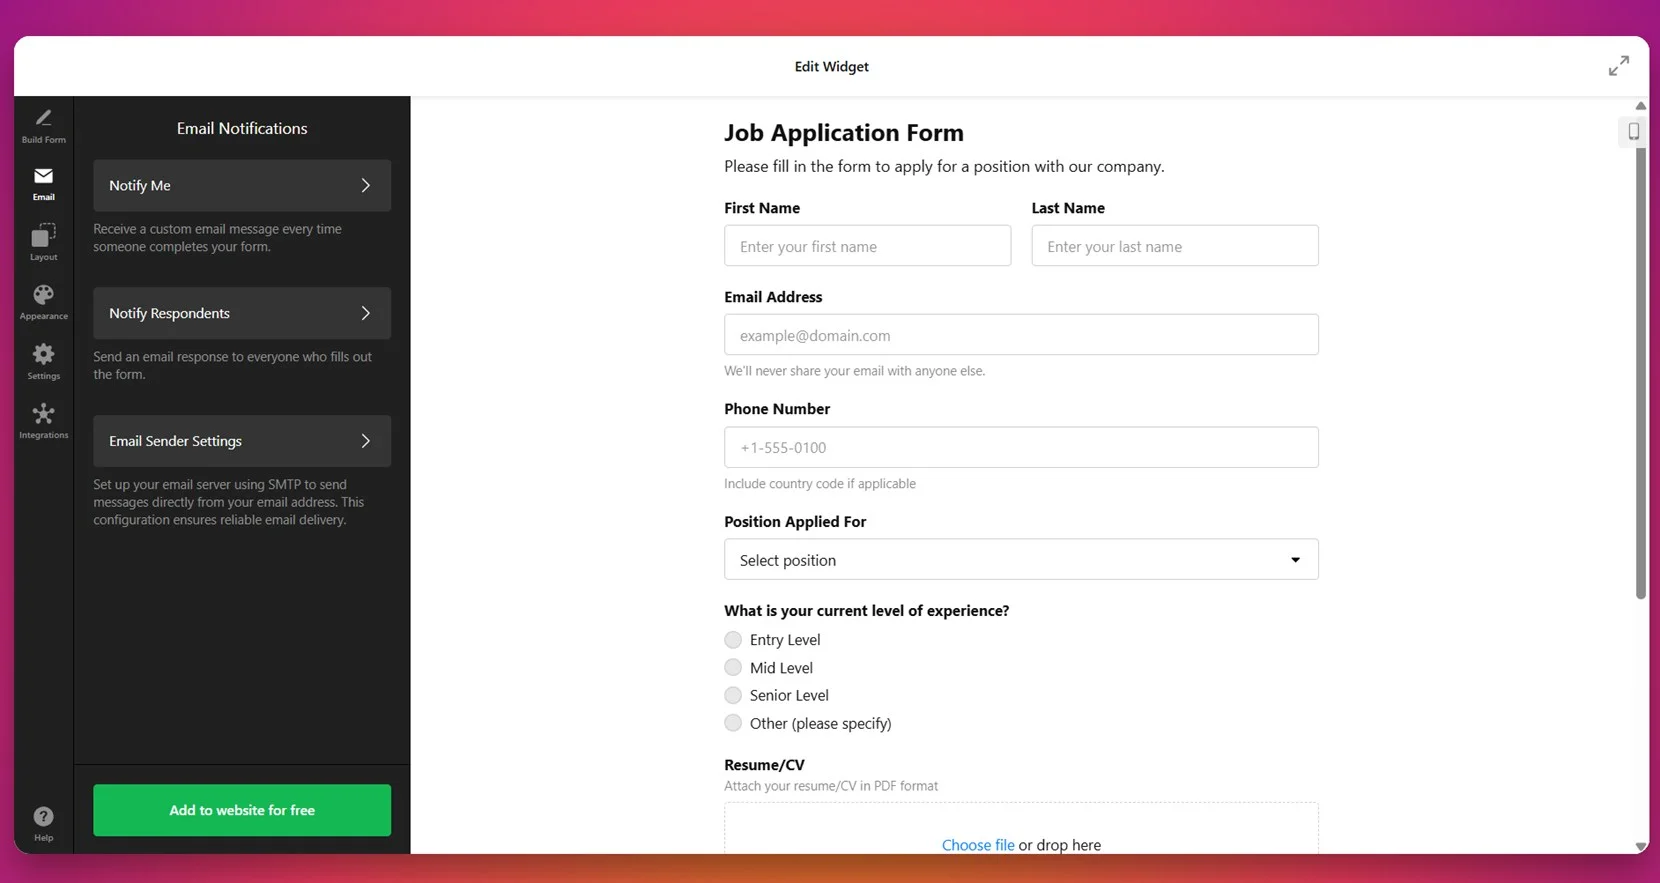
- Configure email notifications. Set up alerts for both your team and the form respondents. You can customize sender details and SMTP settings to ensure messages reach the right inbox without delay.

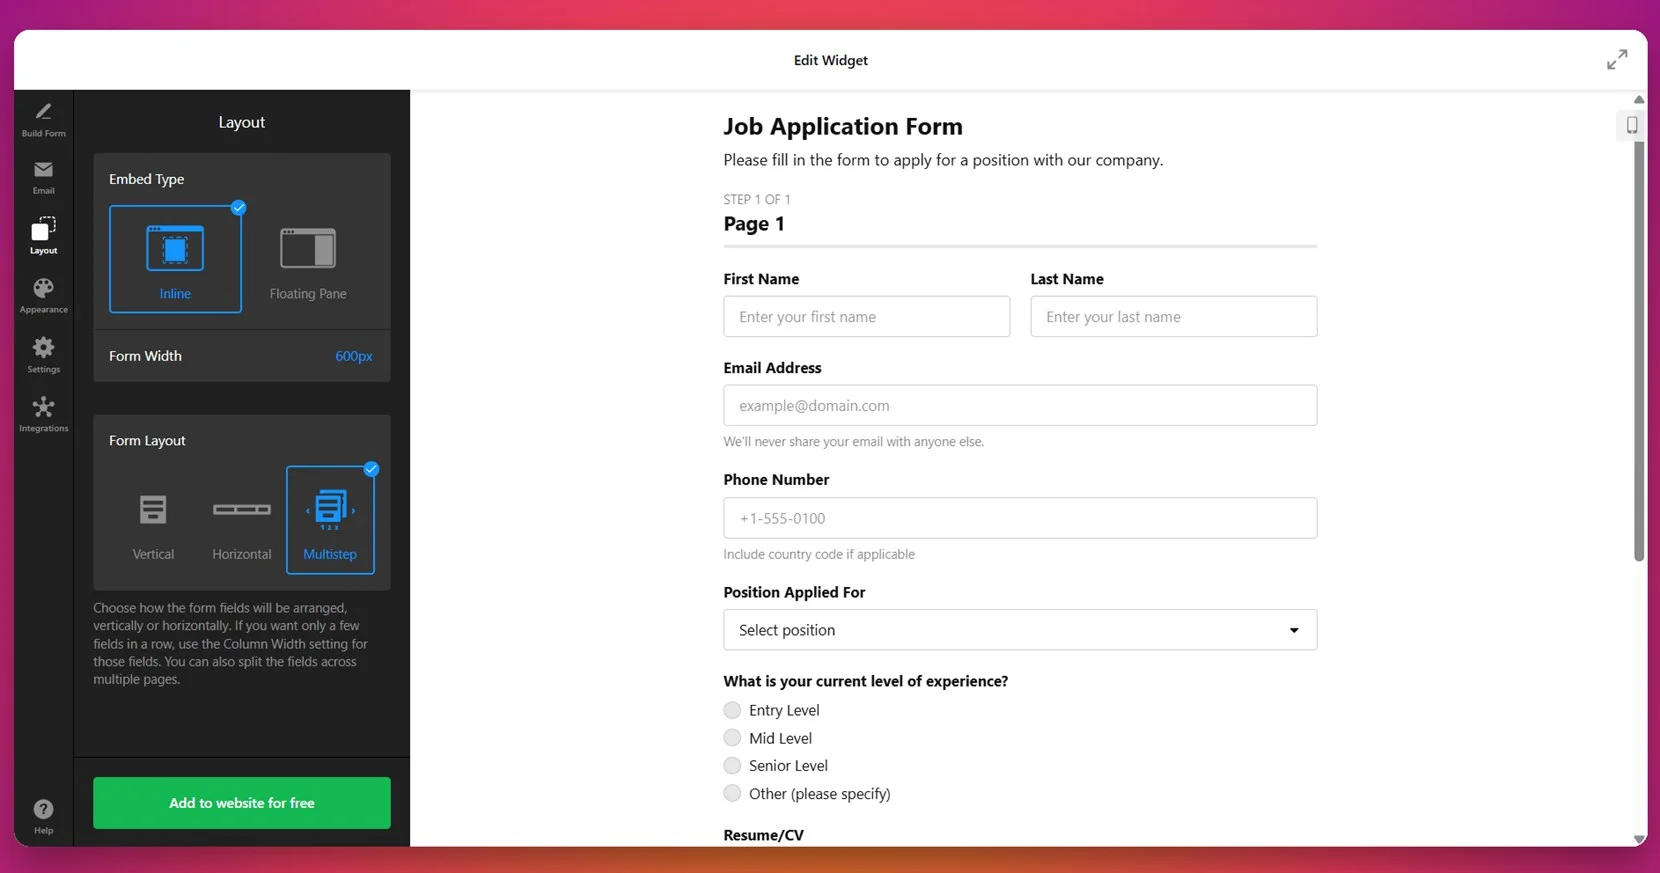
- Adjust layout settings. Head to the “Layout” section and choose how the form appears — inline, floating pane, vertical, horizontal, or multistep. You can also define the form’s width in pixels for better alignment with your website content.
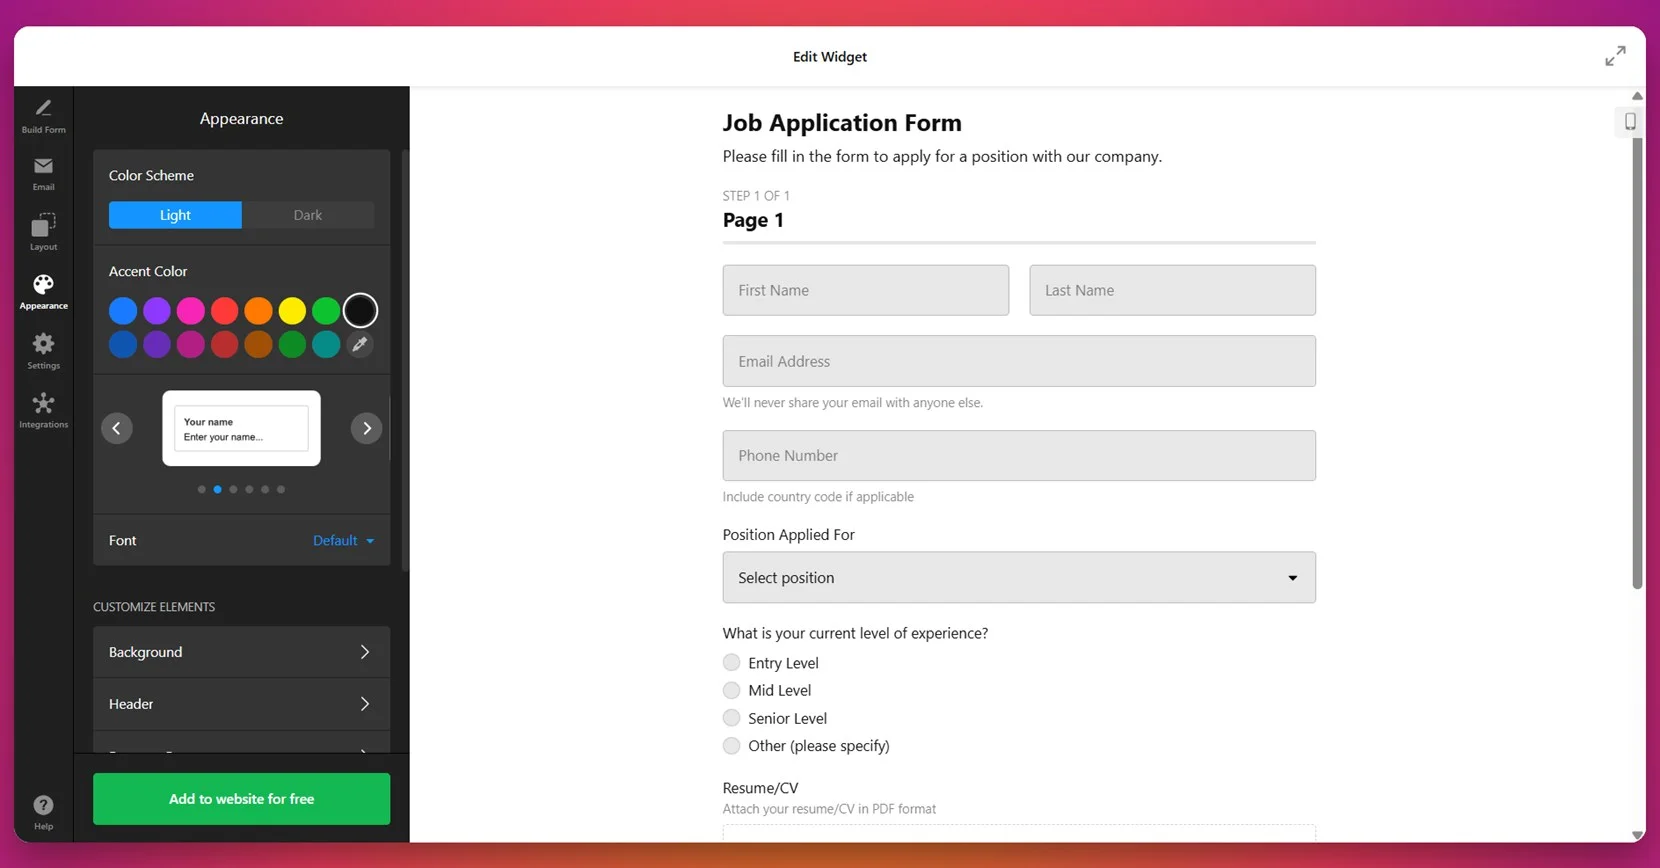
- Customize the design. In the “Appearance” section, apply your preferred light or dark theme, pick an accent color, choose a font style, and fine-tune elements like background, buttons, and borders for a consistent look.

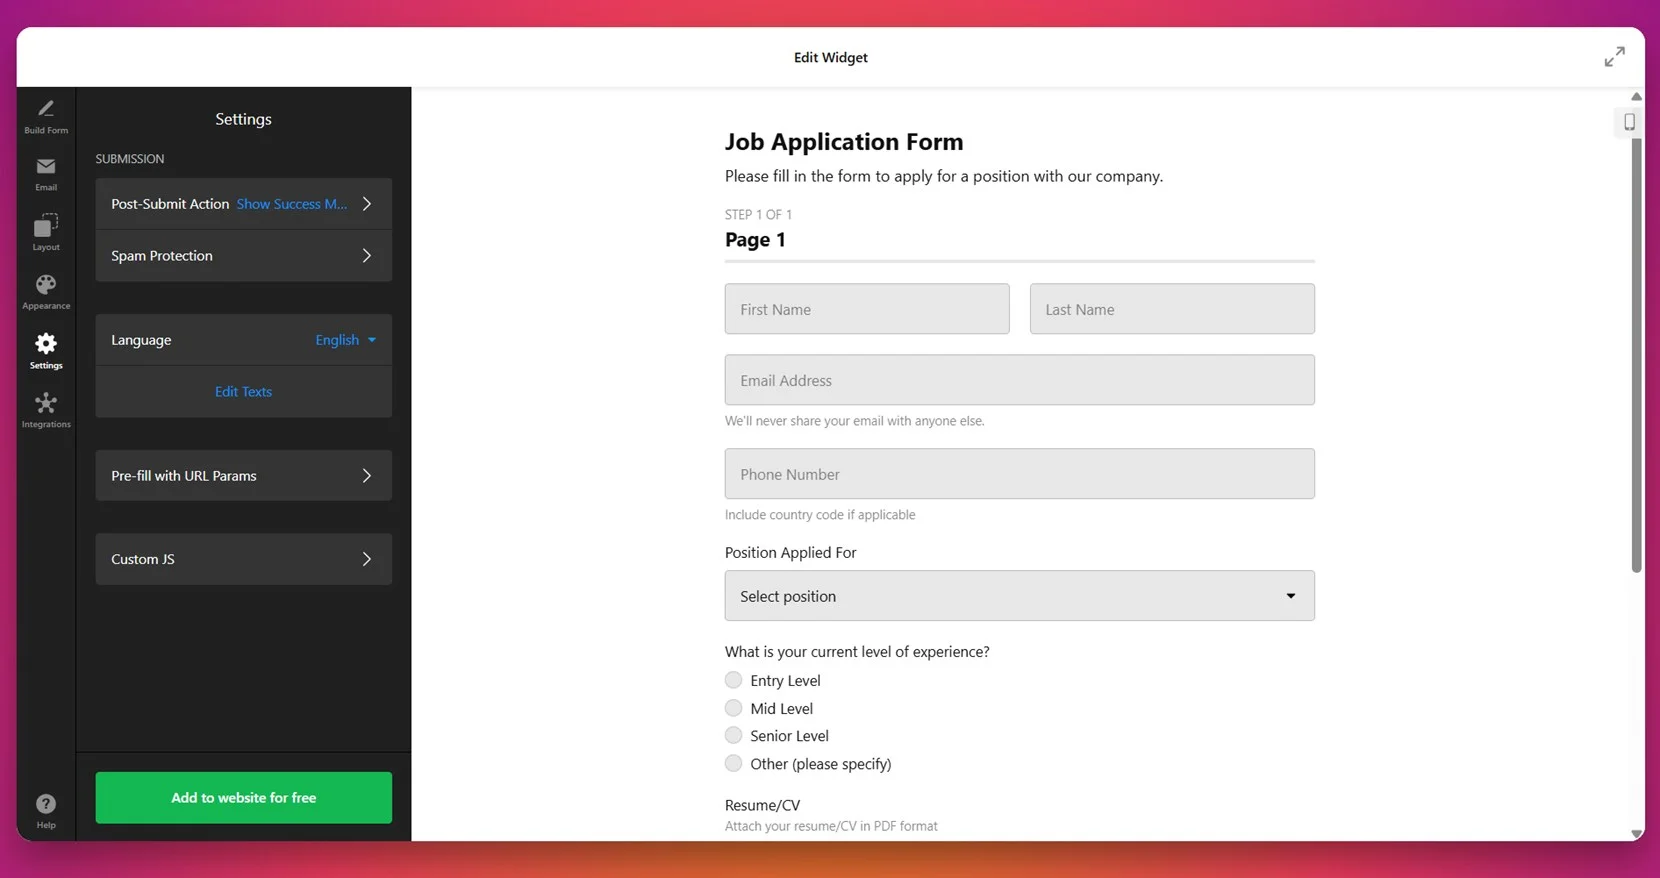
- Fine-tune form behavior. Use the “Settings” tab to define what happens after a user submits the form (e.g., show success message), set up anti-spam protection, select a language, and tweak custom texts if needed.

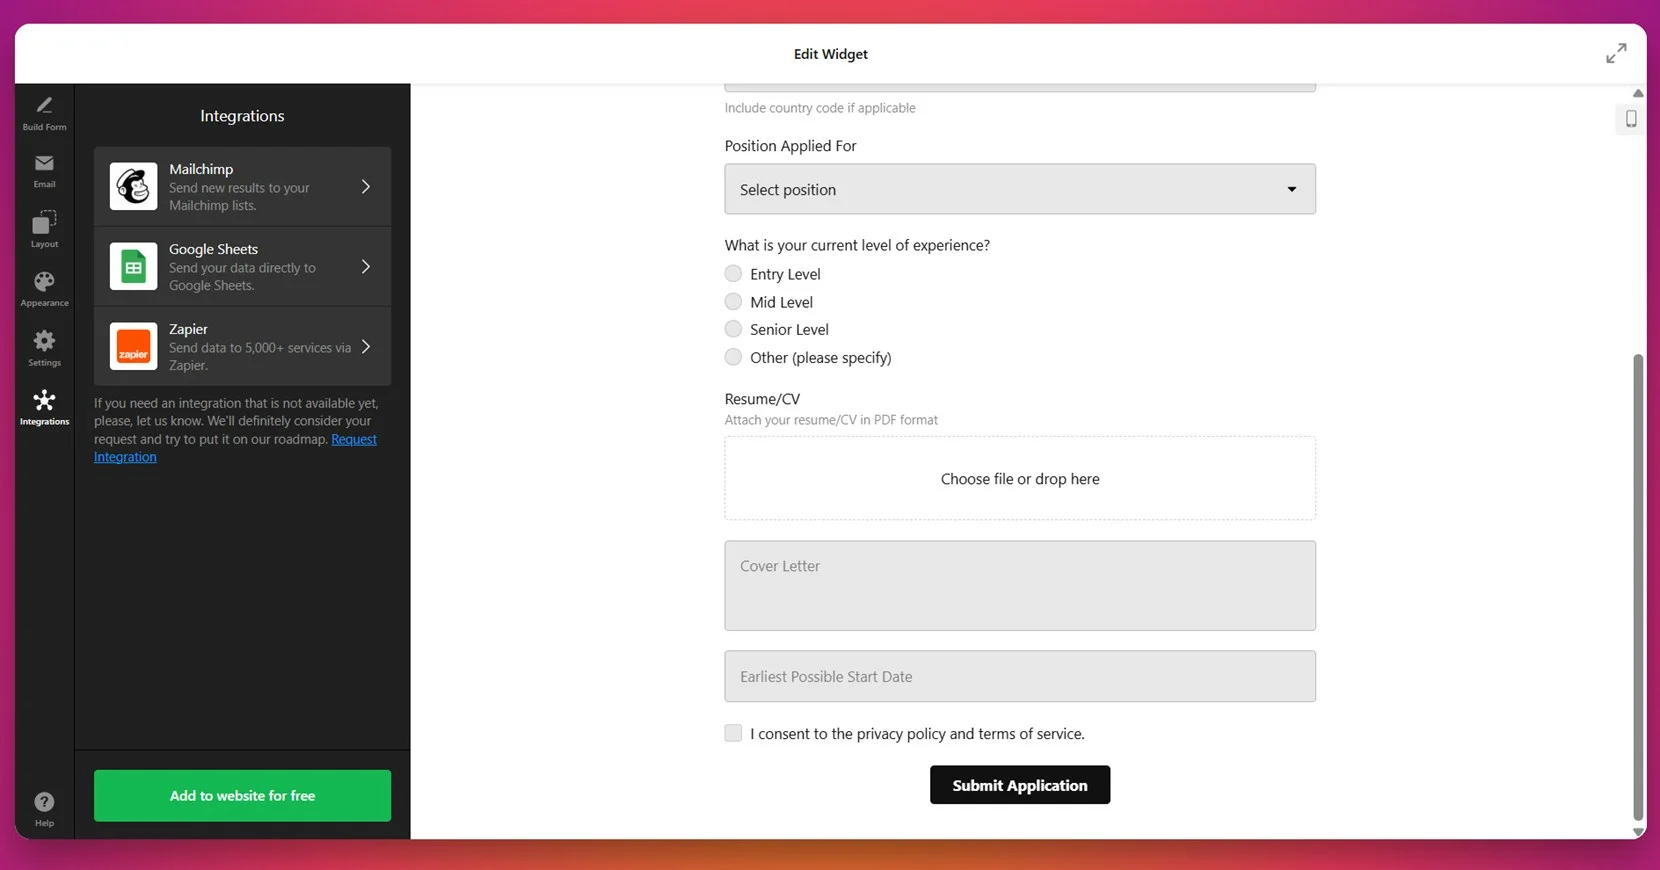
- Enable integrations. Connect your form to Mailchimp, Google Sheets, or Zapier to send collected data where you need it. These integrations help you automate lead processing and email list updates instantly.

- Embed the form on your website. Click “Add to website for free”, copy the generated HTML code snippet.

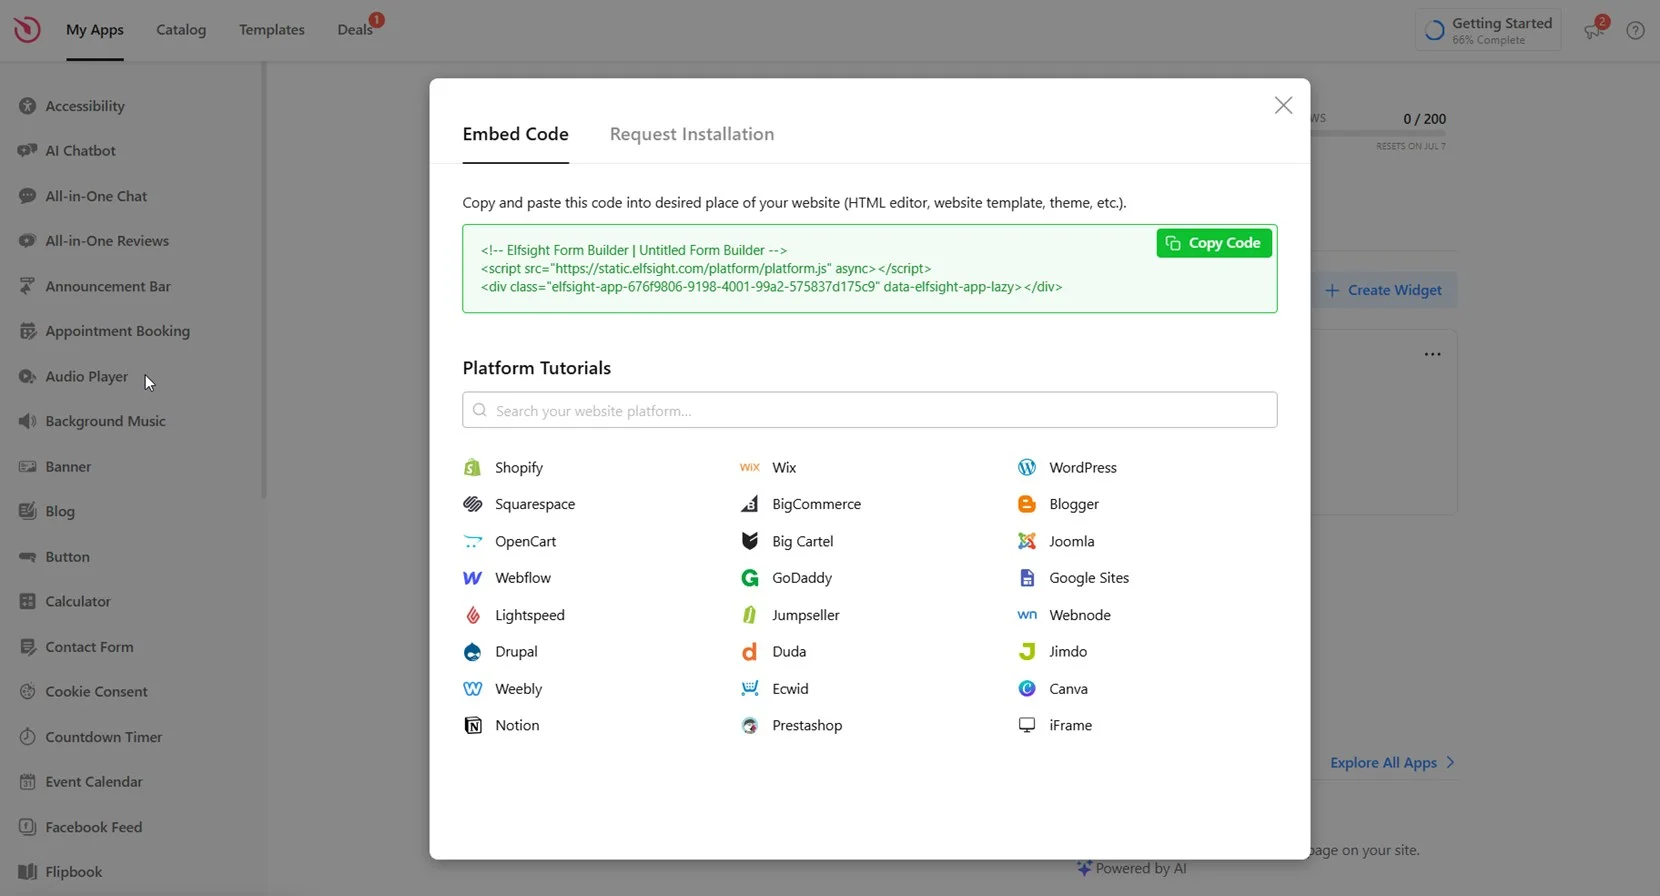
When adding the form to a GoDaddy website, make sure to use the “HTML” block inside the GoDaddy Website Builder. Simply drag the HTML section to the desired area of your page, then paste the code you copied from the form widget. This ensures the form is embedded properly and functions without display issues.
This process gives you full control over the design, content, and functionality of your form — right from one dashboard. Whether you want to collect emails, handle support requests, or build a signup workflow, you can tailor the experience to fit your exact needs.
With everything set up, your form is now live and ready to collect valuable input from your visitors. It’s fully responsive, customizable, and integrated with your favorite platforms — giving you a complete solution without the need for custom development.
Next, let’s look at some alternative methods for adding forms to a GoDaddy website.
Other Solutions to Embed Forms to GoDaddy
If you’re looking for ways to embed a form on your GoDaddy website, several alternative methods exist. These include Google Forms, Mailchimp embedded forms, and GoDaddy’s built-in form editor. Each method has its own use case. Below is a breakdown of each option, with step-by-step instructions and important considerations for each.
Using Google Forms
Google Forms is one of the easiest options available for creating and embedding simple forms. It’s completely free, requires only a Google account, and is ideal for surveys, registrations, or feedback collection. Though limited in styling, it’s reliable and straightforward to set up.
- Open your Google Form. Go to Google Forms, sign in with your Google account, and either create a new form or open an existing one.
- Access the sharing options. Click the “Send” button in the top right corner of the form editor.
- Choose the embed option. Select the “< >” icon to get the HTML embed code. You can set the form’s width and height manually in this step.
- Copy the iframe code. After adjusting size settings, copy the provided code snippet to your clipboard.
- Open your GoDaddy Website Builder. Log in to your GoDaddy account and select the website project you want to edit.
- Insert an HTML block. Drag and drop an “HTML” block into the section where you want the form to appear.
- Paste the embed code. Insert the copied iframe code and save the block.
- Publish the page. Review your layout and click “Publish” to make the form visible on your live website.
Google Forms offers fast deployment and basic data collection, but its appearance cannot be styled to match your website and lacks integrations.
Using Mailchimp Embedded Forms
If your primary goal is to build an email list, Mailchimp’s embedded form feature is a great option. It connects directly with your email audience and allows users to subscribe without redirecting to external pages. Although its customization is limited, it’s ideal for marketers focused on lead capture.
- Log in to your Mailchimp account. Go to your dashboard and navigate to the “Audience” section.
- Choose your audience list. If you have multiple lists, select the one where you want to collect contacts.
- Go to Signup Forms. Under Audience, click “Signup Forms” and then select “Embedded Forms”.
- Customize your form layout. Choose from Classic, Condensed, Horizontal, or Unstyled. Show or hide field labels and checkboxes as needed.
- Copy the embed code. Once satisfied, copy the full HTML code displayed in the panel.
- Open your GoDaddy editor. Log in to GoDaddy, select your website project, and open the editor.
- Add an HTML section. Drag an “HTML” block into the section where you want the form displayed.
- Paste the Mailchimp code. Insert the code into the block and preview how it looks.
- Publish the changes. Save your layout and click “Publish” to make the form go live.
This method is perfect for collecting email signups and building your subscriber base. However, it doesn’t support full layout control or multi-step fields.
Using GoDaddy’s Native Form Builder
GoDaddy Website Builder includes a native form module that can be added to any page. This option is available to all users with paid GoDaddy website plans. It’s great for beginners who want to avoid third-party integrations and keep everything in one dashboard.
- Log in to your GoDaddy account. Open the GoDaddy Website Builder and choose the project you want to edit.
- Select the target page. Navigate to the area of the page where the form should be placed and click “+ Add Section”.
- Choose the Contact Form section. Browse through the options, locate the “Contact Form” section, and add it to your page.
- Edit form fields. Use the on-page editor to add or remove fields such as Name, Email, Phone, Message, or checkboxes.
- Configure notification settings. Enter the email address that will receive new submissions and edit the success message if needed.
- Preview and publish. Review how the form looks, then click “Publish” to make it visible to visitors.
This method is suitable for simple contact or feedback forms. It’s fast, doesn’t require technical knowledge, but lacks the flexibility needed for complex forms or third-party workflows.
Comparison of Form Embedding Methods
Each of these methods has distinct strengths and limitations depending on what you’re trying to achieve. The table below compares them in terms of customization, integrations, ease of use, and professional output.
| Method | Pros | Cons |
|---|---|---|
| Elfsight Form Builder | Delivers full control over design, layout, and integrations — perfect for custom branding and business needs. | Requires copying and pasting a code snippet into an HTML block during installation. |
| Google Forms | Offers fast deployment and is completely free with a Google account, ideal for simple internal forms. | Cannot be visually customized or styled to match the look and feel of your website. |
| Mailchimp Embedded Forms | Provides automatic subscriber management and seamless connection to your email list in Mailchimp. | Only supports email signup functionality and cannot handle general-purpose or dynamic forms. |
| GoDaddy Native Form Builder | Comes built into the GoDaddy Website Builder, easy to set up without needing external platforms. | Lacks support for integrations, conditional logic, and advanced design customization. |
Each method offers something different, but if you’re aiming for a professional, scalable, and visually consistent form experience, Elfsight provides the most well-rounded solution. Now let’s explore a few practical tips to help you make your forms even more effective once they’re embedded.
Form Usage Tips for Better Results
Now that you know how to embed a form on your GoDaddy website, here are some essential tips to help you optimize its design, performance, and user experience. These tips apply regardless of which form tool you’re using and will help ensure your form looks great and functions smoothly across devices.
- Always test your form before publishing. After embedding, preview the form on both desktop and mobile to confirm that all fields are visible, properly aligned, and functioning as expected.
- Place the form in a highly visible area. For best engagement, embed forms above the fold or near the end of a key content section where users are more likely to interact with it.
- Keep the number of fields to a minimum. Ask only for essential information. Too many fields can overwhelm users and reduce completion rates.
- Use clear labels and placeholders. Avoid vague field titles like “Info” or “Type here”. Make sure each field clearly communicates what’s expected.
- Match form styling to your website’s branding. Adjust font styles, colors, and button design to maintain a cohesive visual experience.
- Use section breaks in longer forms. If you need to include more than 5–6 fields, break the form into steps or sections to avoid overwhelming users.
- Optimize email notification settings. Set up confirmation emails and auto-replies for a professional touch and to reassure users that their submission was received.
- Ensure mobile responsiveness. Forms should adapt seamlessly to different screen sizes, especially on smartphones and tablets where most users browse today.
With these practical guidelines in place, let’s explore how different industries and business types are successfully using forms to engage their audiences and capture valuable data.
Who Benefits from Using Website Forms
Forms are essential tools for collecting data, qualifying leads, and enabling direct communication across various business sectors. Below are real-world applications of embedded forms across key industries that regularly use GoDaddy for their websites.
Application in Real Estate 🏡
Real estate agencies and independent brokers can use embedded forms to schedule property viewings, collect buyer inquiries, and manage rental applications. A structured form makes it easy to collect contact details, preferred locations, budget ranges, and availability — streamlining the initial consultation process and reducing back-and-forth emails.
Application in Healthcare & Wellness 💉
Medical clinics, therapists, and wellness providers can integrate forms for appointment booking, patient intake, and feedback collection. Forms can include fields for preferred appointment times, symptoms, insurance details, or consent checkboxes. They help automate scheduling while keeping communication clear and compliant.
Application in Education & Online Training 📚
Educational institutions, course creators, and tutors use embedded forms for student registrations, course signups, lead capture for newsletters, and feedback forms. Whether you’re offering webinars or full training programs, a form simplifies how users express interest, request materials, or register.
From property inquiries to patient onboarding and student registration, embedded forms offer unmatched flexibility and efficiency. Next, let’s cover the common issues you might face during setup — and how to resolve them with minimal effort.
Fixing Common Issues
Even with a user-friendly setup process, embedding forms on a GoDaddy website can occasionally lead to technical difficulties or unexpected behavior. Below are frequently asked questions and their answers to help troubleshoot common form-related issues.
Why isn't my embedded form displaying correctly on the published website?
Why does my form look broken on mobile devices?
What should I do if my form submissions aren’t being received by email?
Can I use multiple forms on the same GoDaddy page?
Why is there extra spacing or layout shifts around my form?
These common problems are easy to fix once identified. Understanding how form snippets interact with GoDaddy’s layout system helps ensure your forms run smoothly and look consistent.
Conclusion
Adding a form to your GoDaddy website is one of the most effective ways to capture valuable user data, enable direct communication, and streamline workflows. Whether you’re using a third-party form builder or GoDaddy’s native tools, you now have a clear understanding of how to create, embed, and manage a fully functional form that aligns with your goals. From customizing contact fields to ensuring responsive form design, every step contributes to better engagement and higher conversion rates.
We’ve covered everything from quick-start guides and feature highlights to industry-specific use cases and troubleshooting tips. Regardless of your business type or technical experience, creating a high-quality form doesn’t have to be complex. With the right setup and attention to layout, you can collect and process user input efficiently, and ensure every form submission adds value to your business.
Have Questions?
Thanks for reading! If you need further assistance, feel free to reach out. Whether you’re looking to add a smart form to your GoDaddy website or explore more use cases, we’re here to help you succeed. At Elfsight, we’re focused on delivering simple, powerful, no-code widget solutions designed for real business needs.
Join our growing Community to share experiences, ask questions, and suggest features. Got an idea to improve a widget? Add it to our Wishlist and help shape the next updates!


