Adding a contact form to your Squarespace website is one of the easiest and most effective ways to communicate with your audience, capture leads, and streamline inquiries. Whether you’re running a business or a personal brand, embedding a Contact Form plugin helps you stay accessible and professional.
If you’re looking for a simple, customizable, and code-free way to engage your visitors, this solution is exactly what you need. It’s fast to set up and makes your communication process much more efficient.
- Direct communication with your audience. Allow visitors to send you messages without needing to leave your website or search for your email address.
- Better lead generation. Collect inquiries, service requests, or customer feedback directly through a user-friendly submission form.
- Improved user experience. A contact message box gives users a clear and accessible way to reach out, which builds trust and encourages engagement.
- Time-saving automation. Automatically route messages to your inbox or CRM, reducing the need for manual follow-ups.
Now that you understand the value of adding a contact plugin to your Squarespace website, let’s look at how to set one up quickly using Elfsight.
Quick Way to Add a Contact Form to Squarespace
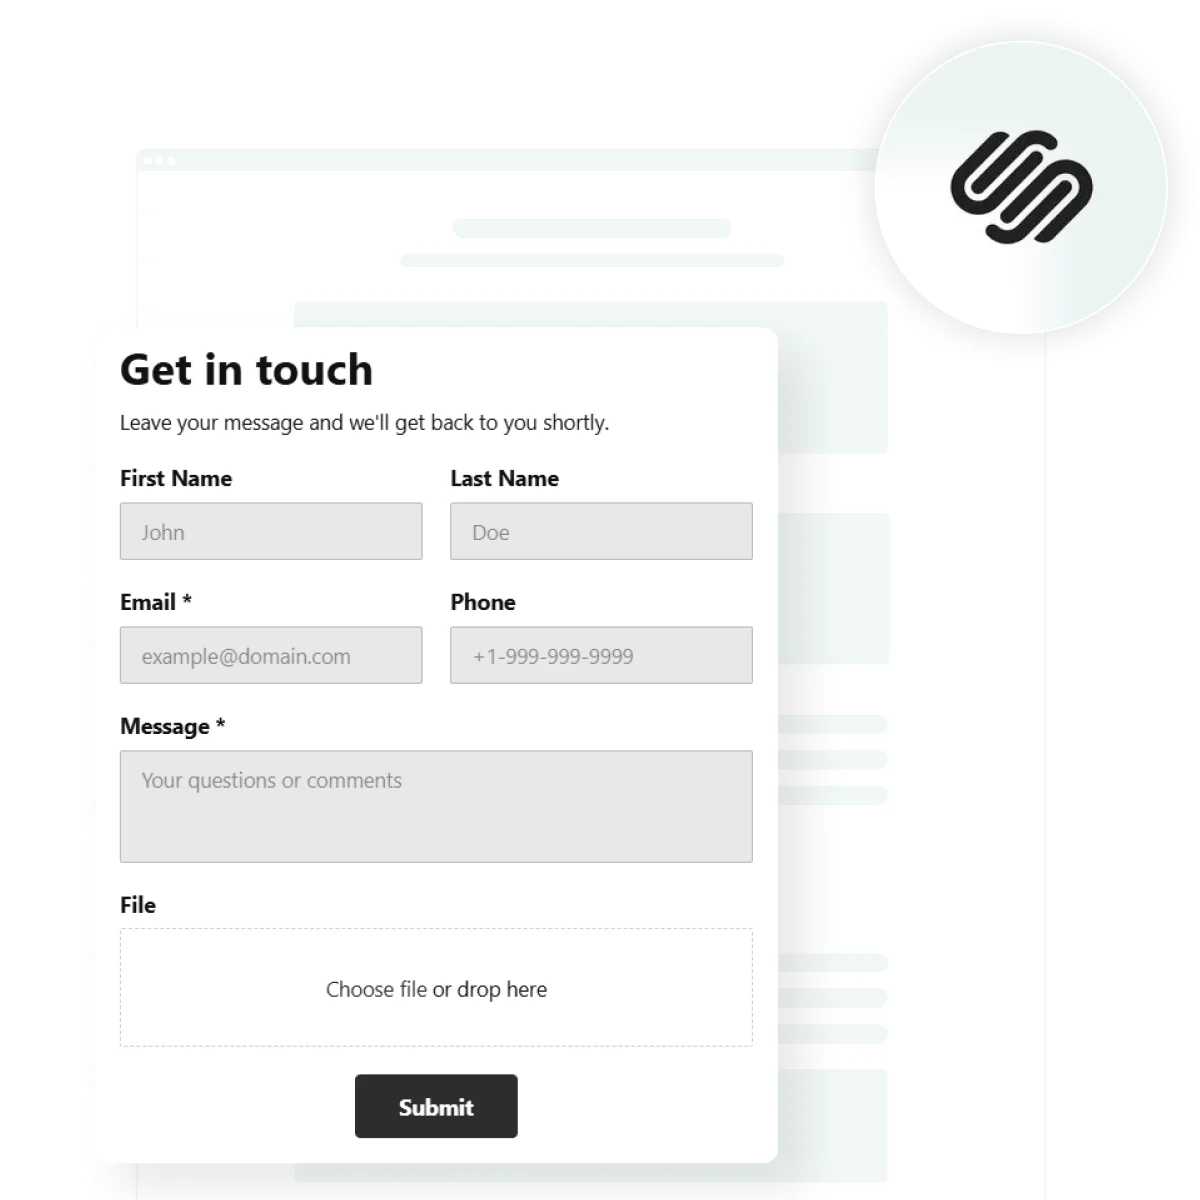
Once you know the advantages of using a contact form, the next step is to create one quickly and easily with Elfsight. You don’t need any coding skills — just follow a few simple steps to publish a communication section that works seamlessly on your Squarespace website.
- Open the Elfsight editor and select a contact form template that suits your needs.
- Adjust the layout and fields — name, email, phone, etc. to match your goals.
- Customize the appearance by changing colors, fonts and other elements to match your branding.
- Click “Add to website for free”, copy the embed code, and paste it into your Squarespace website.
That’s it — your form is ready to collect messages and improve communication directly on your website.
See the widget in action – build your own Contact Form in minutes!
Features of the Elfsight Form Builder
Now that you know how easy it is to build and embed a contact widget with Elfsight, let’s take a closer look at the features that make it a powerful and flexible solution for any Squarespace website.
- Drag-and-drop builder. Easily design your form layout without touching a single line of code. Just pick, drag, and customize fields.
- Multiple field types. Add text inputs, dropdowns, radio buttons, checkboxes, and file uploads to collect exactly the data you need.
- Custom styling options. Adjust colors, fonts, button shapes, and spacing to match your website’s branding perfectly.
- Email notifications. Get instant alerts when someone fills out your plugin so you can respond faster and stay connected.
- Flexible display settings. Show the form as a popup, inline block, or floating button — whatever fits best into your page structure.
- Spam protection. Use CAPTCHA to prevent spam submissions and ensure only genuine messages reach your inbox.
- Mobile-ready design. The message box looks great and works smoothly on all devices, from desktop to mobile.
These features make the Elfsight contact form a strong choice for anyone looking to add a contact form plugin to Squarespace with maximum control and minimum effort. Now let’s walk through the full setup and installation process step by step.
Creating Contact Form: Step-by-Step
Now that you’ve explored the benefits and features of using Elfsight’s contact widget, it’s time to create your own. The process is fast, intuitive, and doesn’t require any coding skills.
Below is a detailed walkthrough based on the editor interface to help you set up, customize, and embed the plugin directly into your Squarespace website.
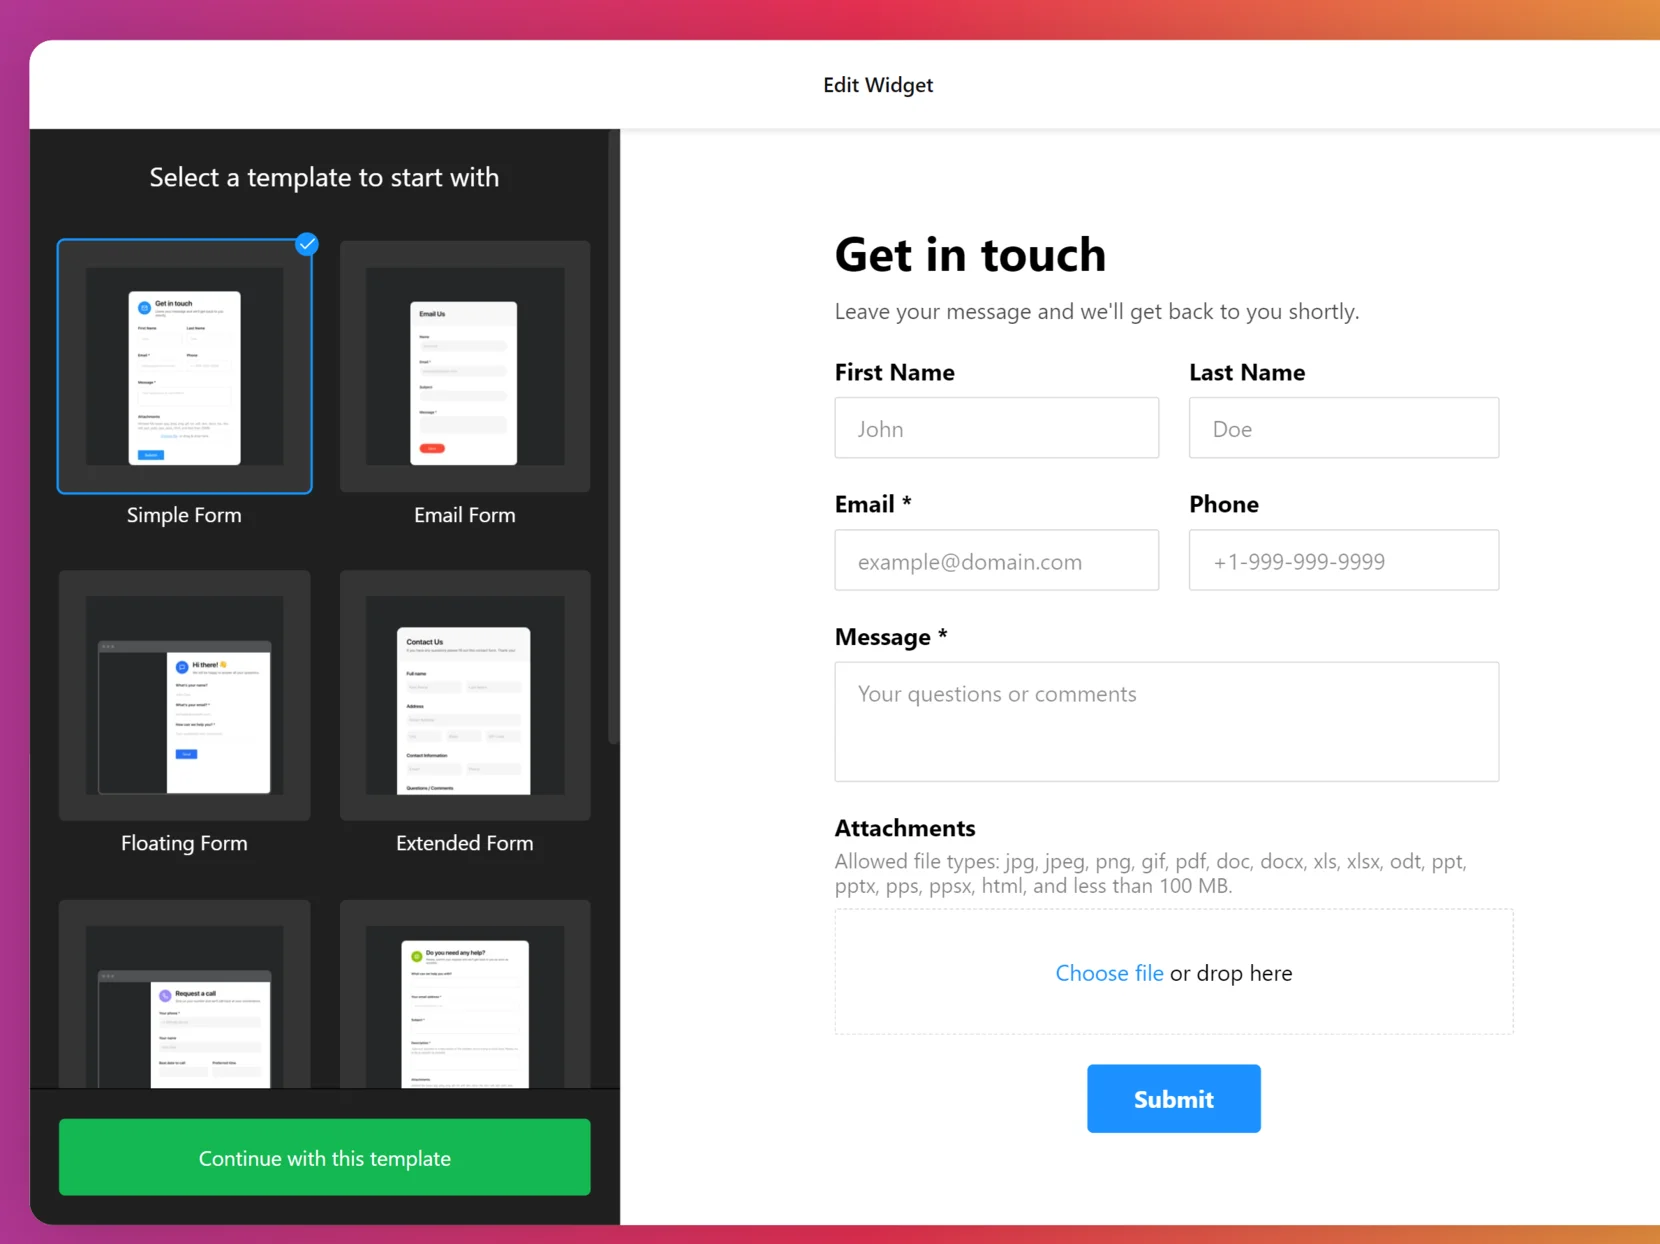
- Choose a Template. Open the Elfsight editor and select a template from the gallery. Click the green button labeled “Continue with this template” to proceed to customization.

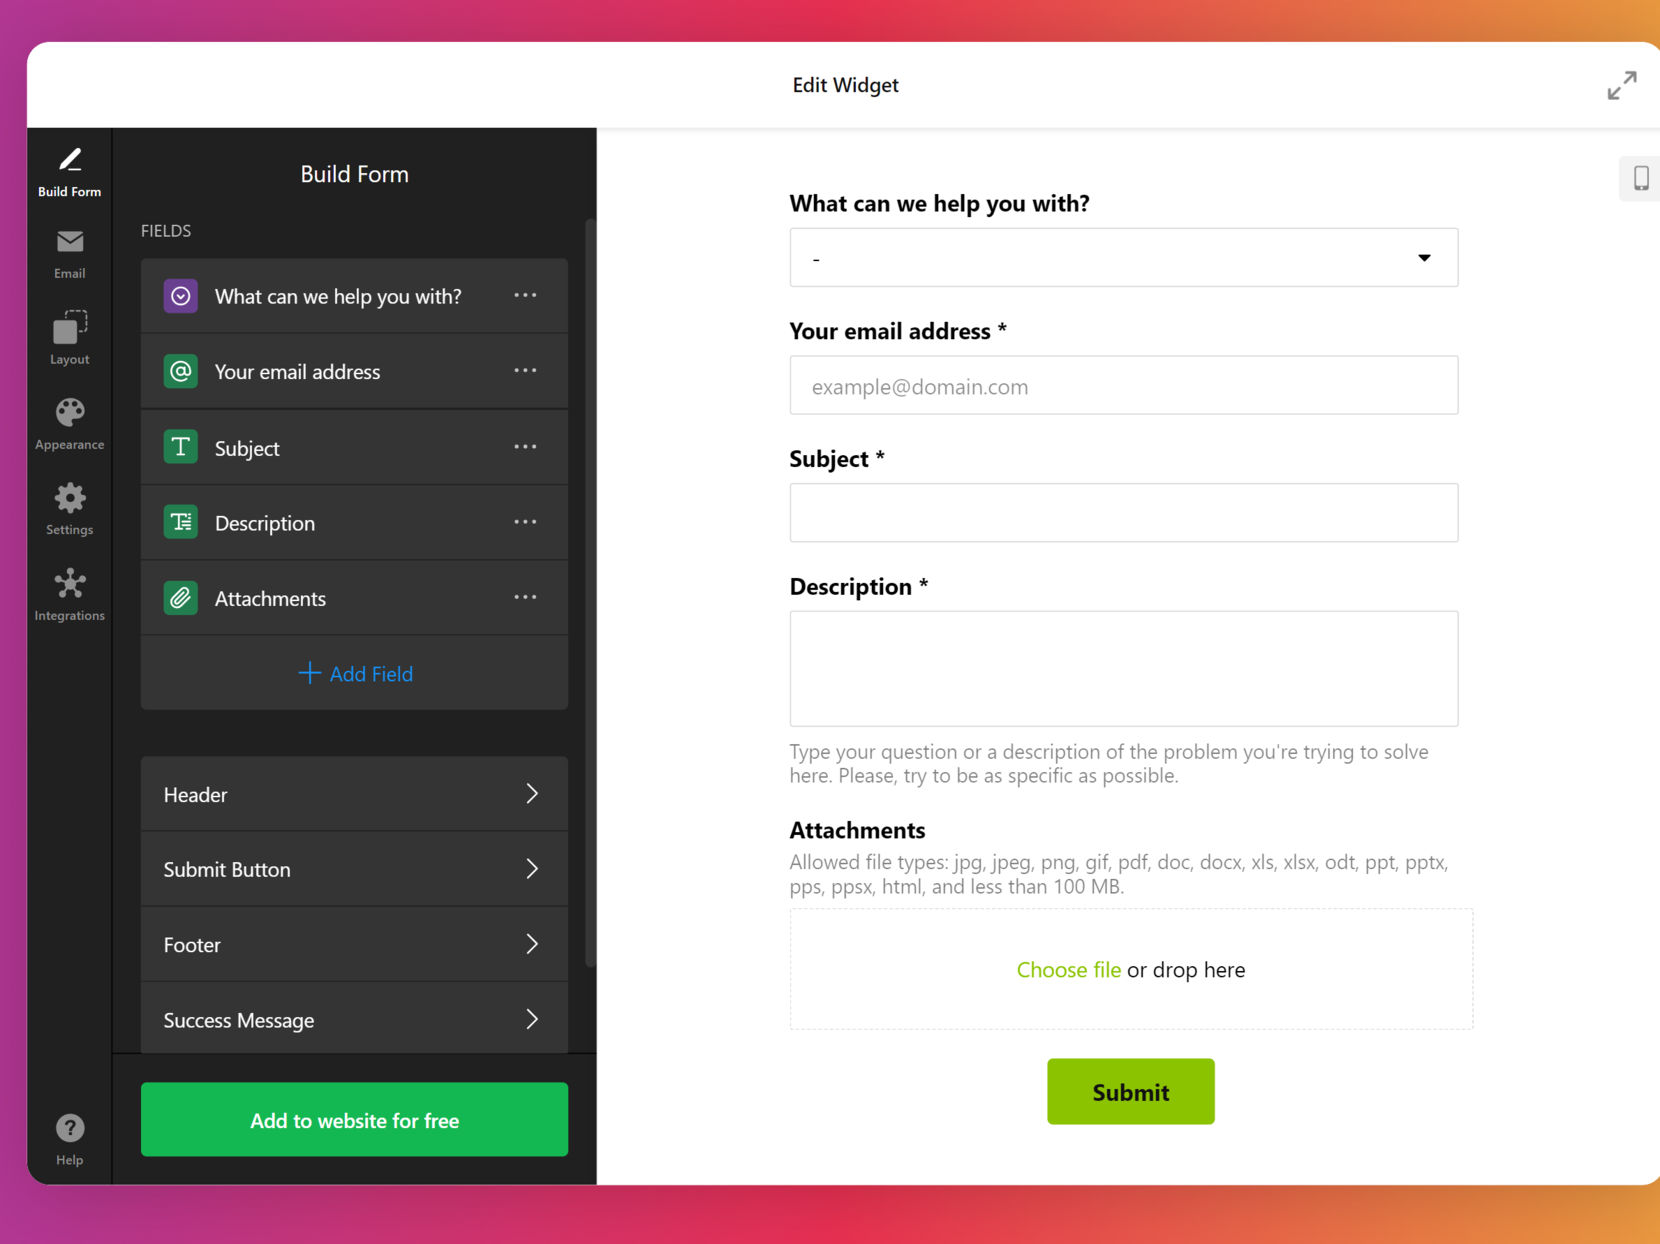
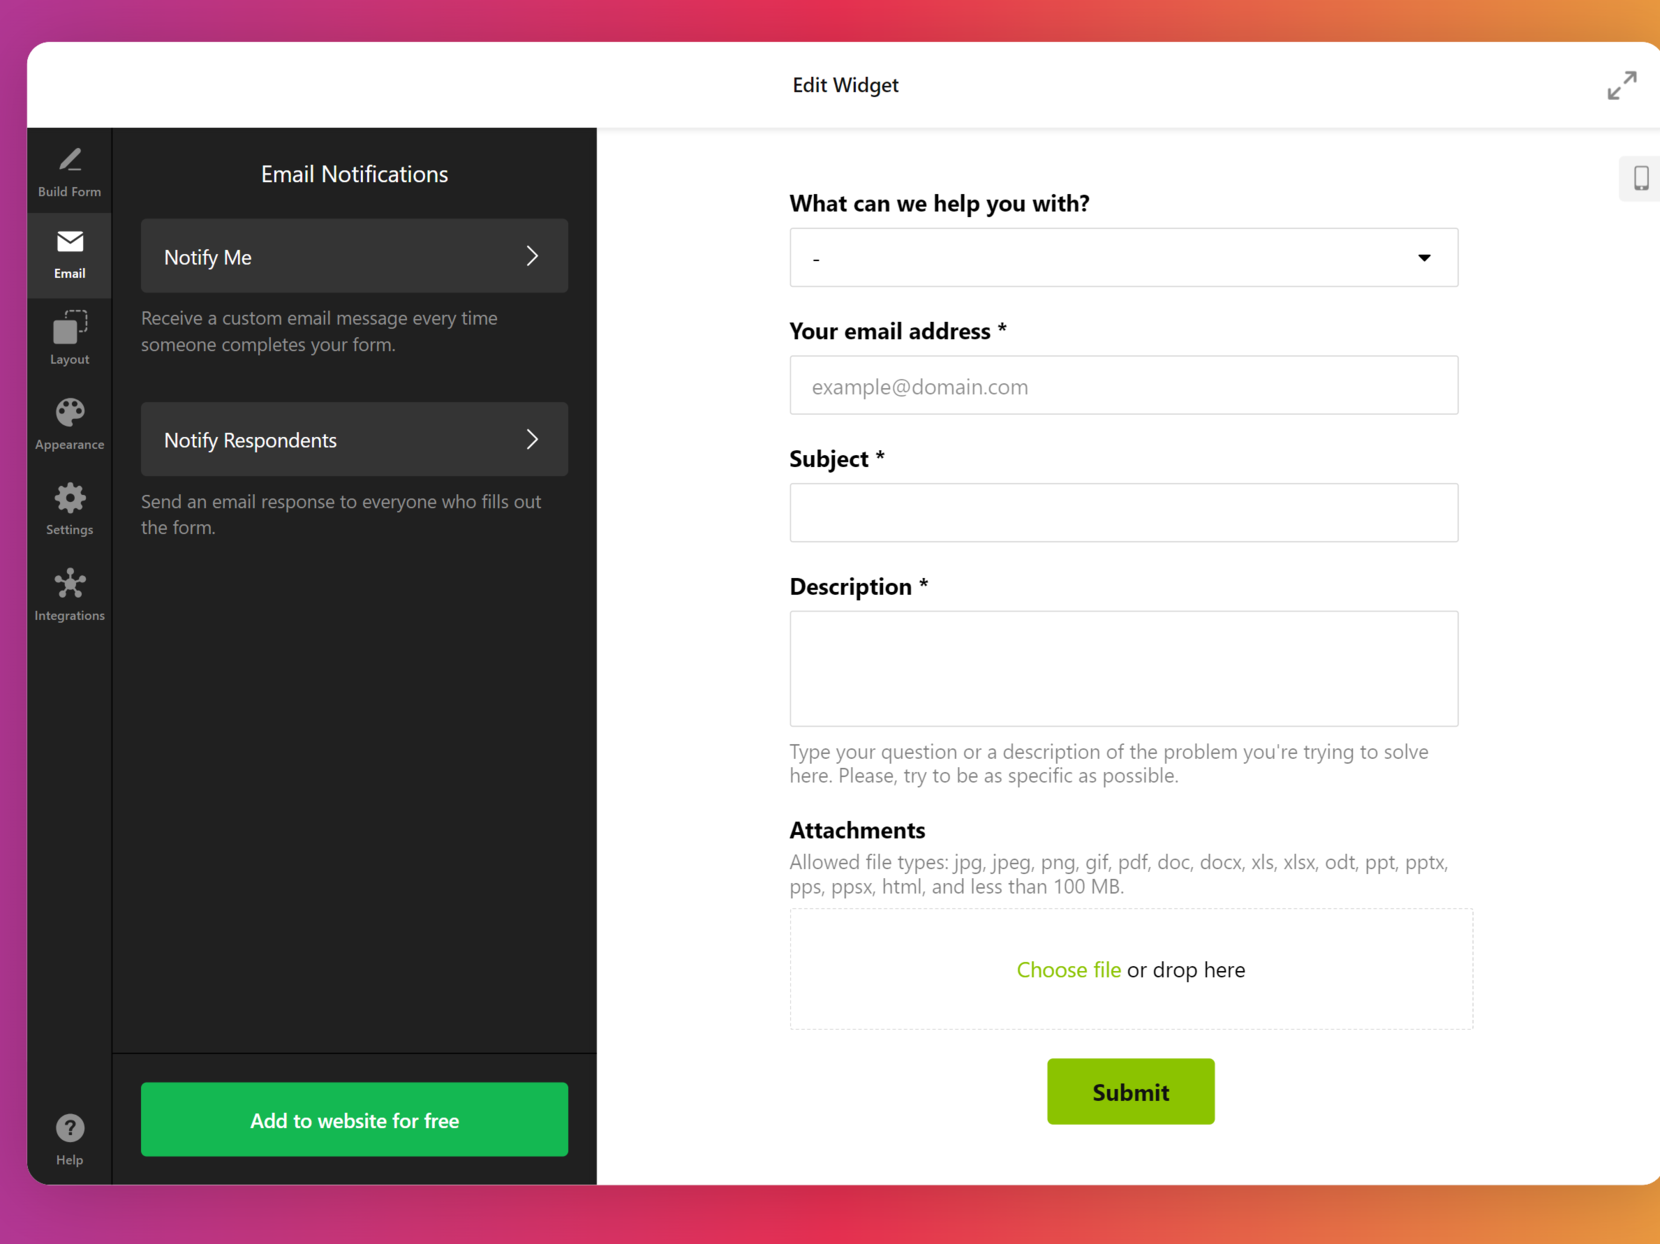
- Build the Form Structure. In the “Build Form” section, edit each field by clicking on it. You can change labels, set required fields, or add new ones such as dropdowns, text inputs, and file uploads using the “Add Field” option. This lets you create a form that fits your specific communication needs.
- Set Email Notifications. Go to the “Email” tab. Under “Notify Me”, set your email address to receive form submissions. Under “Notify Respondents”, you can set up an automated confirmation email to reassure users their message has been received.
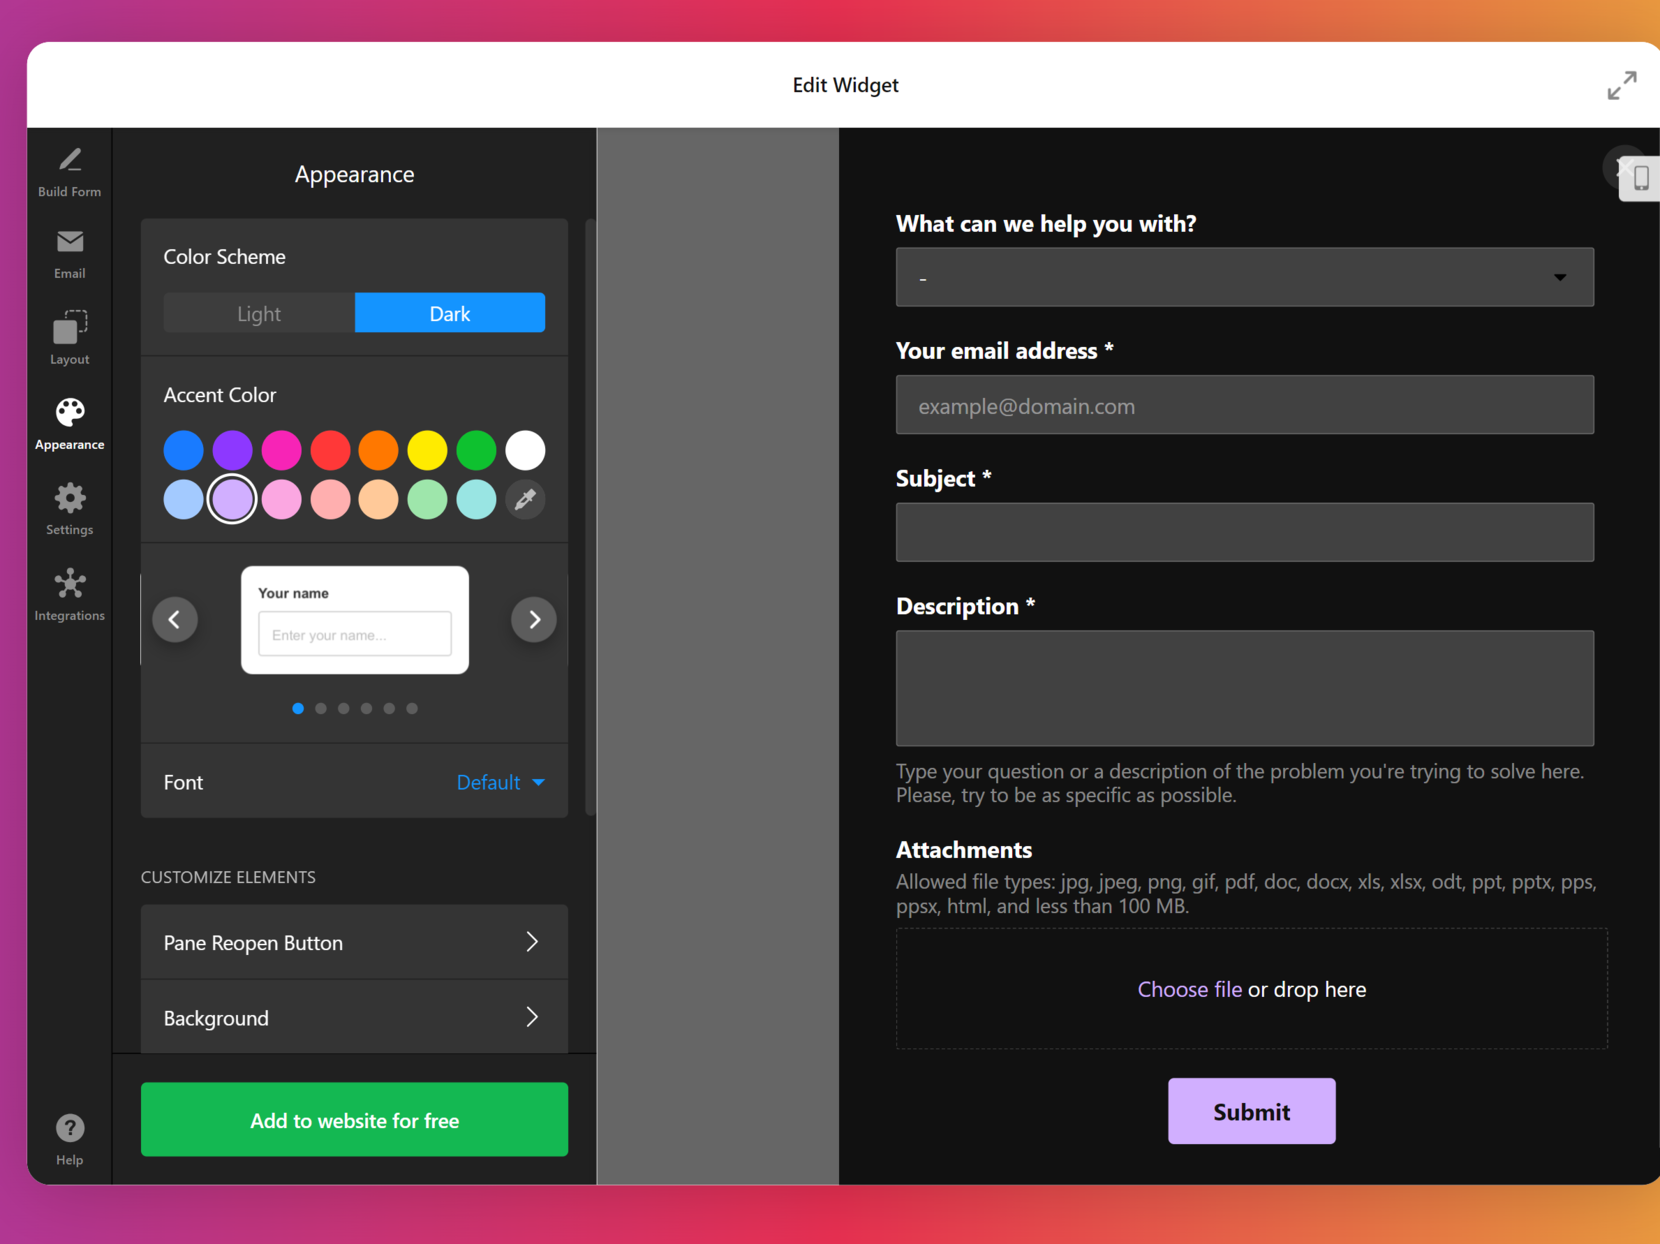
- Customize the Appearance. In the “Appearance” section, choose a light or dark color scheme, pick an accent color, select a font, and tweak the visual layout. You can adjust background, button styles, and field elements to match your website branding.
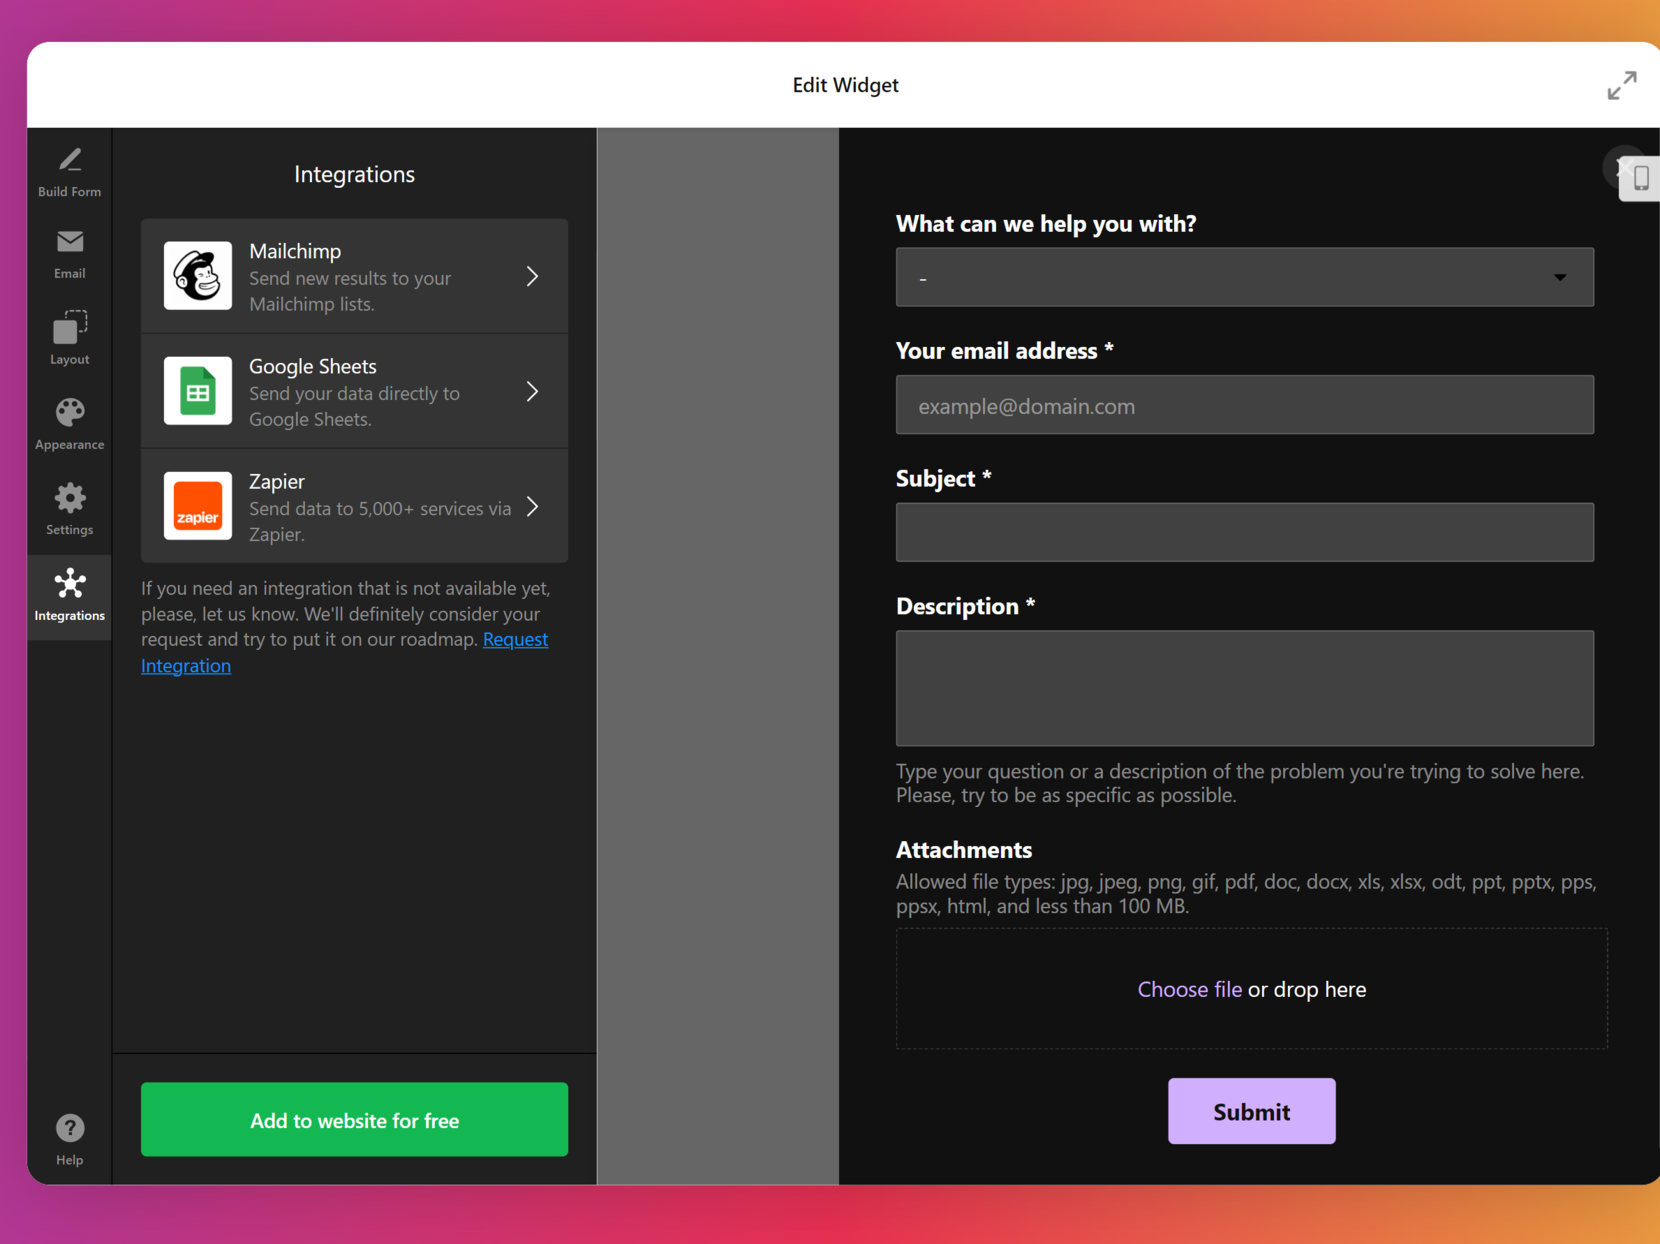
- Integrate with Third-Party Services. Navigate to the “Integrations” tab to connect the form with external platforms like Google Sheets, Mailchimp, or Zapier. These options allow you to automatically sync submissions with your marketing, CRM, or automation tools.
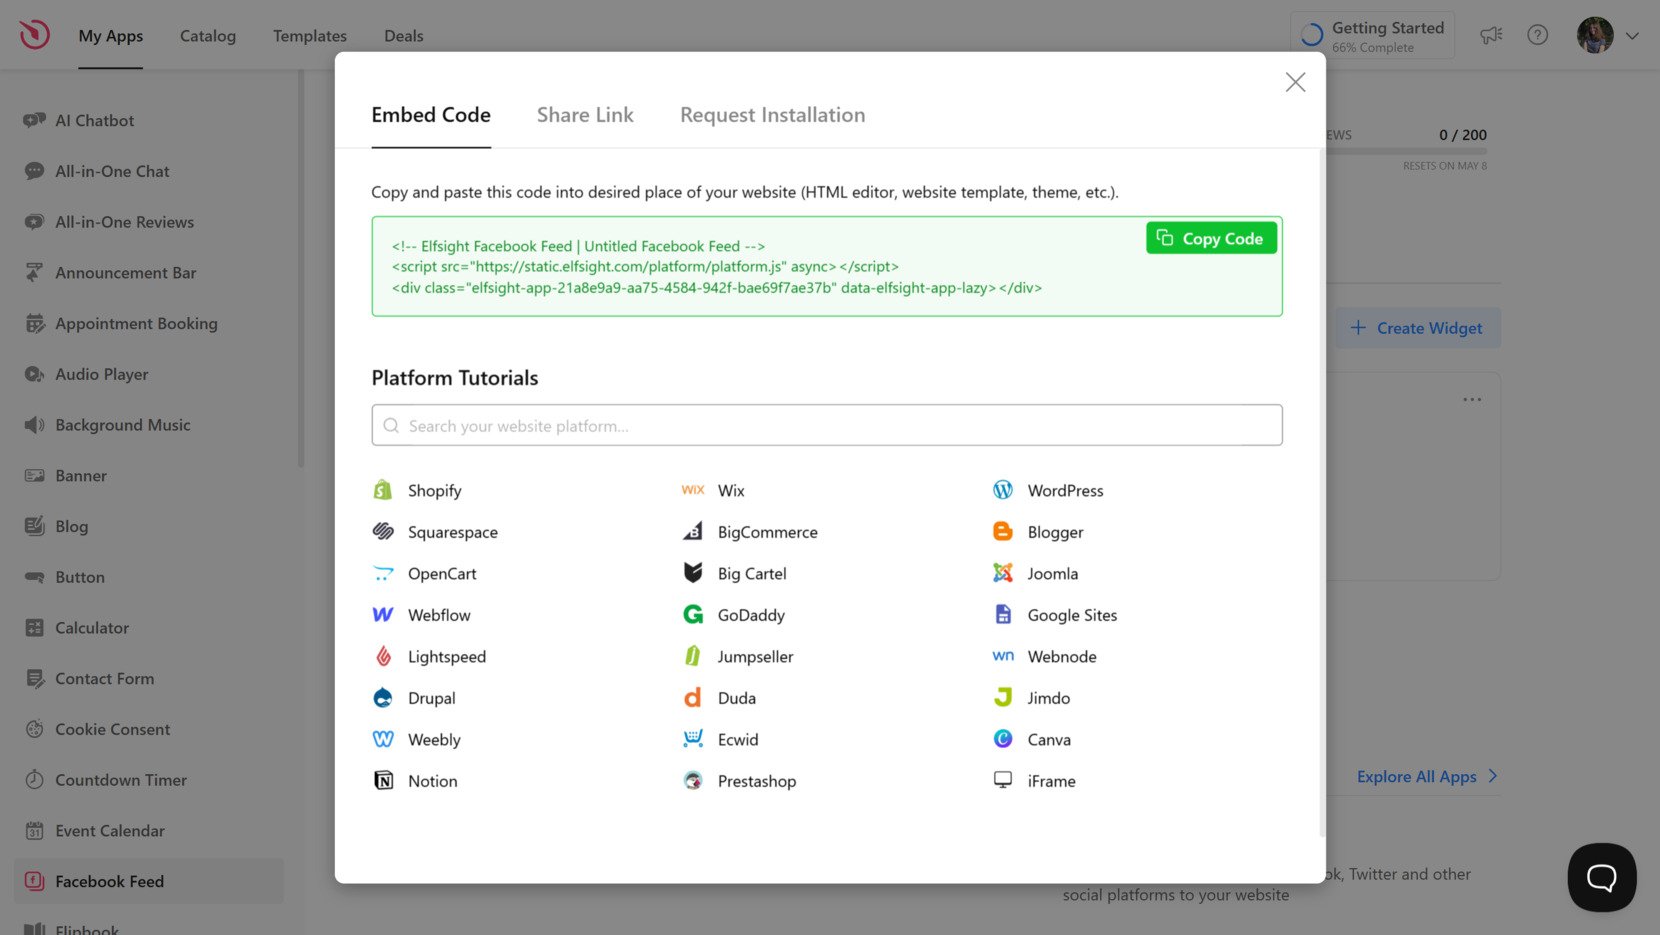
- Embed the Code on Your Website. Click the green “Add to website for free” button. In the popup window, copy the generated HTML embed code. Open your Squarespace website editor, insert a Code Block where you want the form to appear, paste the code, save the page, and publish it.

Once embedded, your plugin is ready to collect responses and connect you with your audience in a structured, professional way. Next, let’s explore other methods for adding contact forms to your Squarespace website if you’re looking for alternatives.
Other Ways to Add Forms to Squarespace
In addition to using Elfsight’s solution, there are other ways to add a contact form to your Squarespace website. Below, you’ll find detailed instructions for two alternatives so you can choose the one that fits your needs.
Using Squarespace’s Built-In Form Block
Squarespace offers a built-in Form Block that allows users to quickly add basic contact forms directly within the website editor. It’s ideal for creating simple forms without needing any external tools or custom code.
- Open the Squarespace editor and go to the desired page. Log in to your Squarespace dashboard, click “Pages”, and choose the page where you want the form to appear.
- Click “Edit” on the content section where you want to insert the form. This opens the content editing view of your selected page.
- Click the “+” icon to add a new content block. This opens the block selector where you can choose different content types.
- Select the “Form” block from the list. The Form Block will be inserted at the location you chose.
- Add and customize your fields. Use the panel on the left to insert standard fields like Name, Email, Subject, and Message, or add checkboxes, dropdowns, and more.
- Configure storage settings. Choose how submissions will be sent — options include Email, Google Drive (via Zapier), and Mailchimp. You can add multiple storage options.
- Edit form appearance. Use the Design panel to control font, spacing, alignment, and color. While customization is limited, you can make basic design adjustments.
- Click “Apply” and then “Save”. Your form will now appear on the page and is ready to collect submissions.
Embedding a Custom HTML Form
Embedding a custom HTML form provides complete control over form layout, functionality, and integrations. This method is best for advanced users or developers who want to design a unique experience and connect the form to a backend server or third-party service via API.
- Open your Squarespace page editor. Navigate to the “Pages” section in your dashboard, and select the page where the form should appear.
- Click “Edit” on the desired section of the page. This enables editing of that content area.
- Click the “+” icon to add a new content block, then choose “Code”. This block allows you to embed custom HTML, CSS, and JavaScript.
- Paste your HTML form code into the editor. Your code should include input fields (name, email, message, etc.), a submit button, and any hidden fields if needed.
- Add a backend form handler endpoint in the form’s action attribute. This URL will process submitted form data, such as sending it to your email or storing it in a database.
- Style your form with CSS. You can include inline styles or embed a <style> block to match your website’s look. Adjust padding, font, colors, and responsiveness.
- Test your form. Submit a few test entries to ensure that the backend handler works correctly and the submissions are delivered or stored as expected.
- Click “Apply” and “Save”. The form will now appear on your live website with your custom configuration.
Comparison of Methods
Here’s a side-by-side comparison of the different methods you can use to add a contact form to your Squarespace website. This table highlights a major advantage and drawback of each to help you choose the most suitable approach.
| Method | Pros | Cons |
|---|---|---|
| Elfsight | Offers the most customization options, visual styling, and integration flexibility without requiring any code. | Requires embedding a third-party script using a code block in the Squarespace editor. |
| Squarespace Form Block | Quick and beginner-friendly setup using native functionality directly within Squarespace. | Offers limited customization and lacks advanced fields like file uploads or conditional logic. |
| Custom HTML Form | Provides full control over structure, styling, and backend integration for complex use cases. | Requires technical knowledge, backend setup, and manual implementation of form security. |
While all of these options can help you create a functional contact form, only Elfsight combines ease of use, full customization, and advanced features in one seamless solution. Now, let’s explore practical tips to get the most out of your form and improve user interaction.
Smart Tips to Improve Your Website Form
Once your contact form is embedded on your Squarespace website, taking a few extra steps can help you optimize its performance, appearance, and usability. These practical tips work for any embedded form, whether you’re using a plugin, native tool, or custom code.
- Place your form where it’s easy to find. Position the contact plugin in high-visibility areas like your homepage, contact page, or as a floating element. Avoid burying it deep within navigation menus or under collapsible sections.
- Use only essential fields. Limit the number of form fields to what’s truly necessary — Name, Email, and Message are usually enough. Long forms can discourage users from submitting their information.
- Make it mobile-responsive. Always test your form on various screen sizes. Forms that don’t scale well on mobile devices can create friction and lead to lost conversions.
- Match the style to your branding. Design the Submission Form with your brand’s colors, fonts, and spacing to maintain visual consistency across your website. Clean, minimal design improves usability and aesthetics.
- Set up email notifications correctly. Double-check the notification address to make sure you receive every message. If using multiple recipients, ensure each is verified and tested.
- Enable basic spam protection. Add a CAPTCHA or honeypot field to block automated bots. This helps maintain clean and relevant message submissions.
- Include a thank-you message or redirect. After submission, show a confirmation message or redirect users to a thank-you page. This improves the user experience and lets them know their message was received.
Consider running periodic tests to ensure everything works — from field validation to email delivery. This helps avoid unnoticed errors and ensures your form remains effective.
By following these tips, you’ll make sure your contact message box looks professional and functions smoothly across devices and user scenarios. Now let’s see how different types of businesses are successfully using contact forms to communicate with their audiences.
Business Use of Contact Forms
Contact forms are versatile tools that can be embedded into nearly any type of website to improve communication, streamline lead capture, and support customer service. Below are three industries that benefit the most from using a plugin, along with practical implementation strategies.
Application in the Real Estate Industry 🏡
Real estate agencies and independent agents use contact form to collect inquiries from potential buyers and renters. Forms can be added to listing pages or property detail sections, allowing visitors to request viewings, ask questions, or submit offers without leaving the page.
Agencies can integrate simple inquiry forms on every property page to streamline communication between prospects and agents.
Application in the Healthcare Industry 🏥
Medical practices, clinics, and wellness providers use submission forms to simplify appointment requests, collect patient feedback, and respond to health-related inquiries. A well-placed plugin allows patients to reach out without needing to call or visit in person.
Leading private clinics often pair contact forms with automated email confirmations to reassure patients their requests have been received.
Application in the Educational Sector 🎓
Schools, online course providers, and training centers can benefit from embedding a contact plugin on admissions, course info, or support pages. Prospective students can use it to ask about enrollment, programs, or schedules, while current students can submit support tickets or feedback.
Many universities include forms on course information pages to capture interest and follow up with custom guidance for prospective applicants.
From real estate to healthcare and education, the contact communication block plays a vital role in helping businesses maintain meaningful engagement. However, like any embedded element, it’s important to be aware of possible issues — and how to fix them quickly. Let’s explore those next.
Fixing Common Issues
While embedding a contact form on your Squarespace website is generally straightforward, there are a few common issues and configuration details you should be aware of. This FAQ section covers typical problems and how to resolve them effectively.
Why isn't my form displaying correctly on mobile devices?
Why am I not receiving email notifications from the form?
What should I do if my form submissions aren't being saved or tracked?
Why is my form not appearing where I embedded it?
Are there accessibility requirements for contact forms?
Being aware of these potential obstacles helps you ensure a smoother experience for your users and keeps your form functioning reliably.
Conclusion
Adding a contact form plugin to your Squarespace website is one of the most effective ways to open direct communication channels, capture leads, and deliver better support. Whether you’re using the native form block, embedding custom code, or choosing a no-code solution like Elfsight, having a well-designed form ensures your visitors can always reach you.
From choosing the right layout to configuring communication settings and integrating custom forms, you’ve now seen how to embed a contact section that truly fits your business needs. With careful implementation and attention to design, your contact plugin can become a powerful touchpoint that enhances user experience and drives engagement.
Need More Help?
We hope this walkthrough made the process clearer and easier for you. If you’d like to learn more about how to add custom form solutions to your website, contact us — our team at Elfsight is ready to support you. We’re here to make sure your communication tools are efficient, beautiful, and code-free.
Become a part of our growing Community to share feedback, discover feature updates, and exchange ideas with other users. Have something you’d love to see in our contact form? Add it to our Wishlist — we value your input!