
A Shopify calculator is a dynamic widget that automatically displays delivery costs based on the customer’s location, cart content, and shipping method. In a Shopify environment, this feature gives buyers a clear idea of what they’ll pay before checkout — eliminating surprises and improving trust.
If you’re looking to reduce abandoned carts, offer real-time delivery pricing, and create a smoother shopping experience, a shipping calculator is exactly what your Shopify website needs. It’s a simple yet powerful addition that delivers real results for both users and store owners.
- Boosts transparency during checkout. Customers know what they’ll pay for shipping right away, reducing hesitation and cart abandonment.
- Improves user trust and satisfaction. Real-time shipping rates display builds confidence and shows professionalism.
- Supports dynamic pricing for better accuracy. The calculator adapts to changing orders, addresses, or shipping methods in real time.
- Saves time with automatic calculations. Avoid manual rate tables and let the widget handle complex delivery pricing logic.
- Enhances mobile shopping experiences. Mobile users benefit from fast, clear access to shipping info without extra clicks or confusion.
More than just a convenience feature, a shipping calculator is a strategic upgrade that helps merchants offer clarity and reduce checkout friction. It meets customer expectations and aligns with modern eCommerce standards.
Now, let’s explore how you can quickly embed a Shopify calculator using Elfsight’s no-code solution.
Create a Shopify Shipping Calculator Fast
With Elfsight’s calculator widget, you don’t need coding knowledge — just a few clicks and your custom utility is ready to go.
The widget is built to be intuitive and flexible. You can configure your delivery logic, customize how pricing is displayed, and instantly preview changes as you go. It’s perfect for store owners who want control without technical hassle.
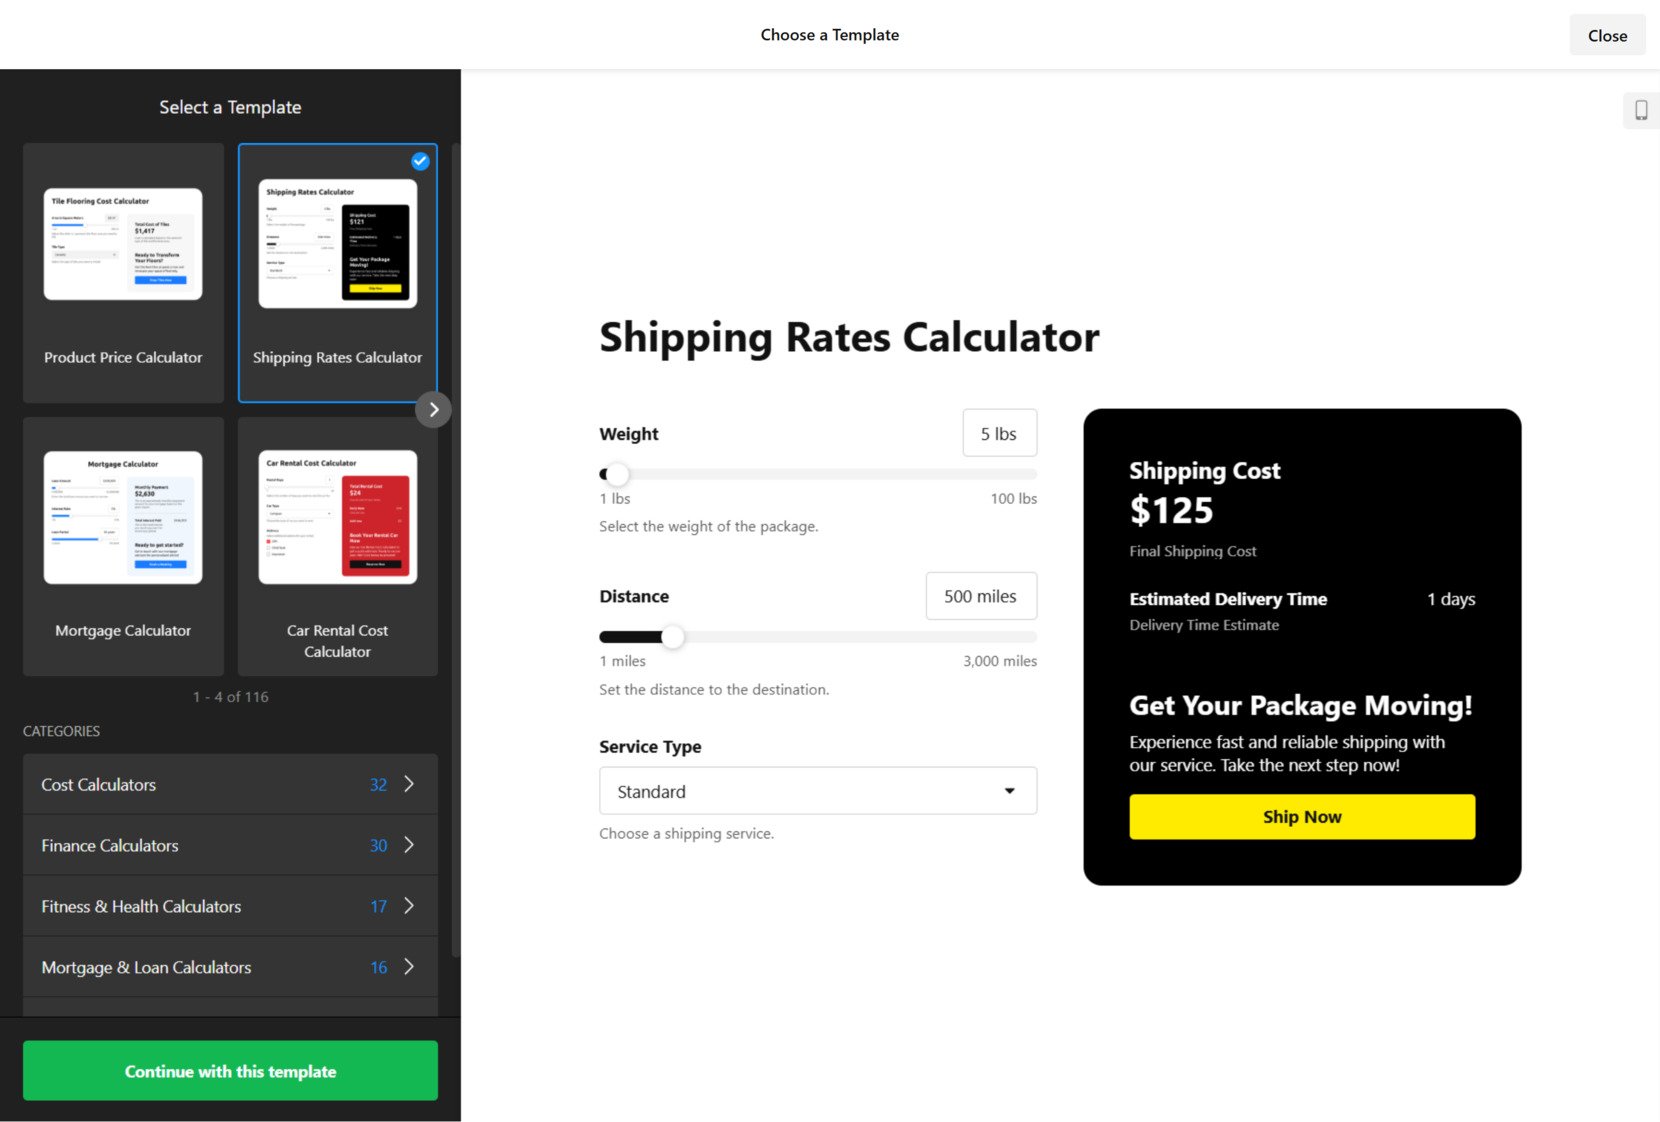
- Open the Elfsight editor and select the Shipping Calculator template.
- Customize layout settings like width, spacing, currency, and shipping zones.
- Style the widget by adjusting colors, fonts, borders, and display options.
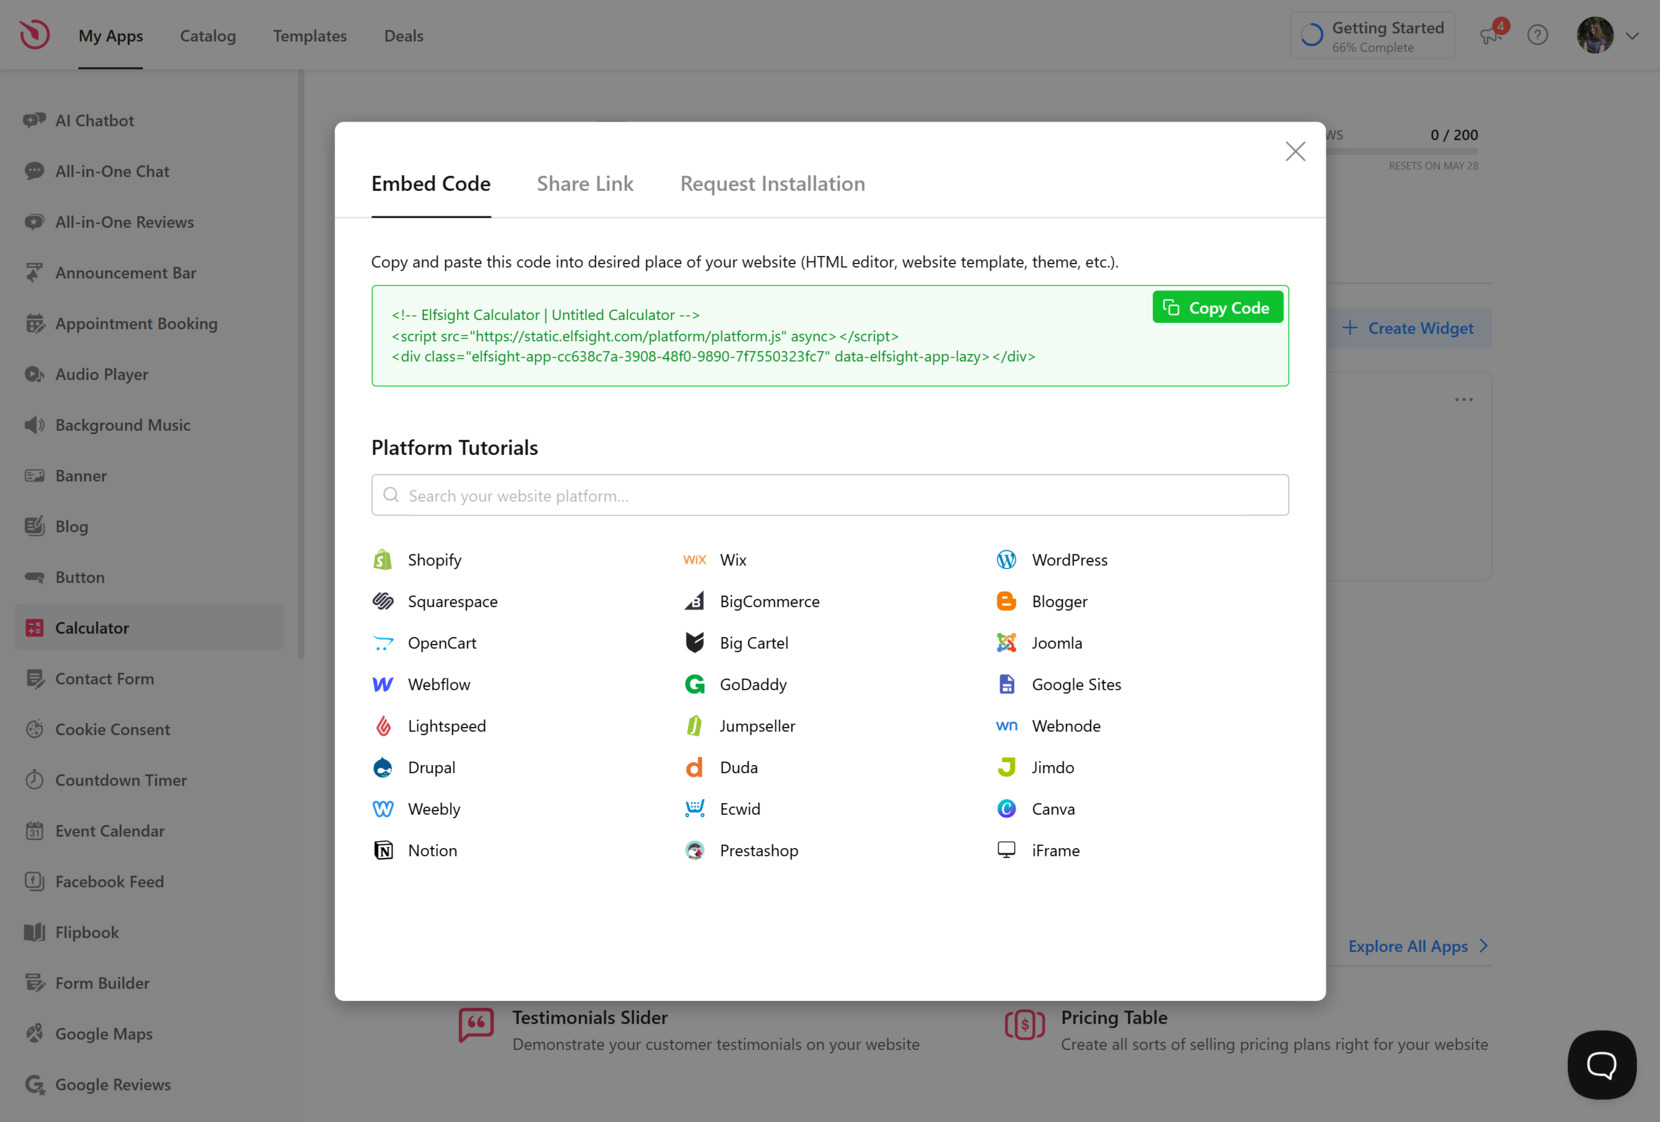
- Click “Add to website for free“, copy the installation code, and paste it into your Shopify website.
This fast setup gives you full control over how your delivery pricing is displayed, letting you configure it to match your Shopify store’s experience and branding.
See the widget in action – build your own Shipping Calculator in minutes!
Features of Elfsight’s Calculator
After seeing how easy it is to create a shipping calculator with Elfsight, it’s time to explore why this widget is a powerful solution for Shopify users. This section highlights the key features and benefits that make it worth integrating into your ecommerce workflow.
Here’s what you get when you use the Elfsight Shopify shipping calculator widget:
- Flexible pricing formulas. Build custom formulas based on weight, quantity, distance, or order value to calculate postage automatically.
- Instant delivery cost display. Show real-time checkout delivery estimates directly on product or cart pages, improving clarity and trust.
- Pre-made templates. Choose from ready-to-use templates for faster setup and easier customization without starting from scratch.
- Multi-step calculation flow. Break calculations into simple steps with multiple screens to reduce friction and keep customers engaged.
- Mobile-friendly and responsive. The widget adapts to all screen sizes and devices, ensuring a seamless shopping experience everywhere.
- Fully customizable design. Adjust colors, typography, spacing, borders, and more to perfectly match your website’s branding.
- No coding required. Enjoy smooth Shopify shipping calculator integration with simple copy-paste embed functionality.
With these capabilities, the Elfsight calculator helps Shopify merchants deliver accurate, real-time shipping info without the usual setup complexity. Let’s now walk through the full installation process step-by-step.
How to Add a Calculator to Shopify: Step-by-Step
This section provides a complete walkthrough for building a custom shipping calculator and embedding it into your Shopify website. Whether you’re new to Elfsight or just need a refresher, this guide will help you configure layout, logic, and styling — no coding required.
- Select a ready-made template. Open the Elfsight Calculator editor and browse the available templates. Pick one that fits your shipping use case — whether it’s based on weight, region, or quantity — and click “Continue with this template”.

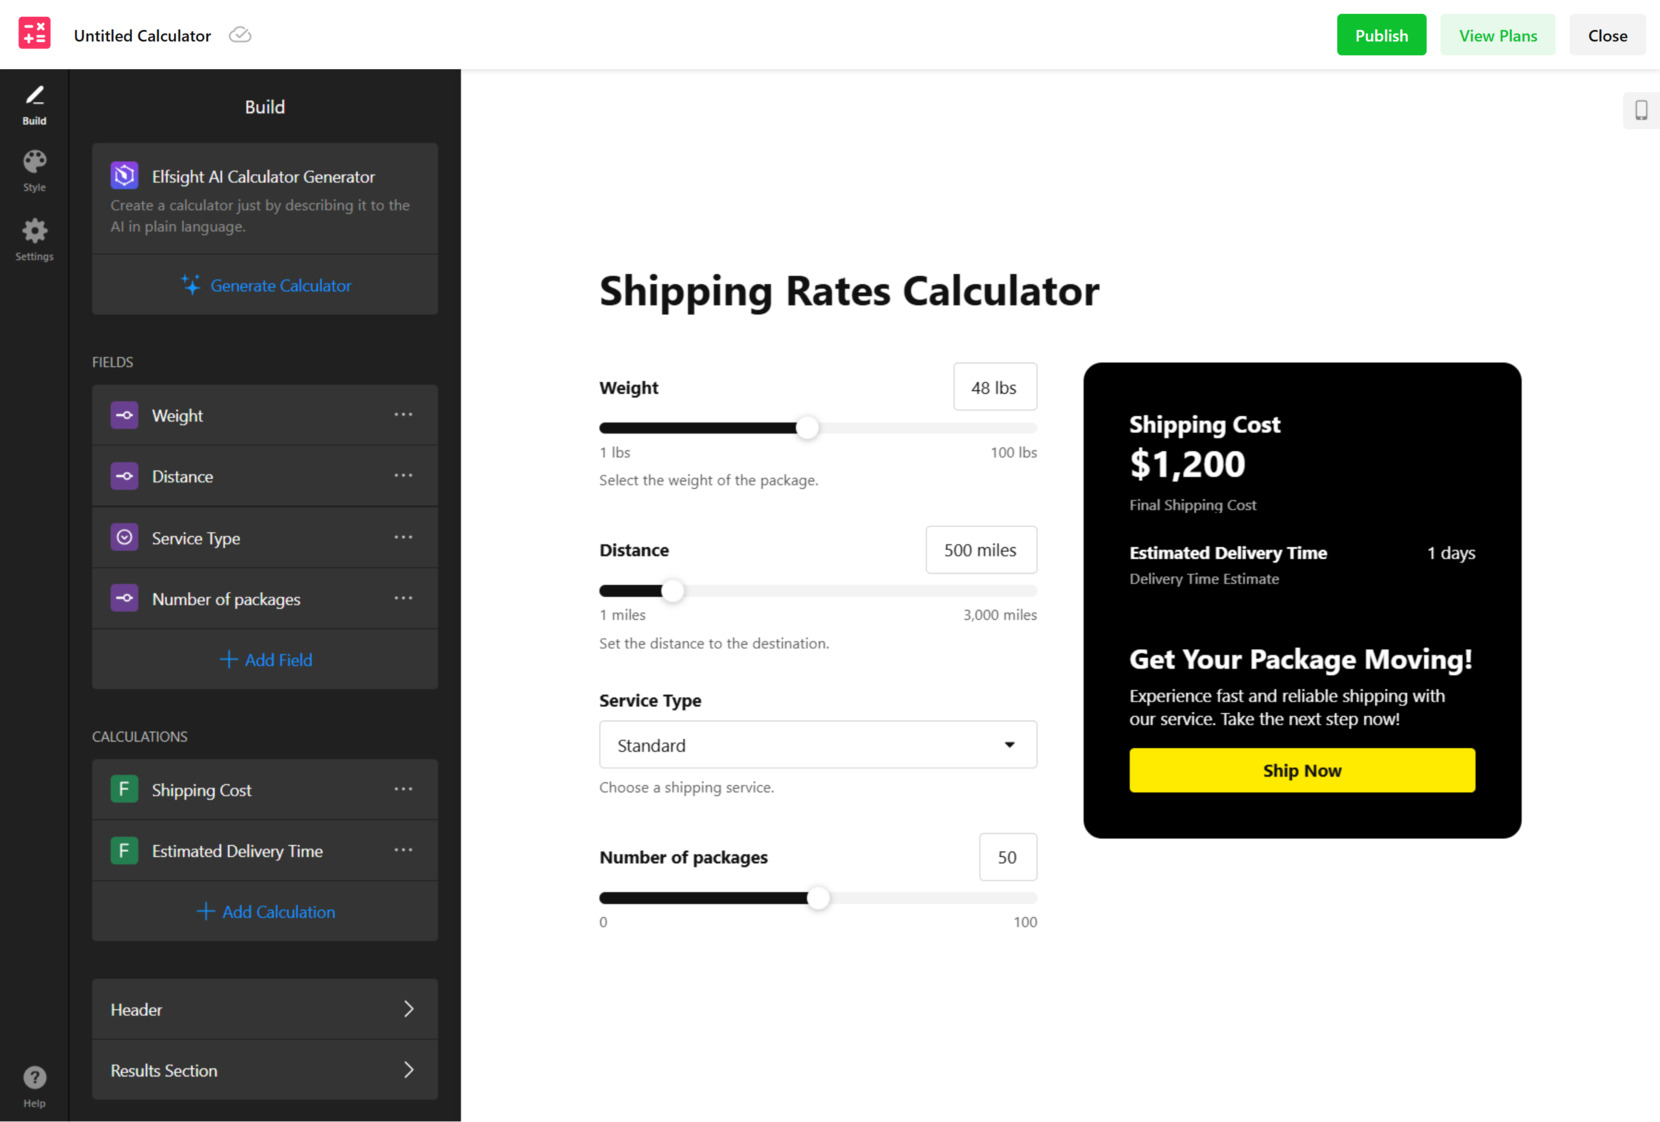
- Set up fields and delivery logic. Use the drag-and-drop editor to insert input elements like dropdowns, sliders, or checkboxes. Then configure the calculation logic to show real-time shipping rates based on user input.
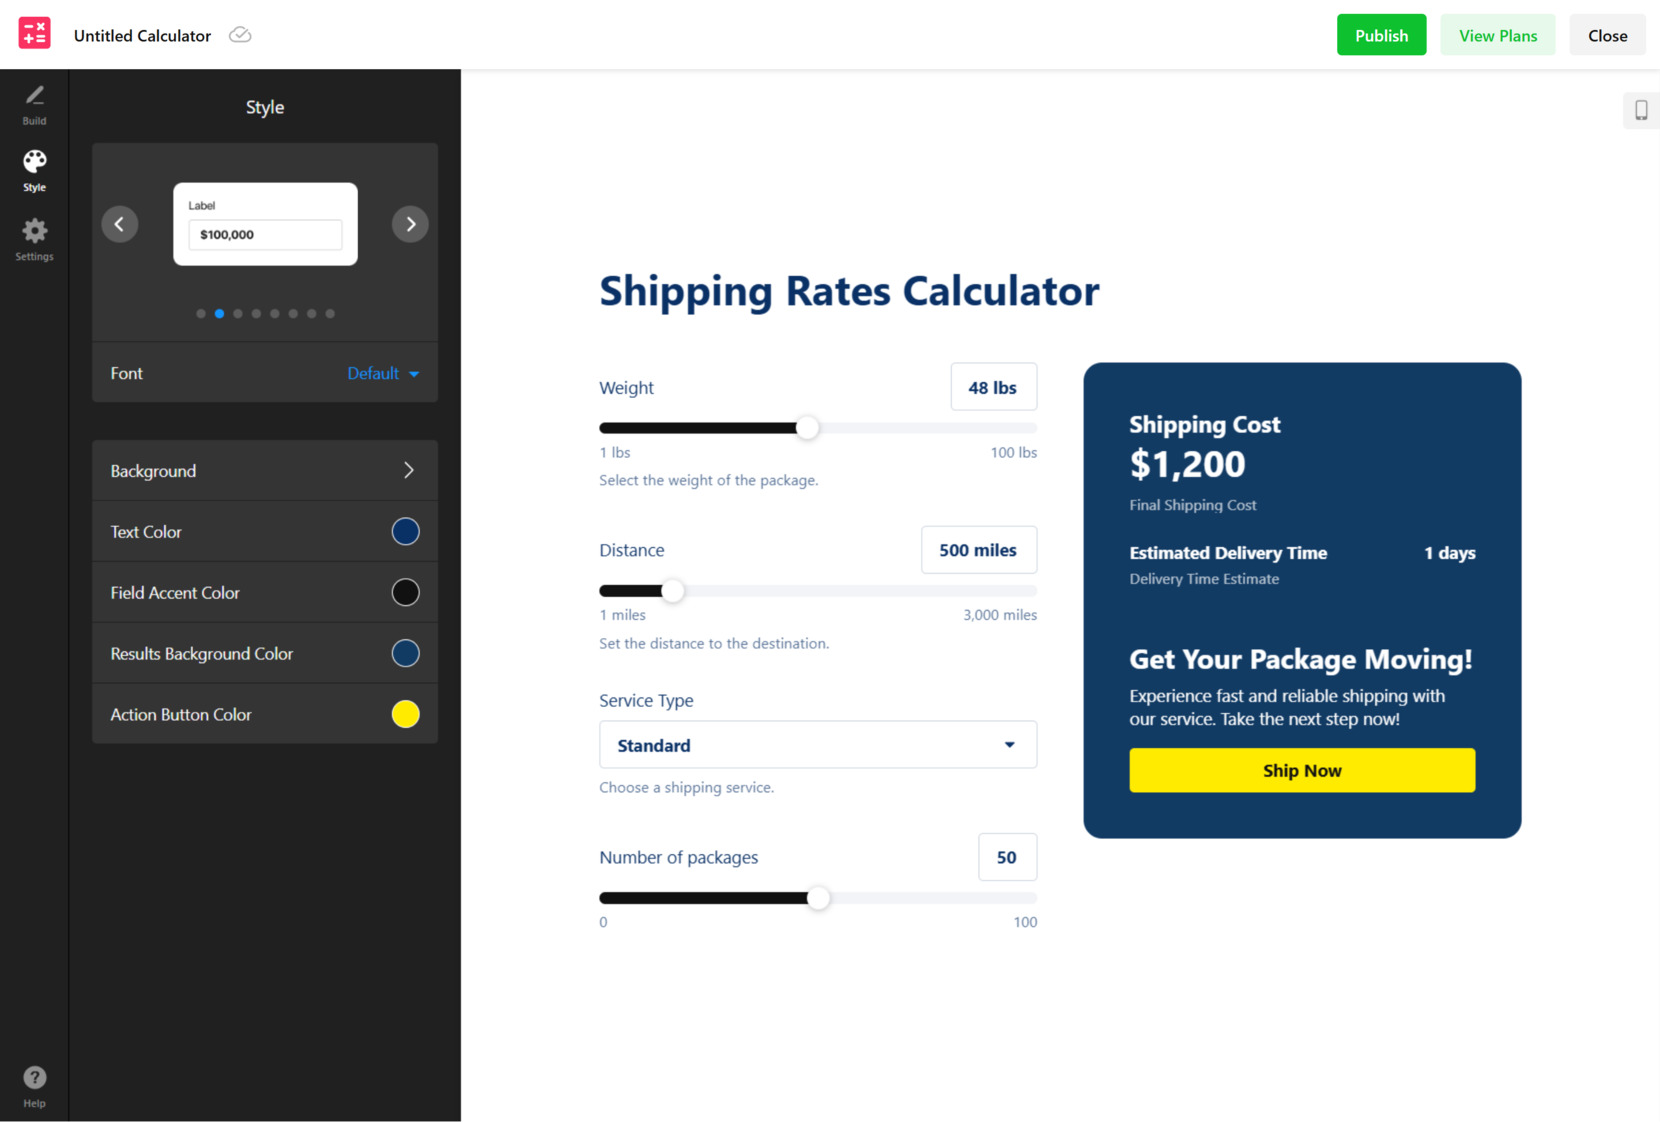
- Style the calculator visually. Open the “Style” section to match the widget with your Shopify branding. Modify background, fonts, button colors, and borders to keep everything consistent with your design.
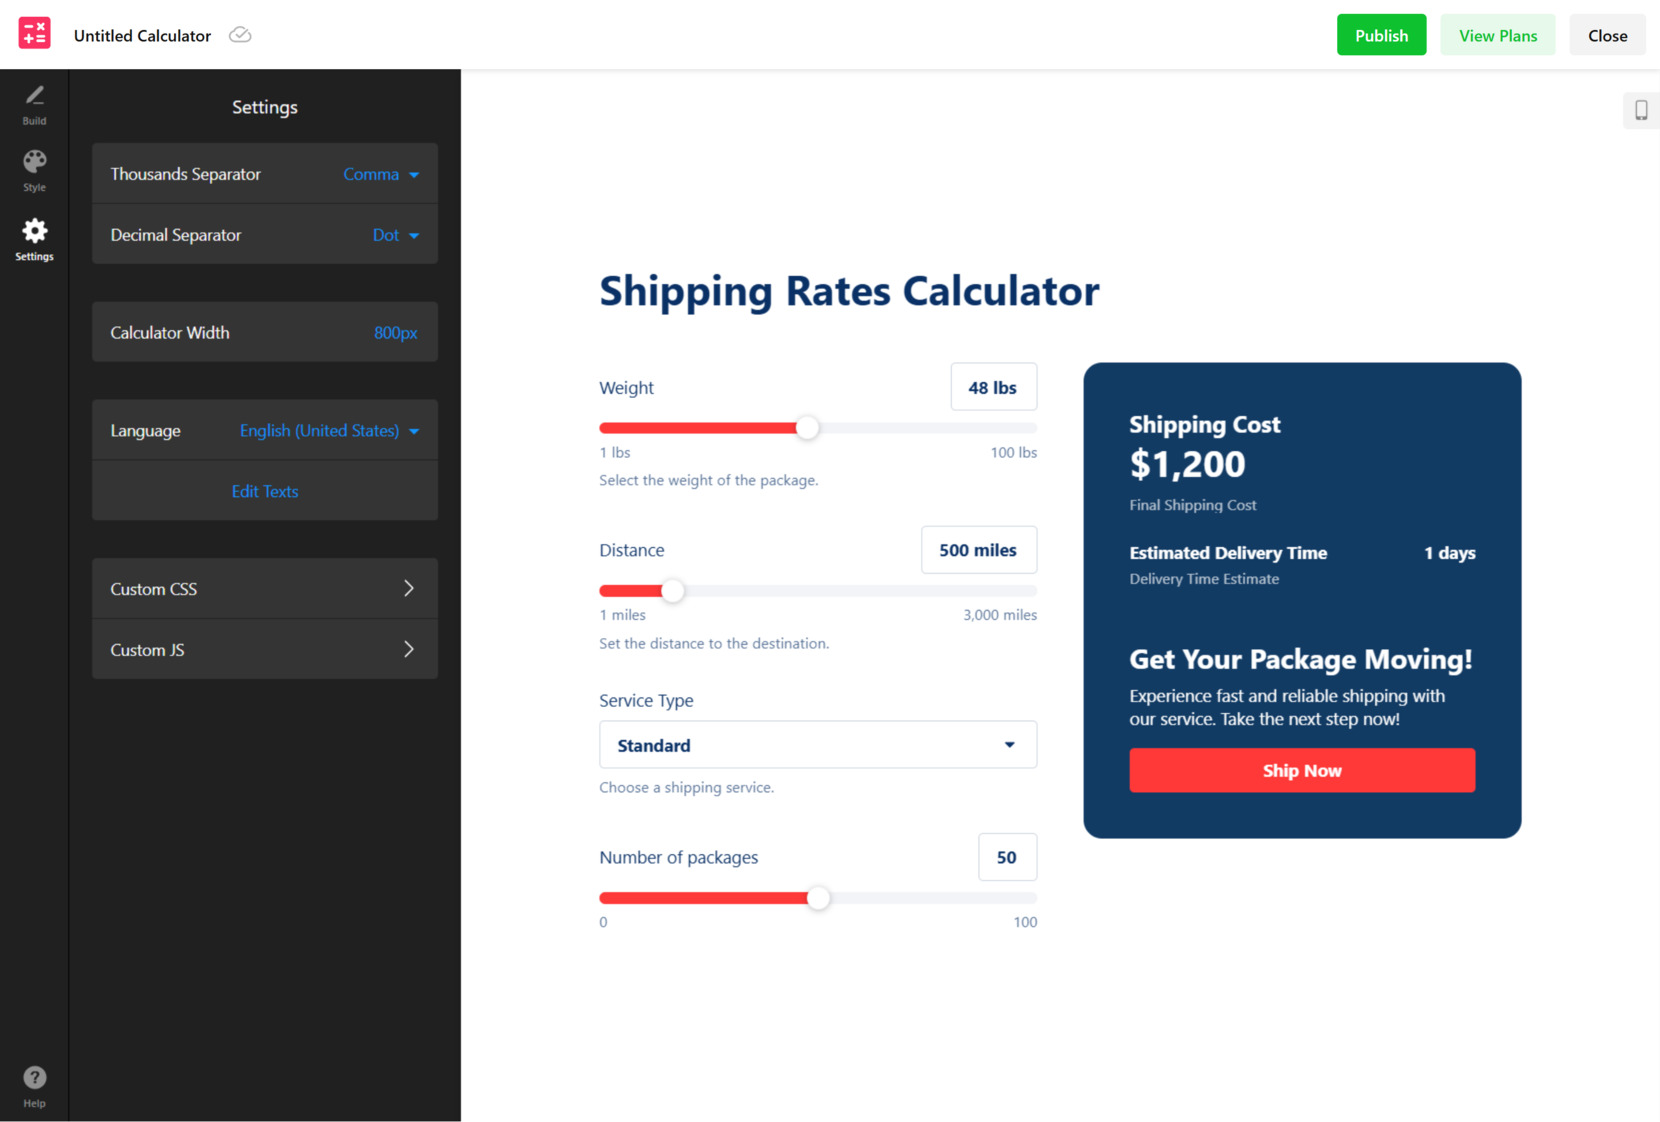
- Adjust Appearance and Functionality. In the “Settings” tab, you’ll be able to format numbers, define widget width, and select the language for display. This section also allows you to rename fields or insert custom code to refine how the calculator works.
- Embed the widget in your Shopify store. Click “Add to website for free”, copy the embed code, and paste it into your Shopify backend. Use a Custom Liquid block or HTML section within your theme editor or product description.
You can also embed the widget inside any content block using Shopify’s Online Store 2.0 editor — perfect for displaying calculators on product or cart pages.
This setup gives you a live, branded shipping calculator tailored to your pricing needs. Revisit the editor anytime to update logic, modify visuals, or test variations.
While Elfsight makes the integration process simple, there are also a few other methods available. In the next section, we’ll go over alternative ways to embed a shipping calculator in Shopify and when they might be worth considering.
Alternative Solutions to Embed a Calculator
While Elfsight offers a fast, visual, and user-friendly approach to embedding a shipping calculator on your Shopify website, there are also official and technical alternatives that some merchants may consider. These include Shopify’s native shipping configuration and the use of advanced APIs. Each method serves different needs depending on your store’s complexity, technical resources, and customization goals.
Using Shopify’s Built-In Shipping Rates Configuration
Shopify offers a built-in shipping settings panel that allows you to configure and automate delivery pricing based on rules like weight, price, destination, and carrier. This setup is handled directly within your Shopify admin and is designed to cover most standard shipping logic without needing extra code or third-party tools.
- Go to your Shopify admin panel. Log in to your Shopify dashboard and look for the “Settings” option located in the bottom-left menu of the screen.
- Click on “Shipping and Delivery“. This opens the full settings for all your delivery methods, shipping zones, and rate logic.
- Locate your shipping profile and click “Manage Rates“. Shopify lets you manage separate profiles depending on product categories, origin addresses, or fulfillment locations.
- Add new shipping zones. Choose the geographic regions where you offer shipping, such as domestic, international, or custom zones by country or zip code range.
- Define shipping methods for each zone. Add rate types like flat-rate, free shipping, or weight-based pricing. If you’re on an Advanced or Plus plan, you can also connect live carrier-calculated rates from services like UPS or USPS.
- Save your configuration. Once your rules are in place, click “Save” to apply the changes and activate them for future checkouts.
This method is ideal for merchants looking for a no-code way to configure and automate shipping logic based on common factors. However, it is limited to displaying rates only at checkout.
Using Shopify API for Custom Shipping Rate Display
For stores with complex delivery logic or integration needs, Shopify offers access to Shipping and CarrierService APIs. These APIs allow developers to return real-time shipping rates to the checkout screen from external systems, based on custom algorithms and external data sources.
- Create a custom or private app. In your Shopify admin, go to “Apps” > “App and sales channel settings” and create a new app with access to the Admin API. Make sure to request access to the CarrierService scope.
- Set up a backend server for rate calculations. This server will receive rate requests from Shopify and respond with appropriate shipping cost options. Technologies like Node.js, Ruby, or Python are commonly used for this purpose.
- Register a CarrierService. Using the API, register your app to respond to shipping requests. You’ll need to provide the callback URL where your backend will send shipping rates in JSON format.
- Create the shipping calculation logic. Implement rules in your backend to calculate shipping based on dimensions, weight, order value, delivery zones, or any other variable relevant to your operation.
- Return the calculated rates to Shopify. Send a structured response that includes titles, prices, estimated delivery times, and service codes. Shopify will use this data at checkout to display the available options.
- Test thoroughly before going live. Place test orders in your store to ensure your app returns rates consistently and behaves correctly with different cart scenarios.
This method is highly flexible and allows complete control over shipping logic, but it requires development resources and API familiarity. It’s best suited for larger stores or merchants working with fulfillment partners or non-standard delivery models.
Comparison of Methods for Adding a Shipping Calculator
Below is a side-by-side comparison of Elfsight and alternative methods available for displaying shipping calculators in Shopify. This overview will help you choose the right solution depending on your goals, skills, and store scale.
| Method | Major Pro | Major Con |
|---|---|---|
| Elfsight Shipping Calculator | Enables fully customizable product-page calculators with zero coding and real-time pricing display. | Requires copying a code snippet into your Shopify editor manually. |
| Shopify Native Shipping Configuration | Provides direct admin access to define shipping rates by zone, weight, or price without external tools. | Only displays delivery costs at checkout, which may confuse users during earlier steps of the buying process. |
| Shopify API Integration | Allows complete automation and external logic integration for dynamic rate calculations during checkout. | Requires development skills, hosting setup, and access to higher-tier Shopify plans like Advanced or Plus. |
Each method comes with trade-offs. Shopify’s built-in tools are easy to access but limited in user experience. API solutions are powerful but demand technical know-how. Elfsight offers the best balance of flexibility, speed, and ease of use — ideal for merchants who want visible, conversion-friendly delivery pricing without complexity.
Now that you’ve explored the integration options, let’s move on to some practical tips to help you get the most out of your calculator widget.
Tips for Using Web Calculator Effectively
Once you’ve chosen and embedded a shipping calculator into your Shopify website, a few practical tips can help ensure it functions correctly and delivers a seamless experience for users. These best practices apply to any third-party or custom-built widget and focus on placement, visibility, and optimization.
- Place the calculator in a high-visibility area. Users expect to see shipping information either on the product page or during the cart review step. Avoid hiding the calculator below less important content or inside tabs.
- Test the widget on all devices. After embedding, verify how it appears on desktop, tablet, and mobile. Ensure the design adapts properly and doesn’t conflict with existing layout elements or styling rules.
- Keep the form short and intuitive. Avoid overwhelming users with too many fields. Focus only on necessary inputs such as destination, item quantity, or preferred shipping speed. Simplicity improves conversion.
- Pre-fill or auto-detect values where possible. If the calculator supports geolocation or default settings, enable them to streamline user input and reduce steps.
- Don’t forget the loading speed. Make sure your widget doesn’t slow down the page. Lightweight calculators or asynchronous loading options help preserve fast browsing experiences.
- Preview changes before publishing. Use the live preview features in your editor or platform to catch layout misalignments or unexpected behavior before users interact with the widget.
- Use consistent styling with the rest of your website. Customize fonts, buttons, and colors to align the widget with your brand. A calculator that blends in visually will feel like a native part of your store.
- Monitor usage regularly. After publishing, keep an eye on user behavior using analytics tools. This can help detect abandonment points or performance issues early.
Now let’s take a closer look at how shipping calculators are applied in different industries and which business types benefit most from using them.
Where Shipping Calculators Work Best: Use Cases
Shipping calculators are valuable across a variety of industries where pricing transparency, order customization, and location-based delivery costs matter. Below are three industries that can effectively use calculators to improve customer satisfaction and streamline logistics.
eCommerce and Retail 📦
Retailers on Shopify offering physical products — such as clothing, electronics, cosmetics, or home decor — can use calculators to display shipping rates in real time based on location, cart value, or delivery method. This not only builds trust but also reduces surprise fees at checkout, which often leads to cart abandonment.
B2B and Wholesale 📊
Wholesale distributors and B2B suppliers often deal with bulk shipments and complex pricing structures. Shipping calculators help buyers get accurate freight estimates instantly, based on quantity tiers, pallet dimensions, or delivery distance — especially useful when transactions involve repeat customers or multi-location shipping.
Subscription and Custom Box Services 🍴
Subscription-based Shopify businesses — like pet care kits, meal delivery boxes, or curated fashion bundles — can use calculators to update shipping estimates as customers change delivery frequency, box size, or item combinations. This allows users to see real-time adjustments and avoids confusion about recurring fees.
As you can see, calculators aren’t just for retail — they serve complex ordering processes and customizable workflows across many industries. Next, we’ll look at the most common setup problems and how to solve them efficiently.
Fixing Common Setup Issues
Even though shipping calculators are generally easy to integrate, a few technical or configuration-related issues can occur. Below are the most frequent problems store owners encounter, along with solutions to get everything running smoothly on your Shopify website.
Why isn’t my Shopify shipping calculator showing up on the page?
Why are shipping rates not displaying correctly or showing zero?
The calculator works on desktop but looks broken on mobile. What should I do?
How do I troubleshoot slow loading or delays in rate display?
Why does the calculator return incorrect totals?
Can I move the calculator to another part of the page after embedding?
Understanding these common issues ensures you’re prepared to troubleshoot quickly and maintain a smooth customer experience.
Conclusion
Adding a shipping calculator to your Shopify website is a smart way to improve the checkout experience, reduce cart abandonment, and offer full transparency to your customers. Whether you’re running an online store, managing wholesale logistics, or offering subscription-based products, embedding a delivery cost estimator helps eliminate uncertainty and simplifies the decision-making process for buyers.
From quick setup with Elfsight’s no-code solution to advanced API integrations or native Shopify configurations, there’s an option for every business size and technical skill level. Whichever method you choose, the key is to ensure your shipping rates are easy to access, accurate, and clearly communicated. With a properly configured calculator in place, your store becomes more efficient, trustworthy, and customer-focused.
Need Help Getting Started?
We hope this guide gives you clarity on how to integrate a shipping calculator into your Shopify website. If you’d like help building your own, feel free to reach out to us — we’re here to make the setup fast and smooth. At Elfsight, we’re committed to giving you a powerful, user-friendly widget experience with zero code required.
Want to exchange ideas or request a new feature? Join our Community to collaborate with other merchants, or leave your suggestions on our Wishlist — we’d love to hear from you.