Step 1. Start Working with the Google Maps Platform
Let’s start with setting up your website app. First, you need to create a billing account which you’ll further attach to your Google Reviews project.
- Go to the Google Cloud Platform Console
- Click on the menu button and select Billing
- Continue by clicking Create billing account
- Sign up and enter your billing information
• Every user gets a $300 credit for 12 months ahead
• Google won’t automatically withdraw money from your card if you run out of credit
• They need this info to ensure that you’re not a robot
- Add multiple billing accounts in case you want to pay for different projects through different cards.
- Create your first project: click Menu > Home > Create
That’s it! Now, as you’ve managed to start your first Reviews project, we’ll move on to using the Google Maps platform.
If working with the API seems too complicated to you, don’t worry and simply use a Google Reviews widget – it will help you show any number of Google reviews on your website with ZERO coding.
Step 2. Enable Google Maps API
As soon as we’re going to use a Google Maps JavaScript API, we’ll set it up.
Both the Places library for the Google Maps JavaScript API and Places API allow you to get such types of place information as name, address, open hours, rating and reviews (which we need). But in this project we’re going to use the JS API.
- Go to the Google Cloud Platform Console
- Select the project you would like to get data for
- Click Menu > Google Maps at the bottom of it > select APIs
- This will open the API library where you need to select Google Maps JavaScript API
- Enable it
That’s it! Now, you’re ready to start using it in your Reviews app. The next step is to generate an API key.
Step 3. Get API Key
To launch your Reviews project on the basis of a Google Maps Platform, you should generate an API key. It doesn’t matter what API or SDK you’re using, this step is required.
Google Maps API key is a unique identifier of someone who requests access to the Google platform, confirming the fact they are permitted to do so. The key also gives info about the project it is connected to and quotas.
After getting an API key, you should further restrict it to exclude the possibility of miscellaneous use or taking access of your account by third parties.
- Go to the Google Platform Cloud dashboard
- Choose the project you’re going to work with
- Click a menu button > hover over APIs and Services > choose Credentials
- Tap Create credentials > in a dropdown list choose API key
- After clicking on it, you’ll see a popup containing your unique API key
You can copy and use it now in a review app. But as we’ve already discussed before, you should further restrict the key. Although this step isn’t obligatory, it is highly recommended. You’ll see a corresponding button in a popup, or you can click the ‘Edit’ button in front of a Google Maps API key.
Two main types of API key restrictions
Application restrictions
- HTTP referrers – is used for appealing to websites and web apps. You can enter a website’s name and the key will only allow requests from this website.
- IP address (web servers, etc.) – particularly useful for web developers who want to allow calls from specific servers or IP addresses.
- Android apps – allows calls from Android apps. To specify your only app, you should define your package name and SHA-1 signing certificate.
- IOS apps – allows calls from IOS apps. Define IOS bundle identifier to specify your Google Maps app.
API restrictions
- By means of them, you can particularize APIs that can be used with a specific key.
Choose the needed restrictions and click ‘Save’.
Step 4. Get Place ID
This is an easy yet important step. Go to the Google Place IDs page and find an interactive map there. Enter a name or an address of the needed place:
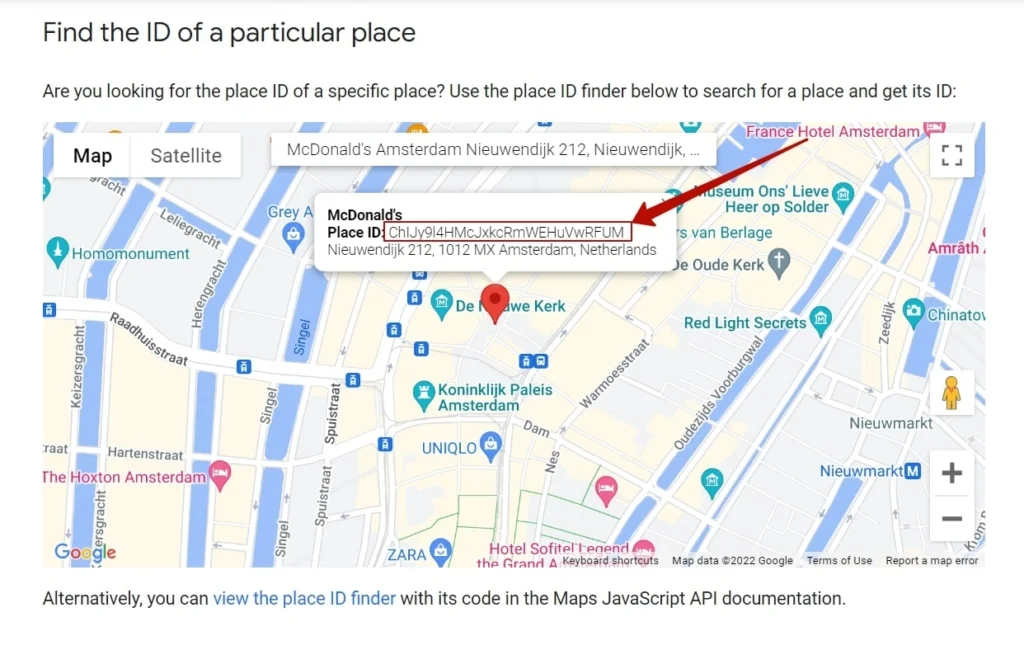
Afterwards, you’ll see a unique Place ID, copy it. That’s it! We’ve finished the setting up of our Reviews project. Afterwards, we’re going to finally get reviews through the Google Maps Platform. Let’s go!
Step 5. Create a Google Maps Reviews Project
You can read more about the features of Google JS for fetching reviews to your website app in official documentation. Here, you’ll find a brief instruction for getting a quick result.
- Let’s work with this JavaScript code:
var axios = require('axios');

var config = {
  method: 'get',
  url: 'https://maps.googleapis.com/maps/api/place/details/json?place_id=ChIJN1t_tDeuEmsRUsoyG83frY4&fields=name%2Crating&key=YOUR_API_KEY',
  headers: { }
};

axios(config)
.then(function (response) {
  console.log(JSON.stringify(response.data));
})
.catch(function (error) {
  console.log(error);
});
Pay special attention to the two fields:
- key=YOUR_API_KEY – replace YOUR API KEY with the Google Maps API key you’ve managed to get and restrict in Step 3.
- place_id=ChIJN1t_tDeuEmsRUsoyG83frY4 – replace the letters and numbers with the string you’ve got in Step 4.
We’ve prepared a short footnote for you to study when you use the above code.
- To define a list of location data types to return, use the fields argument. For instance, fields:
price_level,rating,user_ratings_total,review. If you want to provide compound values, use a forward slash like this:opening_hours/open_now. - The three billing field categories are the following: Basic, Contact, and Atmosphere. There are no extra fees for Basic fields. Atmosphere and Contact fields have greater fees on a Google Maps platform. That’s why you’ll need to restrict all the unnecessary fields and use only the ones that you need.
- For getting reviews and ratings with the Google Maps API, you’ll need to use the Atmosphere category. It contains the following fields:
price_level, rating, reviews, user_ratings_total.
Here’s the explanation of what responses you’ll get after using Google Maps API:
rating– contains the location’s overall user rating. It ranges from 1.0 to 5.0.reviews– an up to five-review JSON array. If a language parameter was requested, the service will favor reviews published in that language above those written in other languages.user_ratings_total– the total number of text-based and text-free evaluations for this location.
Don’t hesitate to use the Google Reviews widget
In this article we’ve simply managed to get a response to a particular call. However, if your purpose is to get appealing and exquisite reviews and paste them into a website, the above steps aren’t enough. Here’s an editor for you to easily create a Google Reviews widget, customize it visually, without a single line of code. You can find a more detailed process of Google Reviews installation on different platforms in our article. This widget works on the basis of Google API, presenting any number of reviews you need. Just give it a try right away.