
Webflow Accessibility plugin
Create your Accessibility widget
Add the Webflow accessibility plugin to your website
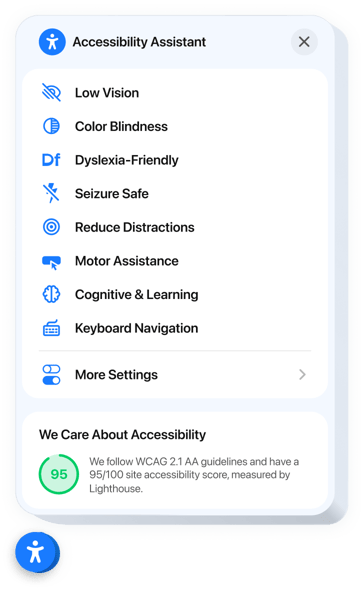
Put an accessibility panel on your Webflow website, and each visitor can pick a ready-made mode for sight, focus or movement needs. One click applies a set of visual and usability adjustments, so reading and navigating gets more comfortable.
The built-in accessibility checker runs a Lighthouse-based scan of the page and shows the findings and an accessibility score in the widget panel, so you know what to fix first. The panel is localized for 76 regions, so visitors can use it in their own language.
Add the Accessibility widget to Webflow and give every visitor a way to use your website their way.
The most valuable widget features include
- Ready-made modes for 8 user scenarios. Visitors choose the mode that suits them, such as Low Vision, Color Blindness, Dyslexia-Friendly or Seizure Safe, and your website adapts at once.
- Built-in accessibility checker. A Lighthouse-based scan finds weak spots on the page and gives you an accessibility score with recommendations you can download as a report.
- Trust badge with accessibility score. Show the result of your scan to visitors right in the widget.
- Text settings. Visitors can change font size and spacing, switch on readable fonts and use contrast views.
- Visual filters. Grayscale, inverted colors, saturation adjustments and high-contrast presets.
- Navigation aids. Link highlighting, reading guides, focus indicators and screen reader enhancements.
- Accurate localization. The widget supports 76 regions, so visitors see it in their own language.
Try every setting in the editor right on this page.
Made for Webflow
- Works in CMS collections. Put the widget in a CMS Collection template and it shows on every collection item.
- One component, many pages. Create a component from the Code Embed and reuse it on other pages.
- Updates without republishing. Change the widget in Elfsight, and the changes appear on your website without republishing it in Webflow.
- Preview before you publish. In Designer the widget is replaced by a placeholder; it shows in Preview with custom code and on the published website.
How to add Accessibility to Webflow
Set up the widget in the Elfsight editor first and get your installation code. Then place it on one page, on all pages, in a component or in a CMS Collection template. Webflow loads external code only on a paid plan, so check your plan before you start.
Good to know: the free Starter plan does not load the widget. You need a paid website plan or a paid Workspace plan.
Method 1: Add the widget to one page
- In your Webflow dashboard, click Open in Webflow.
- Open the Pages panel and select the page.
- Click + (Add panel) and choose Code Embed.
- Drag the Code Embed to the place where the widget should appear.
- Paste the installation code and click Save & Close.
- Click Publish, then Publish to Selected Domains.
Method 2: Add the widget to all pages
- In your Webflow dashboard, open the menu next to your website and go to Settings → Custom Code.
- Paste the installation code into Head Code.
- Click Save.
- Click Publish, then Publish to Selected Domains.
Method 3: Reuse the widget with a Component
- Add a Code Embed and paste the installation code.
- Right-click the Code Embed and select Create component.
- Drag the component from the Components panel to other pages.
- Click Publish.
Method 4: Add the widget to a CMS Collection template
- Go to Pages → CMS Collection pages and open the collection template.
- Add a Code Embed and paste the installation code.
- Click Save & Close.
- Click Publish.
After publishing, open your webflow.io staging domain and check that the widget loads.