Adding an HTML reviews block is one of the most effective ways to build trust and showcase credibility directly on your website. Whether you run a small business, an online store, or a portfolio, displaying reviews helps highlight positive experiences and encourages new customers to engage with your brand.
If you’re looking for a simple way to embed a professional-looking customer feedback section without writing complex code, you’re in the right place. This guide will walk you through how to add a reviews widget that looks great and works seamlessly across any device.
- Build trust instantly. Showing real customer reviews creates authenticity and increases confidence in your products or services.
- Boost engagement and conversions. A clean and well-placed feedback display can encourage more users to take action and complete purchases.
- Improve visual appeal. A styled review section enhances your design while keeping the layout informative and user-friendly.
- Encourage more feedback. Displaying existing testimonials motivates new visitors to leave their own reviews.
Now let’s see how you can quickly generate a HTML review widget for your website without any coding hassle.
Build Your HTML Review Widget in Seconds
Creating a review block manually can take time, but with Elfsight’s easy-to-use editor, you can generate HTML code for a fully customizable widget in under a minute. No coding needed, just pick your style and go live. Here’s how it works:
- Open the editor and choose a ready-made review template.
- Customize the layout, fonts, and alignment to fit your website’s design.
- Select colors, borders, and background to match your branding.
- Click “Add to website for free“, copy the star rating code, and paste it into your website’s backend.
See it in action – build your All-in-One Reviews Widget now!
What You Get with Elfsight’s Widget
Now that you’ve seen how easy it is to build a review widget, let’s explore what makes Elfsight a powerful choice. The platform offers a wide range of customization options and built-in features that let you display testimonials in HTML and CSS without hassle.
Here are some of the key features and benefits you’ll get with Elfsight:
- Collect reviews from multiple sources. Automatically sync and display reviews from Google, Facebook, Yelp, and many more — all in one place.
- Flexible layouts and styles. Choose from grids, carousels, sliders, and list formats to match your design vision.
- Easy visual customization. Adjust colors, fonts, borders, and layout spacing to create unique visual star graphics and testimonial blocks.
- Auto-updating content. Keep your client testimonial carousel fresh with automatic review syncing so you never have to update manually.
- Moderation and filters. Show only the reviews you want with built-in moderation, keyword filtering, and tagging features.
- Mobile-responsive and SEO-ready. Every star rating feature looks great on any device and helps improve your visibility in search results.
With all these tools in your hands, setting up and installing your feedback block becomes a smooth process — let’s dive into the full setup steps next.
How to Set Up Your Review Section
Now that you know what makes Elfsight powerful, it’s time to walk through setting up your HTML review block from start to finish. The process is fast, intuitive, and doesn’t require any coding.
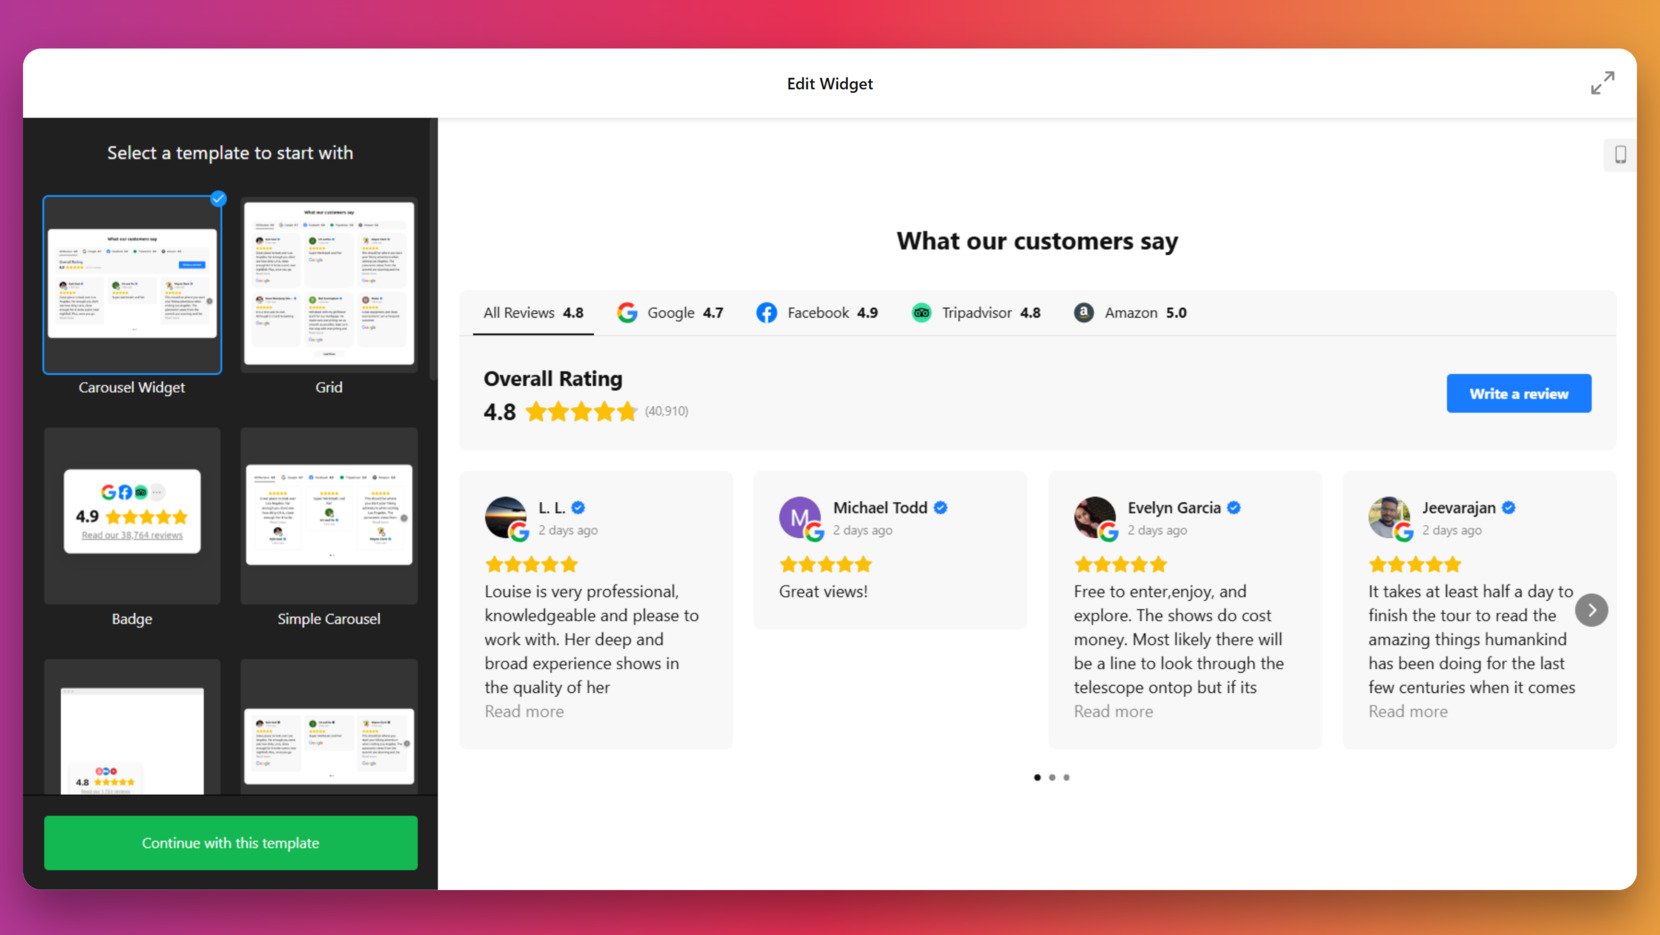
- Choose a Template. Launch the Elfsight All-in-One Reviews widget editor. Pick a layout like Carousel, Grid, or Badge and click “Continue with this template” to start customization.

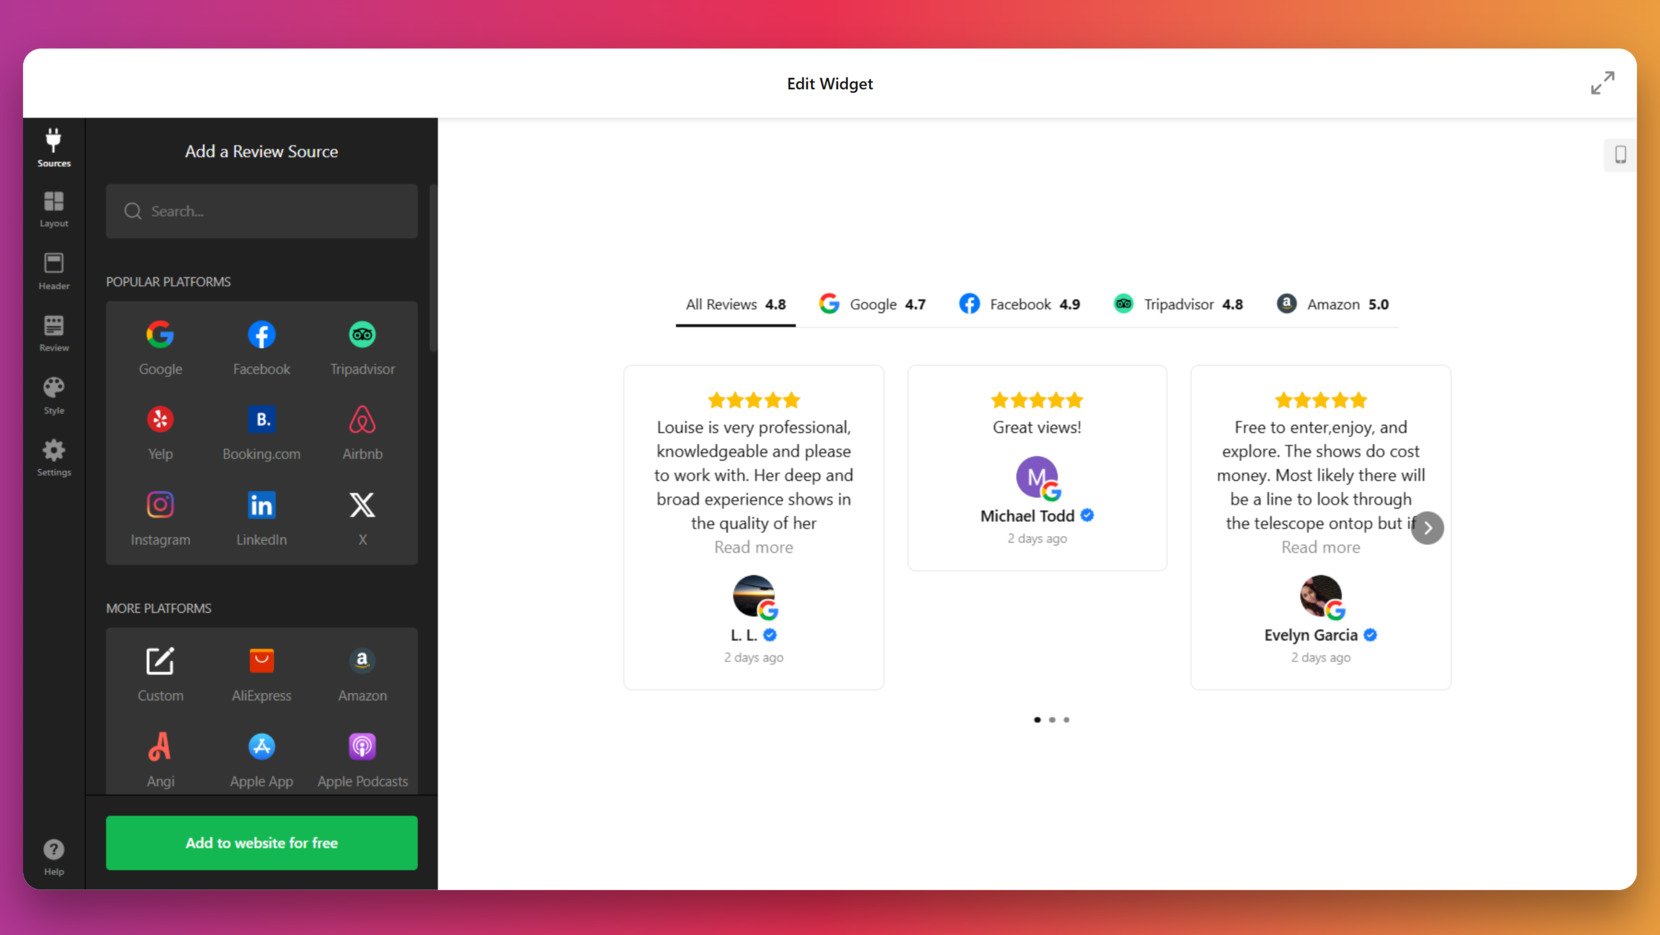
- Add a Review Source. In the “Sources” tab, click “Add a Review Source”. Select a platform such as Google, Facebook, TripAdvisor, or Amazon, and connect it by pasting your business page URL. You can adjust what type reviews are being shown in your widget by customizing the Filters: show only those reviews that have textual content or only 5-star rating reviews. Here, you can also set the total number of reviews to be displayed.
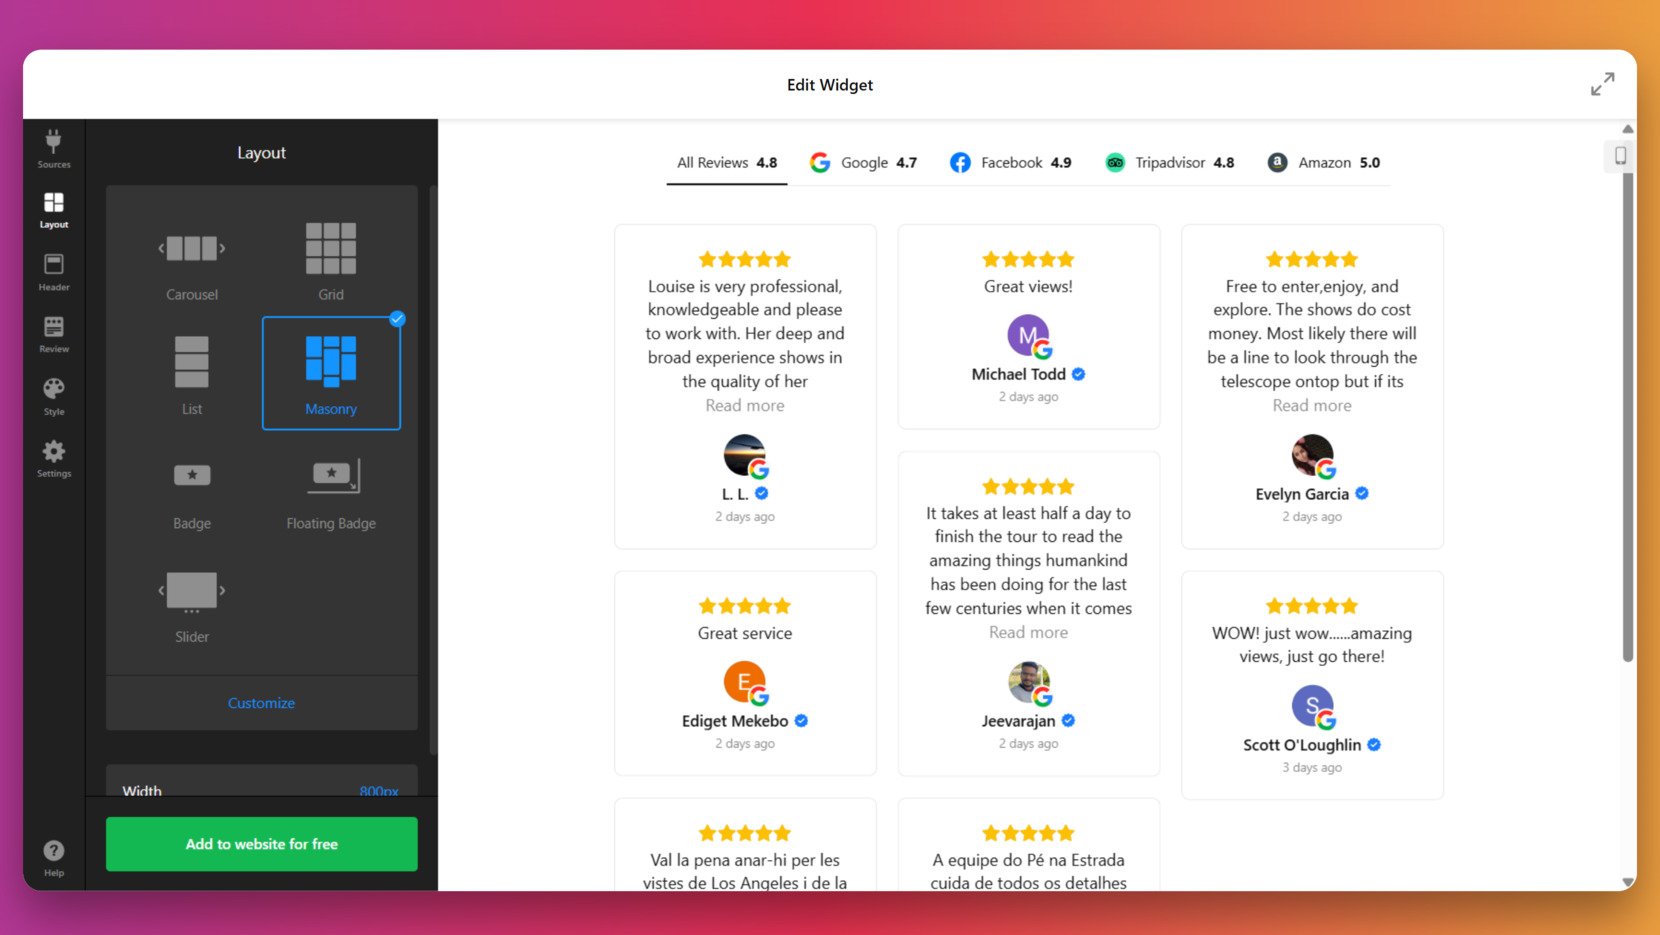
- Customize the Layout. Go to the “Layout” tab to choose how your reviews are presented to the viewers — Carousel, Grid, List, Badge, etc.
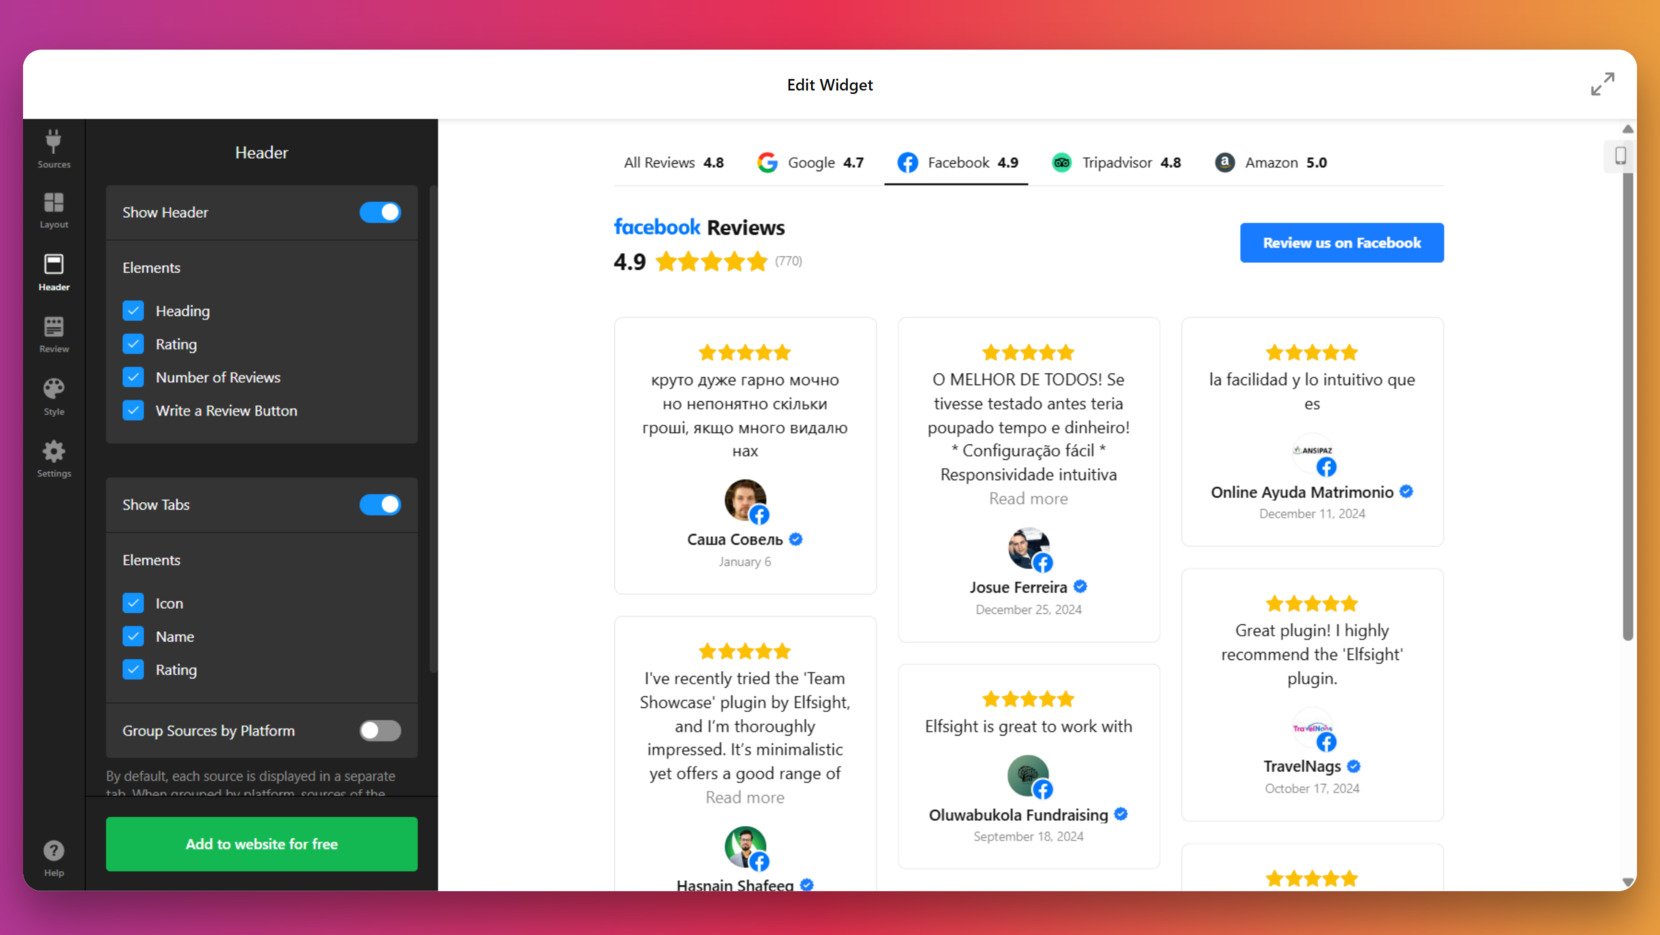
- Adjust the Widget Header. In the “Header” tab, customize the widget’s header and other elements like icons, names, rating, and CTA button.
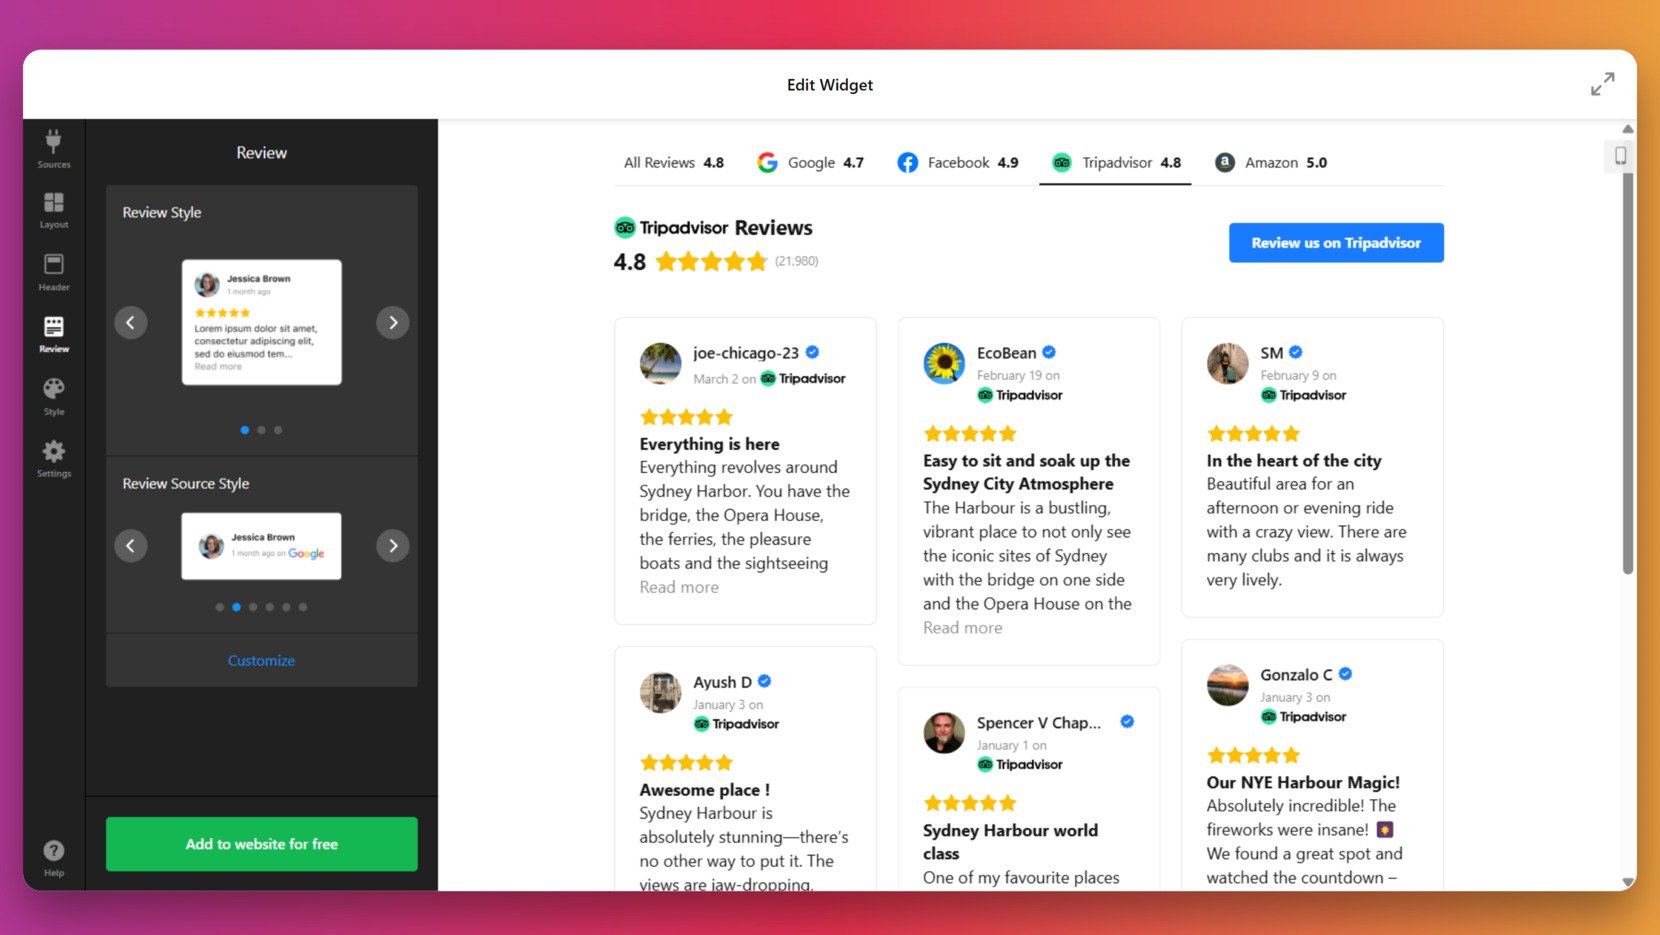
- Change Review Style. Go to the “Review” section to customize the style of how your feedback blocks appear. You can change Review Style and Review Source Style.
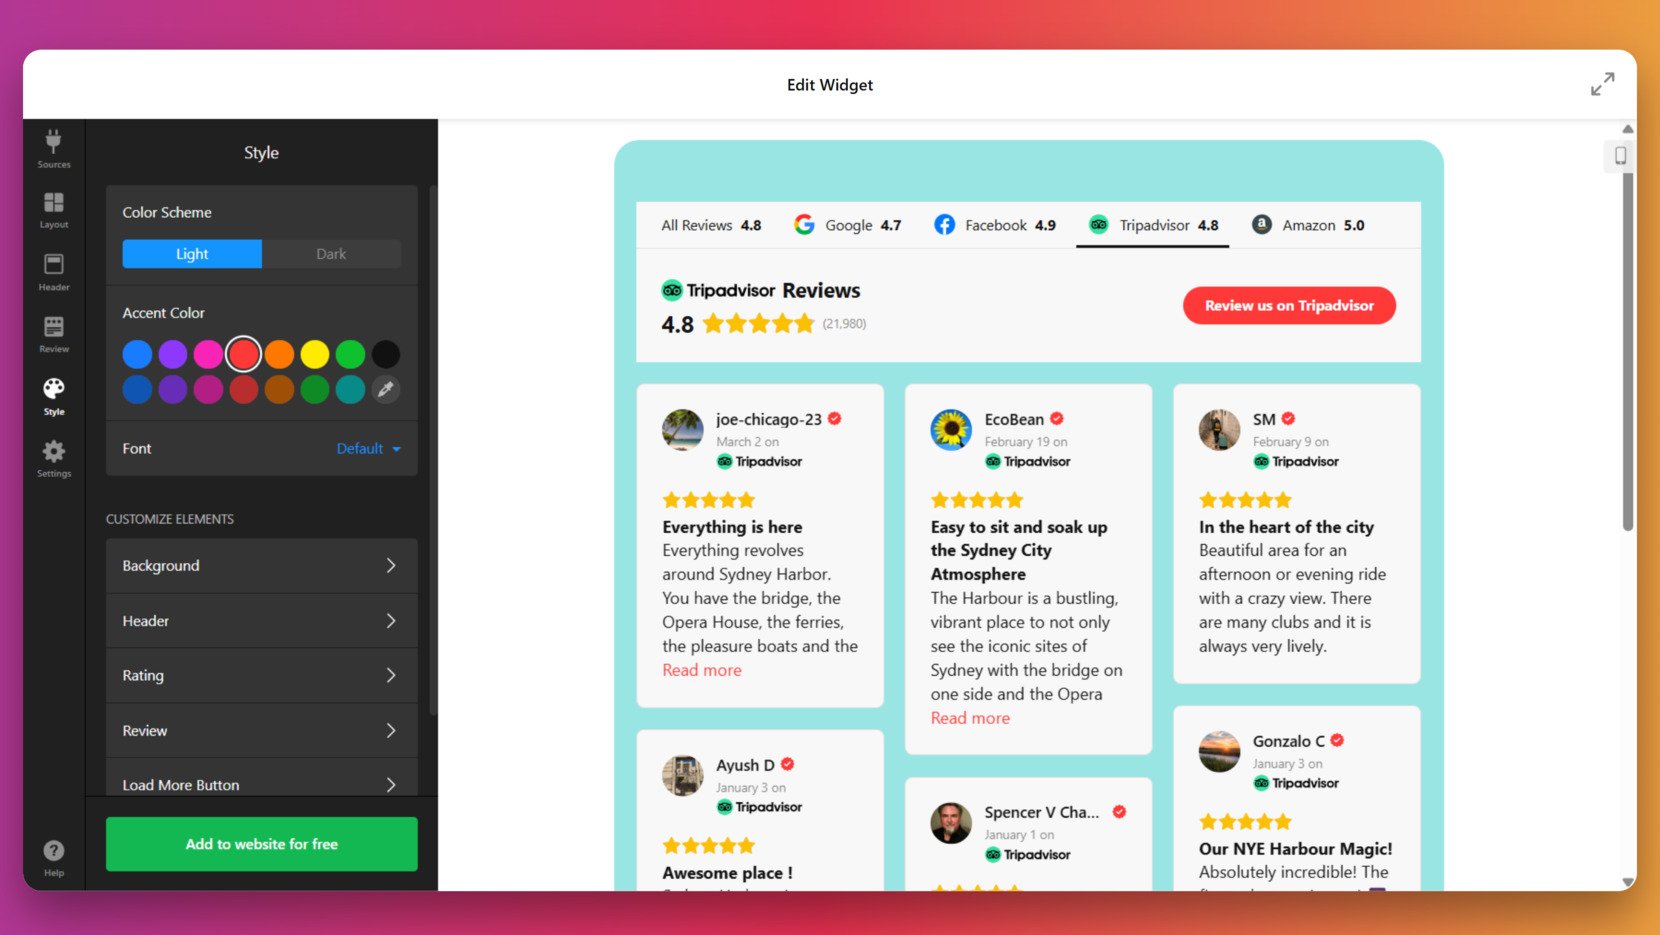
- Adjust Style and Design. In the “Style” tab, pick a color scheme (light or dark), set your brand accent color, select a font, and modify background, layout spacing, and other custom review elements.
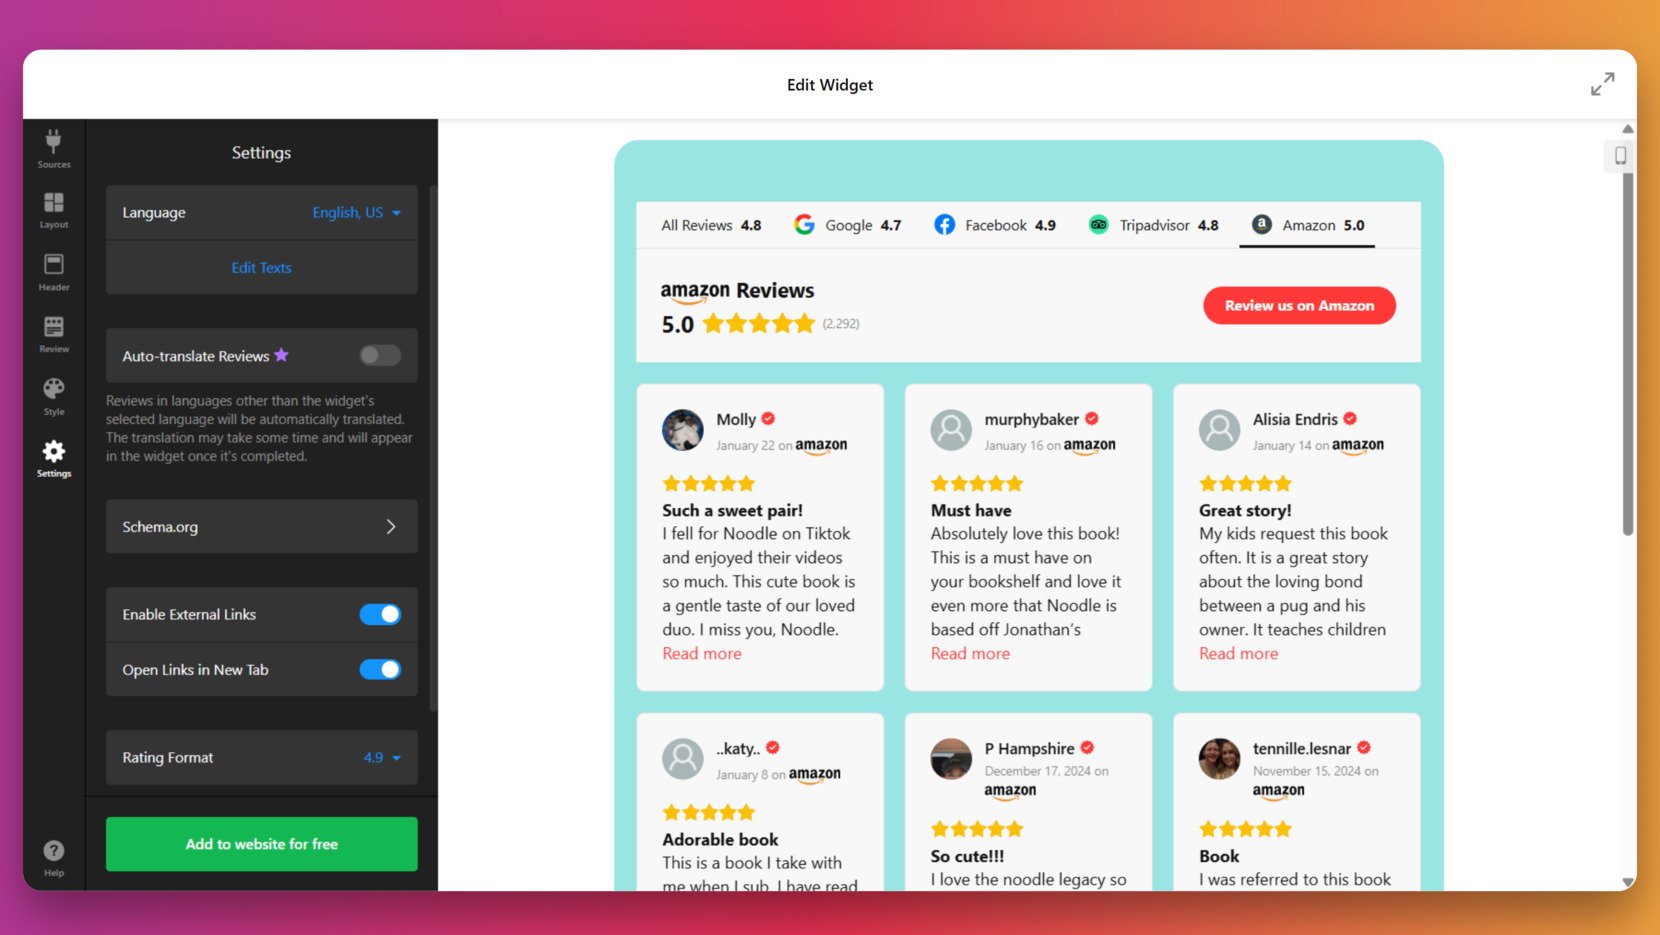
- Finalize the Widget’s Settings. Adjust settings like the widget’s language, enable external links, and rating format. You can also set auto-translation for your reviews.
- Publish and Copy the Code. Once ready, hit “Publish” and copy the generated embed script. Paste this into your website’s HTML code wherever you want the review widget to appear.


That’s it! Your HTML star rating widget is now live and automatically pulls in fresh reviews from connected sources — keeping your review block dynamic and always up to date.
How and Where to Embed the Reviews Code
After customizing your HTML reviews widget in Elfsight, the final step is to embed it into your website. Below you’ll find clear options for inserting the widget via raw HTML or on popular website builders like WordPress, Squarespace, Webflow, Shopify, and BigCommerce.
- Raw HTML: Copy the provided embed code and paste it directly into the HTML of any page. Place it within a <div> tag inside the <body> to ensure it loads correctly.
- WordPress: Go to the dashboard, open the target page in the block editor, add a “Custom HTML” block, and paste the widget code. Update the page to publish your HTML star rating plugin.
- Squarespace: Use a “Code” block on any page. Open the editor, click “+”, choose “Code”, and insert the embed script into the block. Confirm and save your changes.
- Webflow: Navigate to the Designer view, drag in an “Embed” component, and paste the HTML code. Publish the project to activate the feedback display on your live website.
- Shopify: From the admin panel, go to “Online Store” → “Themes” → “Edit Code”. Choose the desired template (like product.liquid or index.liquid), paste the embed code, then save and preview.
- BigCommerce: In the “Storefront” → “Web Pages” section, open the page for editing, switch to HTML mode, and insert the code. Save and publish the updated content.
To get the most out of your review widget, place it where it drives the most user engagement. Here are the most effective spots to consider:
- Homepage above the fold. Grab attention with social proof right when users land on your website.
- Product pages under the description. Reinforce purchase decisions with authentic customer feedback.
- Checkout pages. Add trust near key decision points to reduce hesitation and cart abandonment.
- Dedicated testimonials page. Showcase all reviews in a clean, organized layout for deep validation.
- Sidebar or sticky sections. Keep positive feedback visible while users scroll through content.
Now that you’ve integrated the widget, let’s look at how you can also create your own star rating display manually with HTML and CSS if you ever need a static version or a backup styling option.
Writing HTML Star Rating Code Manually
If you prefer building your review elements from scratch and want complete control over layout and design, it’s possible to create a feedback widget using plain HTML and CSS. This method is ideal for developers or users comfortable with editing raw code and working within their website’s existing structure.
Below is a detailed step-by-step guide to manually building a simple, clean rating block that includes visual stars, a numeric score, and a text review — all without relying on any third-party tools or libraries.
- Create a container for the rating block. Use a <section> or <div> element to house your custom star rating block. This will help encapsulate your layout and apply scoped styles without affecting other page elements.
- Insert static star icons using Unicode. Add five <span> tags, each containing the Unicode star character. Apply a class like .filled to indicate which stars should appear active based on your rating (e.g., 4 out of 5).
- Display a numeric rating value. Add a label or number (like “4.0/5”) beside the stars using a separate <span> element. This reinforces the visual rating stars layout with clear numeric context for better clarity.
- Add customer feedback and supporting details. Beneath the star display, insert the review text and optionally include the reviewer’s name or a short title for the feedback. This helps simulate a realistic client review section.
- Style the block using CSS. Customize the size, color, spacing, and alignment of your stars and text. Use distinct colors for filled vs. unfilled stars and ensure the block fits seamlessly into your website’s layout.
- Position the block on your page. Add this HTML to any relevant section of your website such as a testimonials area, product page, or service description. Adjust container padding and max-width to ensure good visual balance.
Here’s a full working example of how your HTML and CSS might look:
<section class="review-block">
  <h4>Customer Rating</h4>
  <div class="stars">
    <span class="star filled">★</span>
    <span class="star filled">★</span>
    <span class="star filled">★</span>
    <span class="star filled">★</span>
    <span class="star">★</span>
    <span class="rating-number">4.0/5</span>
  </div>
  <p>“Very helpful service and smooth support!”</p>
  <span class="reviewer-name">— Jane M.</span>
</section>

<style>
  .review-block {
    max-width: 400px;
    padding: 16px;
    border: 1px solid #e0e0e0;
    border-radius: 8px;
    font-family: Arial, sans-serif;
  }

  .stars {
    display: flex;
    align-items: center;
    gap: 4px;
    margin-bottom: 8px;
  }

  .star {
    font-size: 24px;
    color: #ccc;
  }

  .star.filled {
    color: #ffc107;
  }

  .rating-number {
    margin-left: 8px;
    font-weight: bold;
    font-size: 16px;
  }

  .reviewer-name {
    display: block;
    margin-top: 4px;
    color: #666;
    font-size: 14px;
  }
</style>
Manually creating a feedback display gives you full control but requires careful upkeep and design alignment. In the next section, we’ll compare the two discussed methods: using the generator and the manual approach.
HTML Review Generator vs Manual Coding
Both manual coding and visual generators can display a HTML star rating feature on your website, but they offer very different workflows and outcomes. Below is a practical comparison between the two approaches:
| Feature | Manual Coding | Using a Generator |
|---|---|---|
| Setup Speed | Requires hours of writing and testing code | Build and publish in minutes with a visual editor |
| Ease of Use | Requires HTML/CSS skills | No coding knowledge needed |
| Design Consistency | Must be manually optimized for devices | Pre-optimized and responsive by default |
| Customization | CSS must be edited manually | Colors, fonts, and layout adjusted visually |
| Error Risk | High (e.g., syntax issues, mobile bugs) | Low (validated and tested code) |
| Maintenance | Manual updates required for every change | Centralized updates apply instantly everywhere |
| Content Updates | Reviews must be updated manually | Auto-sync from connected sources |
| Platform Integration | Requires layout tweaking per platform | Embed-ready for WordPress, Shopify, Webflow, etc. |
As the table shows, a generator removes the pain points of manual coding by offering a streamlined, error-free, and scalable way to manage your feedback widget.
- Speed and consistency. With a generator, you can launch a polished HTML star rating system without writing a line of code.
- Professional design with zero risk. All styling is handled through a visual interface and mobile responsiveness is built-in.
- Set it once, update anywhere. From syncing reviews to styling updates, everything is handled centrally without re-embedding code.
For most users — especially those managing multiple pages or platforms — a review code generator like Elfsight is the smarter long-term solution. Next, let’s go over what issues you may run into during the creation process and how to solve them.
Troubleshooting Issues
Even though embedding a review widget is simple, users may occasionally face technical challenges after inserting the code. Below are common problems and quick solutions.
Why is the widget not appearing after I paste the code?
body of your page. If using a builder like WordPress or Squarespace, ensure you’re using a code block or custom HTML section. Also confirm that no browser extensions, script blockers, or content security policies are interfering with external scripts.
Why does the widget look broken or misaligned on mobile devices?
How do I fix styling conflicts with my website CSS?
div, span, or p, they may unintentionally affect the star rating feature. To avoid this, place the widget inside a dedicated container with a unique class (e.g., .review-wrapper) and limit inherited styles using scoped selectors.
Why are the fonts or colors different from what I selected in the editor?
What if the widget doesn’t update after I change it in Elfsight?
Understanding these typical issues can help you avoid unnecessary frustration and get your testimonials in HTML and CSS running smoothly. If you’ve resolved all technical concerns, you’re ready to wrap up and see how everything comes together.
Final Thoughts
Creating a strong HTML review block is one of the most effective ways to showcase social proof and build trust on your website. Whether you choose to use a manually coded layout or a visual generator, embedding a professional-looking feedback widget helps you highlight real customer experiences in a structured, attention-grabbing format.
For most users, a visual solution like Elfsight provides the fastest, cleanest, and most reliable way to deploy a testimonial showcase. It ensures design consistency, saves hours of manual effort, and lets you focus on what matters — delivering value to your audience. With features like auto-syncing, layout presets, and responsive design, Elfsight makes managing your HTML star rating widget a hands-off, stress-free experience.
Looking for More Guidance?
We hope this walkthrough gave you everything you need to confidently add reviews to your website. If you’d like help building the perfect review solution, contact us — our team is here to support you every step of the way. At Elfsight, we’re committed to providing intuitive, no-code widgets that help your business grow online.
Want to share ideas or request a feature? Join our Community to connect with others, give feedback, and add your voice to the Wishlist — we’d love to hear from you.