Adding audio to a website can enhance the user experience, boost engagement, and make your content more interactive. Whether it’s background music, podcasts, or sound effects, knowing how to use the HTML audio player code generator is the first step toward creating an immersive environment for your visitors.
If you’ve ever wondered how to add sound in HTML without writing complex code or dealing with compatibility issues, this is exactly what you need. A user-friendly audio player generator can solve those problems while giving you full control over how your music or audio content is presented.
- Creates a richer user experience. Sound adds an emotional layer — whether it’s music, voice, or ambient audio — making your content more immersive and memorable.
- Keeps visitors engaged longer. Background tracks or spoken messages can encourage users to stay on your pages and explore more content.
- Strengthens your brand identity. Custom audio — like branded jingles, voiceovers, or curated playlists — helps establish a distinctive tone and style.
- Enables passive content consumption. Visitors can listen while browsing, reducing cognitive fatigue and increasing interaction time without demanding full attention.
This makes a sound widget ideal for content creators, online stores, educators, and anyone looking to upgrade their website with rich audio features. Let’s move on to how you can make your own custom HTML audio player in just a few clicks.
Get Audio Player HTML Code Quickly
Now that you know why sound integration is valuable, let’s quickly walk through how to create an audio player for your website using Elfsight. It’s a straightforward process that requires no coding and gives you a ready-to-use audio HTML code for embedding.
- Open the Elfsight editor and choose a template that fits your needs.
- Upload your audio files or add external sound links to build your playlist.
- Customize the layout, colors, fonts, and playback controls to match your website’s style.
- Click “Add to website for free“, copy the code, and paste it into your website’s HTML section.
Ready to try the widget? Build your own Audio Player in 1-2-3!
Features of Elfsight’s Music Player
Elfsight offers everything needed to fully customize and manage how audio looks and behaves on your website. Below are the standout features that make this solution both flexible and powerful:
- Support for multiple audio formats. Upload and stream MP3, OGG, and other common formats without compatibility issues across browsers.
- Stylish, ready-made templates. Pick from pre-designed layouts that look great out of the box and adjust them as needed.
- Full design control with CSS styling. Easily match the audio player to your website by adjusting spacing, colors, buttons, and fonts — no code required.
- Responsive audio playback. The widget adapts automatically to all screen sizes, maintaining usability and design integrity on any device.
- Playlist support with flexible sorting. Add multiple tracks and reorder them with ease, offering full playlist capabilities in a single player.
- Autoplay, loop, and volume controls. Decide how your audio behaves on load and let users adjust settings to their preference.
These features make your music embed or interactive audio element a seamless part of the user experience. Next, let’s walk through a detailed setup and installation process so you can publish your player without missing on its full capabilities.
Using Music Code Generator: Detailed Guide
Now that you know the key features of the widget, let’s walk through a complete setup of the Elfsight Audio Player widget. This step-by-step guide covers everything from template selection to installation. You’ll be able to customize the look, behavior, and functionality of your audio player in just a few minutes — no coding required.
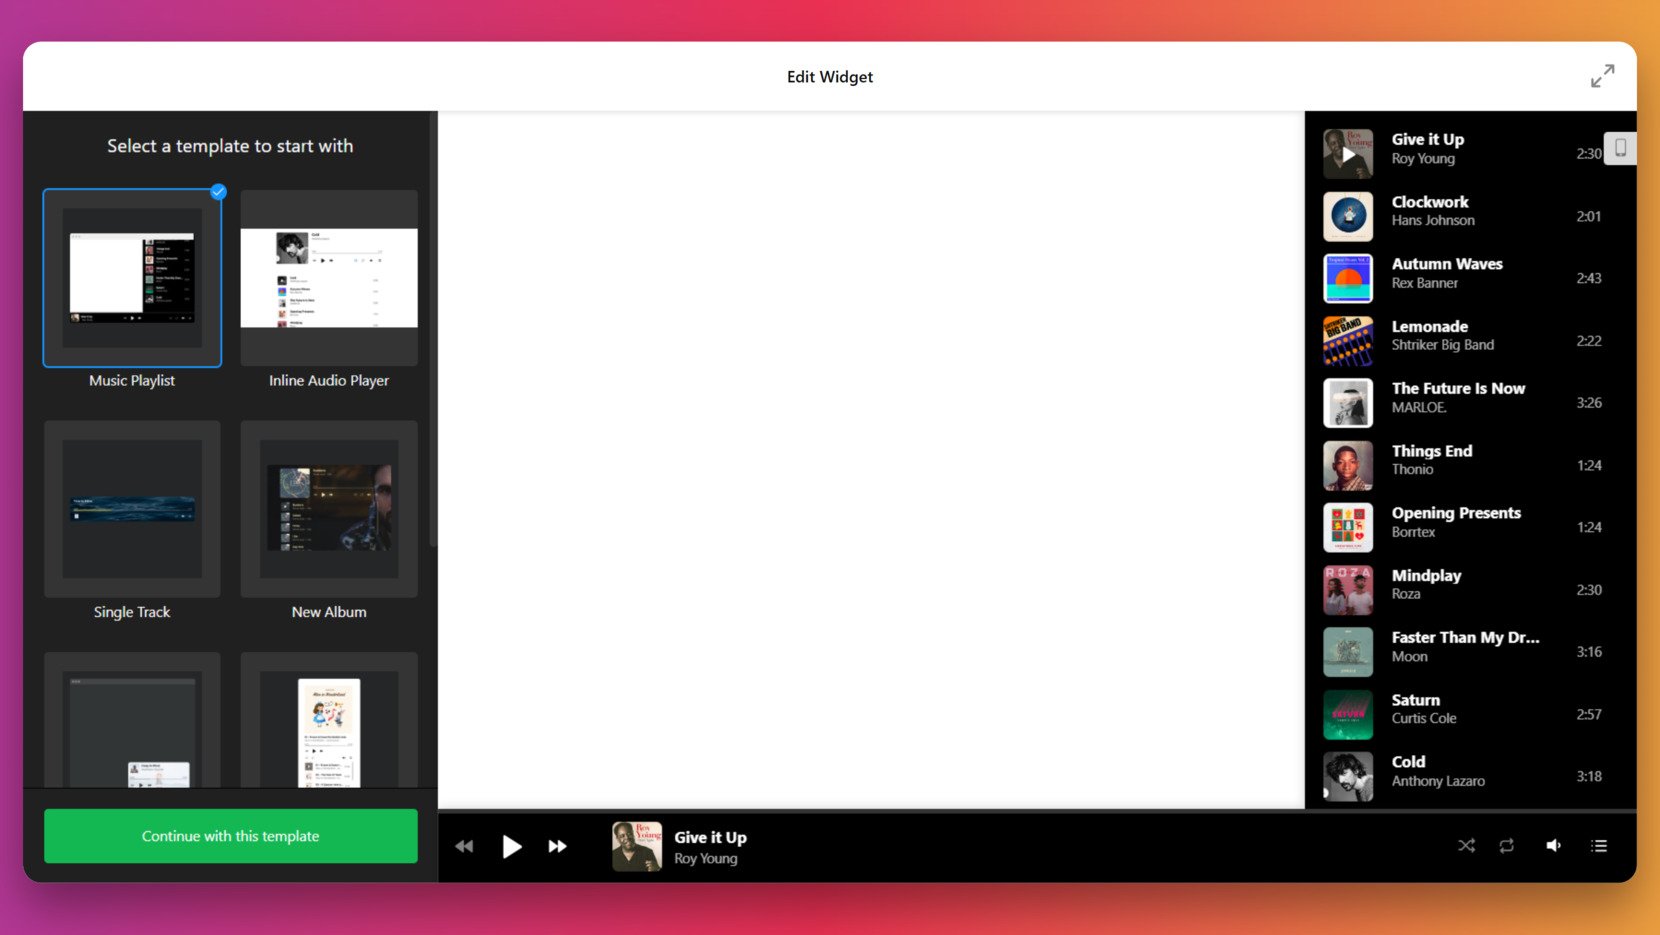
- Select a template. Open the editor and choose a template that fits your needs. Once selected, click “Continue with this template”.

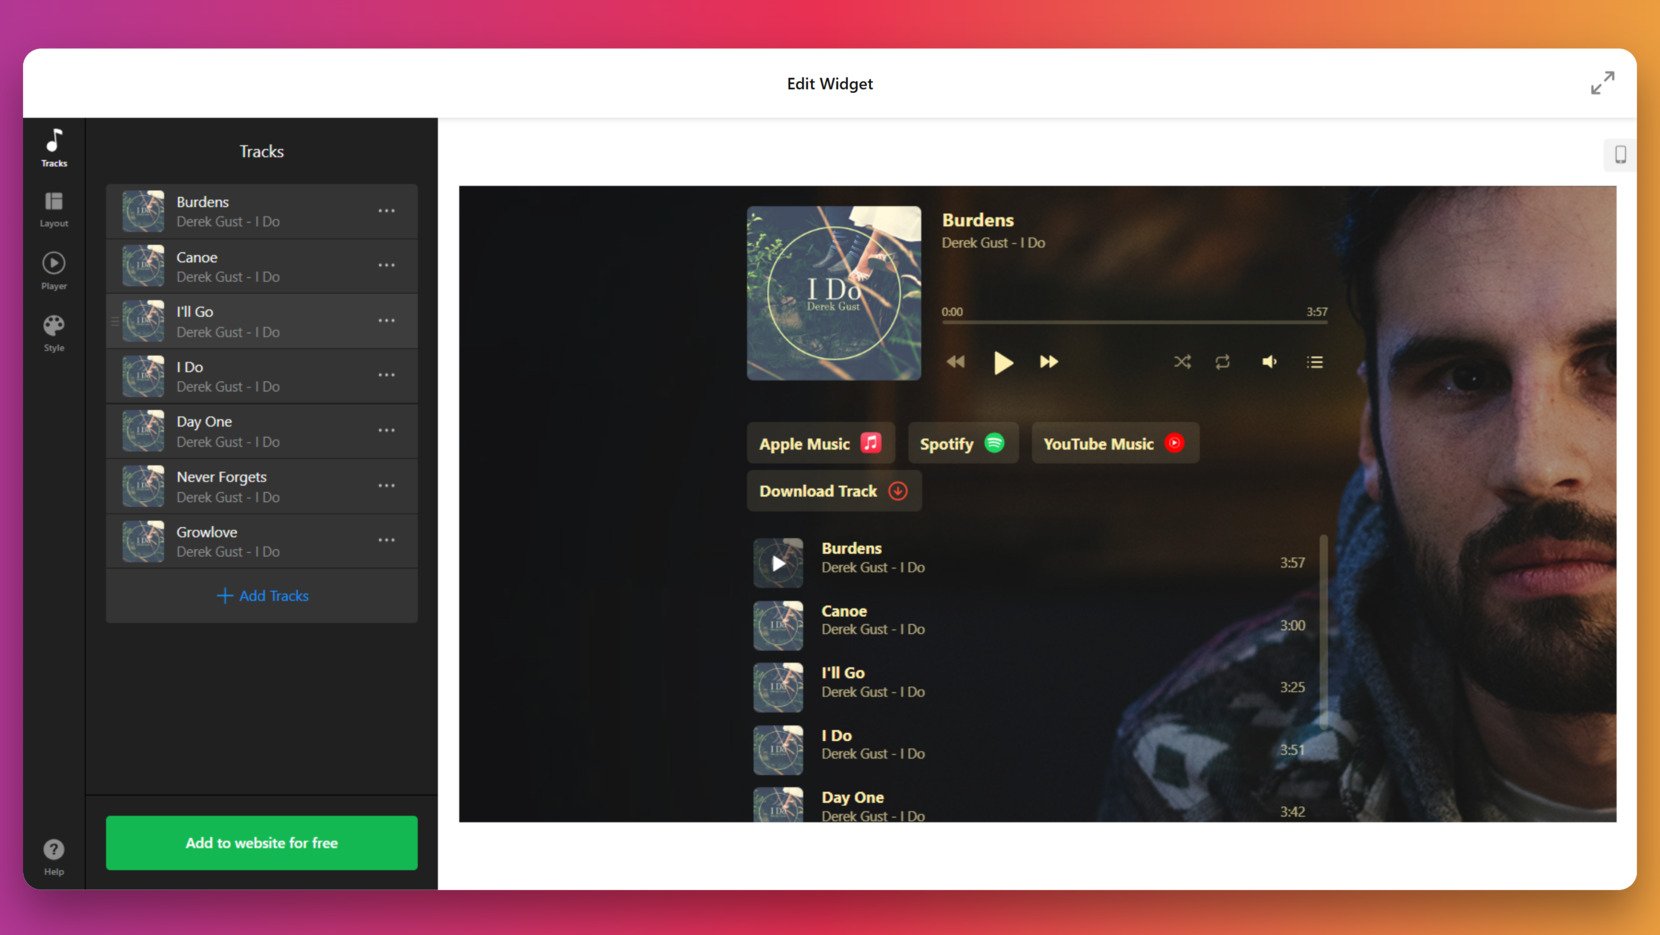
- Add your tracks. In the “Tracks” tab, upload your audio files and organize them into a playlist. You can edit or rearrange tracks anytime, giving you full control over your tracklist customization.
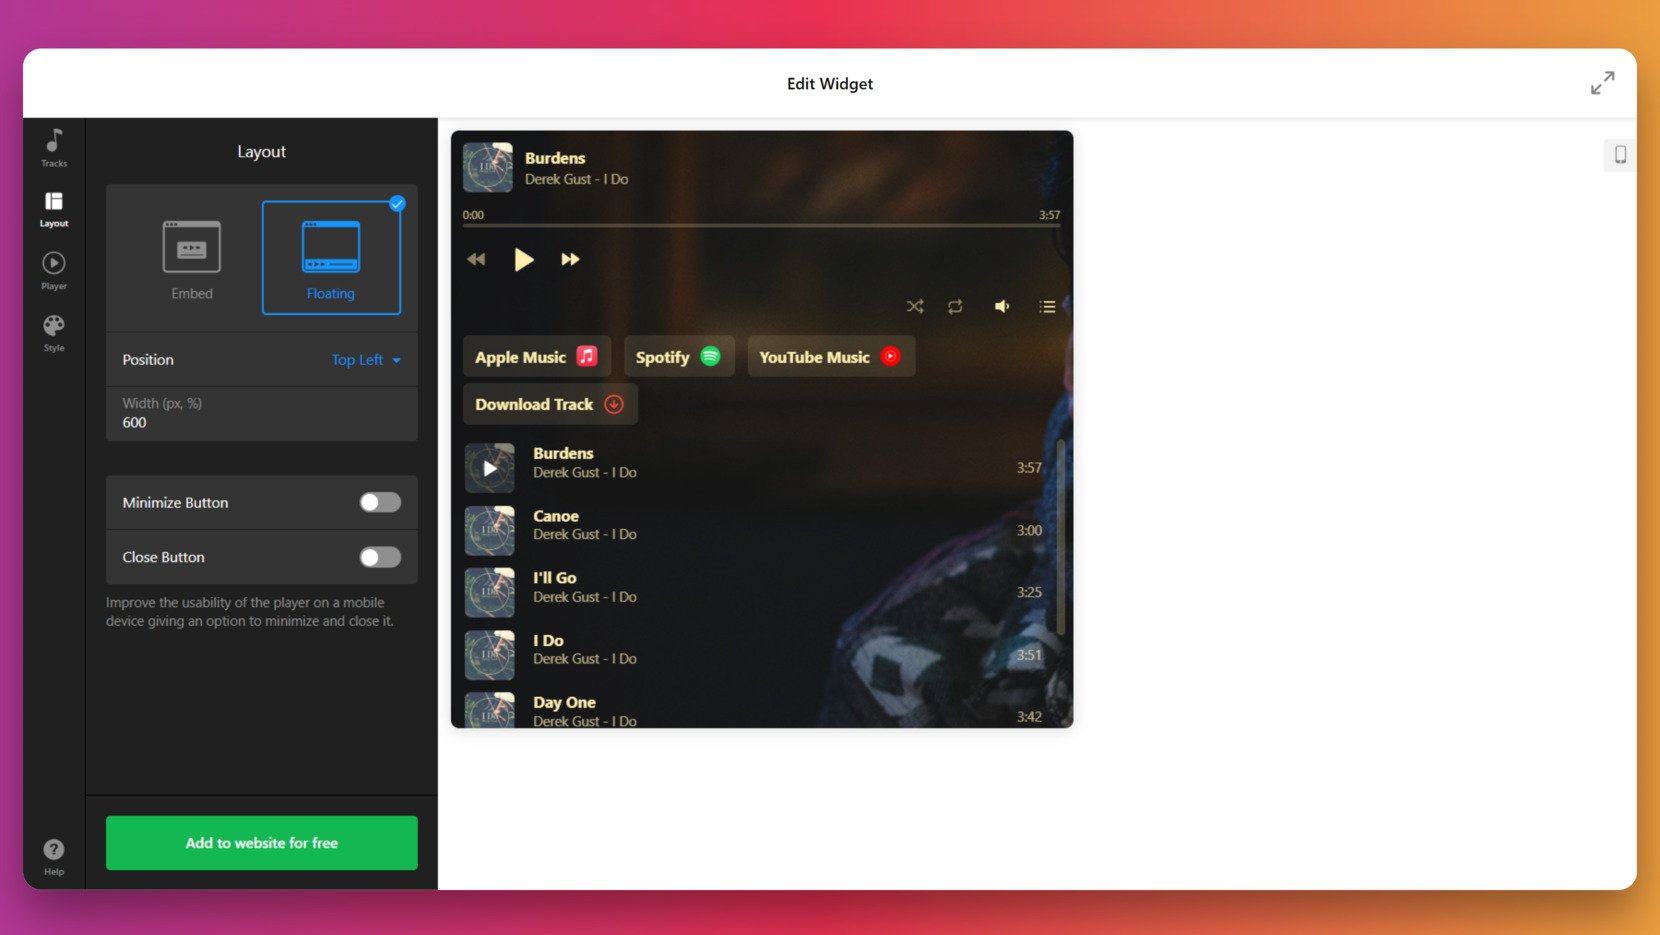
- Configure layout options. Open the “Layout” tab to choose between an embedded or floating layout. Adjust position, width, and enable minimize or close buttons for mobile usability.
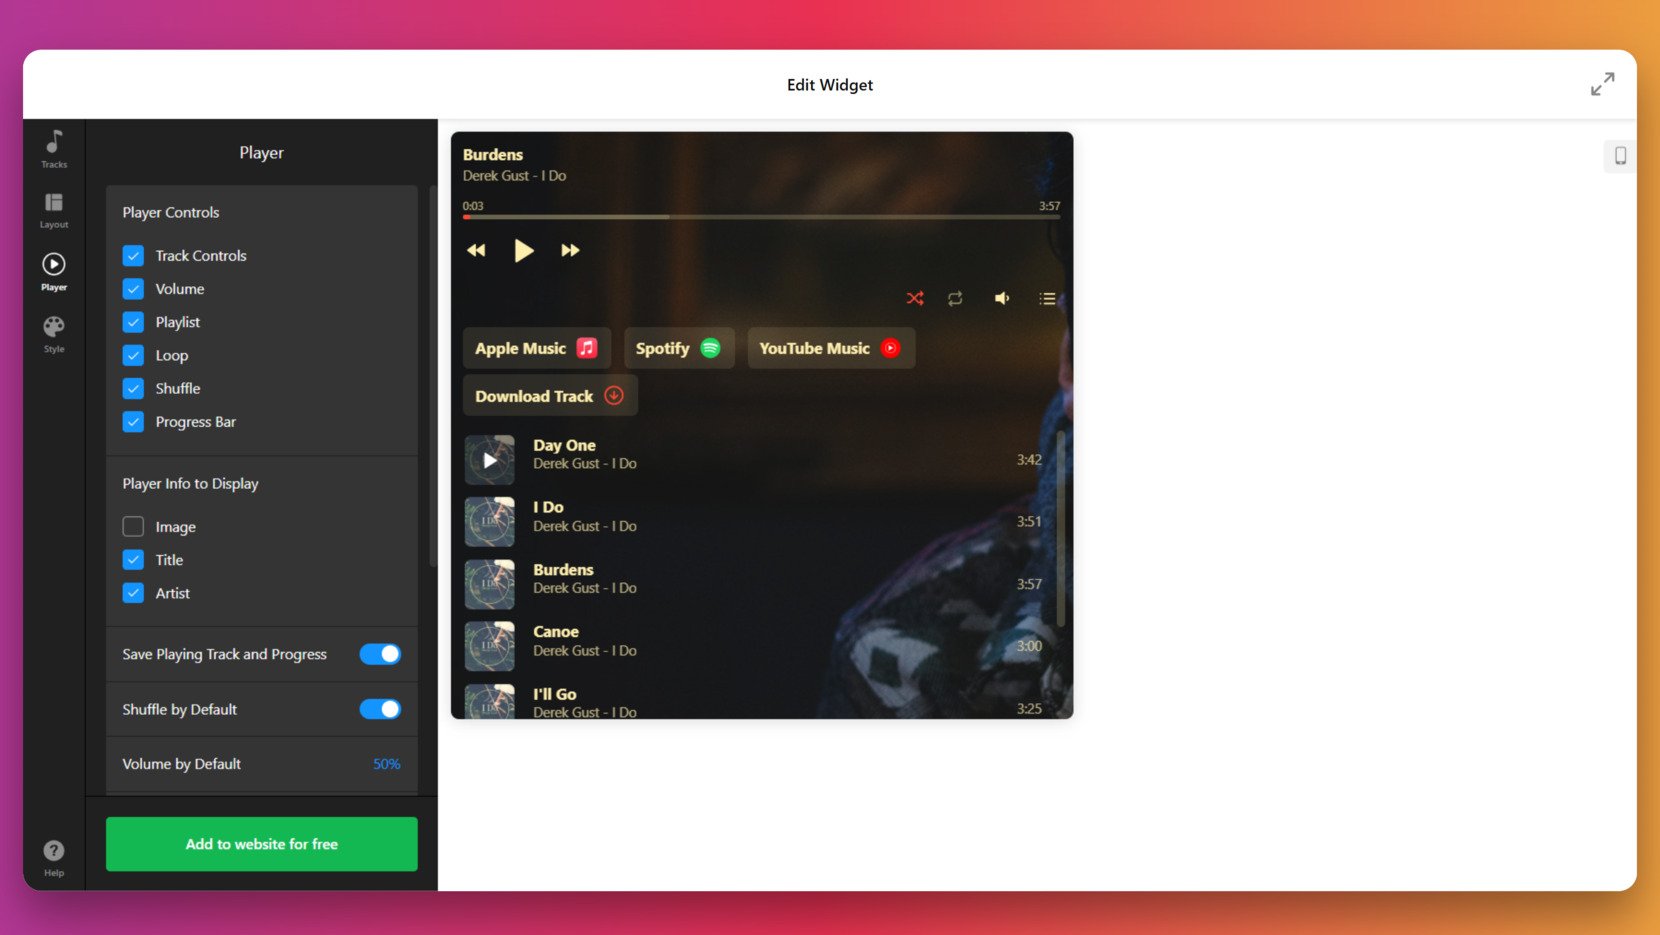
- Adjust the player’s settings. Under the “Player” tab, toggle options like volume control, playlist visibility, loop, shuffle, and track progress. You can also display track image, title, and artist info.
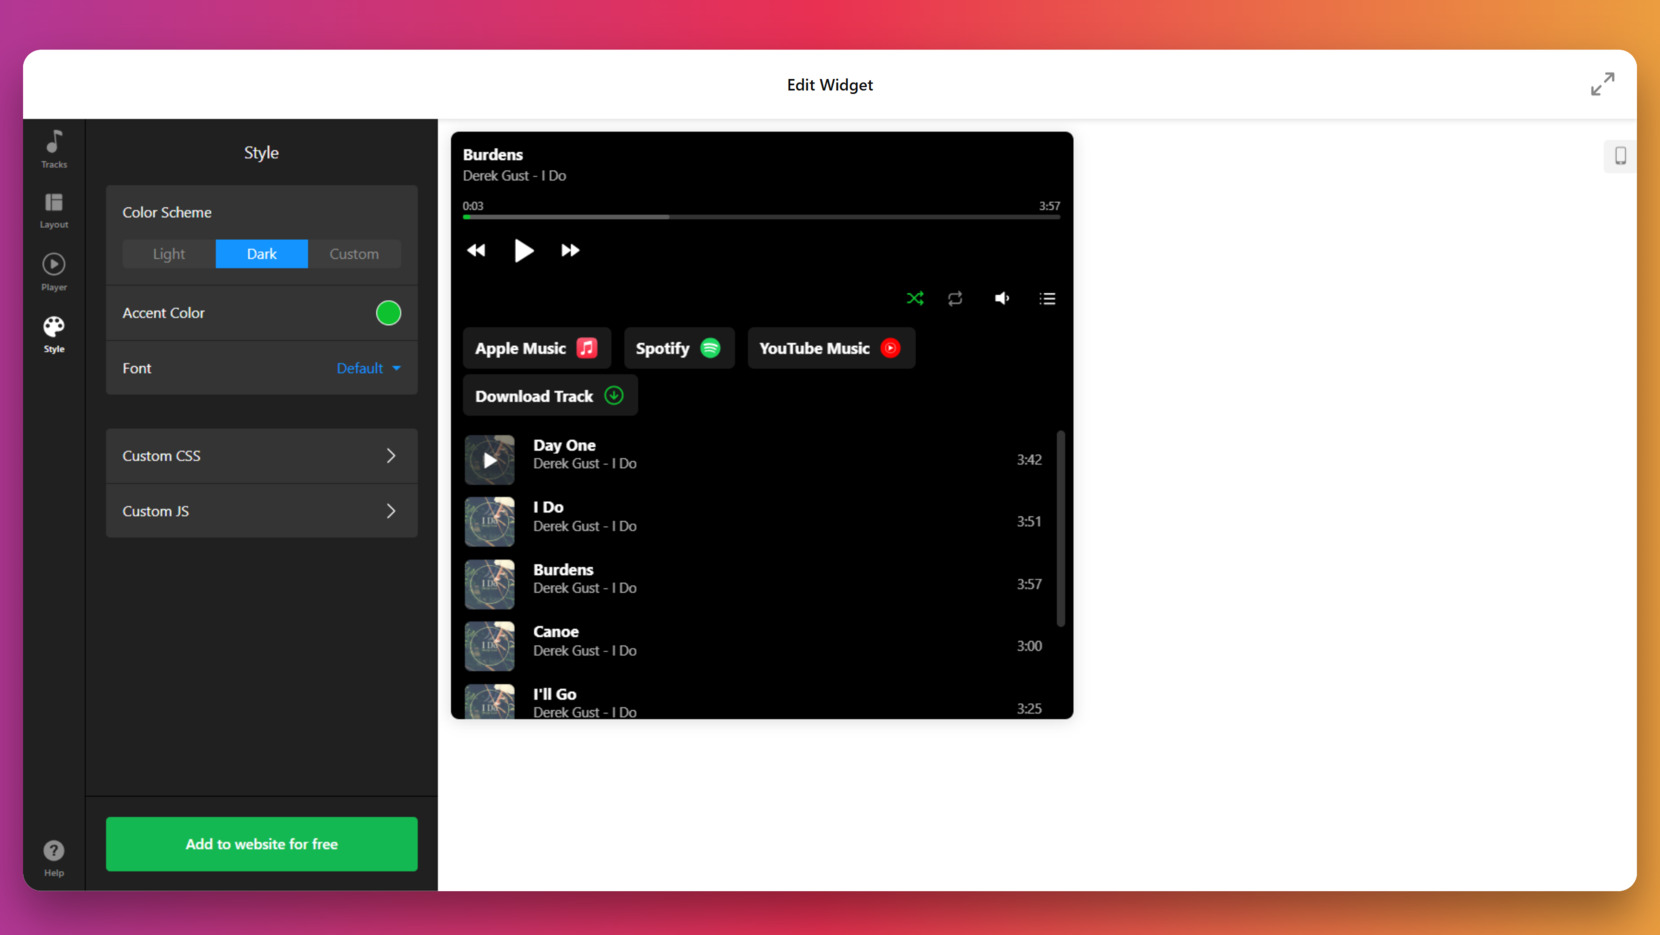
- Style the widget. Go to the “Style” section to select a light, dark, or custom color scheme. Modify the accent color, font style, and apply additional CSS/JS if needed for deeper customization.
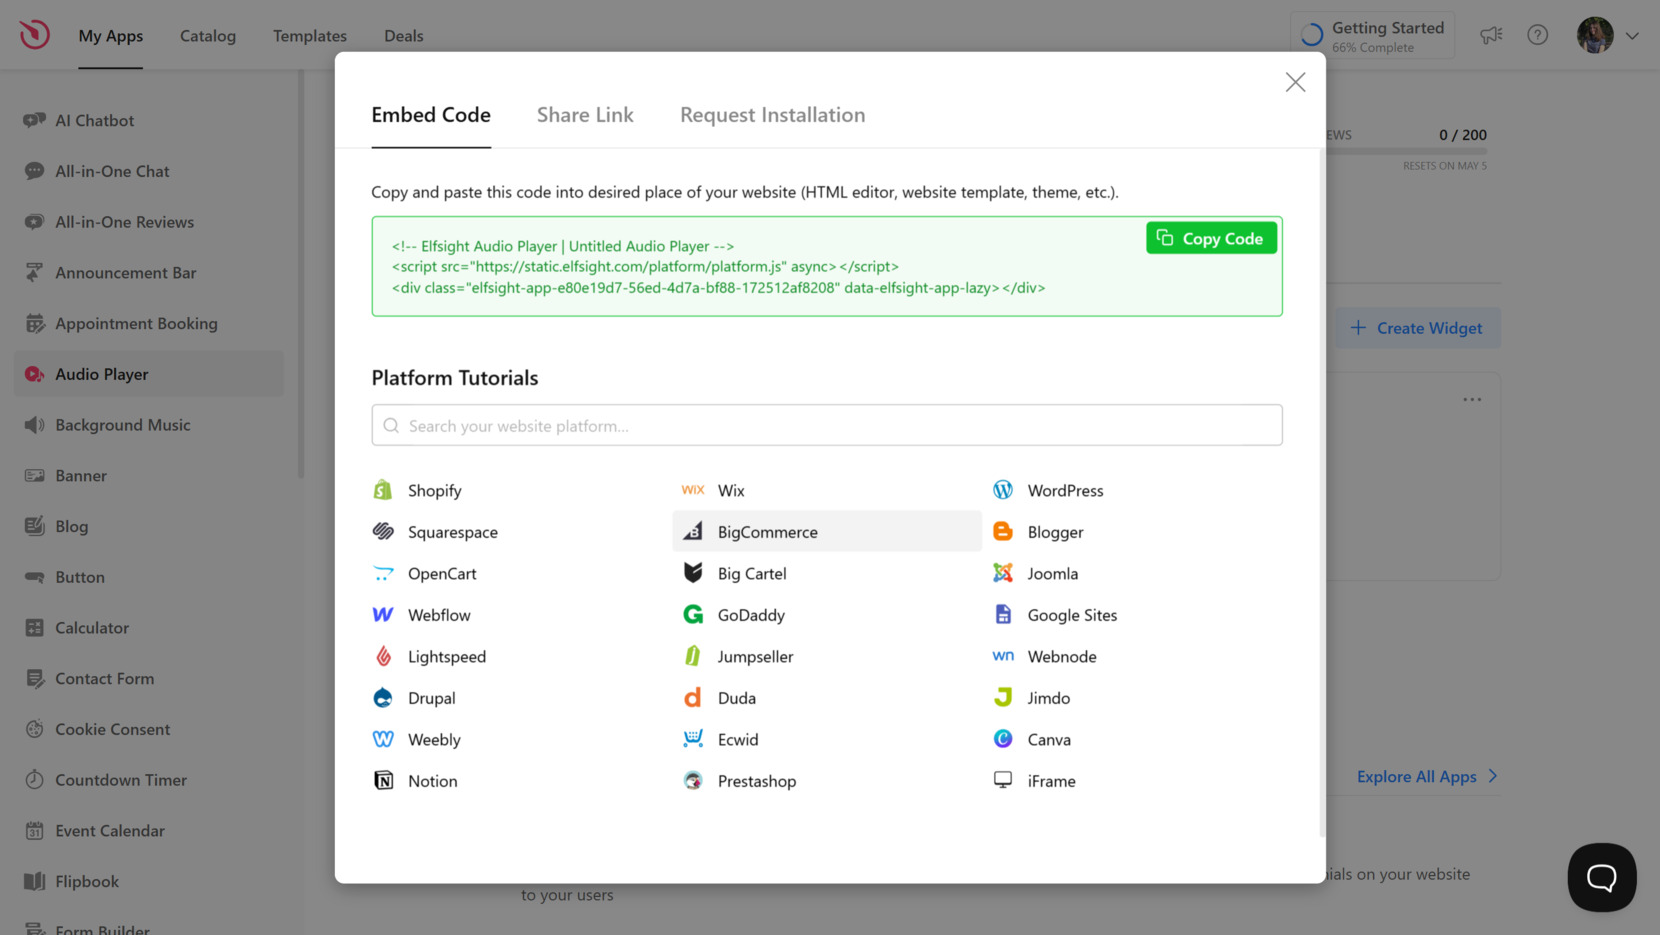
- Embed the widget on your website. Click “Add to website for free” to get your embed code. Copy the generated code and paste it into the HTML section of your website. Platform-specific tutorials are available for WordPress, Shopify, Webflow, Squarespace, and more.
This streamlined setup gives you full creative freedom while keeping the process beginner-friendly. In just a few steps, you’ll have a fully functional and stylish audio player live on your website.
Where and How to Embed Your Web Playlist
Once your HTML audio widget is ready, embedding it into your website is easy. Whether you’re working with raw HTML or a content management platform, Elfsight provides a simple process for integrating the music playlist code into any page layout.
- Raw HTML embedding. Copy the generated embed code from Elfsight and paste it into your website’s HTML editor. Place it within the <body> section where you want the player to appear. For example, below your content or inside a dedicated audio section.
- WordPress. Use a Custom HTML block in Gutenberg or paste the code into your theme’s HTML via “Appearance” → “Widgets” or “Customize”. For Elementor users, insert it using the HTML widget.
- Webflow. Drag and drop the Embed element to your desired section and paste the Elfsight code into the HTML field. Publish changes to make the widget live.
- Squarespace. Add a “Code” content block to your page and paste the code into it. Ensure JavaScript is enabled and not blocked by security settings.
- Shopify. Go to “Online Store” → “Themes” → “Actions” → “Edit Code”, and paste the code inside a template file (e.g., product.liquid or index.liquid). Save and preview the changes.
- BigCommerce. Navigate to “Storefront” → “Web Pages” or “Script Manager”, depending on where you want it displayed. Paste the code into a Script or HTML section and apply changes.
Strategic placement matters. Here are the most effective places to insert your audio player widget:
- Homepage hero or secondary section. Perfect for featured tracks or welcome messages.
- Blog posts or podcast articles. Embed directly within content to accompany written material.
- Product pages. Useful for adding sound previews or promotional audio.
- Floating in corner positions. Ideal for background music while users browse the website.
- Footer section. A non-intrusive area for continuous playback across pages.
Once embedded, your music embed will be instantly live. In the next section, we’ll look at how to create a similar experience manually by writing HTML audio player code from scratch.
Writing HTML Code for Audio Player Manually
Creating a manual HTML audio player gives you full control over how audio content is displayed and played on your website. While this method involves a bit more effort than using a generator, it’s ideal for developers or anyone comfortable with editing code directly. You can implement custom layouts, fine-tune design elements, and keep your codebase minimal and clean — no external services or scripts needed.
The steps below guide you through building a standalone, styled audio block using HTML5 and basic inline CSS. This manual setup is great for showcasing single tracks, album previews, or audio messages, and works across all modern browsers.
- Upload your audio file to a public server. First, you need a direct link to the audio file. Upload your MP3 (or OGG/WAV) file to your hosting platform or cloud storage. Ensure it’s accessible via a public HTTPS URL, as browsers often block insecure or inaccessible content.
- Create a container element. Wrap your audio content in a <div> or <section> element. This container will allow you to apply padding, spacing, backgrounds, or layout styling to the entire audio block.
- Add the HTML5 <audio> tag. This tag enables playback functionality within the browser. Use the controls attribute so users can play, pause, or adjust volume. You may also add autoplay (to start playback automatically), loop (to repeat), or preload (to hint how the audio should load).
- Style the block with CSS. Default audio players look and behave differently in each browser. To create a unified experience, apply CSS styles to the outer container and optionally to elements like <h3> titles, cover images, and spacing. You can use inline styles for quick customization or link to an external stylesheet for better structure.
- Add supporting content. Enhance the user experience with elements like a title, artist name, or cover image. These additions help users understand what’s playing and visually tie the player to your website’s branding or content theme.
Here’s a detailed HTML snippet that includes a styled container, heading, cover image, and a working audio player:
<section style="max-width: 500px; margin: 40px auto; background: #f9f9f9; padding: 25px; border-radius: 10px; box-shadow: 0 2px 8px rgba(0,0,0,0.1);">
  <h3 style="font-family: sans-serif; font-size: 20px; margin-bottom: 10px;">Now Playing: Acoustic Chill</h3>
  <img src="https://yourdomain.com/images/cover.jpg" alt="Cover Art" style="width: 100%; max-height: 200px; object-fit: cover; border-radius: 6px; margin-bottom: 15px;">
  <audio controls style="width: 100%;">
    <source src="https://yourdomain.com/audio/acoustic-chill.mp3" type="audio/mpeg">
    Your browser does not support the audio element.
  </audio>
</section>
This structure is simple but flexible. You can remove the image, add multiple audio sources for browser fallback, or nest the player inside a larger layout. Most importantly, it gives you full freedom to decide where and how the player appears.
While this method provides fine-tuned control, it can become time-consuming when managing playlists, styling multiple players, or embedding audio across multiple pages. In the next section, we’ll compare this approach to Elfsight’s sound player code generator and explain when each one makes the most sense.
HTML Music Playlist Generator vs Manual Setup
While both manual coding and visual generators can be used to create an audio player, they differ significantly in terms of time, effort, flexibility, and long-term maintenance. Below is a detailed comparison to help you clearly see the pros and cons of each method.
| Feature | Manual Coding | Visual Generator |
|---|---|---|
| Setup Time | 30–60 minutes depending on complexity | 2–5 minutes with real-time preview |
| Technical Skills Required | Requires knowledge of HTML, CSS, and hosting setup | No coding skills needed — drag, drop, customize |
| Design Consistency | Manual styling may vary across devices | Pre-optimized and responsive by default |
| Error Risk | High — typos or structural issues may break functionality | Low — output is tested and production-ready |
| Customization Options | Highly flexible but time-consuming to implement | Extensive visual controls, instantly applied |
| Browser & Mobile Compatibility | Manually tested per browser/device | Automatically responsive and mobile-ready |
| Maintenance & Updates | Manual code edits and re-publishing required | All changes sync instantly from your dashboard |
| Reusability Across Projects | Must recreate or duplicate code each time | Easily cloned and deployed across multiple pages |
As the table shows, visual generators are designed to streamline the entire process — from setup and styling to updates and deployment. They eliminate technical friction, reduce the risk of errors, and produce reliable, high-quality results across all browsers and screen sizes.
- Generators save you hours of development time. You can build, preview, and embed your custom sound module without writing a single line of code.
- Design stays consistent across all pages. Since the layout is pre-optimized, your player will look clean and professional every time.
- Maintenance is seamless and centralized. With all edits done in the visual dashboard, you don’t need to touch your website’s codebase for updates or changes.
Generators also eliminate guesswork when styling the player. With real-time previews and intuitive toggles, there’s less trial-and-error and more time saved during setup.
In short, a music code generator is the go-to choice for anyone who values speed, simplicity, and a hassle-free experience. But even with a streamlined setup, small technical issues can occur — let’s explore how to troubleshoot those in the next section.
Troubleshooting Common Issues
Even though using a generator simplifies the setup process, you may still encounter small technical issues after embedding the audio player. This section answers common questions and provides fast solutions to help you resolve problems related to visibility, styling, and mobile responsiveness.
Why isn’t the audio player showing up on my website?
Why does the player look broken or misaligned on mobile?
Why is the player overlapping with other page elements?
The player loads, but the audio doesn’t play. What’s wrong?
How do I fix design conflicts with my website’s CSS?
Can I reposition the floating player if it covers content?
Most of these issues are easy to fix with small adjustments to layout or embed settings. If problems persist, Elfsight’s editor and documentation provide platform-specific guidance. In the final section, we’ll recap the benefits of using an audio player generator and reinforce why it’s a smart choice for website owners.
Final Thoughts
Whether you’re building a background playlist, highlighting a podcast, or integrating music into your content, learning how to add sound in HTML is a useful skill. But for most website owners, using a visual generator offers a faster, cleaner, and more reliable way to add audio content without worrying about code. Elfsight’s Audio Player combines ease of use with professional design, helping you deliver a polished sound widget in minutes.
Compared to manual methods, a generator simplifies every step — from layout customization and styling to responsive behavior and ongoing updates. With just a few clicks, you can create a web audio block that works seamlessly across devices, integrates into your design, and updates effortlessly through a central dashboard. If you want to offer an interactive listening experience without the technical burden, a music embed generator is the way to go.
Looking for More Help?
We hope this article gave you everything you need to get started with your audio player. If you have questions or want tailored guidance, feel free to reach out to us — we’re here to help you build powerful, no-code audio widgets with ease. Elfsight is committed to making website integration as seamless and intuitive as possible.
Be sure to explore our Community to exchange ideas with others, and if there’s a feature you’d like to see in the future, we’d love your input on our Wishlist. Your feedback shapes what we build next.