Ensuring your WordPress website is accessible isn’t just a matter of ethics — it’s becoming a legal and user-experience standard. With more users relying on assistive technologies to browse the web, making your website ADA compliant helps ensure no visitor is left behind.
If you’re running a business, blog, or any kind of public-facing platform on WordPress, integrating an accessibility feature is exactly what you need. It enhances usability, improves compliance with laws, and shows your audience that you care about inclusivity.
- Boosts usability for all visitors. An accessible design supports keyboard navigation, screen readers, and visual enhancements for better interaction across the board.
- Reduces legal risk and improves compliance. Meeting ADA and WCAG standards helps you avoid potential lawsuits or fines associated with inaccessible digital content.
- Improves SEO and organic reach. Search engines favor accessible websites thanks to better structure, content clarity, and improved user engagement.
- Supports brand reputation and inclusivity. Showing commitment to accessibility reflects positively on your brand and builds trust among diverse audiences.
Understanding the importance of ADA compliance is the first step. Now let’s look at how you can quickly implement an inclusive interface on your WordPress website — even without coding skills.
Make WordPress Website ADA Compliant: Quick Guide
Now that you understand why accessibility matters, let’s look at how easily you can implement it. Using an assistive compliance widget offered by Elfsight, you can quickly create and customize an accessibility feature without any technical skills.
- Open the Elfsight editor and select a widget template.
- Perform an accessibility scan on your website whenever needed.
- Adjust the widget’s configuration, including placement, language, and additional options.
- Hit “Add to website for free”, copy the generated code, and insert it into your website.
See how easy it is – create your own accessibility widget now!
Features of Elfsight’s Accessibility Widget
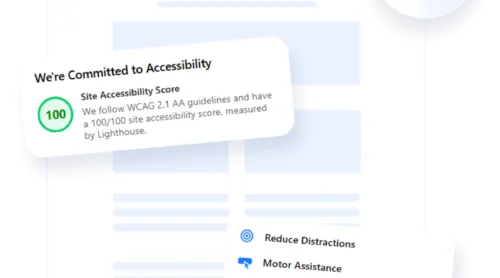
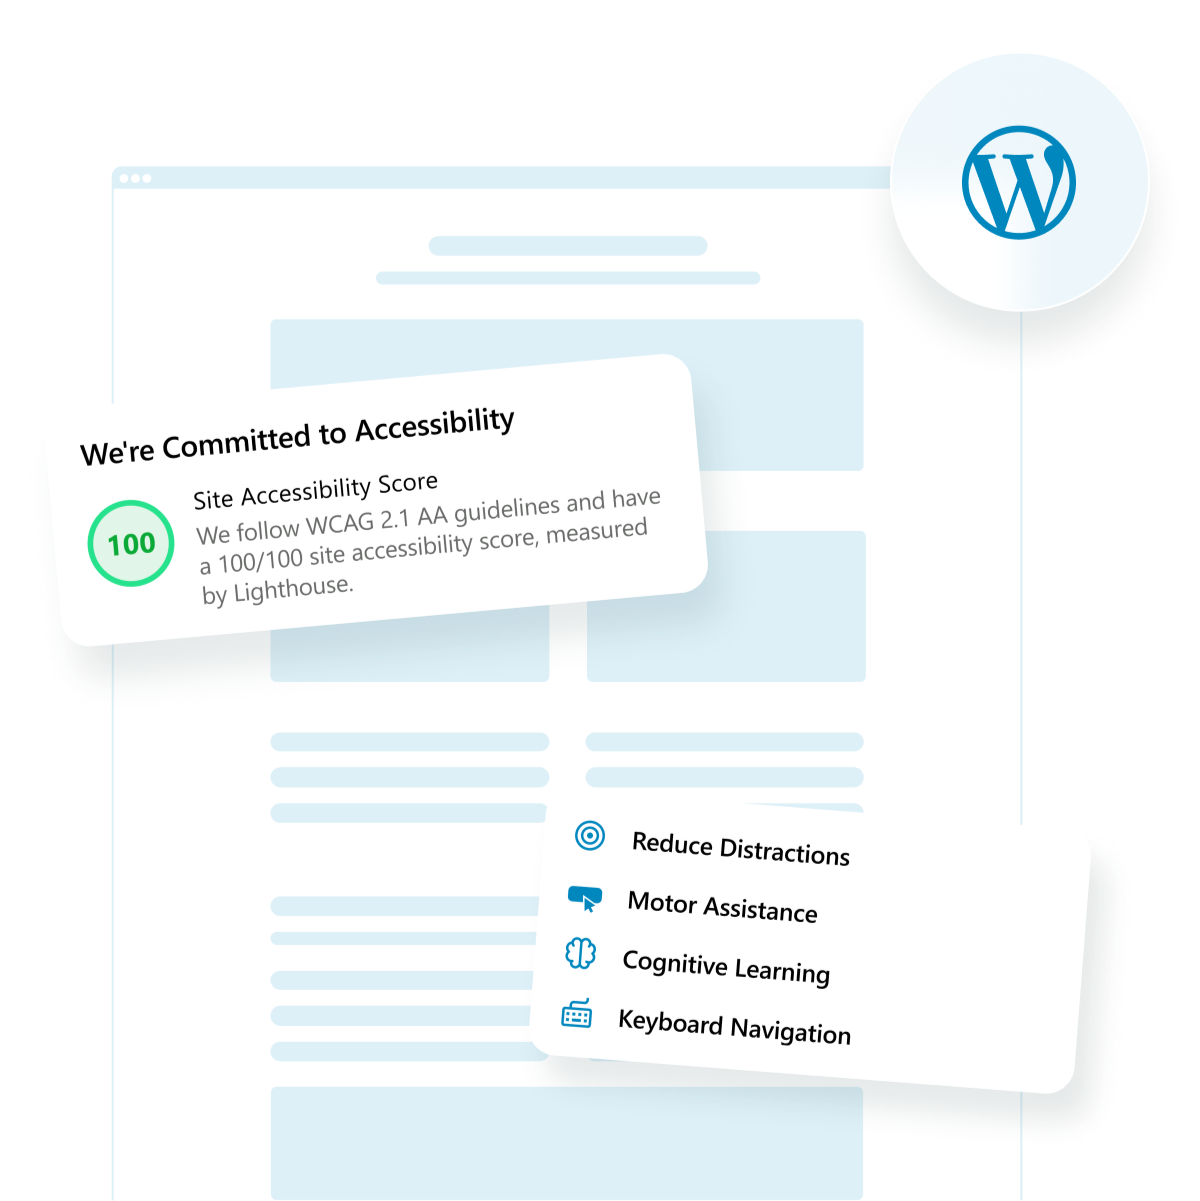
After creating your accessibility feature, it’s time to understand why this solution stands out. Elfsight’s widget is designed to cover key accessibility needs with a powerful set of features that enhance user experience and help ensure ADA web compliance.
- Screen reader optimization. Automatically supports screen readers to help visually impaired users interact with your content clearly and effectively.
- Font size and spacing controls. Visitors can adjust font size, line height, and letter spacing for better readability.
- Color contrast and dark mode toggles. Improve text visibility with high-contrast modes and customizable background settings.
- Keyboard navigation improvements. Ensure smooth navigation for users relying on keyboards or alternative input devices.
- Distraction reduction options. Features like reading guides and hiding media elements help users stay focused on content.
- Localization and multi-language support. Serve users in different regions with automatic or manual language settings.
- Preset accessibility profiles. Enable quick adjustments for specific conditions such as epilepsy, low vision, or ADHD.
These built-in options allow any visitor to personalize their experience in just a few clicks. Whether someone needs higher contrast, larger text, or simplified layouts, the widget delivers seamless accessibility adjustments on demand.
Now, let’s go deeper and walk through the full setup process for adding this feature to your WordPress website.
Full Guide: Add ADA Compliance to WordPress
To fully enable ADA compliance on your WordPress website, you’ll need to create and install the accessibility feature using Elfsight’s intuitive widget builder. Below is a step-by-step walkthrough based on the widget’s setup interface, covering everything from template selection to embedding the final code.
Here’s the step-by-step guide:
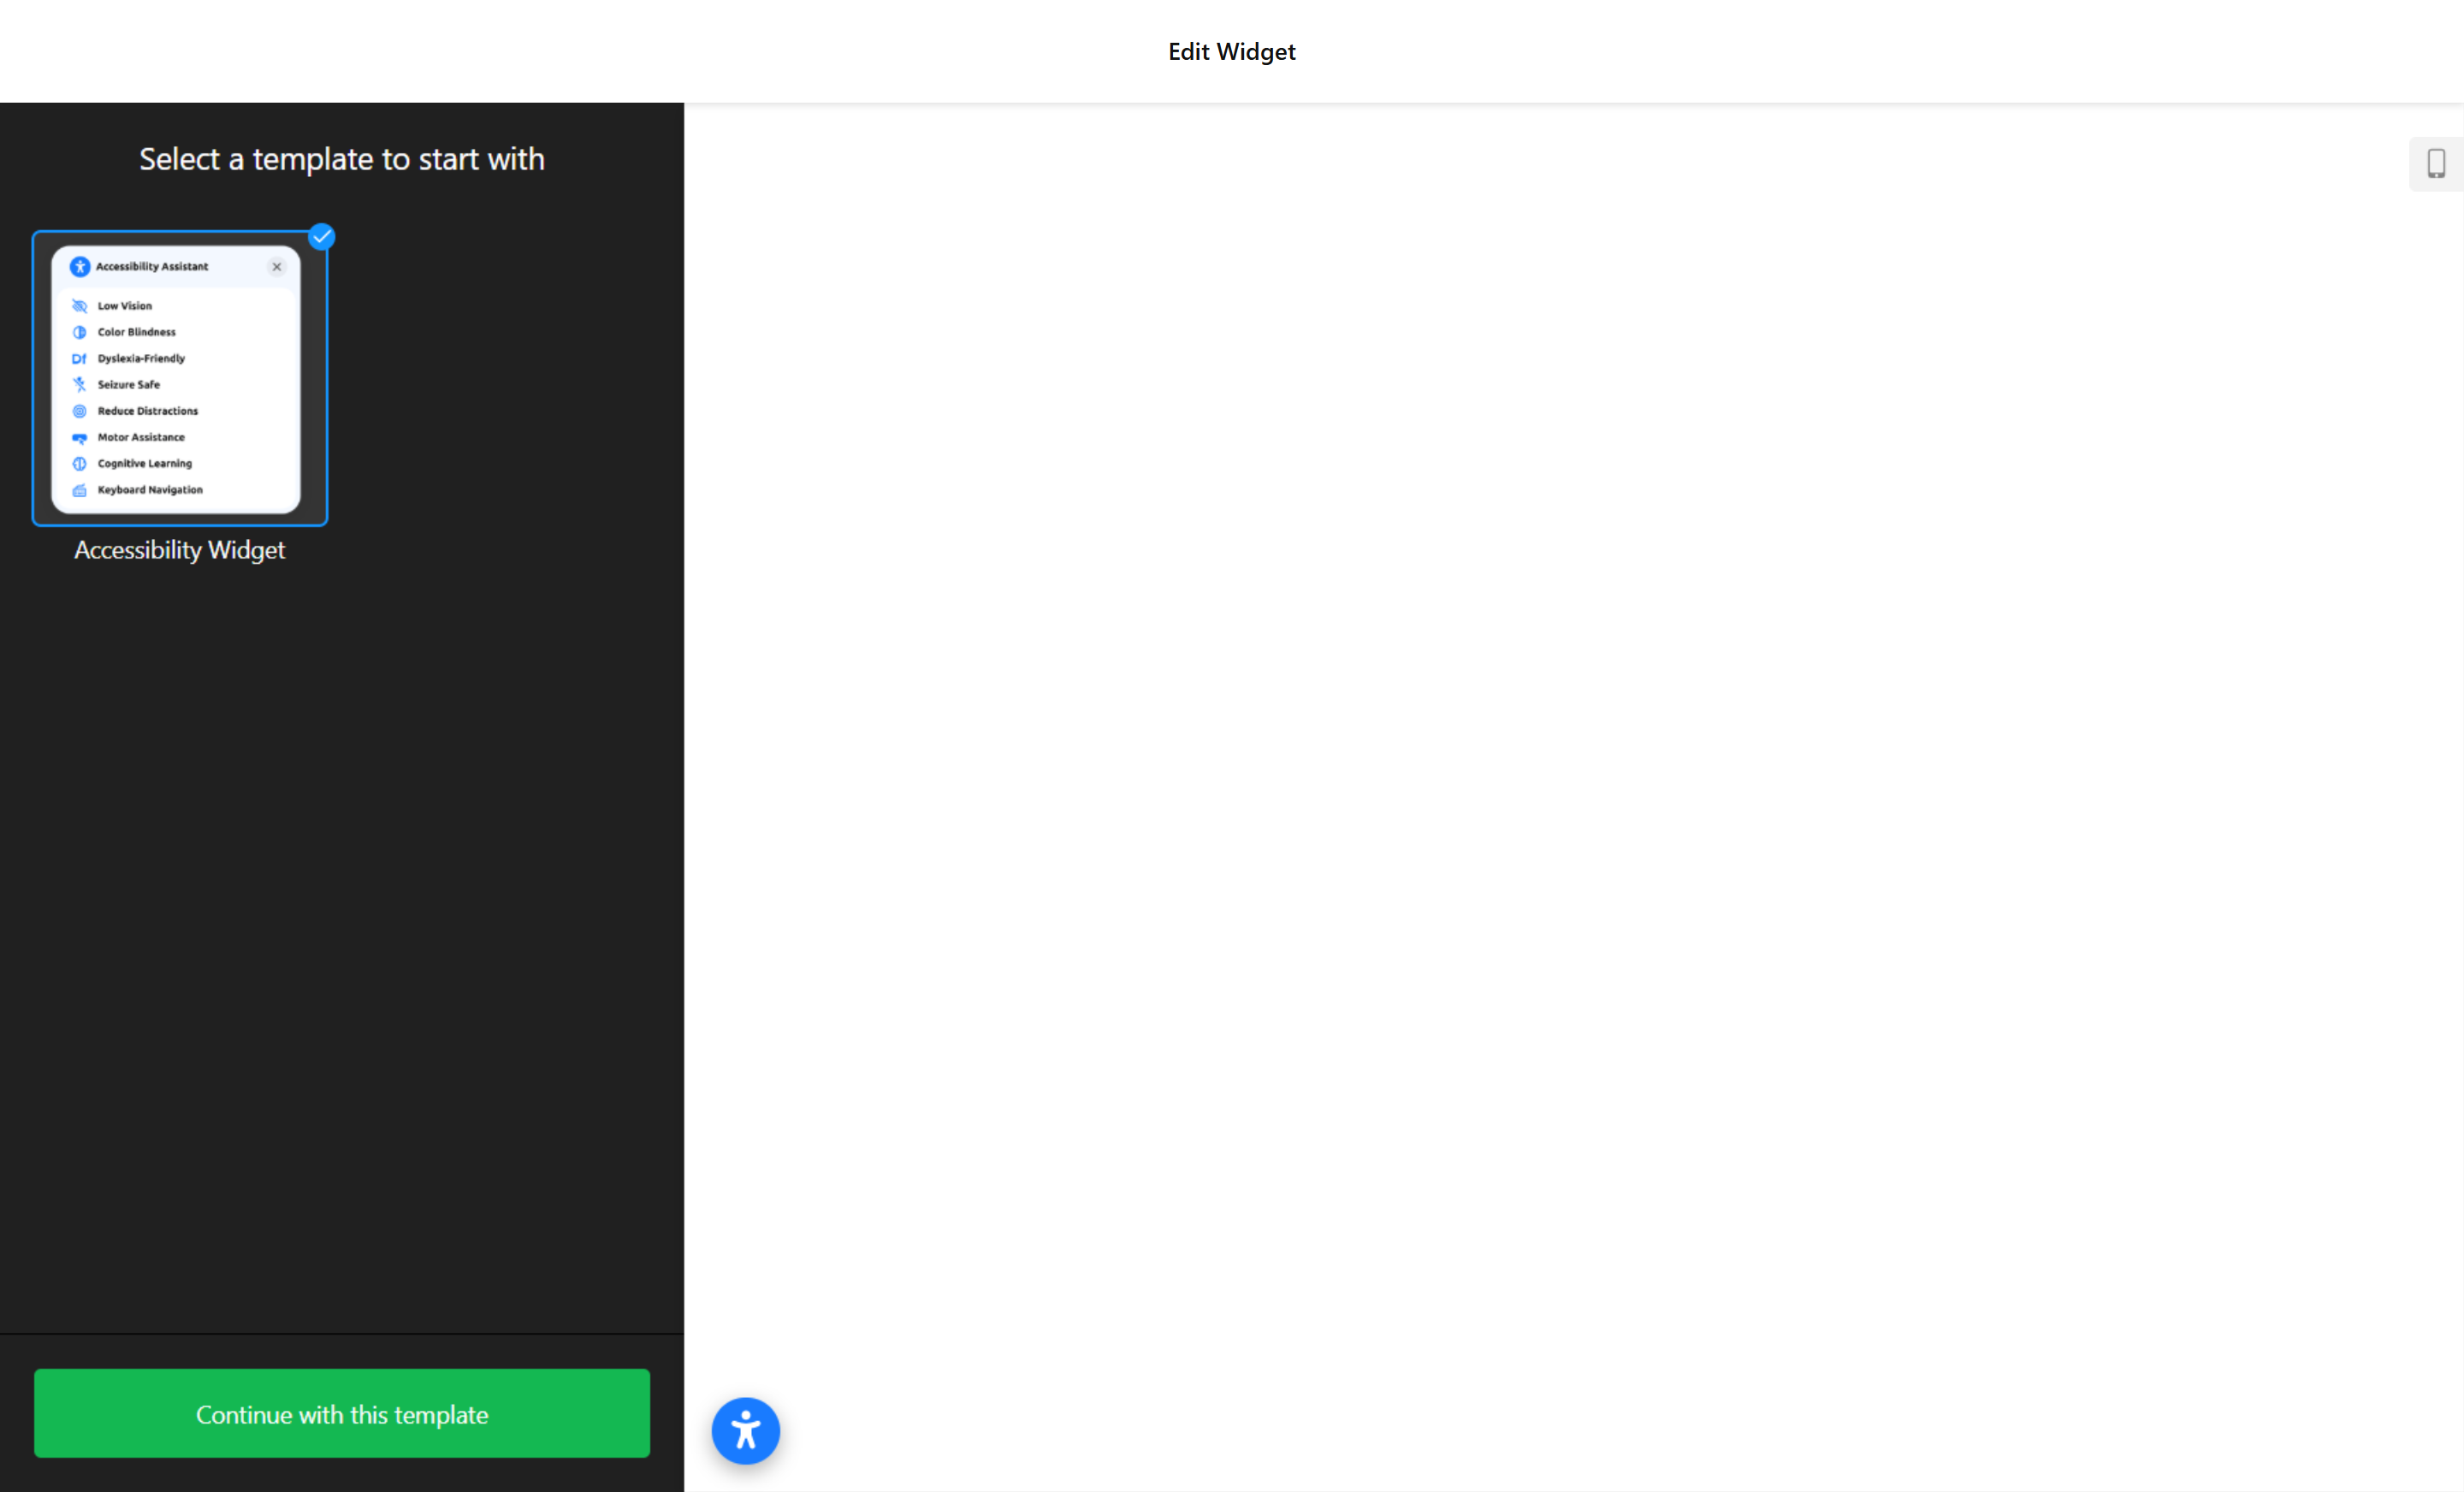
- Choose a Template. Start by opening the editor and picking a template. Once selected, click “Continue with this template” to begin configuring your widget.

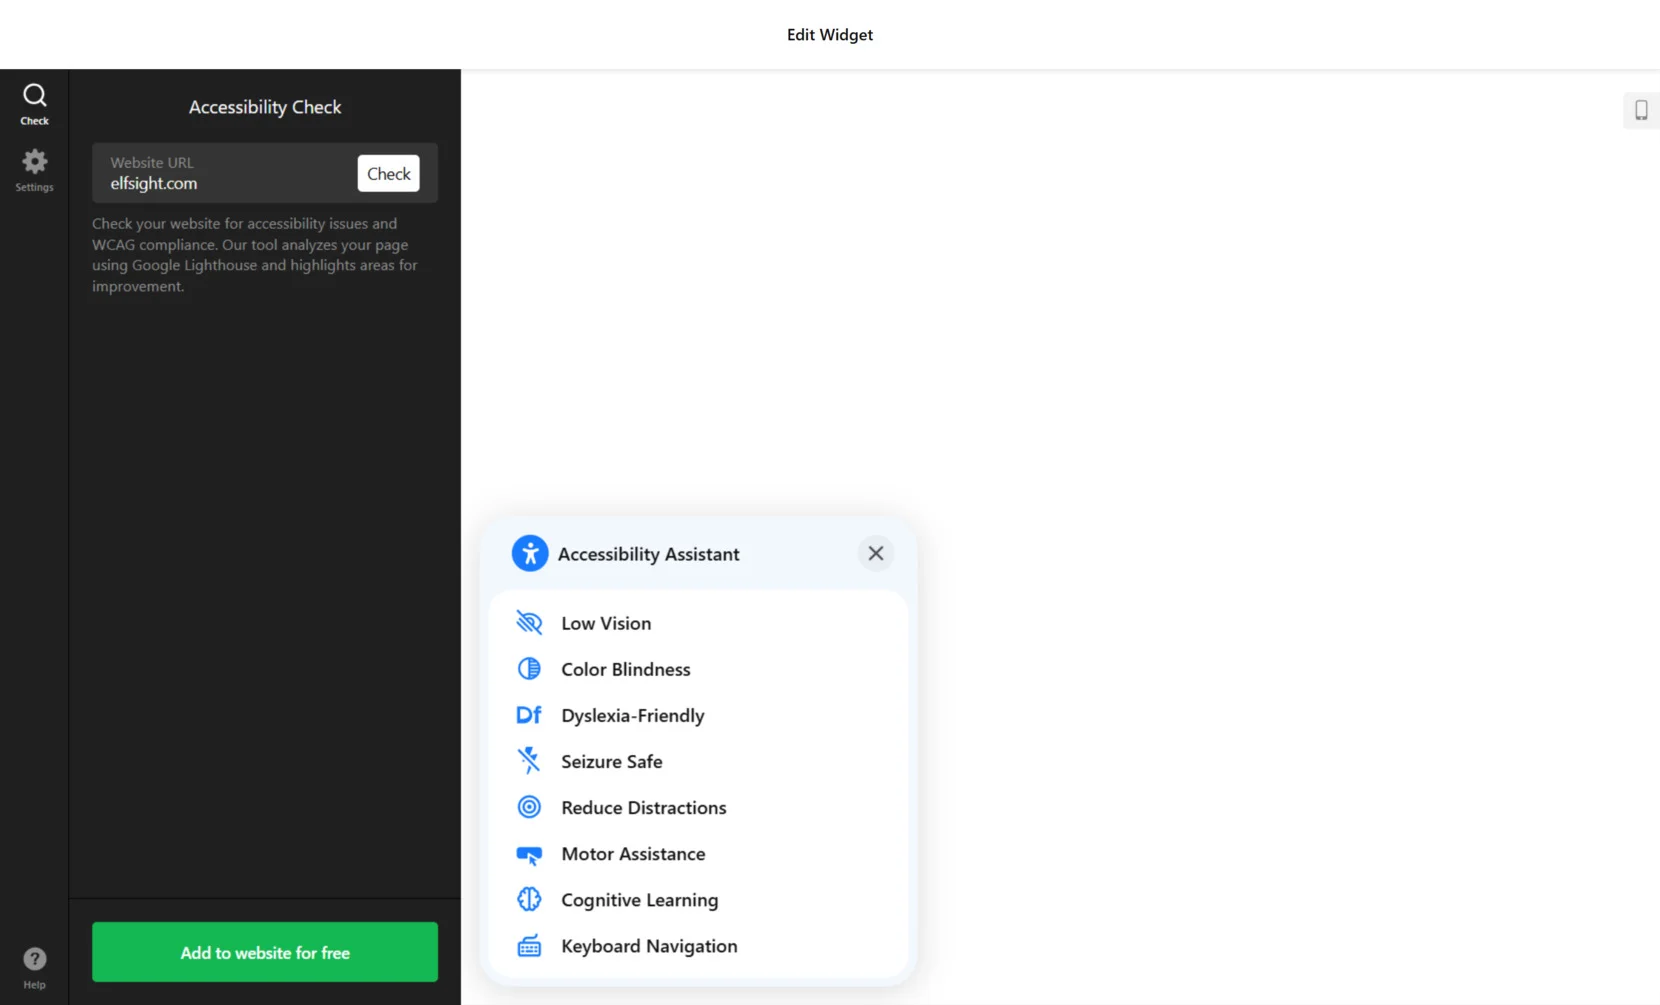
- Run an Accessibility Check. Enter your website URL in the checker tab and hit “Check”. The tool will scan your content for accessibility issues and highlight improvement areas using WCAG standards.

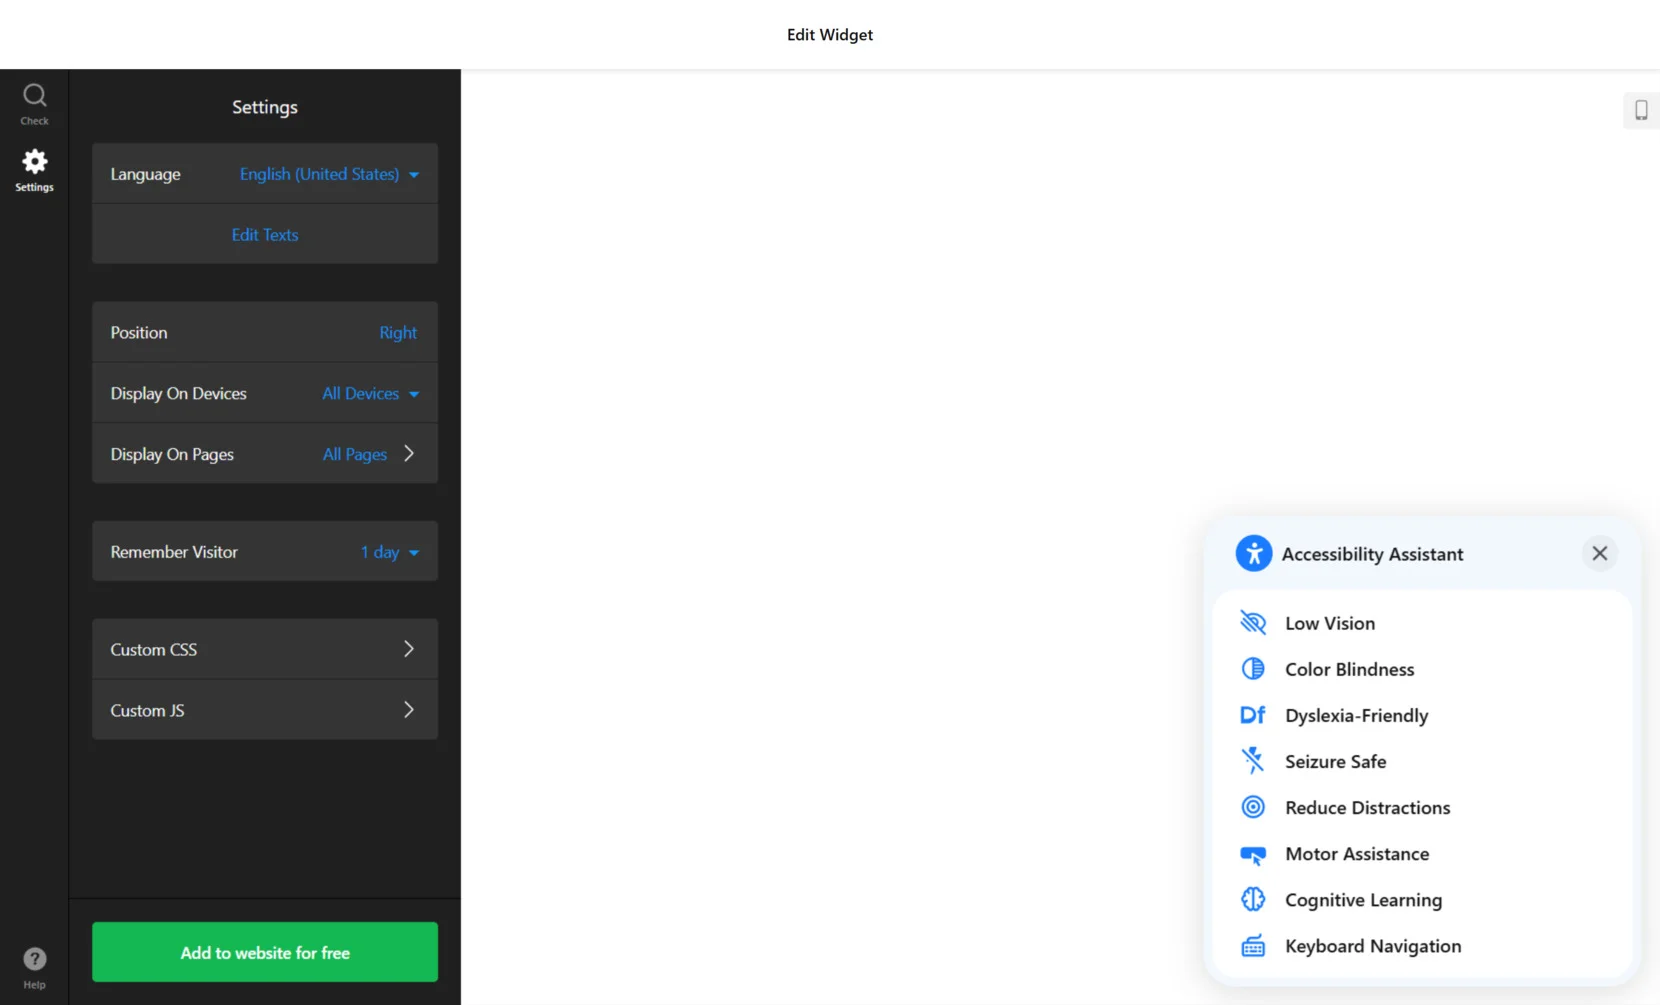
- Customize Settings. Go to the “Settings” tab. Set the widget’s display language, edit the texts, choose display position (e.g., right side), and decide where and when the widget appears — on all devices, all pages, or specific ones.
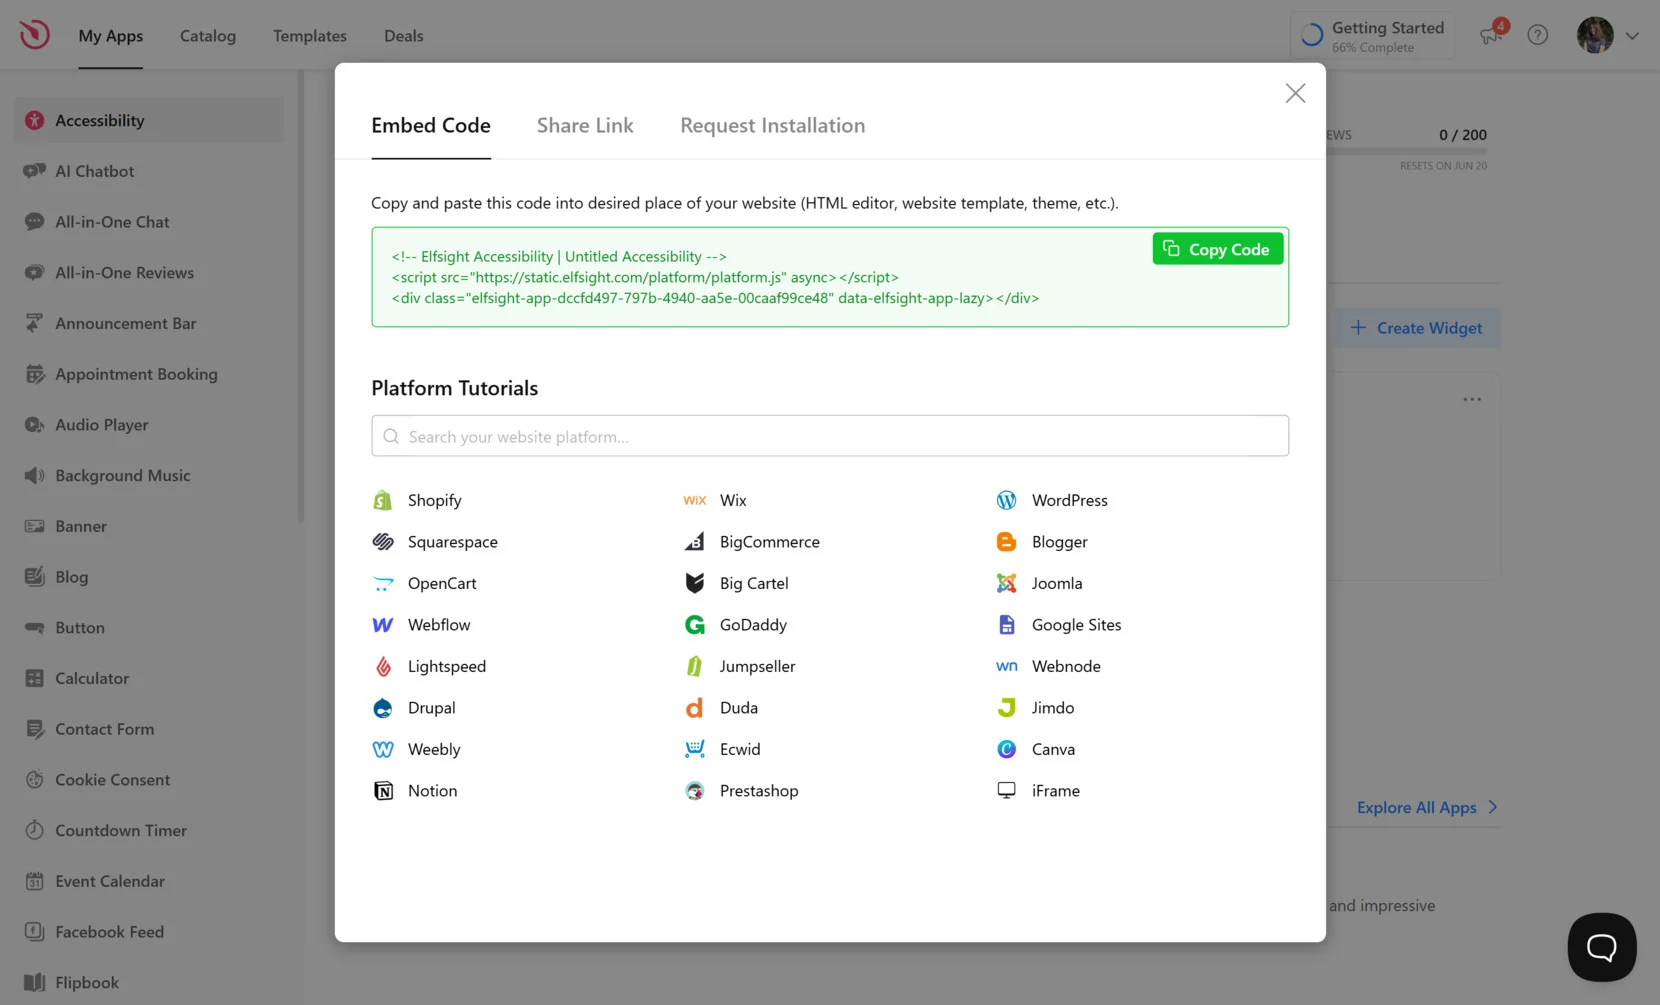
- Embed the Code on Your Website. Click “Add to website for free”, then copy the generated embed code. Open your WordPress admin, paste the code into your theme’s footer, widget area, or custom HTML block, save the changes, and publish.
With the setup complete, your visitors can now use powerful accessibility controls tailored to their needs, improving compliance and inclusivity across your content.
There are also alternative methods and third-party solutions that can help improve accessibility on WordPress. Let’s look at them next.
Other Ways to Improve WordPress Accessibility
While Elfsight’s accessibility widget offers a powerful and flexible way to make your WordPress website ADA compliant, there are other method to improve accessibility. Let’s look at two alternative solutions.
Accessible WordPress Themes
ADA compliant WordPress themes include structural and semantic improvements like keyboard-friendly navigation, ARIA (Accessible Rich Internet Applications) landmarks, and sufficient color contrast. By selecting the right theme, you can eliminate many potential accessibility issues before they arise — without needing any coding knowledge or third-party tools.
Below is a detailed step-by-step guide on how to find, install, and activate one of these themes on your WordPress website.
- Go to the WordPress Theme Directory. From your WordPress admin dashboard, navigate to “Appearance” in the left-hand menu, then select “Themes”. Click on the “Add New” button at the top of the screen to access the full library of themes hosted by WordPress.
- Apply the accessibility filter. In the theme directory, click on the “Feature Filter” button. From the list of features, check the box labeled “Accessibility Ready”. This filter will limit the results to themes that meet basic accessibility criteria established by WordPress. After checking the box, click “Apply Filters”.
- Browse and evaluate themes. Carefully review the filtered themes by clicking “Preview” on each one. Pay attention to how menus are displayed, whether links are clearly styled, and whether text is easily readable. Use the Tab key to check if the navigation is keyboard-friendly. A good theme should have logical heading structure and skip-to-content links built-in.
- Install your selected theme. Once you’ve found a theme that meets your design and accessibility needs, click the “Install” button. WordPress will download and prepare the theme for use. After installation, click “Activate” to apply it immediately to your website.
By choosing an accessibility-ready theme, you’re making a proactive decision to support inclusive design from the ground up. These themes are especially useful for creators who want to meet compliance standards without needing custom code or third-party development.
Manual Accessibility Setup
For developers and advanced users, a manual approach offers maximum control over accessibility implementation. This method uses semantic HTML elements, ARIA roles, and structured markup to make your WordPress website more accessible to screen readers, keyboard users, and people with disabilities. Though more complex, it allows you to tailor accessibility exactly to your layout and audience needs.
Manual implementation is ideal when using a custom theme or builder that doesn’t offer built-in accessibility support. It’s also recommended when aiming for strict WCAG 2.1 Level AA or AAA compliance.
Below is a detailed breakdown of how to apply accessibility enhancements directly in your WordPress theme or content code.
- Use semantic HTML for layout and structure. Replace generic tags like <div> with meaningful alternatives. For example, use <header>, <nav>, <main>, <aside>, and <footer> to reflect the actual structure of your website. This helps screen readers understand your content hierarchy.
- Apply ARIA roles and labels. Use attributes like role=”navigation”, aria-label=”Main navigation”, or aria-labelledby to provide context to users relying on assistive technologies. For instance, a popup menu can be labeled with aria-expanded to indicate whether it’s open or collapsed.
- Ensure all interactive elements are keyboard-accessible. Test buttons, forms, modals, and navigation menus using the Tab and Enter keys. Avoid custom scripts or components that break keyboard interaction. For sliders, dropdowns, and tabs, use tabindex attributes and ARIA controls as needed.
- Add skip links for fast keyboard navigation. Insert a hidden “Skip to content” link at the top of your pages using <a href=”#main-content” class=”skip-link”>Skip to content</a> and ensure the linked anchor exists in your markup. This allows users to bypass repetitive navigation.
- Maintain high contrast and scalable text styles. Avoid low-contrast color schemes. Use relative units like em or rem for font sizes to ensure text scales properly when zoomed. Check contrast ratios using tools like Chrome DevTools or online contrast checkers.
- Test your changes with accessibility auditing tools. Use Lighthouse, axe DevTools, or the Firefox Accessibility Inspector to identify violations, missing labels, or insufficient contrast. Repeat testing for different user flows and screen sizes.
This approach takes more time than using plugins or widgets, but it’s the most flexible and code-level precise method to create a fully accessible digital environment. It’s commonly used by teams that manage custom-built WordPress themes or need enterprise-grade compliance.
Comparison of WordPress Accessibility Methods
Here’s a breakdown comparing Elfsight’s widget, native WordPress themes, and manual accessibility implementation. This table highlights the key strengths and limitations of each method to help you choose the right fit for your website.
| Method | Advantages | Limitations |
|---|---|---|
| Elfsight Accessibility Widget | Provides ready-to-use accessibility profiles, a floating toolbar, and full design flexibility with no coding required. | Needs a simple code snippet to be embedded into your WordPress backend for activation. |
| Accessibility-Ready Themes | Native WordPress themes that follow semantic HTML and provide screen reader and keyboard navigation support. | Limited design flexibility and may still require adjustments for content and plugin compatibility. |
| Manual Accessibility Implementation | Offers complete control with semantic HTML, ARIA roles, and custom keyboard interactions for maximum compliance. | Requires coding knowledge, regular testing, and significant time investment to implement and maintain effectively. |
While all three approaches contribute to making your WordPress website more inclusive, Elfsight stands out for its ease of use, instant results, and rich customization — all without touching a line of code.
Now, let’s look at how you can further tailor your widget to meet specific accessibility goals and design preferences.
Tips to Ensure Website’s ADA Compliance
Once your accessibility feature is installed, proper customization is key to ensuring it blends naturally with your website and delivers the best possible experience for all users. This section covers practical tips for configuring your widget to meet both design and compliance goals.
- Match the widget’s visual style with your branding. Choose accent colors, fonts, and positioning that align with your website’s aesthetic. Make sure the contrast between the widget and background is strong enough to ensure visibility for all users.
- Prioritize essential accessibility profiles. Enable modes that cover the most common accessibility needs — such as Dyslexia-Friendly, Low Vision, and Color Blindness — without overwhelming users with too many toggles. Keep the interface focused and intuitive.
- Make the widget accessible on all devices. Ensure that it’s not restricted to desktop views only. Test the floating toolbar or toggle button on tablets and smartphones to confirm it behaves responsively and remains fully functional.
- Position the widget thoughtfully. Place the accessibility toggle in a spot that’s easily noticeable but doesn’t interfere with key content — commonly the bottom right or top left of the screen. Avoid covering navigation menus or call-to-action buttons.
- Use clear, readable labels and icons. Customize the widget’s text to be straightforward, descriptive, and jargon-free. Users with cognitive disabilities or limited literacy benefit from simple language and universally recognized symbols.
- Enable keyboard navigation and focus outlines. Test tab key navigation through all widget features to ensure every control is reachable. Also, activate visible focus states to help users track where they are while navigating by keyboard.
- Set default state and behavior wisely. If most of your users require a specific mode (e.g., high contrast), consider making it active by default. This removes a step for users who might struggle to find the control themselves.
By following these tips, you ensure that your assistive add-on not only complies with standards but also truly supports every visitor’s experience.
Accessibility Features Application: Use Cases
Now that you know how to customize your accessibility feature, let’s explore practical examples of how accessibility widget helps websites in different industries.
Application in Education and eLearning 🎓
Educational websites benefit greatly from inclusive interfaces that support diverse learning needs. You can configure a widget with Dyslexia-Friendly mode, text spacing controls, and keyboard navigation support to assist students with learning or cognitive disabilities. Enabling features like “Readable Fonts”, “Highlight Links”, and “Text Magnifier” helps maintain focus and usability across learning modules and reading materials.
Application in E-Commerce 🛒
For online stores, accessibility widgets improve product browsing and checkout usability. Features like “Stop Animations”, “Adjust Contrast”, and “Bigger Cursor” are vital for users with visual sensitivity or motion-triggered discomfort. Placing the toggle near the top of the screen and ensuring compatibility with product sliders and filters boosts overall accessibility during the shopping process.
Application in Healthcare 🏥
Healthcare websites often handle sensitive tasks like appointment booking, test result viewing, or symptom checking. Accessibility widgets configured with “Seizure Safe Mode”, “Screen Reader Optimization”, and “Readable Line Height” help patients with neurological conditions or visual impairments safely interact with the interface. Keyboard accessibility ensures form elements and calendars are reachable without a mouse.
As you can see, accessibility widgets are flexible and highly adaptable across industries. Whether your website is focused on education, commerce, or healthcare, you can build a compliance plugin that improves user experience and meets legal standards.
Fixing Common Issues
Even with the right tools in place, users may encounter challenges when configuring or using an accessibility feature. Below are common questions and detailed answers to help you resolve setup issues, usability concerns, and integration limitations effectively.
Why isn't the accessibility widget visible on my WordPress pages?
The widget loads but some features don't work. What should I check?
How can I make sure the widget is screen reader-friendly?
Why is the widget overlapping with my chat or cookie banner?
Can the accessibility widget slow down my website?
What if my accessibility feature disappears after a theme update?
Addressing these common challenges ensures that your assistive add-on functions reliably and supports all users as intended.
Final Thoughts
Ensuring your WordPress website is ADA compliant is no longer optional — it’s a fundamental step toward building an inclusive, user-friendly experience for everyone. Whether you choose to implement an accessibility-ready theme, go the manual route, or use a customizable compliance plugin, the goal remains the same: provide equal access and usability for all visitors, regardless of ability.
With tools like the accessibility feature discussed throughout this guide, you can easily implement keyboard navigation, visual enhancements, and assistive modes that comply with WCAG guidelines. Now is the perfect time to make your WordPress website more welcoming and accessible.
Need More Help?
We hope this walkthrough has helped clarify how to make your WordPress website ADA compliant. If you have more questions or want to explore advanced accessibility solutions, feel free to reach out to us. Our goal is to make web accessibility simple, effective, and code-free for every business owner.