You’ve already put in the work creating YouTube videos – product demos, tutorials, customer testimonials – but they’re just sitting on your channel, unseen by the people who matter most.
Elfsight’s YouTube Gallery widget puts your video content where it actually gets seen – right on your website. It lets you showcase your channel, playlists, or selected videos in a fully customizable gallery that blends seamlessly with your design, updates automatically, and keeps visitors engaged without ever pulling them away from your pages.
- How to embed a full YouTube channel, playlist, or single video in HTML
- Why showcasing videos on your website is helpful for your business
- Alternative HTML embedding methods and their limitations
- Customization & optimization tactics for best results
Quick Start: Embed YouTube Video in HTML
Here’s how to add a YouTube gallery to your HTML website in four simple steps.
- Open the YouTube Gallery editor and select a template.
- Add your channel, playlist, or individual video URL as the source.
- Click “Add to Website” to generate the embed code.
- Paste the code into your HTML file & upload it to your web server.
Create your YouTube video gallery now in the live editor!
Why Add YouTube Videos to Your HTML Website
If you’ve published videos on YouTube, embedding them on your website turns that content into an active sales and support tool. A YouTube gallery gives you a flexible, low-maintenance way to keep your video content organized, fresh, and easy to manage.
Showcase you product
Product demos, before-and-after transformations, and case study walkthroughs build trust that text descriptions can’t match. A beauty salon showing makeover results, a SaaS company demonstrating their dashboard, or a contractor displaying finished renovations – that’s visual proof that converts skeptical browsers into buyers. If you haven’t created those videos yet, an AI-powered online video editor like FlexClip makes it straightforward — you can easily craft polished product walkthroughs, video FAQs, or promo clips in minutes using ready-made templates and intuitive editing tools.
Reduce support effort
Every “How does this work?” or “Will this fit my use case?” email costs you time. Video FAQs, setup tutorials, and troubleshooting guides embedded on your website answer common questions before they become support tickets. Visitors get immediate answers, and you spend less time responding to repetitive inquiries.
Build credibility through social proof
Customer testimonials and review videos carry more weight than written quotes because visitors see real people vouching for you. A gallery of client success stories on your homepage or pricing page gives hesitant prospects the social proof they need to move forward. Video testimonials feel authentic in a way that polished text never does.
Keep visitors on your site longer
When someone clicks a YouTube link, they leave your website and land in YouTube’s algorithm-driven feed, getting distracted and forgetting why they visited your site. An embedded gallery keeps them in your controlled environment. More time on your website means more opportunities to guide them toward a purchase, signup, or contact form.
Step-by-Step: Embedding YouTube Gallery on HTML Website
Now that you’ve seen how a YouTube gallery solves real business problems, let’s walk through each step setting up a YouTube video gallery on your HTML website.
Step 1: Open the YouTube Gallery Editor and Choose a Template
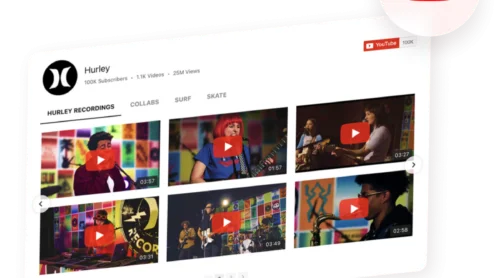
Go to the Elfsight editor. You’ll see a selection of pre-built templates: channel showcases, video sliders, sidebar playlists, and grid layouts. Choose the one that fits where you plan to place the gallery on your HTML page.
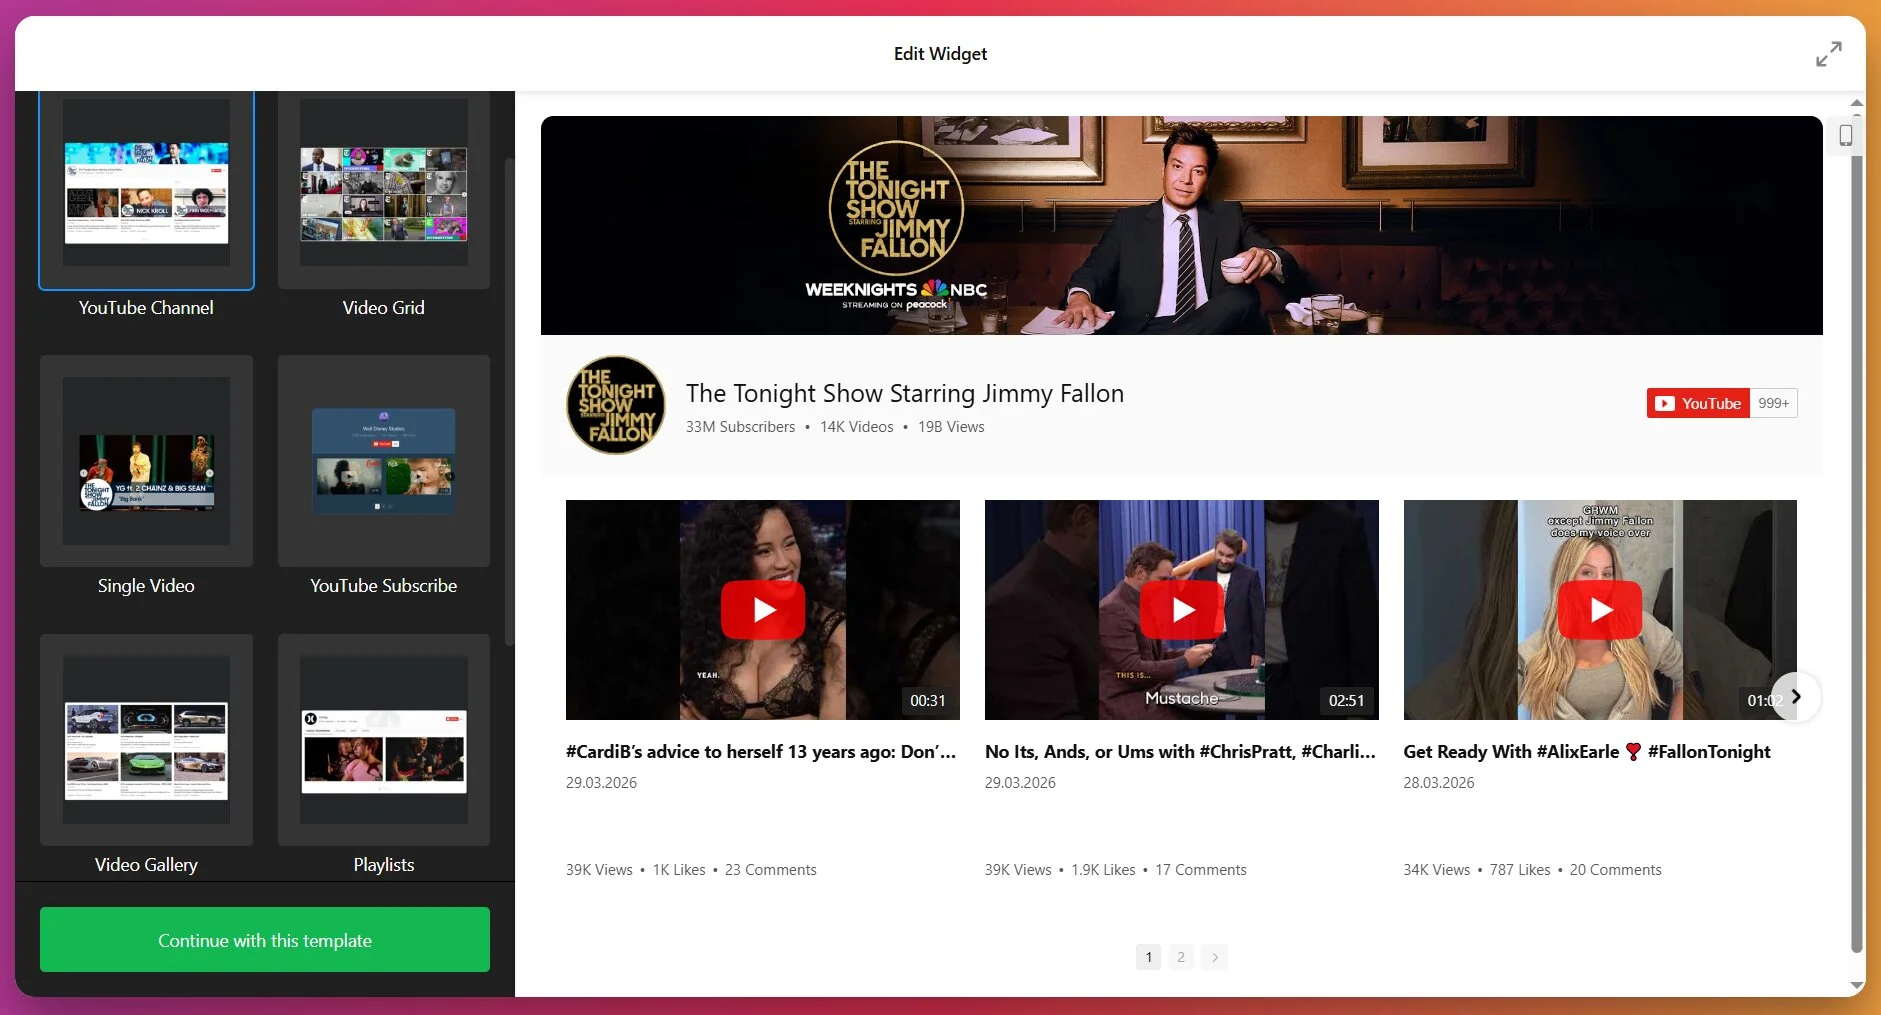
For example, if you want a full-width video showcase above your footer, the “YouTube Channel” template with a header works well. You can always customize the template later, so pick the closest match and move forward.
Step 2: Add Your YouTube Source
Click the “Source” tab. Here’s where you tell the widget what content to display. Paste your YouTube channel URL, playlist URL, or individual video link into the source field.
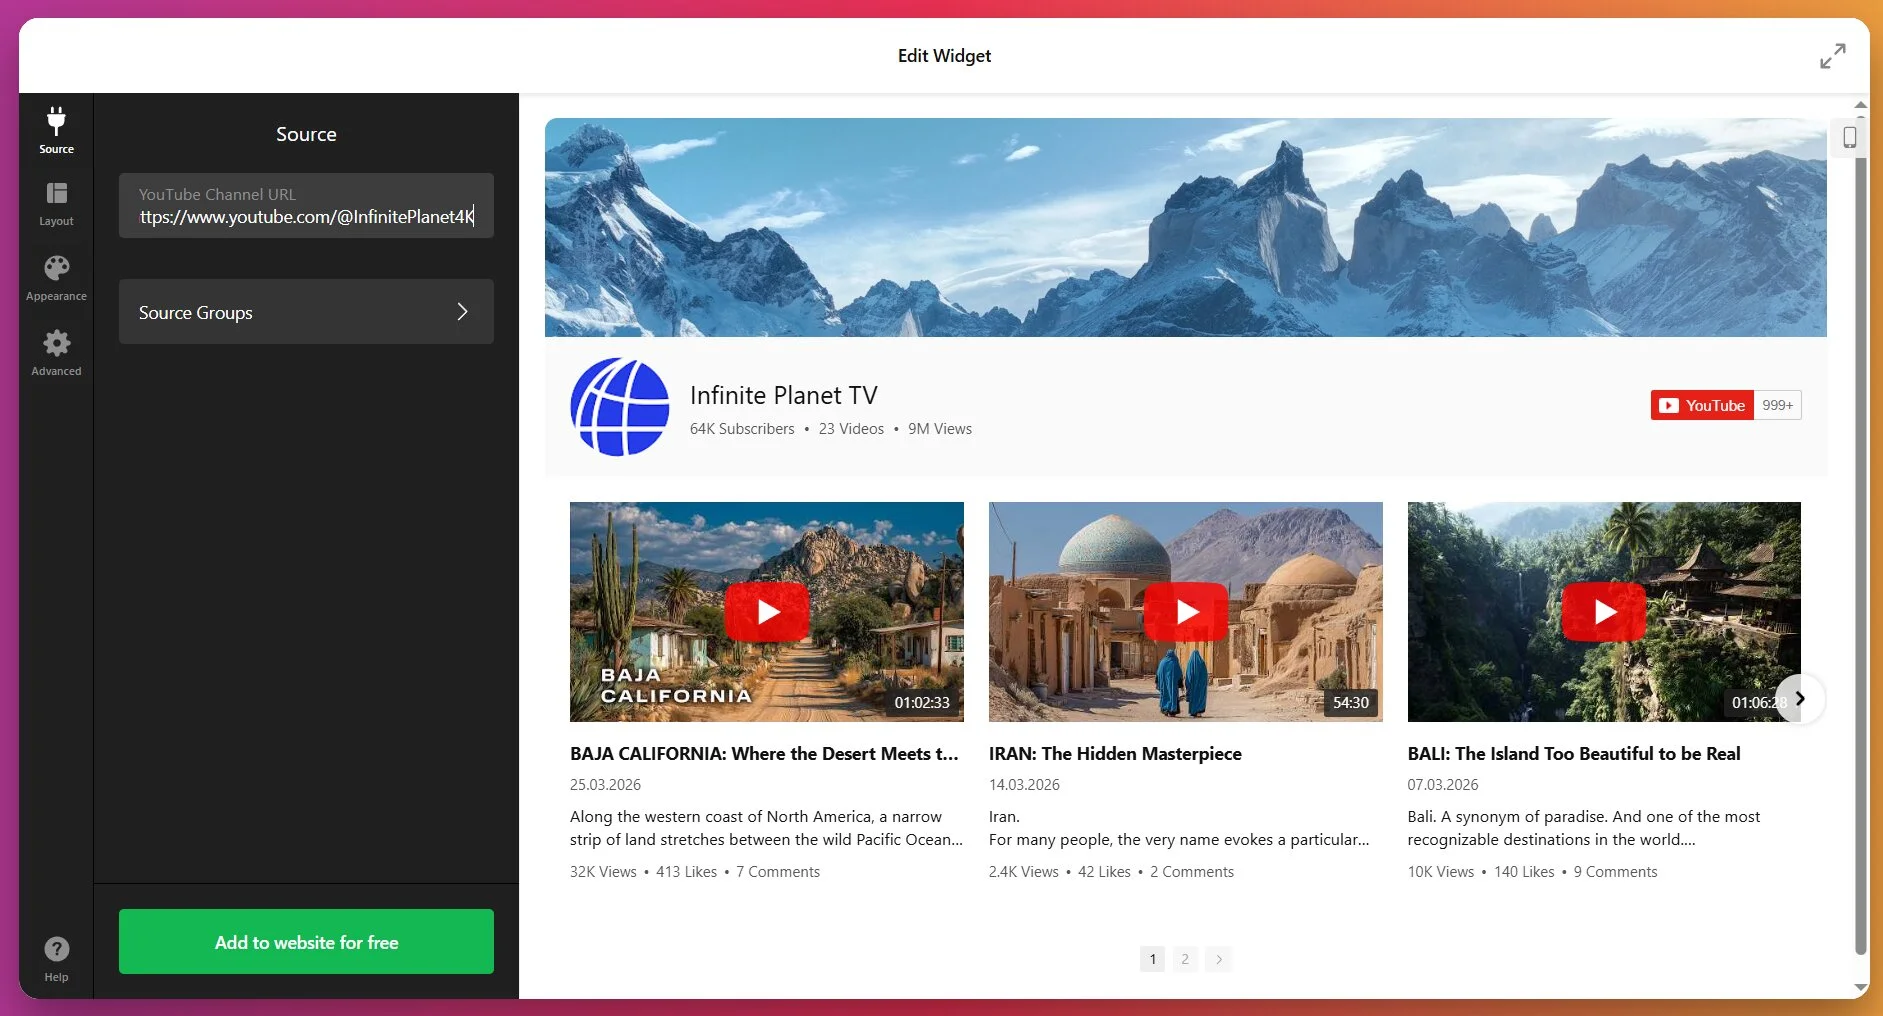
If you’re embedding a full channel: Use the full desktop YouTube URL format (youtube.com/channel/... or youtube.com/@YourHandle). Short mobile links (youtu.be/...) are not supported, so always use the full URL.
If you’re embedding a playlist: Copy the playlist URL directly from YouTube. The widget will display videos in the same order they appear in the YouTube playlist. You can’t reorder videos within the widget itself — order changes must be made on YouTube.
If you’re embedding specific videos: Add individual video URLs one by one. This is useful if you want a curated selection rather than an entire channel’s uploads.
You can combine multiple sources. For example, add your main channel URL plus a separate playlist for tutorials. The widget will organize them into tabs.
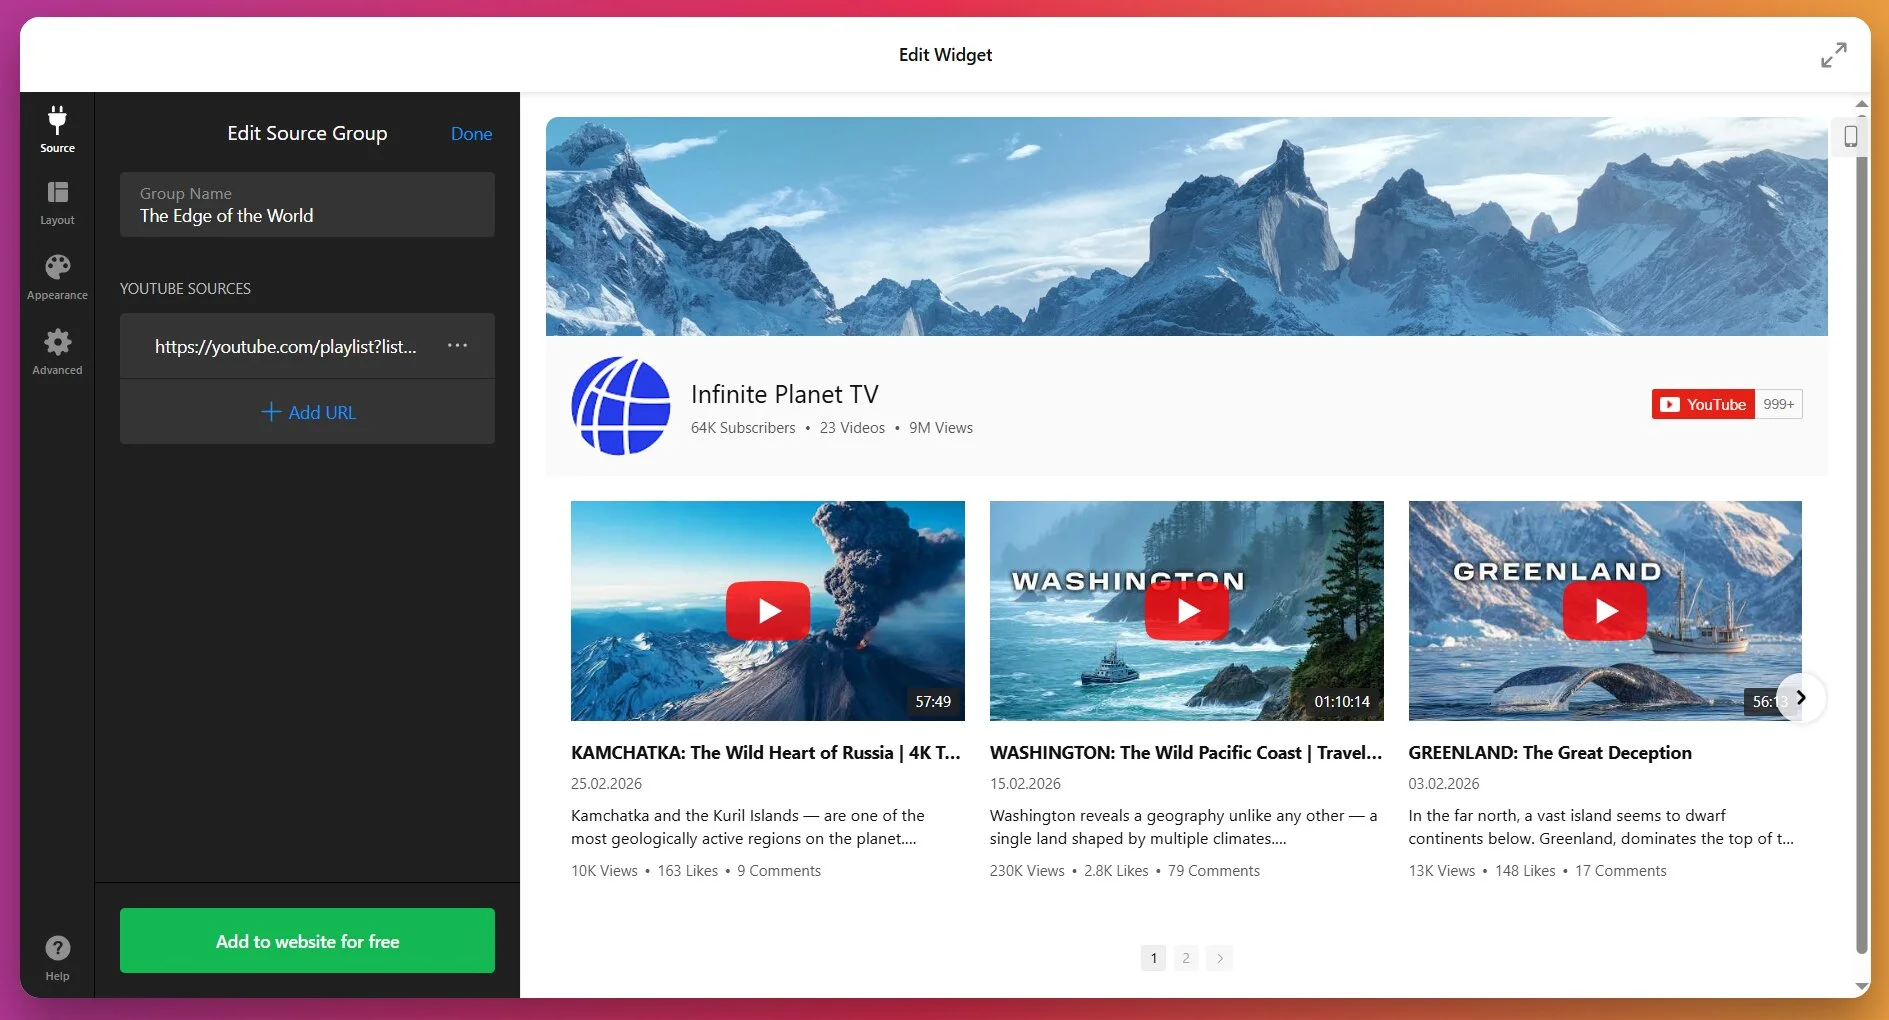
Step 3: Organize Videos into Groups (Optional)
If you added multiple sources, you can organize them into “Source Groups.” Each group becomes a separate tab in the gallery. For example, create one group called “Tutorials” with your tutorial playlist, another called “Product Reviews” with review videos, and a third called “Customer Stories” with testimonial videos.
To do this, click “Source Groups” in the editor, add a new group, give it a name, and assign specific sources to it. If you only have one source or don’t need tabs, skip this step — the widget will display all videos in a single flow.
Step 4: Customize Header and Layout
In the “Layout” tab, you can show or hide the channel header. The header displays your channel name, description, subscriber count, and a “Subscribe” button that links to your YouTube channel. If you want to drive subscribers, keep the header visible. If you just want a clean video grid, hide it.
Three layout modes are available: Classic (standard grid), Cinema (large featured video with thumbnails below), or Horizontal (scrolling thumbnail strip).
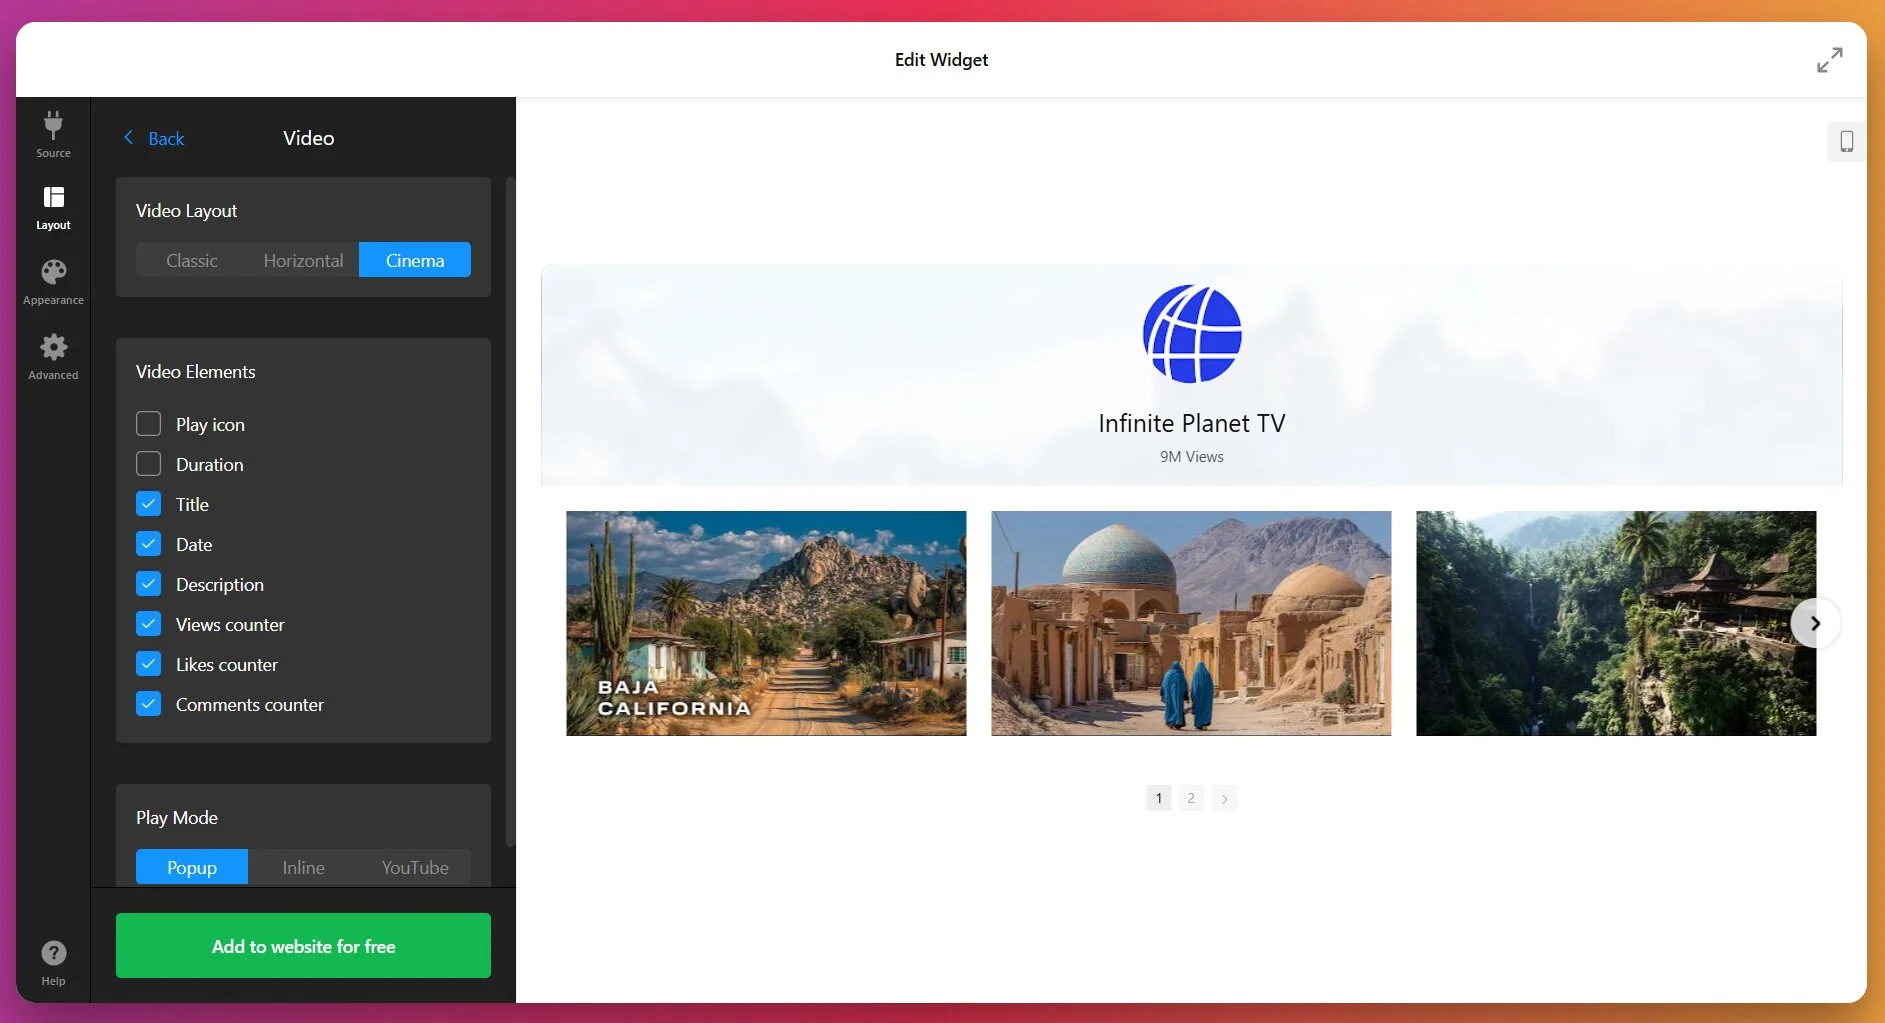
For HTML websites, the Classic grid layout is the most flexible. You can set the number of columns and rows, adjust spacing (gutter), and control the widget width. If you’re placing the gallery in a full-width section, try 3-4 columns. For sidebar placement, 1 or 2 columns work better.
If you choose to play your videos in a Popup lightbox, you can configure how individual elements display by clicking a video in your editor preview.
Step 5: Configure Navigation Controls
Under Layout ➝ Slider Settings, you can enable or disable arrows, drag-to-scroll, pagination dots, and mouse scroll navigation. You can also enable autorotation, which automatically advances to the next video after a set interval.
For most HTML websites, arrows + pagination work well. If you have a long list of videos and want smooth browsing, enable drag-and-scroll. Autorotation is useful for landing pages where you want videos to cycle automatically, but it can be distracting on content-heavy pages.
Step 6: Customize Visuals
You can choose from the 5 pre-made color schemes or customize everything from scratch:
- Header background, channel name, description, and counters
- Video background, captions (title, date, duration), and icons
- Slider arrows in static mode and on hover
For HTML websites, matching the gallery colors to your website’s existing color scheme makes the widget feel integrated rather than tacked on.

Same as with Layout, the Appearance tab lets you control the design of both primary display and popup visuals, if you’re using this option.
Step 7: Get the Embed Code and Add It to Your HTML
Once you’re happy with the setup, click “Add to Website”. The widget will generate an embed code — a <script> tag and a <div> tag.
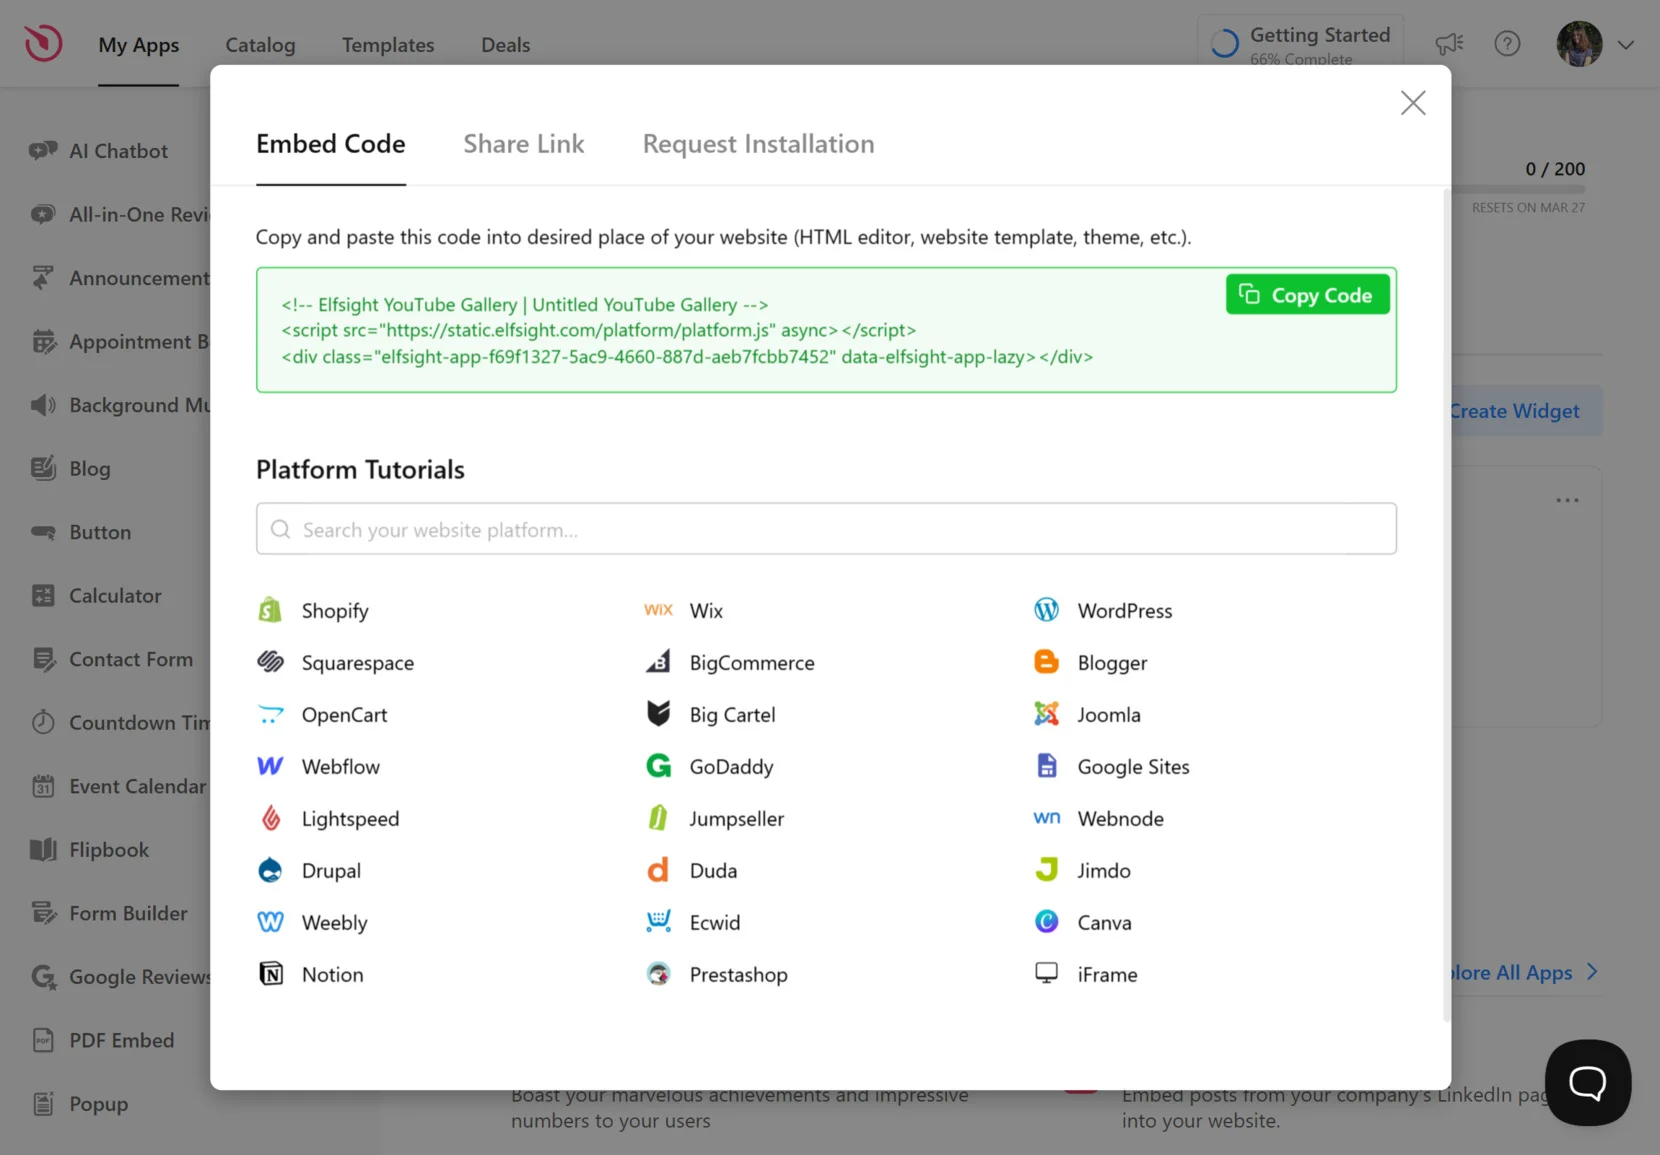
Copy the full code snippet. Open your HTML file in a code editor (VS Code, Sublime Text, Notepad++, or your hosting file manager). Find the spot where you want the gallery to appear and paste the code inside the <body> section.
For example, if you want the gallery below your main content, paste it before the closing </body> tag or in a dedicated section. The widget code is self-contained and won’t interfere with your existing HTML structure.
Save the file. If you’re editing locally, upload the updated HTML file to your web server via FTP, hosting file manager, or your deployment method. Once uploaded, visit your website and the gallery should display.
Troubleshooting Quick Check
- Gallery not showing: Confirm the code is pasted inside the body tags, not in head. Also verify the file uploaded successfully to the server.
- Broken layout: Make sure the code isn’t nested inside another HTML element that restricts width (like a narrow column or fixed-width div). The widget is responsive, but it needs enough horizontal space.
- Videos don’t load: Check your internet connection. The widget pulls content from YouTube’s API, so you need an active connection. Testing by opening the HTML file directly from your computer (file:// protocol) may not work — upload it to a live server instead.
- New videos not appearing: The widget caches content and refreshes every 24 hours. If you just uploaded a new video to YouTube, it won’t show immediately in the gallery.
Other Ways to Embed YouTube Content in HTML
Elfsight isn’t the only way to add YouTube videos to an HTML website. Here are alternative methods and what each is best suited for.
YouTube Native Iframe Embed
YouTube provides a basic iframe embed code for every video. Go to a video on YouTube, click “Share,” then “Embed,” and copy the iframe code.
How to use it:
- Open the YouTube video you want to embed.
- Click “Share” below the video, then “Embed.”
- Copy the iframe code snippet.
- Paste it into your HTML file where you want the video.
- Save and upload the file to your server.
Manual HTML5 Video Player with YouTube URL
HTML5’s video tag can play video files, but it doesn’t support YouTube URLs directly. You’d need to download the video file (which violates YouTube’s terms of service) or host videos yourself.
How it’s done:
- Host video files on your own server or a CDN.
- Add the video tag to your HTML with src pointing to the video file.
- Include controls, autoplay, or loop attributes as needed.
Google Sites YouTube Gadget (if using Google Sites)
If you’re building on Google Sites rather than raw HTML, Google has a native YouTube gadget that embeds channels or playlists. This is a visual drag-and-drop tool.
Steps for this method:
- Open your Google Sites page editor.
- Click “Insert” → “YouTube.”
- Paste the video or playlist URL.
- Adjust size and alignment settings.
- Publish the page.
Comparison: Which Embedding Method Fits Your Needs?
After reviewing the alternatives, here’s how they stack up based on key features:
| Feature | Elfsight YouTube Gallery | Native YouTube Iframe | HTML5 video Tag | Google Sites Gadget |
|---|---|---|---|---|
| Embed full channel | Yes | No (single video only) | No | Limited |
| Automatic updates | Yes (24-hour cache) | No | No | No |
| Custom styling | Yes (colors, fonts, layout) | Minimal | No YouTube branding | Minimal |
| Multiple sources in one widget | Yes | No | No | Limited |
| Mobile responsive | Yes | Yes | Yes | Yes |
| Popup video player | Yes | No | No | No |
| Coding required | No | Basic HTML | Basic HTML | No |
| Cost | Free tier available | Free | Free (but hosting costs) | Free |
If you want a single video embedded quickly with no customization, the native YouTube iframe works. If you need an organized, updateable gallery with design control, Elfsight is the better fit. HTML5 video only makes sense if you’re hosting videos yourself and don’t want YouTube involved. Google Sites gadget is only relevant if you’re on Google Sites.
Optimization Tips for Your YouTube Gallery
For best results, we’ve compiled a few proven tips for enhanced widget setup and better performance of video content on your website.
- Set columns and rows based on your content volume. Clicking “Load More” repeatedly gets tiring. If you have fewer than 12 videos, a 3-column × 2-row grid shows everything without requiring scrolling or pagination. If you have 50+ videos, increase rows or enable infinite scroll for smooth browsing.
- Use Source Groups to separate content types. If your channel covers multiple topics — tutorials, product demos, customer stories — create a Source Group for each. Visitors find relevant videos faster, and your gallery looks organized rather than overwhelming.
- Enable captions in your YouTube videos. 85% of mobile video is watched on mute, and captions keep viewers engaged even when they can’t use audio. Upload SRT files to your YouTube videos before embedding them, and the gallery will display captions automatically.
- Test popup vs. inline play mode based on page layout. Popup mode works best for pages with dense content — it focuses attention on the video. Inline mode (plays in the preview area) works better for minimal landing pages where the gallery is the main element.
- Monitor YouTube Analytics to see which embedded videos drive traffic. YouTube’s analytics dashboard shows where your views come from, including embedded sources. Check which videos on your HTML website get the most plays, then feature those prominently in your gallery.
- Use custom CSS for advanced layout control. If you need pixel-perfect spacing or want the gallery to align with other HTML elements, Elfsight’s widget supports custom CSS. Add CSS rules to adjust margins, padding, or positioning without editing the core widget code.
Real-World Example: Beauty Website Builds Trust with Video
Andrew Chin runs Gigi Beauty PMU, a permanent makeup and beauty services website built on Squarespace. They needed a way to showcase before-and-after results, tutorial content, and service walkthroughs without cluttering the page or sending visitors to YouTube mid-browsing session.
Before using Elfsight
- Limited customization capabilities in their website builder
- Inflexible layout that restricted effective content positioning
- No way to organize and order video content
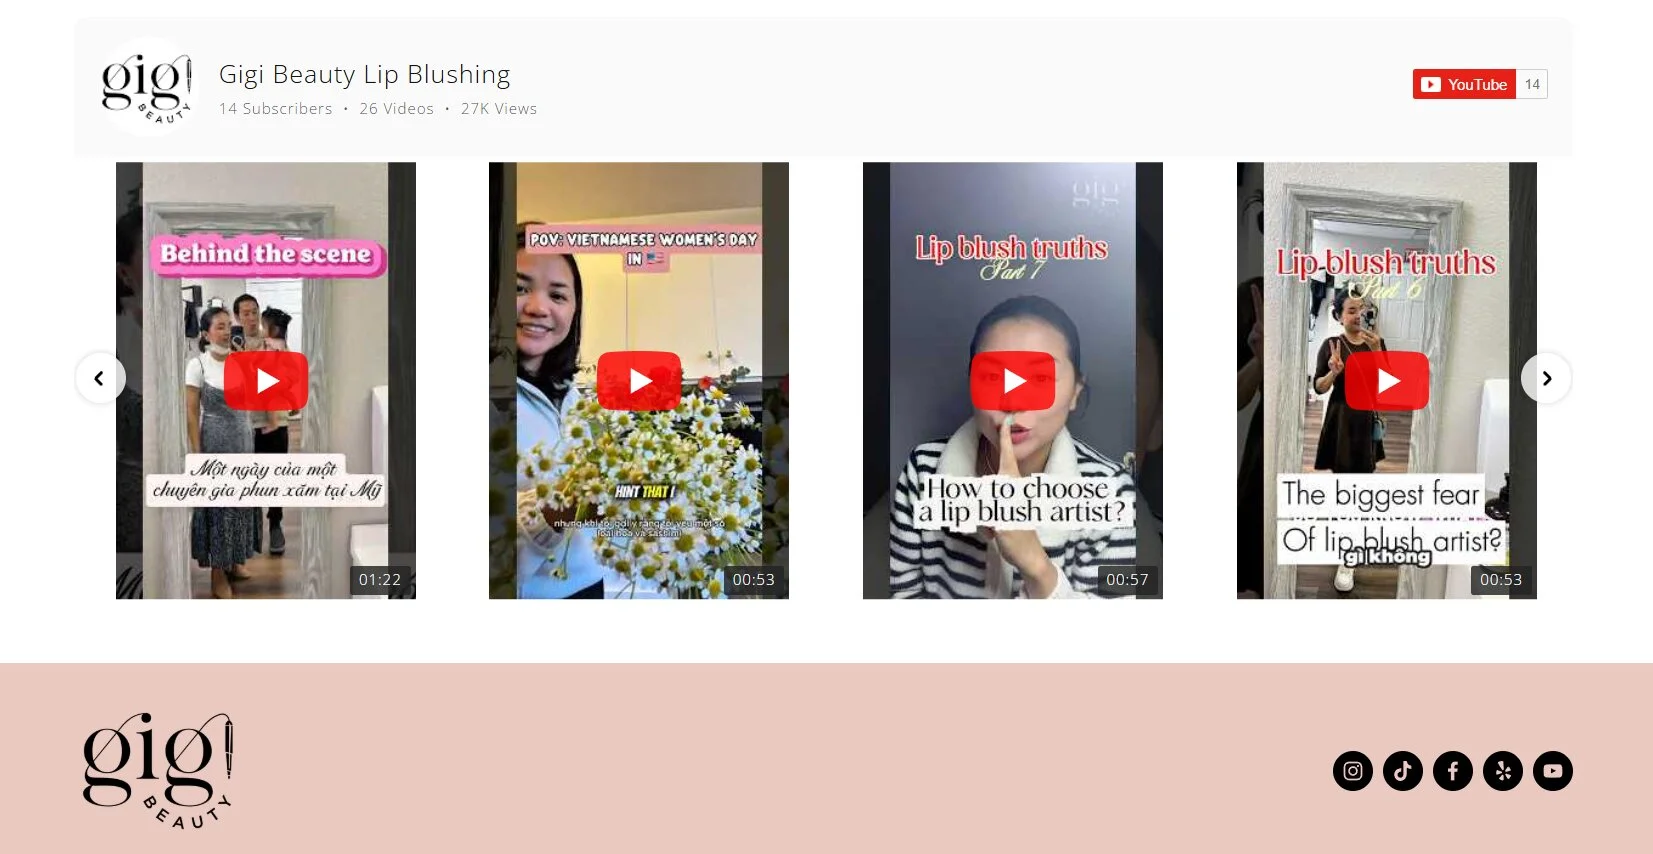
With the YouTube Gallery
“I needed a custom solution to better represent my wife’s beauty business and showcase all her great work. Elfsight made it easy to add testimonials, photos, and organize content in a way that made the site both beautiful and functional.” – Andrew Chin, Gigi Beauty
Now the Elfsight YouTube Gallery widget displays tutorial videos and client result clips in an organized grid. Visitors watch videos in a popup player without leaving the website, which keeps them focused on booking a service rather than getting distracted by YouTube’s algorithm-driven recommendations.
The result: a more engaging website with visual proof of service quality, organized video content that matches the website’s branding, and higher time-on-page metrics. Read the full case study here.
Frequently Asked Questions
Can I embed a YouTube playlist in HTML?
Will YouTube Shorts appear in my HTML video gallery?
How do I make the YouTube gallery responsive on mobile?
Can I use the YouTube Gallery widget for free?
How often does the gallery update with new YouTube videos?
Conclusion
Embedding YouTube videos on an HTML website doesn’t have to mean managing dozens of individual iframe codes or sacrificing design control. A YouTube gallery gives you an updateable, branded video showcase that works across devices and keeps visitors engaged without leaving your website.
If you’re ready to add organized video content to your HTML website, try the Elfsight YouTube Gallery widget. It takes less than 5 minutes to set up, requires no coding, and automatically updates when you publish new videos. Your website visitors get a polished viewing experience, and you get more YouTube subscribers from website traffic.