Adding a quiz to your WordPress website is one of the most effective ways to increase user interaction, keep visitors engaged longer, and drive meaningful actions like lead capture or product discovery. Whether you’re running a blog, portfolio, or business page, interactive content such as quizzes can significantly enhance your digital strategy.
If you’re looking for a simple, no-code way to create a quiz in WordPress, you’re in the right place. This guide will show you exactly how to do it — without overwhelming steps or complex plugins. It’s fast, it’s flexible, and it delivers real value to your visitors and your goals.
- Boosts visitor engagement. Quizzes turn passive readers into active participants, encouraging them to click, think, and interact longer.
- Generates quality leads. Lead generation quizzes help you collect emails and segment audiences while providing them with instant, valuable feedback.
- Creates shareable content. Interactive quizzes are highly shareable on social media, expanding your reach and visibility without extra effort.
- Improves content personalization. You can tailor quiz outcomes to different audience segments, making the experience more relevant and conversion-friendly.
Now that you know why a quiz widget can make a big difference, let’s take a quick look at how you can create one with Elfsight in just a few simple steps.
Quick Way to Make a WordPress Quiz
Now that you understand the value of adding a quiz to your WordPress website, let’s walk through how to quickly build one using Elfsight. You won’t need any plugins or coding — just a smooth drag-and-drop creation process right in your browser.
- Open the Elfsight editor and choose a quiz template that fits your goals.
- Customize the layout, question types, and answer logic using the intuitive design panel.
- Adjust styles like background, fonts, and colors to match your branding.
- Click “Add to website for free“, copy the provided installation code, and paste it into your WordPress backend.
This quick setup allows you to embed a fully functional quiz on your website without the hassle of installing extra plugins or dealing with technical setup. Everything is done visually, making it ideal for beginners and professionals alike.
Start building your own WordPress quiz in just minutes!
Features of the Elfsight Form Builder
Once you’ve seen how easy it is to create a quiz, it’s worth understanding what makes Elfsight a standout WordPress quiz builder. The platform combines powerful functionality with simple customization, offering everything you need to build audience feedback forms and deliver a personalized quiz experience.
Here are some of the most valuable features and benefits you get when using Elfsight:
- Fully customizable templates. Start with a pre-designed quiz layout and adjust every element to match your goals and brand identity.
- Conditional logic support. Create dynamic quizzes that adapt in real time based on user answers, providing personalized experiences.
- Email capture and notifications. Collect user data and receive instant alerts whenever someone completes a quiz on your website.
- Multi-step and one-page layouts. Choose the flow that best fits your quiz type — either single-page for simplicity or multi-step for guided interaction.
- No-code embed. Get a ready-to-use installation code that works seamlessly with WordPress — no developer needed.
- Mobile responsiveness. Your quiz will look great and function perfectly on any device, from desktop to smartphone.
These features make Elfsight not just a quiz builder, but a complete solution for creating engaging, high-converting forms on your WordPress website. Next, let’s walk through the full step-by-step process of setting up and adding the widget to your pages.
Adding Quiz to WordPress: Step-by-Step
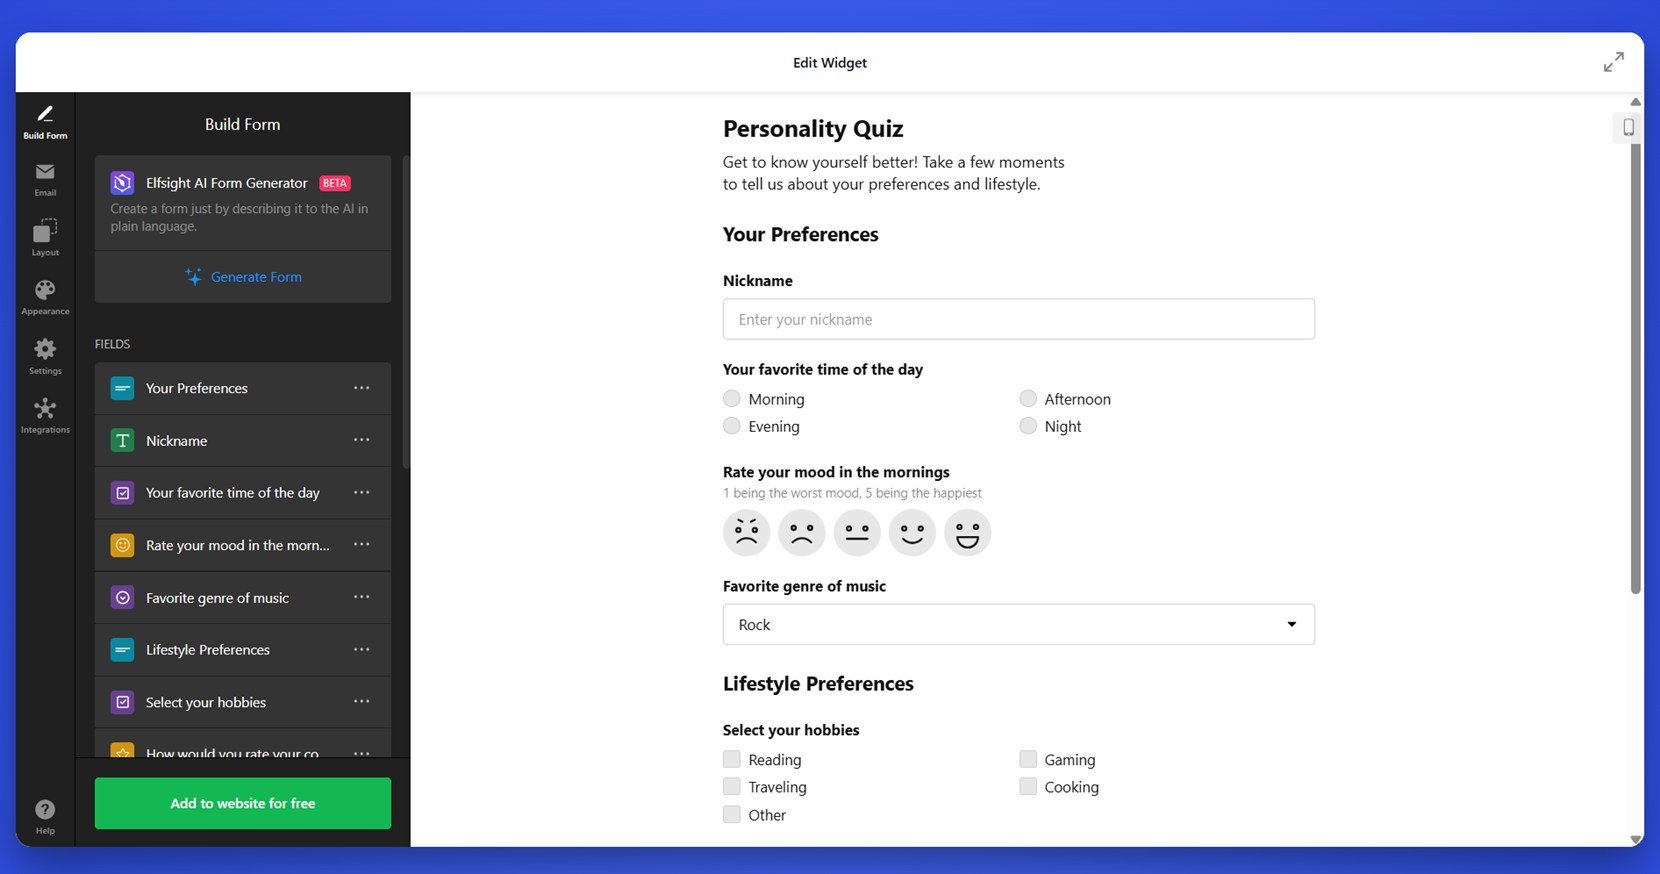
Elfsight’s visual layout editor allows you to build and publish a custom WordPress quiz without coding. Below is a step-by-step instruction based on the actual widget interface. You’ll start by selecting a template and move through form creation, styling, behavior settings, and embedding.
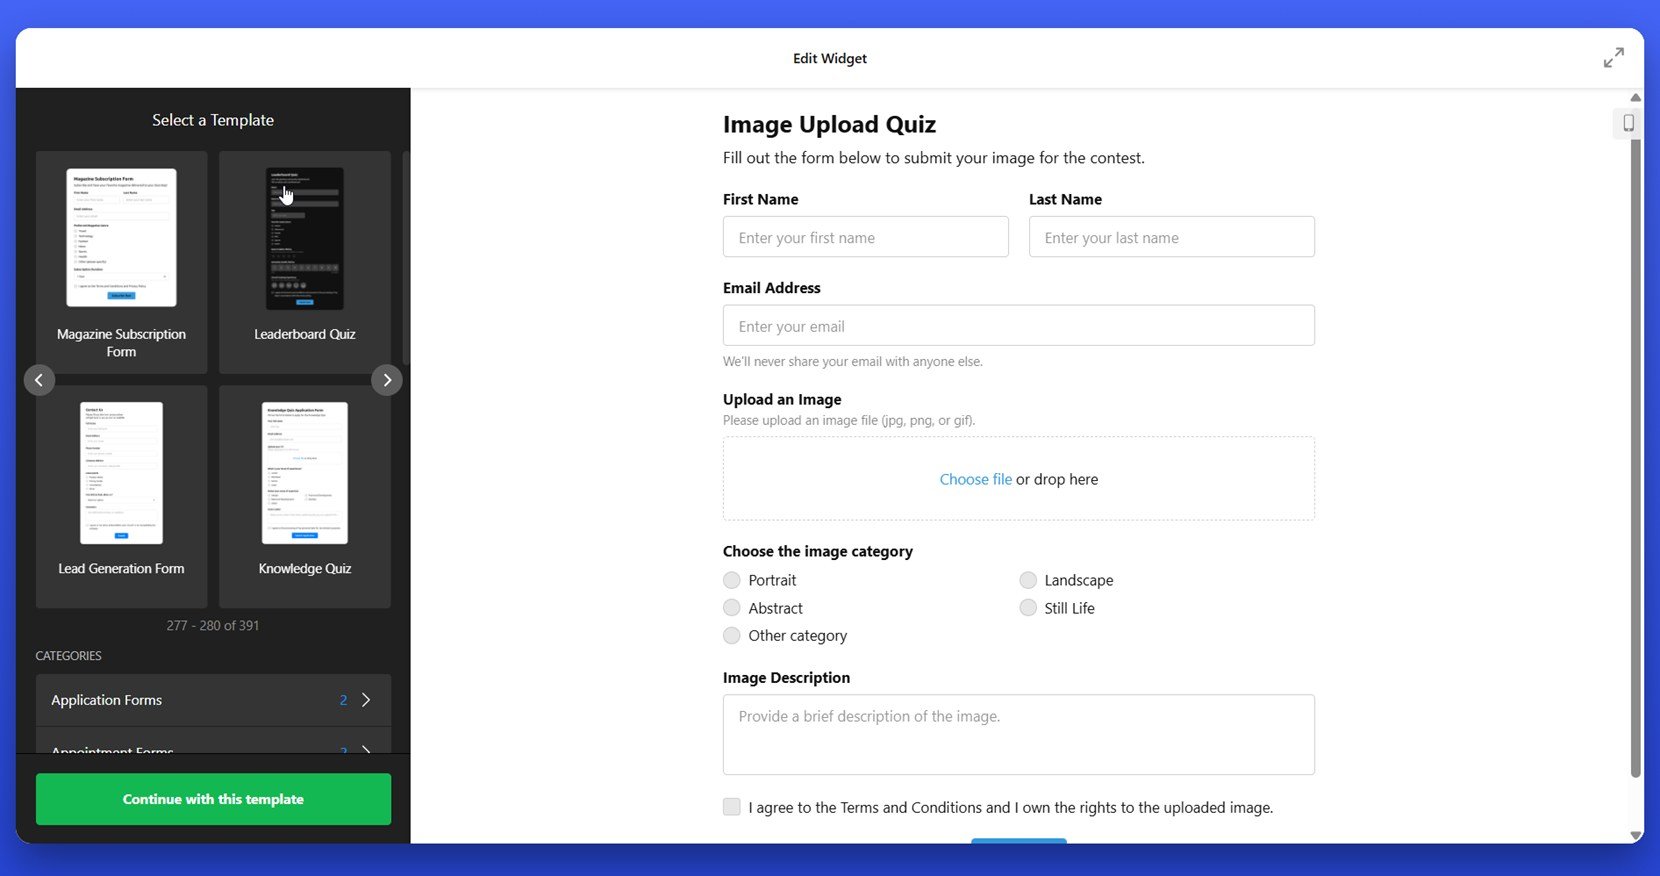
- Choose a Template. Open the Elfsight Form Builder and browse available templates. Select a quiz format that fits your goals — such as “Knowledge Quiz” or “Image Upload Quiz”. Click “Continue with this template” to begin editing.

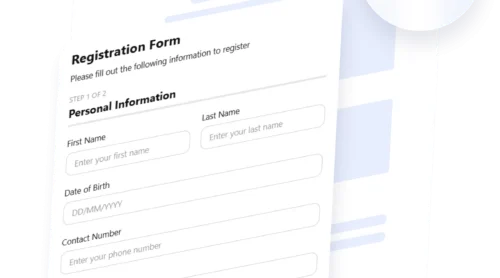
- Build Your Form. In the “Build Form” tab, add form fields using the drag-and-drop panel. You can include text fields, multiple choice options, email input, image uploads, and consent checkboxes. Rearrange them freely to structure your quiz flow.

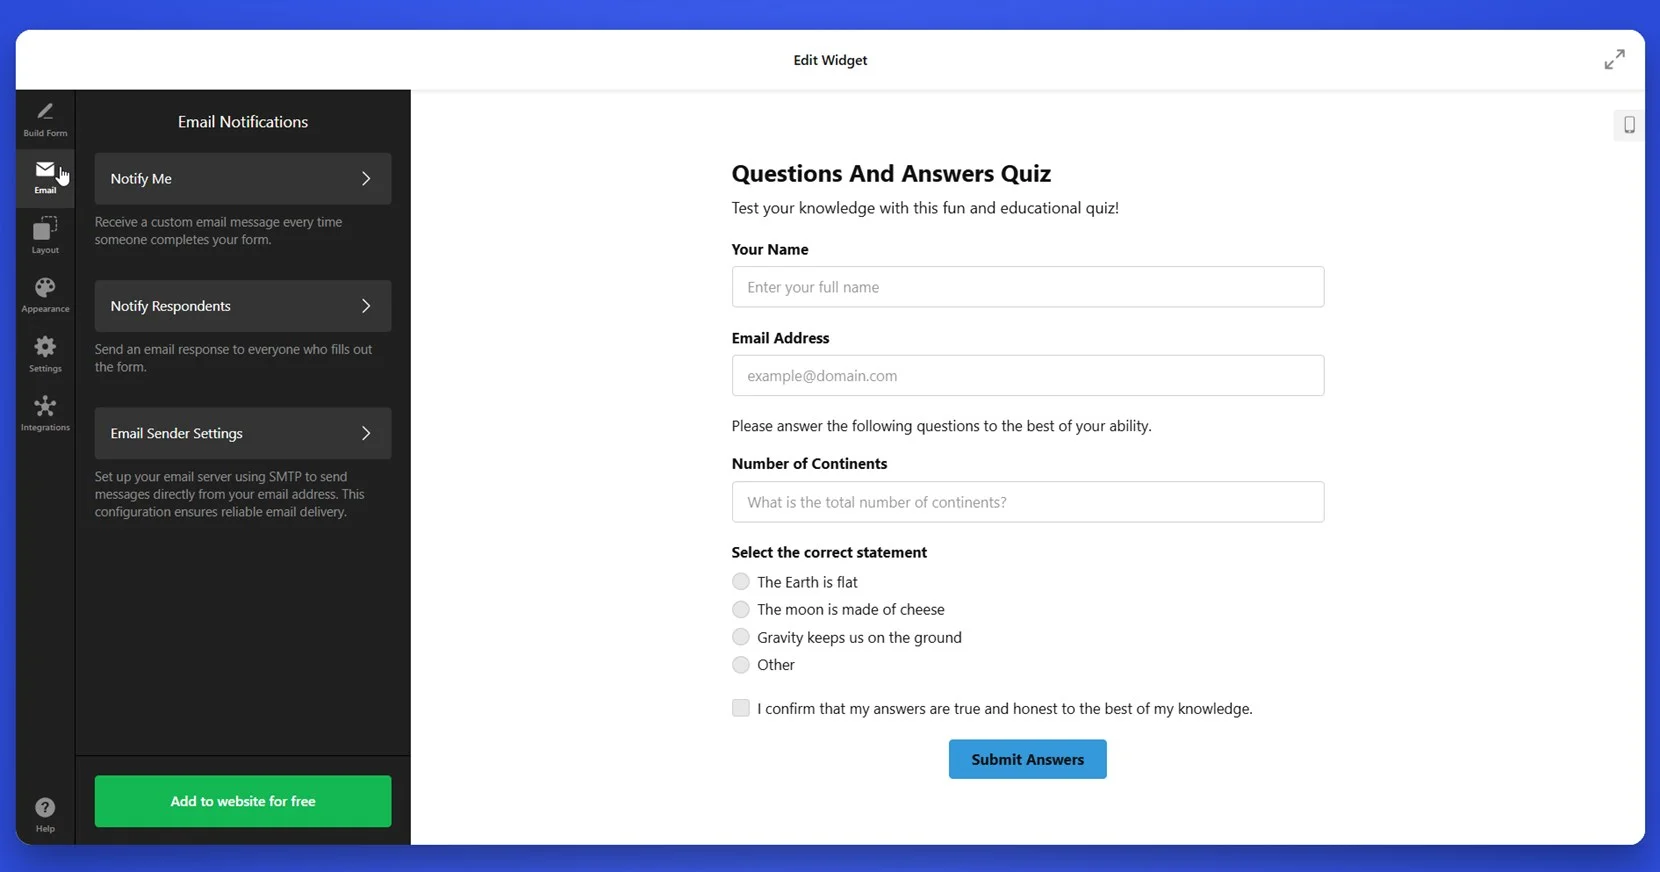
- Set Up Notifications. Go to the “Email” tab to configure how responses are handled. Enable admin alerts under “Notify Me” and set up confirmation emails under “Notify Respondents”. Define sender settings if needed.

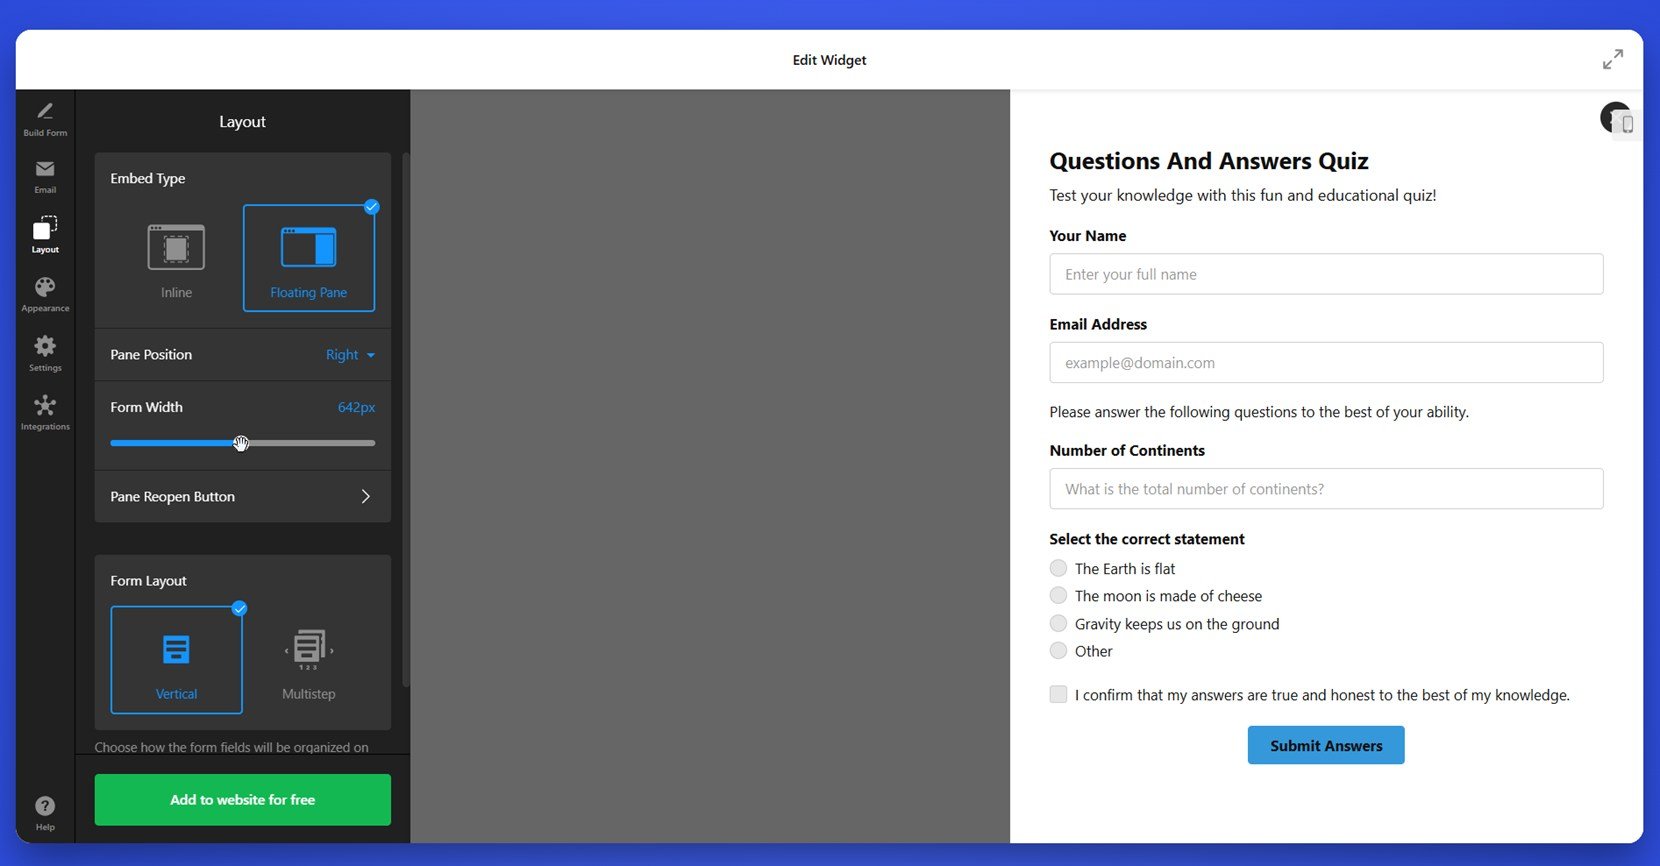
- Adjust the Layout. Under the “Layout” section, select whether the quiz appears as “Inline” or “Floating Pane”. Choose the pane’s position (left or right), set the desired form width using the slider, and select between a “Vertical” or “Multistep” form structure.

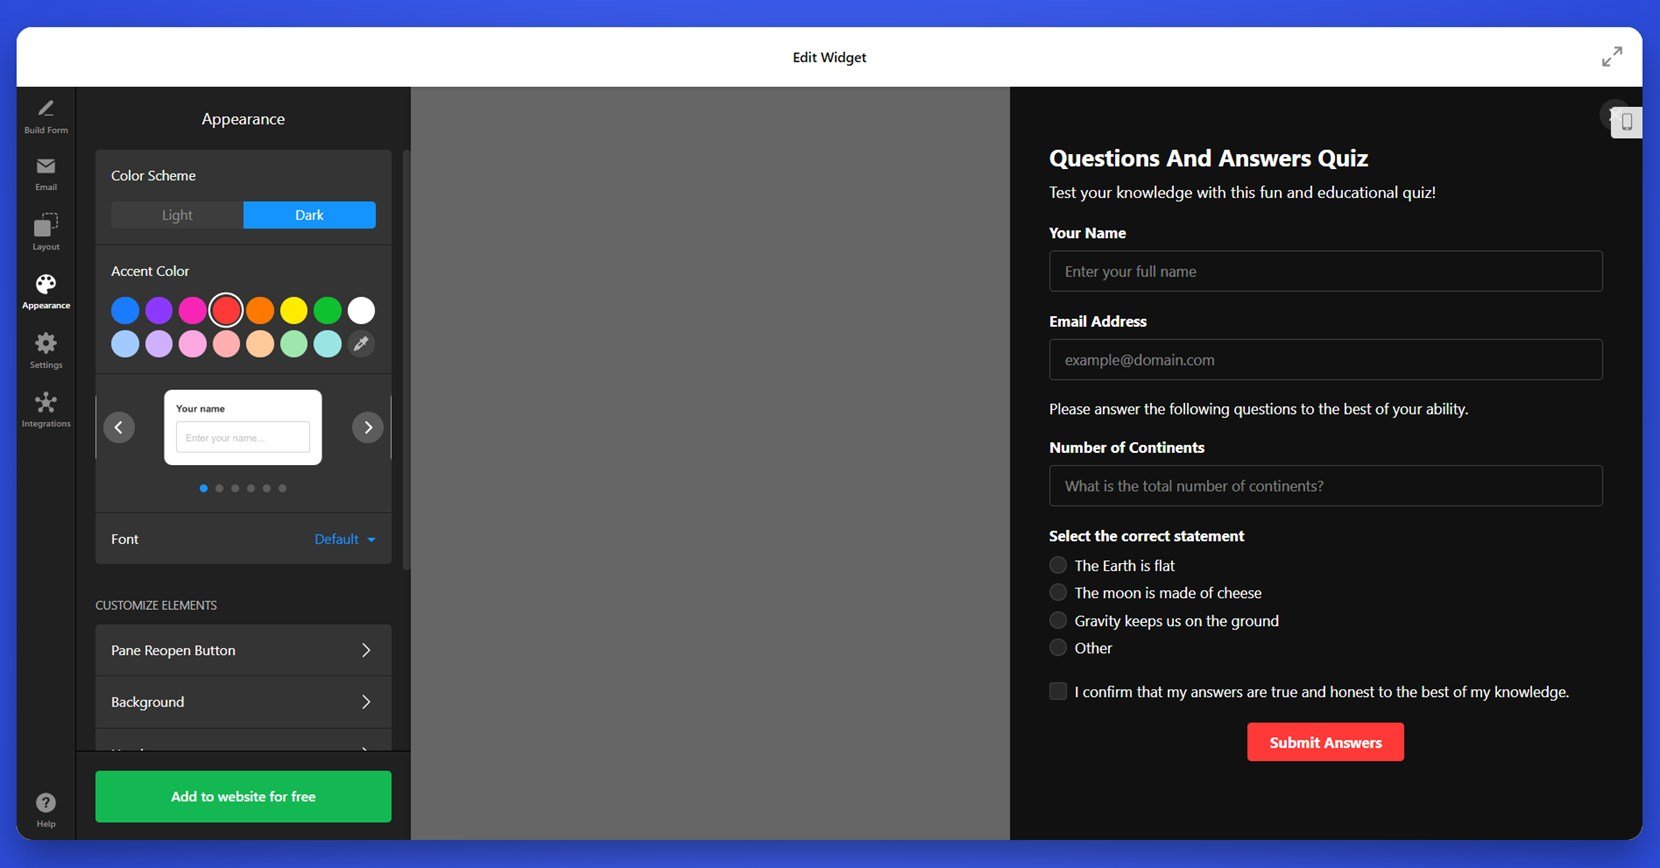
- Customize Appearance. In the “Appearance” section, pick a color scheme (Light or Dark), set an accent color, and adjust fonts. Use the live preview to see how your quiz looks on the front end and fine-tune spacing and background as needed.

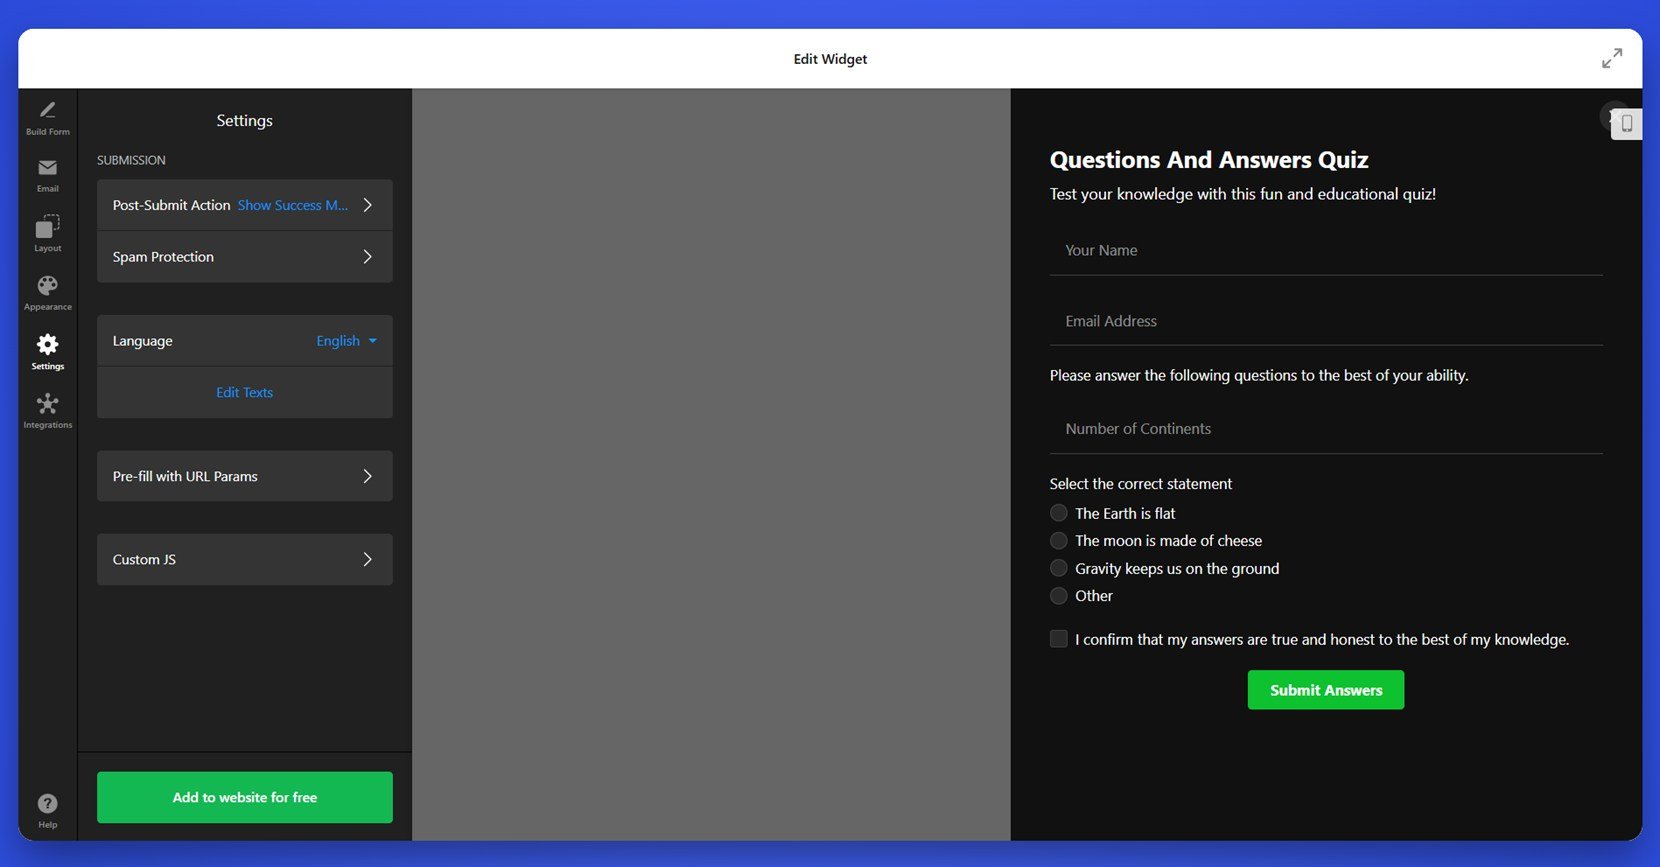
- Configure Widget Settings. Navigate to “Settings” to define the post-submit action (e.g., display a thank-you message), enable spam protection, choose your display language, and optionally add URL parameters or custom JavaScript.

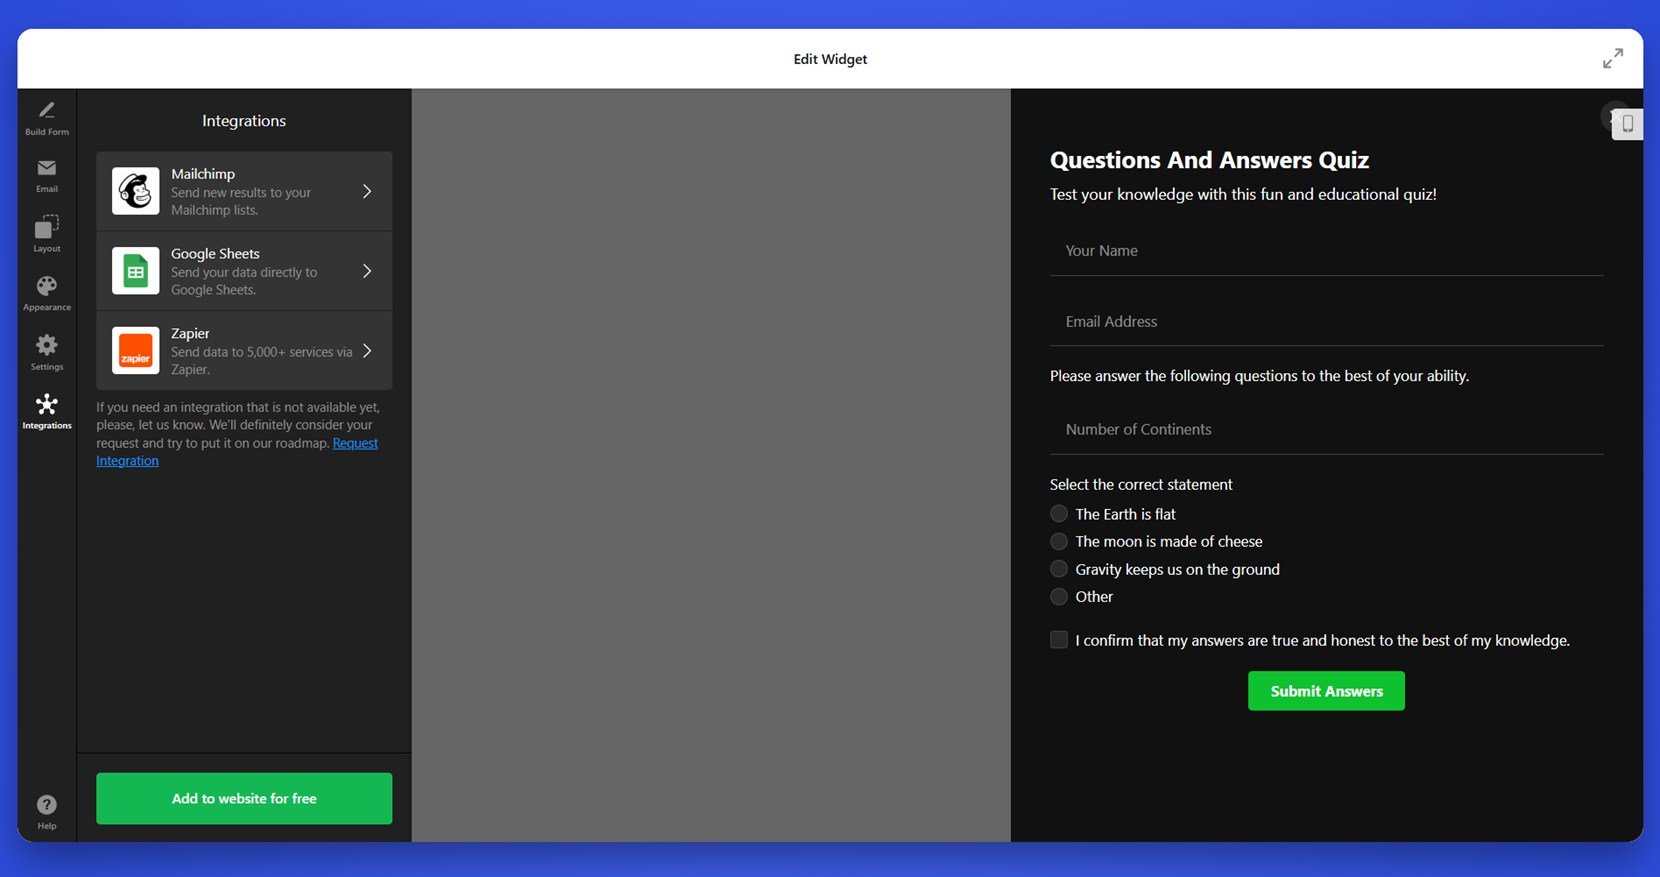
- Connect Integrations. Go to the “Integrations” tab and link your quiz to platforms like Mailchimp, Google Sheets, or Zapier. This allows seamless lead collection and automation after quiz submissions.

- Embed the Code on Your Website. Click “Add to website for free” and copy the embed code provided. Open your WordPress dashboard, go to the target page, add a Custom HTML block, and paste the code. Save and publish the page to activate your quiz.


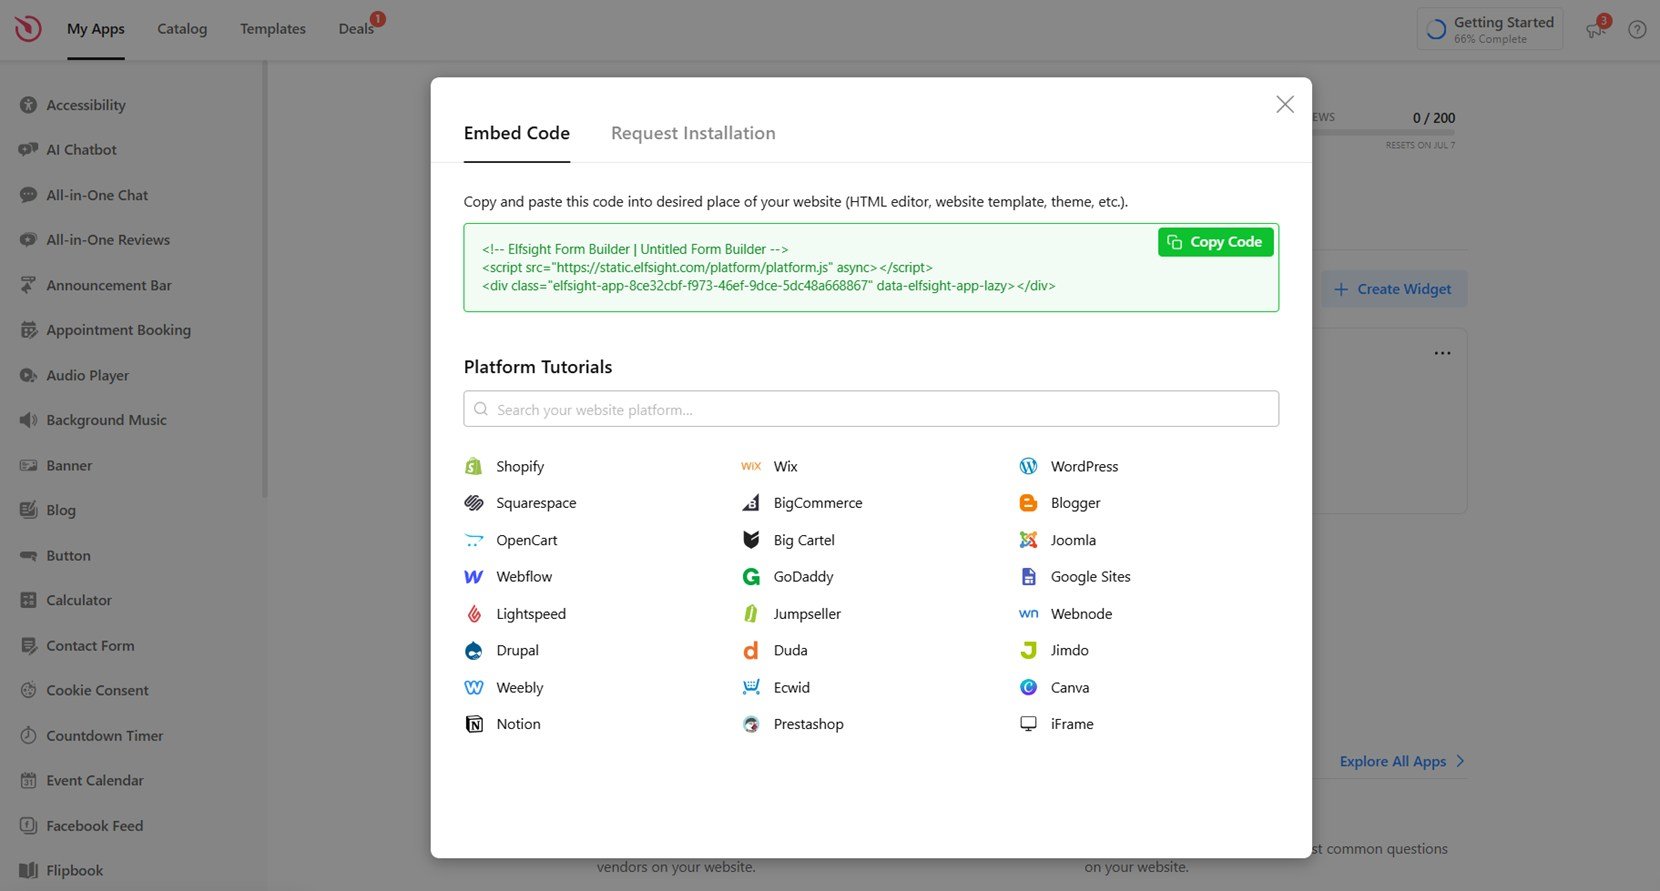
When adding the Elfsight quiz widget to a WordPress website, the process is especially straightforward thanks to WordPress’s built-in block editor. After copying the embed code from the Elfsight editor, all you need to do is open the page or post in your WordPress dashboard, click the “+” button to add a new block, and select “Custom HTML”. Paste the code into this block, then preview to ensure everything displays correctly. Once you’re happy with the result, click “Update” or “Publish” to go live.
WordPress supports custom embeds natively, so you don’t need any additional plugins or integrations — just copy, paste, and publish.
Now that you know how to create and install your WordPress quiz using Elfsight, let’s look at some other ways you can build a quiz and how they compare to this method.
Other Ways to Build a WordPress Quiz
While Elfsight offers an all-in-one solution for creating and embedding quizzes, there are also other methods you can explore directly within the WordPress ecosystem. These include native WordPress plugins, official block-based editors, and manual embedding via HTML. Below, you’ll find a step-by-step guide to one of the most accessible native methods for building a quiz without relying on third-party competitors or external services.
Method 1: HTML block in WordPress Gutenberg
One of the most straightforward alternatives is using the official WordPress Block Editor (Gutenberg) combined with the built-in HTML block. This method allows you to embed basic quiz HTML or JavaScript from quiz platforms or use custom code if you’re comfortable with that. Here’s how to do it manually:
- Log in to your WordPress dashboard. From the left-hand menu, go to “Pages” or “Posts” and select the one where you want the quiz to appear. If you’re starting fresh, click “Add New”.
- Launch the Gutenberg editor. This opens the visual page builder where you can add or arrange blocks of content.
- Click the “+” button to insert a new block. You’ll see this icon in the top left corner of the editor or inline between existing blocks. Clicking it will open a block library.
- In the block library, scroll to or search for “Custom HTML”. It’s located under the “Formatting” section. Once found, click on it to add it to your page.
- Paste your quiz embed code into the HTML block. This could be a script provided by another platform or custom quiz markup you created yourself. Make sure to paste only valid, clean code.
- Click the “Preview” button above the editor. This allows you to see how the quiz will actually render on the live page. It’s a useful step to catch formatting issues or display problems before publishing.
- Make adjustments if needed. If the quiz doesn’t display as expected, check for syntax errors or missing code.
- Once you’re satisfied, click “Update” or “Publish”. This saves your changes and pushes them to your live WordPress website.
This approach gives you flexibility if you already have custom quiz code or are comfortable editing HTML manually. However, it doesn’t include visual editing, templates, or user-friendly customization.
Method 2: WPForms Lite (Native Plugin)
WPForms Lite is one of the most widely used native plugins for WordPress and is a good starting point for creating basic quizzes or survey-style forms. It’s designed with ease of use in mind and includes a drag-and-drop builder that requires no coding. Although its free version doesn’t support advanced scoring or result-based logic, it’s useful for creating simple questionnaires, feedback forms, or non-graded quizzes.
- Log in to your WordPress dashboard. From the left-hand menu, navigate to “Plugins” → “Add New” to open the plugin library.
- In the search bar, type “WPForms Lite.” Once it appears in the search results, click “Install Now”, and then hit “Activate” when the installation finishes.
- After activation, go to WPForms → Add New. This will launch the form builder where you can start designing your quiz or questionnaire.
- Choose a starting template. You can select the “Blank Form” to start from scratch or pick a basic pre-designed form such as “Simple Contact Form” and modify it to serve as a quiz.
- Drag and drop quiz-relevant fields into your form. Use field types like “Multiple Choice”, “Dropdown”, or “Checkboxes” to build your questions. Click on each field to edit the label, choices, and whether it’s required.
- Set up confirmation messages and notifications. Under the “Settings” tab, customize what the user sees after submission and define email notifications that go to your inbox when someone fills out the form.
- Click the “Save” button in the top right corner. This ensures your form configuration is preserved.
- Click “Embed” and copy the generated shortcode. You’ll see a shortcode like [wpforms id=”123″] that can be placed anywhere on your WordPress page or post.
- Open the page editor where you want to add the quiz. Insert a “Shortcode” block and paste the code into it.
- Click “Update” or “Publish” to make your form live. Your quiz will now be visible on the front end of your website.
WPForms Lite makes it easy to create a basic questionnaire or form-based quiz with a clean interface and WordPress-native integration. It’s ideal for non-technical users looking for a no-fuss solution that lives entirely within the WordPress environment.
Comparison: Elfsight vs Other WordPress Quiz Methods
Here’s a quick comparison to help you evaluate which method fits your needs best:
| Method | Major Advantage | Major Limitation |
|---|---|---|
| Elfsight Quiz Plugin | Offers visual editing, conditional logic, and a no-code experience with a beautiful UI. | Requires copying and pasting third-party embed code into your website. |
| Gutenberg HTML Block | Allows full code control and integration with any external quiz script. | Requires manual coding and offers no visual interface for quiz building. |
| WPForms Lite Plugin | Quick to install and works directly inside the WordPress dashboard. | Limited features for quizzes, no scoring logic, and basic customization. |
As you can see, while there are other options for adding a quiz to your WordPress website, Elfsight provides the most complete, user-friendly experience — especially if you want results without technical effort. Let’s now explore how you can make your quiz match your branding and content goals.
Tips to Personalize Your Website Quiz
Once your quiz is live, the next step is customization. Tailoring the quiz layout, questions, and styling to match your goals and audience is essential for maximizing user engagement and creating a personalized quiz experience. Below are practical tips to help you get the most out of your quiz widget using any drag-and-drop form maker or HTML embed method.
- Align the visual style with your brand. Use consistent fonts, button styles, and color schemes that match the rest of your website. This keeps the user experience seamless and professional.
- Use conditional logic for better flow. Show or hide questions based on previous answers to keep the quiz relevant and dynamic. This approach not only improves usability but also avoids overwhelming the user with unnecessary questions.
- Keep your quiz concise and clear. Aim for 5–7 well-written questions with minimal distractions. Each question should be easy to understand and quick to answer to avoid drop-offs.
- Include engaging feedback or results pages. Use the final screen to share results, display personalized messages, or prompt users to take action — like signing up for your newsletter or exploring related content.
- Test mobile responsiveness. Preview your quiz on different screen sizes to ensure everything — from buttons to spacing — functions properly across all devices.
- Label answer choices clearly. Avoid vague language. If you’re using images or icons, ensure they are easy to interpret and visually aligned.
- Use entry animations or progress indicators. Smooth transitions and visible progress bars make multi-step quizzes feel interactive and structured.
Once you’ve customized your quiz to fit your audience and brand, the next step is knowing what types of quizzes you can create. Let’s explore the most popular and useful quiz formats you can build for your WordPress website.
Quiz Types You Can Build with Elfsight
Elfsight offers a collection of customizable quiz templates designed for various purposes — from product recommendations to lead capture. These pre-made layouts help you build interactive experiences quickly, with zero coding required. Below are four popular quiz types you can create using Elfsight’s templates.
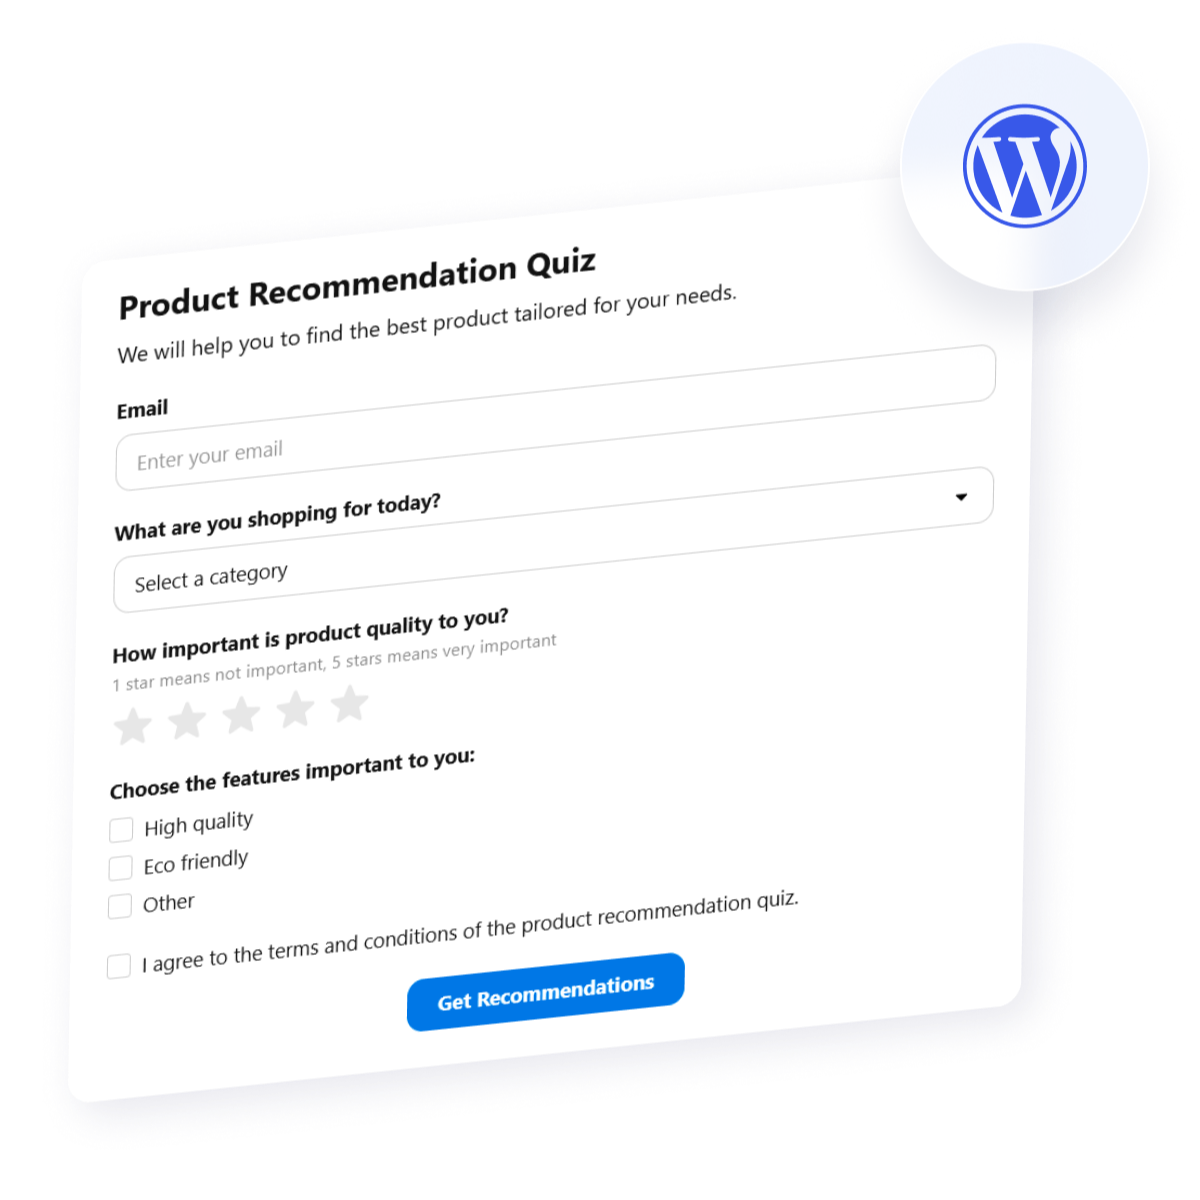
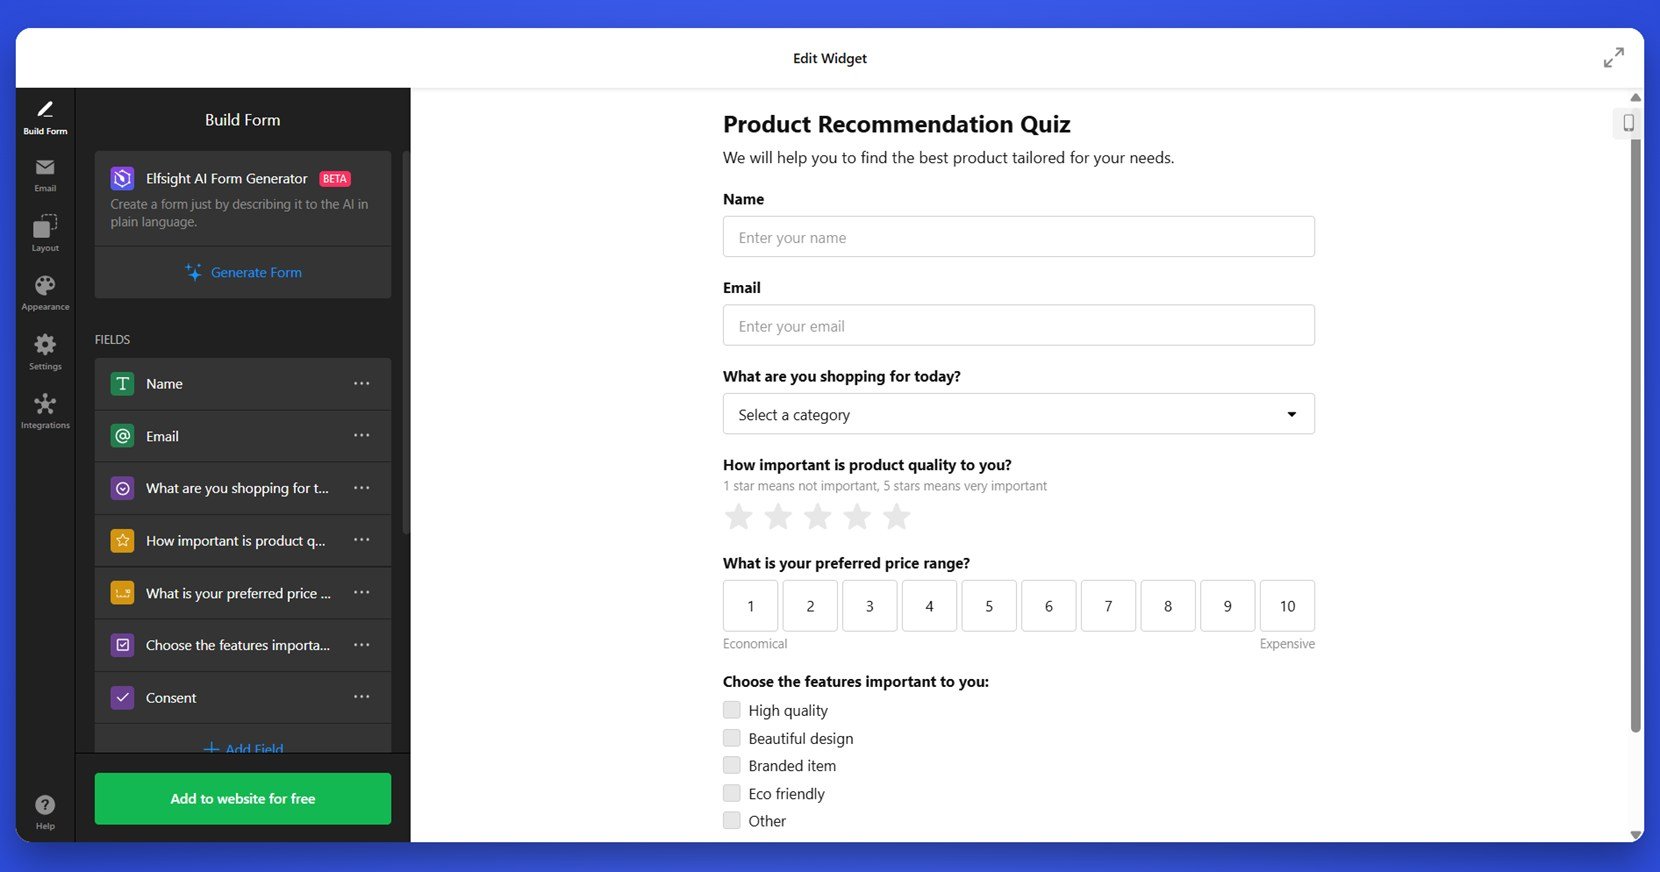
Product Recommendation Quiz 🛒
The Product Recommendation Quiz template walks users through a sequence of questions to determine which product suits them best. It’s ideal for eCommerce websites looking to provide a personalized shopping experience and guide buyers to the right items.
Personality Test Quiz 👤
With a fun and engaging format, the Personality Test Quiz template helps users discover their personality type based on their responses. It includes personalized results and is designed to be shared across social media, increasing visibility and engagement.
Knowledge Quiz 📚
The Knowledge Quiz template is perfect for testing users’ understanding of specific topics or verifying what they’ve learned. It supports multiple choice formats, correct answer indicators, and scoring logic, making it ideal for educational content or training purposes. You can customize the number of questions, scoring weight, and final result feedback.

These templates are just the beginning — each one can be fully adapted to fit your brand and goals. Next, we’ll cover the common challenges users face when working with quiz widgets and how to solve them quickly.
Fixes for Common Issues
While creating and embedding a quiz on your WordPress website is generally smooth, some technical and functional challenges may arise. Below are common questions users face when working with a quiz builder and how to handle them efficiently.
Why isn’t my quiz displaying on the website after embedding the code?
Can I use the quiz builder with WordPress page builders like Elementor or WPBakery?
The design looks broken or misaligned. What should I check?
Why is the form not collecting responses or leads?
Is there a way to edit the quiz after it’s embedded?
Why does the quiz load slowly on some pages?
These are some of the most common problems users encounter when setting up quiz widgets on WordPress. In most cases, a few small adjustments can fix display or functional issues quickly. Let’s wrap up everything we’ve covered and get you ready to build your perfect quiz.
Conclusion
Creating an engaging quiz for your WordPress website has never been easier. Whether you want to drive leads, personalize product recommendations, or simply entertain your audience, a well-designed quiz widget adds real value to your interactive content strategy. With Elfsight’s intuitive templates — ranging from product recommendation forms to scored and knowledge-based quizzes — you can build dynamic, visually appealing quizzes without touching a single line of code.
We’ve walked through setup, customization, use cases, and common challenges to give you a full understanding of how to create a quiz in WordPress. Now it’s your turn to take the next step — build a quiz that fits your brand, meets your business goals, and keeps visitors coming back for more.
Need More Help?
We hope this guide gave you everything you need to start building your first quiz widget. If you have questions or want help designing something specific, don’t hesitate to reach out. Elfsight is here to help you launch powerful, no-code solutions that bring measurable results to your business.
Be sure to join our vibrant Community to swap ideas, offer feedback, and suggest improvements. We’d love to hear your thoughts — submit new ideas directly to our Wishlist and help shape the future of our platform.