A sign-up form is one of the most effective ways to engage visitors and convert them into subscribers or customers. If you’re looking for how to add a sign-up form in WordPress, you’re already on the right track to building a stronger, more connected audience.
Adding a sign-up form to your WordPress website is a smart move if you want to collect user information, grow your email list, or simplify user onboarding. It’s quick to implement and brings long-term benefits for your business goals.
- Build a qualified email list faster. A visible and easy-to-use form encourages more users to subscribe, giving you a direct line to engaged leads.
- Simplify user onboarding and lead generation. Automate the way you collect essential user data and turn visitors into actionable contacts.
- Improve engagement and drive repeat visits. Forms help establish a communication channel that keeps your audience coming back for updates, offers, or exclusive content.
- Boost conversion rates with minimal effort. Even a basic sign-up form can guide visitors into your sales funnel without disrupting their experience.
In the next section, we’ll show you just how quickly you can create a professional sign-up form using Elfsight — even if you have zero technical experience.
Quick Way to Make a WordPress Sign-Up Form
Now that you know why a sign-up form is essential, let’s look at how easy it is to create one using Elfsight. With just a few steps, you can build a fully functional form that helps you collect user data and grow your subscriber base — no coding needed.
- Open the Elfsight editor and choose the Sign Up Form template.
- Adjust layout settings like form fields, spacing, and alignment to match your website’s structure.
- Customize the look by selecting colors, fonts, and background elements that fit your branding.
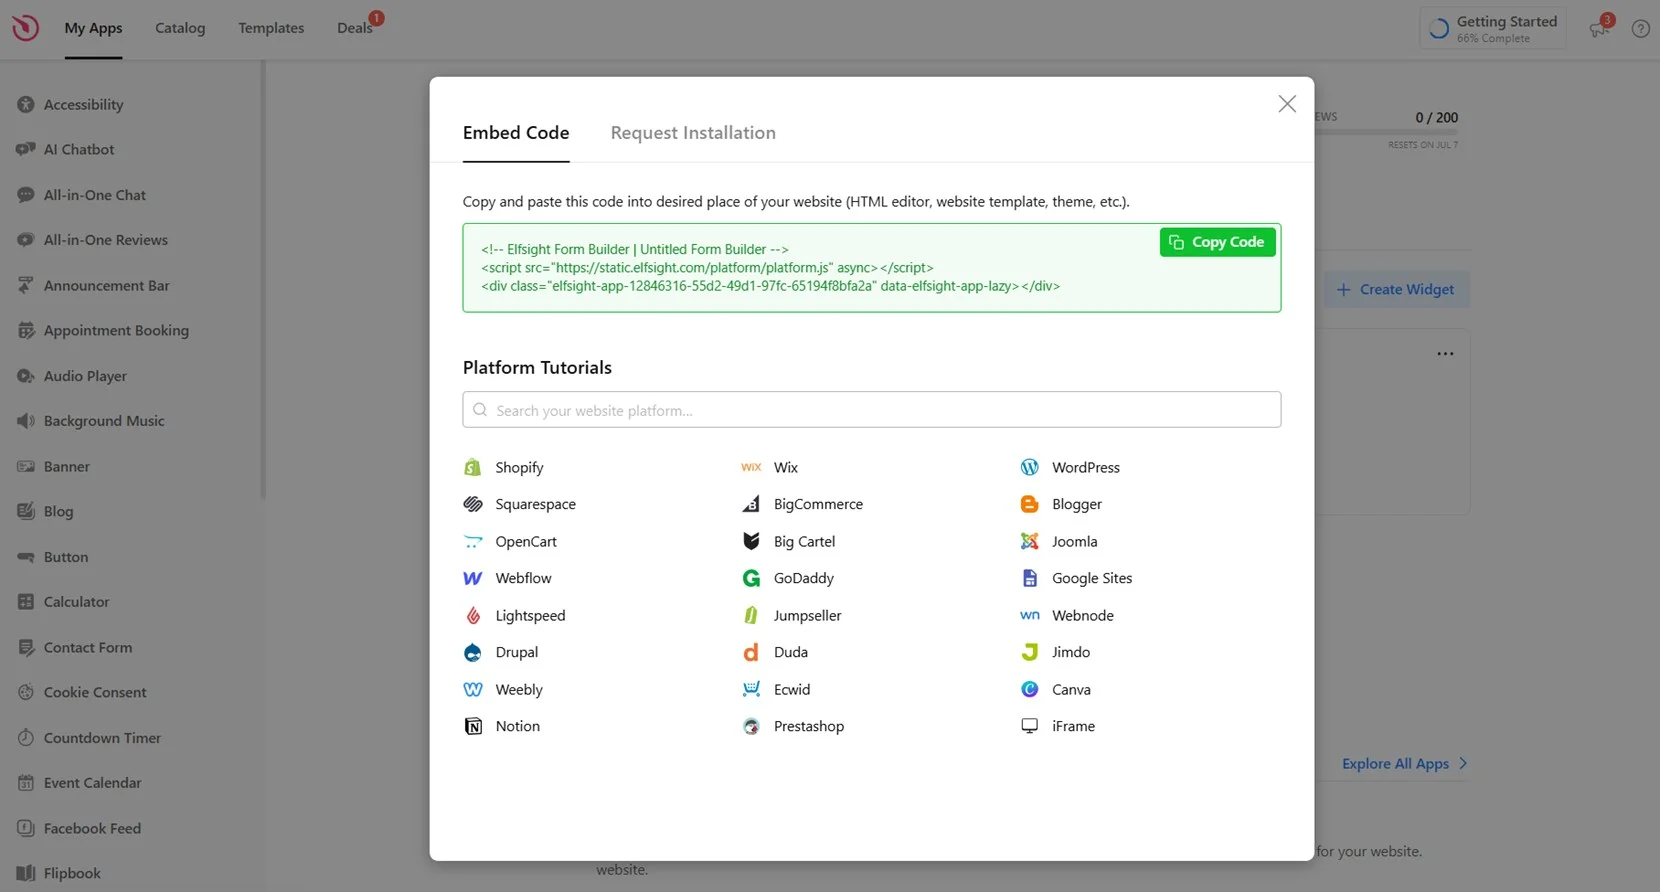
- Click “Add to website for free“, copy the embed code, and paste it into your WordPress backend.
This process takes only a few minutes and gives you full control over how your form looks and works. Whether you’re building a mailing list or simplifying user onboarding, Elfsight makes the setup process seamless.
Want to see it live? Build your own sign up form in seconds!
Benefits of the Elfsight Form Builder
After you’ve seen how simple it is to build a form, let’s take a closer look at what makes Elfsight the go-to solution for creating sign-up forms in WordPress. This tool offers a powerful set of features designed to help you engage visitors and collect data effortlessly.
Here are the key features and benefits that make Elfsight’s Sign Up Form worth trying:
- Fully customizable form layout and design. Tailor every detail of your form, from field structure to colors and fonts, so it blends seamlessly with your website’s branding.
- Mobile-ready and responsive by default. Your form will look and perform great across all devices without any manual adjustments.
- Field flexibility for any purpose. Add, remove, or rearrange fields to collect the exact information you need, from emails to detailed user data.
- Built-in email notifications and alerts. Get instantly notified when someone fills out your form, keeping you connected in real time.
- Anti-spam protection with CAPTCHA. Keep your inbox clean with smart spam filtering tools built right into the widget.
- Seamless integrations with email services. Easily link your form with platforms like Mailchimp, Google Sheets, or Zapier for streamlined data handling.
- One-click installation with auto-updates. Embed your form once and enjoy future improvements automatically, no maintenance needed.
These features give you everything you need to create an interactive, professional-looking form that works perfectly on any WordPress page. Now let’s move on to the full setup process — where we’ll walk through every step from creation to installation.
Create a Sign Up Form in WordPress: Step-by-Step
Now that you’ve seen what’s possible with Elfsight’s ready-made templates, it’s time to walk through the full process of creating and embedding your sign-up form in WordPress. The setup is fast and doesn’t require any coding — you simply choose a layout, customize the form, and paste the code into your website. Follow these steps to build a working registration form in minutes.
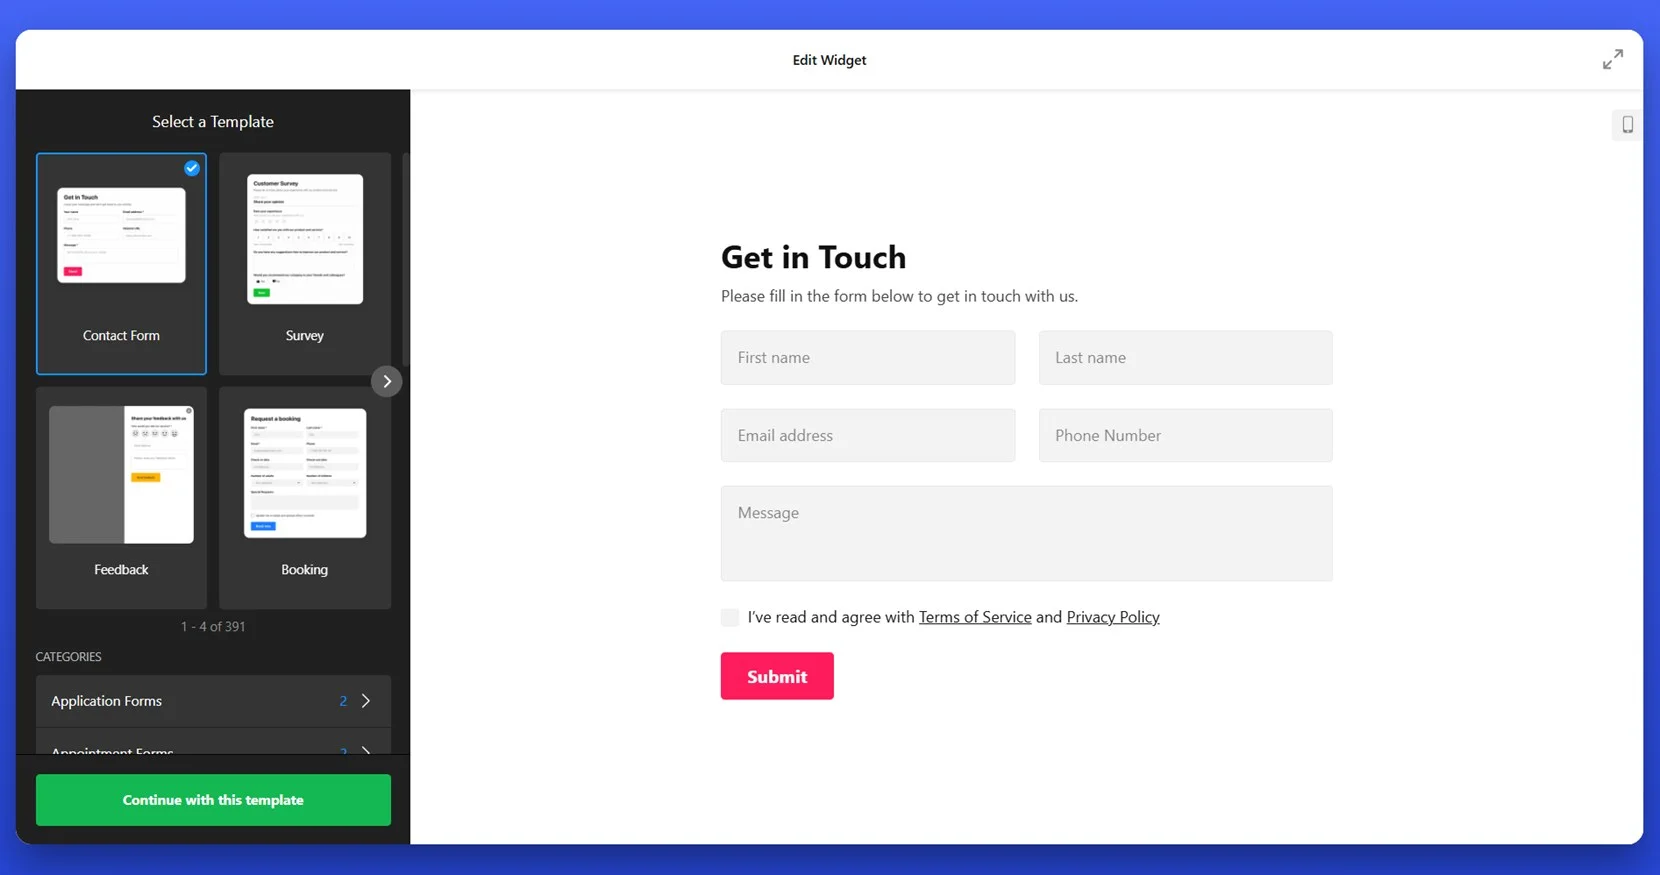
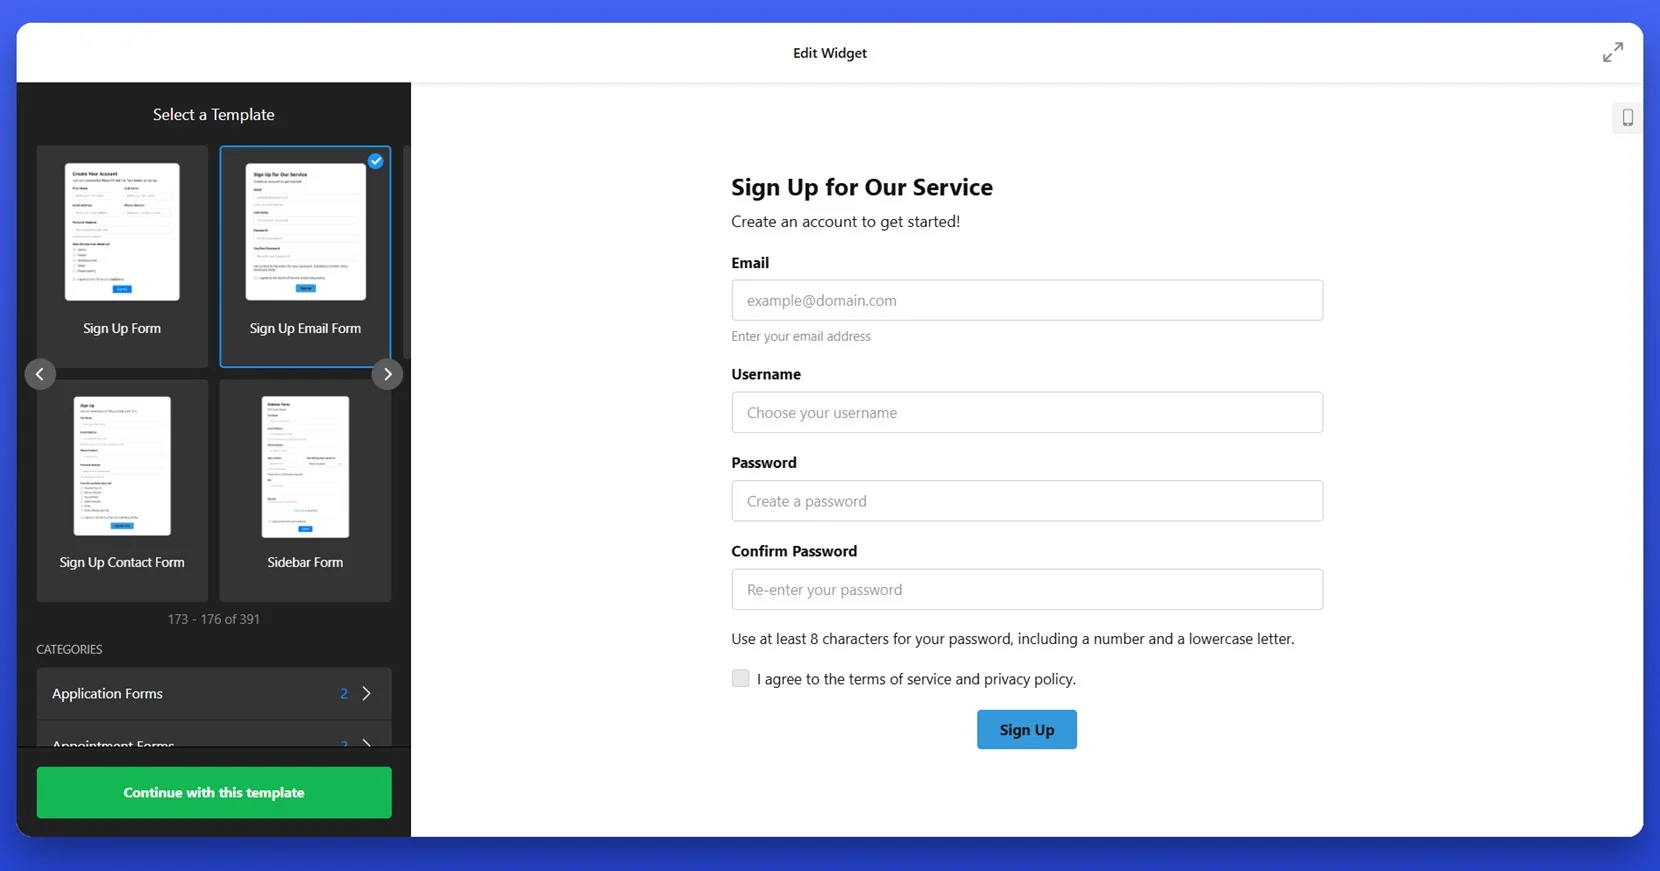
- Choose a Template. Open the Form Builder and select the “Sign Up Email Form” template. Click “Continue with this template” to enter the editor with the layout preloaded.

- Customize the Form Fields. In the form editor, fill in fields like Email, Username, Password, and Confirm Password. You can edit field labels and placeholder text to match your tone and add or remove any fields depending on your registration flow.

- Enable Notifications. Navigate to the “Email” tab in the left menu. Set up “Notify Me” to receive alerts when someone completes your form, and “Notify Respondents” to send confirmation messages to new users. Configure SMTP in the “Email Sender Settings” for reliable delivery.

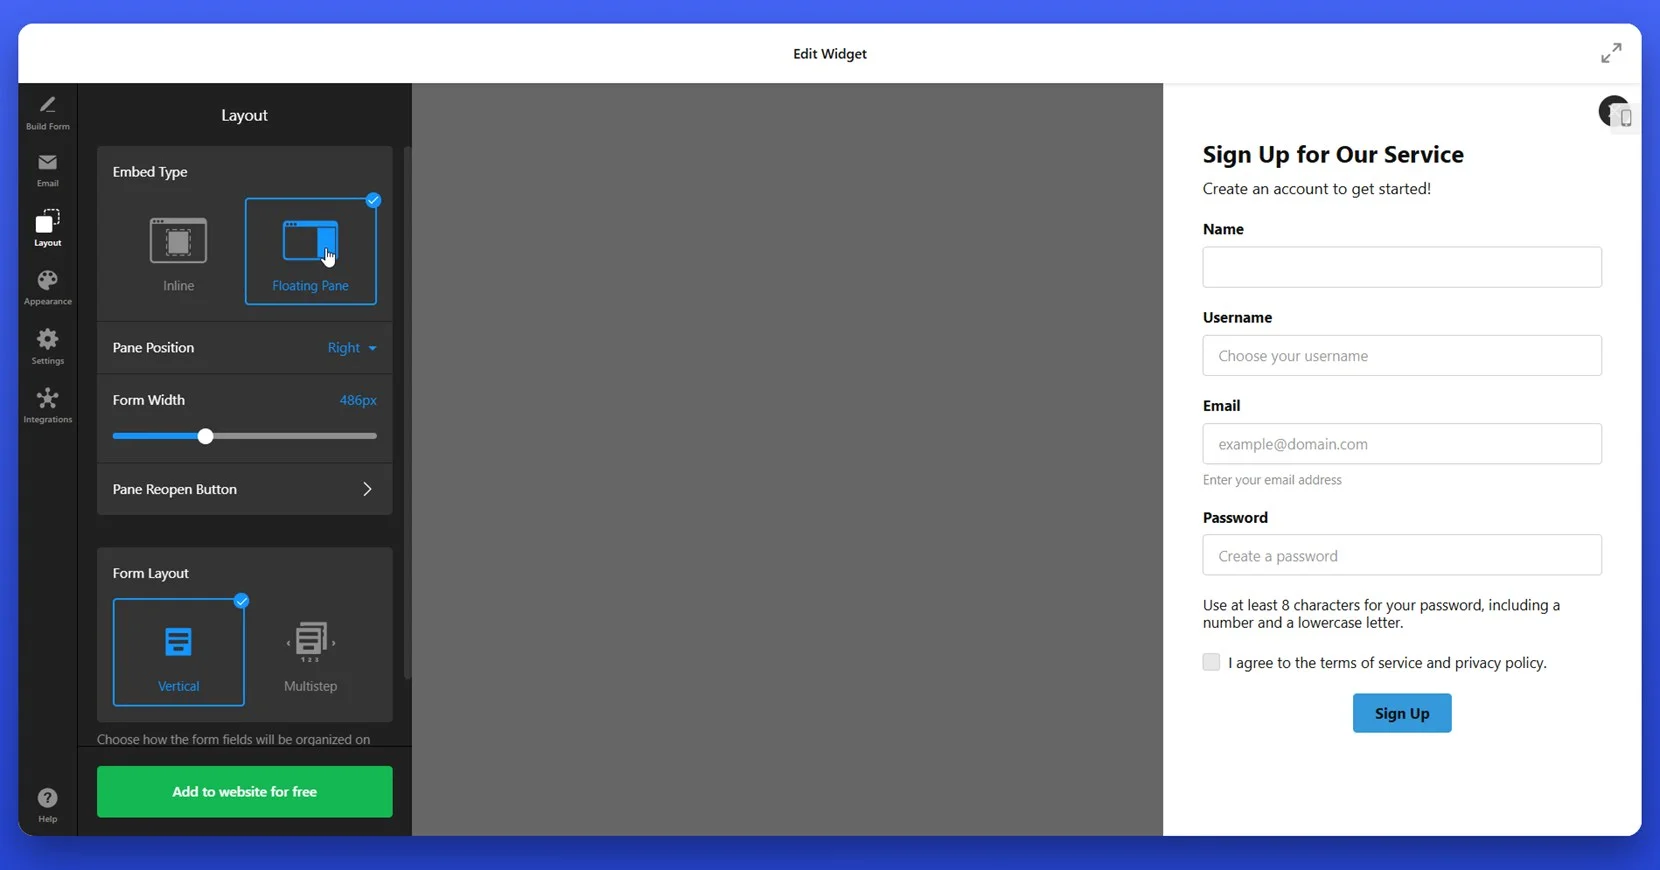
- Adjust the Layout Settings. Open the “Layout” tab and choose how the form should appear — Inline or Floating Pane. Set the pane position (e.g., right side of screen), adjust the width, and choose whether you want a vertical layout or a multistep form flow.

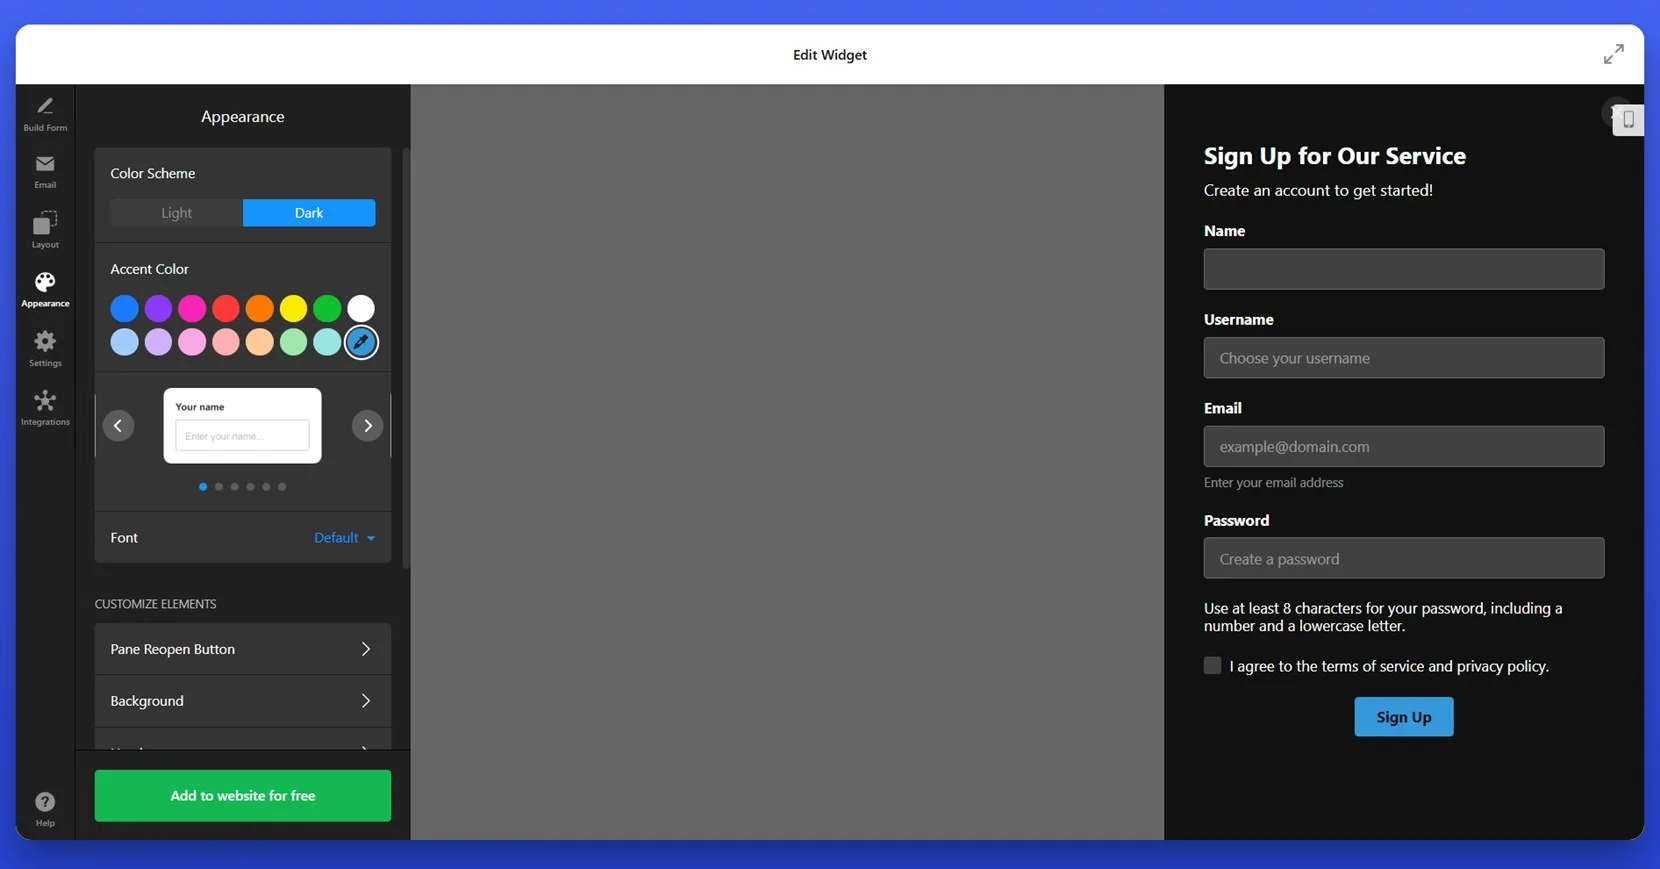
- Edit the Visual Style. Go to the “Appearance” tab to personalize colors, font style, and theme. Choose between Light and Dark modes, pick an accent color, and align the design with your website’s branding.

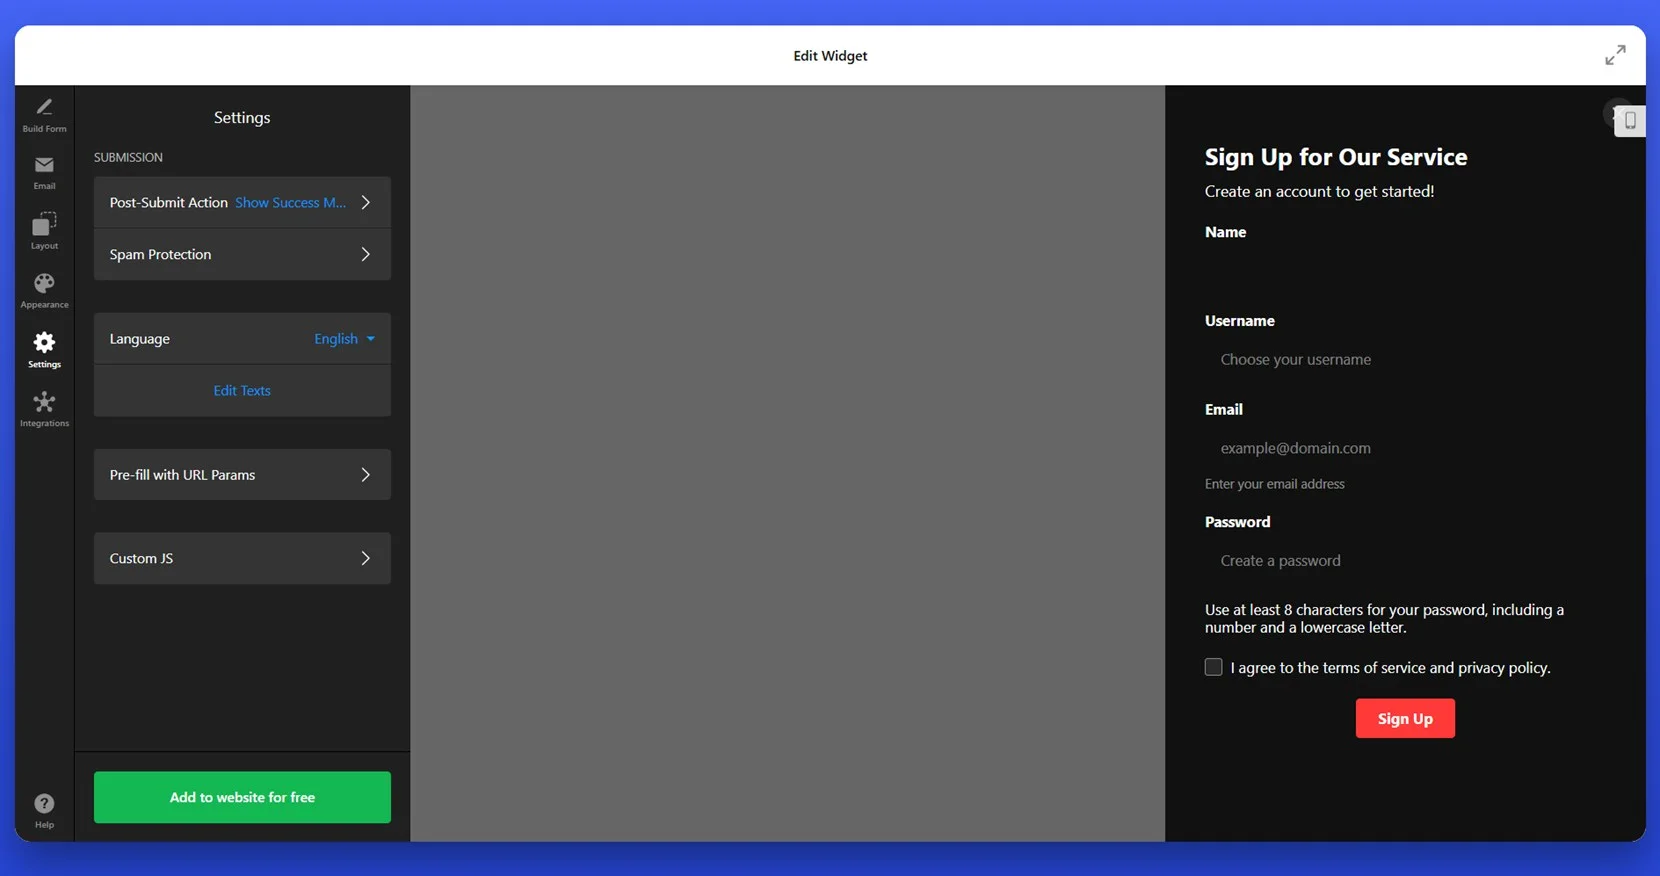
- Set Form Behavior and Language. In the “Settings” tab, define what happens after submission — such as showing a success message or redirecting to another page. Turn on spam protection, choose your language, and fine-tune text labels if needed.

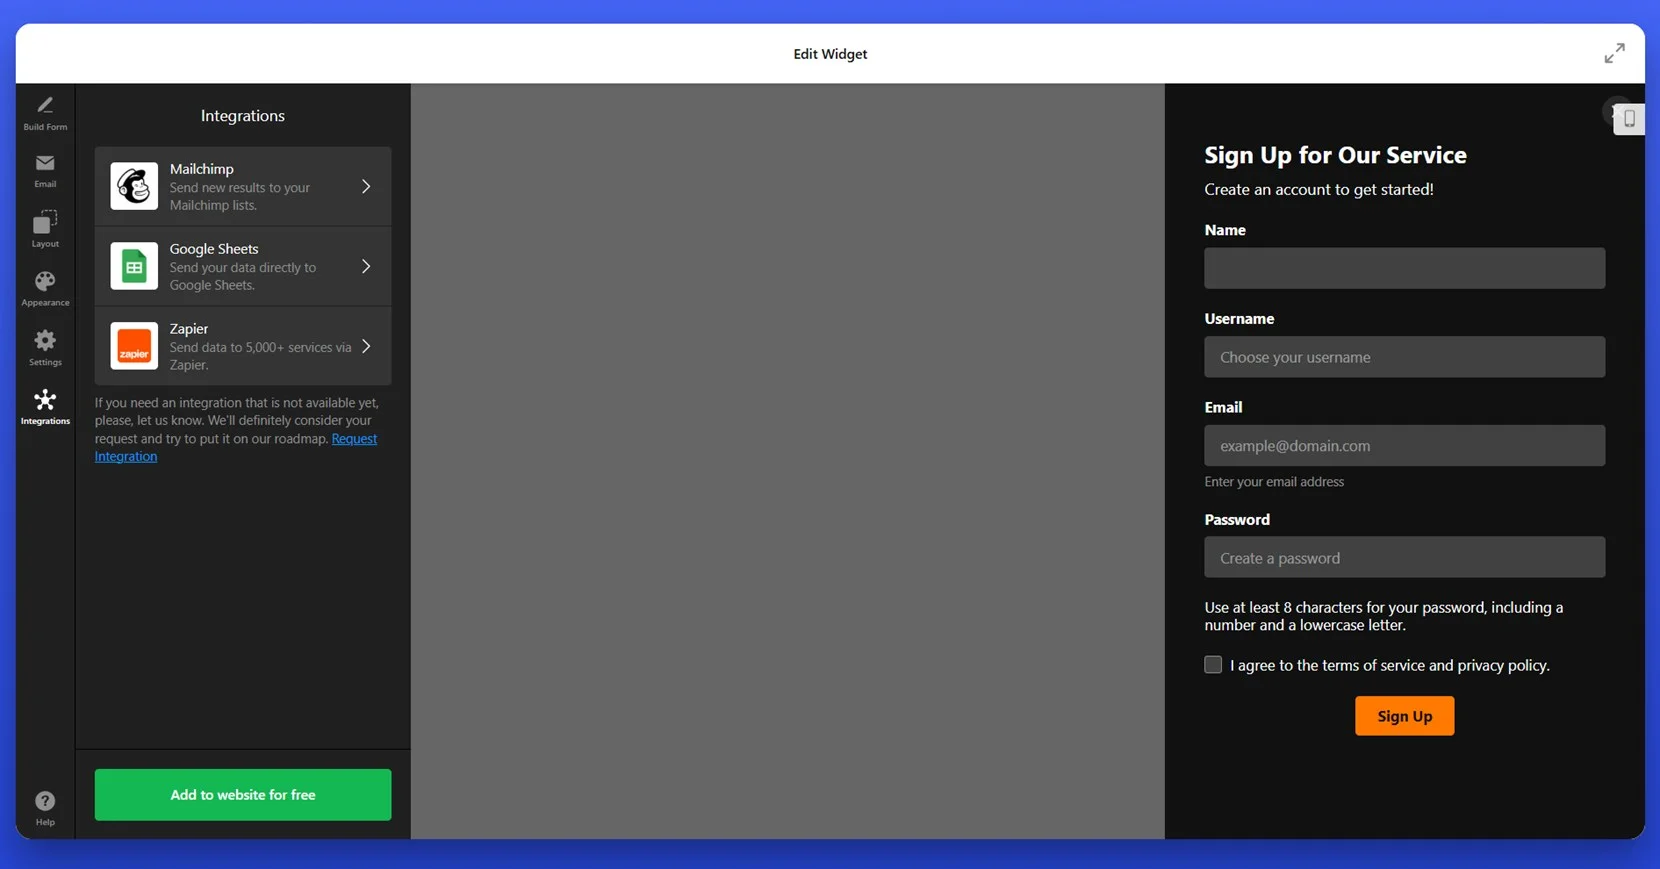
- Connect Integrations (Optional). Go to the “Integrations” tab to link your form with Mailchimp, Google Sheets, or Zapier. This allows you to automatically send submitted data to your preferred marketing or storage platform.
- Embed the Code on Your Website. Click “Add to website for free” and copy the generated embed code. Open your WordPress dashboard, navigate to the page or section where the form should appear, and paste the code into a Custom HTML block. Save and publish your changes.


With these steps, you’ll have a fully functional, styled, and integrated sign-up form on your WordPress website — ready to collect user data, drive conversions, and support your onboarding workflow.
Other Ways to Build a Sign-Up Form
While Elfsight offers a user-friendly, visual setup process, some users may prefer to create a sign-up form manually using pure HTML. This method is suitable for developers or website owners with coding knowledge who want a lightweight, plugin-free form that can be fully tailored to their technical requirements. It gives full control over the structure, styling, and integration of the form.
Manual HTML Form Setup in WordPress
This approach allows you to embed a custom sign-up form using HTML directly into your WordPress content. You’ll create the form markup, define its action behavior, and handle submissions using your own backend or third-party service. This method is flexible but requires attention to form validation, spam protection, and styling.
- Write your HTML form code. Start by drafting the core form structure using standard HTML elements. For example:
<form action="your-processing-script.php" method="POST"> <label for="name">Name:</label> <input type="text" id="name" name="name" required><br> <label for="email">Email:</label> <input type="email" id="email" name="email" required><br> <input type="submit" value="Sign Up"> </form> - Create a form handler script. Replace action=”your-processing-script.php” with the URL of a server-side script (written in PHP, Python, or similar) that will handle form submissions. You must build a backend script that collects and processes the submitted data. In PHP, for example, you’d collect values using $_POST[’email’] and store or email them securely.
- Log into your WordPress dashboard. From the admin panel, navigate to the page or post where you want to add the form. Click on the “+” icon to add a new block. From the list of available blocks, choose “Custom HTML.”
- Paste your HTML form code into the block. Insert the complete HTML code you wrote in the first step into the Custom HTML block. Use the “Preview” button to check if the form renders properly and aligns with your layout.
- Publish or update your page. Once everything looks good, click “Publish” or “Update” to make the form live on your website.
Because this form is manually coded, you’re responsible for implementing styling with CSS, protecting it with CAPTCHA or anti-spam mechanisms, and validating inputs either client-side with JavaScript or server-side in your script.
Comparison of Methods for Adding a Sign-Up Form in WordPress
The table below compares Elfsight’s sign-up form solution with the manual HTML method. It highlights the key benefits and limitations of each approach to help you choose the best one for your needs.
| Method | Pros | Cons |
|---|---|---|
| Elfsight | Offers the easiest setup with full visual customization and zero coding required. | Advanced features like integrations may require a paid Elfsight account. |
| Manual HTML | Provides full structural and functional control without relying on plugins. | Requires coding, backend setup, and lacks built-in security or visual customization tools. |
While the manual method gives advanced users complete freedom, Elfsight provides a faster, more intuitive solution for building interactive and responsive forms. Next, let’s look at how you can customize your widget to align with your branding and make it more engaging for your visitors.
Tips to Customize Your WordPress Form
Once your sign-up form is embedded, the next step is to customize its look and behavior to match your website’s design and engage your visitors effectively. This section covers essential tips for creating a visually appealing and high-converting form layout.
- Keep the layout simple and intuitive. Place the most important fields (like name and email) at the top, and avoid overwhelming users with too many inputs.
- Match your form design to your website’s color scheme. Use consistent fonts, colors, and spacing to create a smooth visual experience across your pages.
- Use clear and concise call-to-action (CTA) buttons. Labels like “Join Now” or “Subscribe for Free” perform better than generic “Submit” buttons.
- Choose the right form placement for visibility. Forms placed above the fold, in pop-ups, or inside blog post content tend to get more attention and conversions.
- Enable mobile responsiveness for all elements. Make sure your form adjusts properly on smaller screens and that the fields remain easy to tap and fill out.
- Add optional fields only when needed. Keep your form focused on the key data you want to collect. Long forms often discourage users from completing them.
- Display success messages or redirect after submission. Confirm that the form was submitted successfully with a thank-you message or redirect to a follow-up page.
Once you’ve fine-tuned the form’s appearance and functionality, you can take it a step further by exploring the different types of sign-up forms you can build. From simple newsletter forms to interactive lead capture modules, the possibilities are flexible and powerful.
Sign-Up Form Types You Can Create with Elfsight
Elfsight offers a collection of ready-made templates that simplify the process of creating a targeted, high-performing sign-up form. These templates are tailored to different business needs, helping you streamline user onboarding, partnership outreach, and client registration. Below are three versatile options and how they can be effectively used across various industries.
Signature Sign Up Form
The Signature Sign Up Form features a clean, compact layout perfect for professionals looking to build a mailing list without disrupting the website’s flow. It’s best suited for personal brands, consultants, and freelancers who need a lightweight form embedded in blog footers, sidebars, or about pages. The design keeps focus on the message while making it easy for users to opt in.
Affiliate Sign Up Form
The Affiliate Sign Up Form is tailored for businesses that want to grow their affiliate programs. This template includes fields for capturing names, business details, and promotional platforms, making it easier to filter applicants and build a qualified network of partners. It’s ideal for SaaS companies, eCommerce brands, and digital product creators.
Customer Registration Sign Up Form
The Customer Registration Sign Up Form is built for onboarding new users and setting up customer accounts. With input fields for email, name, and password, it’s a perfect fit for online services, membership platforms, and digital marketplaces. Use it on account creation pages or after checkout to convert buyers into registered members.
These templates provide a solid foundation for a wide range of business goals. Whether you’re aiming to grow your audience, build partnerships, or streamline registrations, you can get started quickly with minimal setup. Let’s now go over common issues and how to resolve them effectively.
Common Issues and How to Fix Them
Even the best-designed sign-up forms can run into issues during setup or usage. Below are common problems users face when adding a sign-up form in WordPress, along with clear solutions to help you fix them quickly and keep your form running smoothly.
Why isn’t my sign-up form showing on the page?
How do I test if the form is working correctly?
Why aren’t email notifications being sent?
How do I prevent spam through my form?
Addressing these challenges early helps ensure your sign-up form functions smoothly across all devices and integrates seamlessly with your workflows. Let’s wrap things up with a few final thoughts on the benefits of using sign-up forms on your WordPress website.
Final Thoughts
Adding a sign-up form to your WordPress website is one of the most effective ways to collect user information, grow your subscriber base, and engage visitors with personalized experiences. Whether you choose a visual widget like Elfsight or opt for a manual HTML method, a well-placed and well-designed form can become a powerful tool in your digital strategy.
From flexible templates like the Signature or Affiliate Sign Up Form to detailed customization and responsive design, you now have all the knowledge to build an interactive, user-friendly form tailored to your needs. With the right setup, your sign-up form can become more than a simple field — it becomes the starting point of a meaningful customer relationship.
Need Assistance?
We hope this article helped you get a clear understanding of how to create and manage sign-up forms for your WordPress website. If you have questions or run into any issues, contact us — our team at Elfsight is here to help. We’re committed to offering intuitive widget solutions that empower your business.
Feel free to connect with our growing Community to ask questions, share ideas, and collaborate with others. Have a feature in mind? Drop your suggestions in our Wishlist — we’re always eager to improve and evolve with your input.