
Magento Accessibility extension
Create your Accessibility extension
What the Accessibility widget does on your Magento store
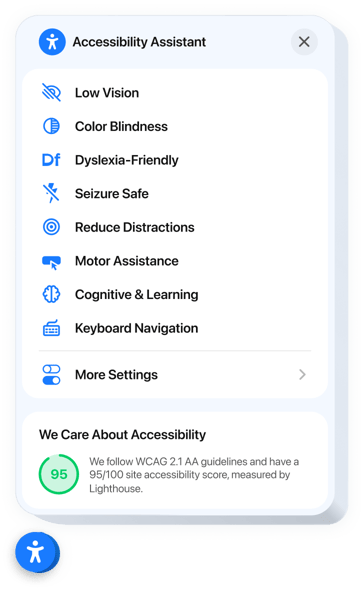
Visitors pick a ready-made mode for their needs, such as Low Vision, Color Blindness, Dyslexia-Friendly or Seizure Safe, and the page adjusts to them. There are 8 modes in total, built for visitors with visual, attention or motor difficulties.
Visitors can also change font size, spacing, readable fonts and contrast views, apply visual filters, and turn on navigation aids such as link highlighting, reading guides and focus indicators.
The built-in checker scans your store with Lighthouse, gives a score and recommendations, and lets you download them as a report. Localization covers 76 regions, so visitors can use the widget in their own language.
Accessibility features your visitors can use
- Ready-made modes for 8 user scenarios. Visitors choose a preset such as Low Vision, Color Blindness, Dyslexia-Friendly or Seizure Safe.
- Font, spacing and contrast settings. Visitors change font size, spacing, readable fonts and contrast views.
- Visual filters. Grayscale, inverted colors, saturation and high-contrast presets.
- Navigation aids. Link highlighting, reading guides, focus indicators and screen reader enhancements.
- Saved preferences. Settings are kept in cookies and restored when visitors return, and the Reset button clears all adjustments.
- Built-in checker and trust badge. A Lighthouse-based scan gives a score and recommendations you can download as a report, and the badge shows the accessibility score on your store.
- Localization in 76 regions.
How to add the Accessibility widget to Magento
Here is how to add this Magento accessibility extension to your store with standard Magento Admin tools, without a module. Use the first method to place the widget inside a CMS page, or the second to show it on every page of your store.
Method 1: Add the widget to a CMS page with Page Builder
Page Builder is available in Adobe Commerce from 2.3.1 and in Magento Open Source from 2.4.3.
- In the Elfsight editor, finish your widget and choose the static (embed) layout.
- Copy the installation code.
- In Magento Admin, go to Content → Pages.
- Click Select next to the page, then click Edit.
- Expand the Content section.
- In Page Builder, expand Elements and drag HTML Code onto the stage.
- Hover over the element, click Settings and paste the Elfsight code.
- Click Save, then click Save on the page.
- If Magento shows a cache message, go to System → Tools → Cache Management and click Refresh.
- Open the page on your storefront and check that the widget works.
Method 2: Add a floating widget to all pages
- In the Elfsight editor, choose the floating layout and copy the installation code.
- In Magento Admin, go to Content → Design → Configuration.
- Click Edit in the Global row to apply the code to all store views.
- Expand Other Settings → Footer.
- Paste the code into Miscellaneous HTML.
- Click Save Configuration.
- Go to System → Tools → Cache Management and click Refresh.
- Open your storefront and check that the widget appears.
Why add it without a module
The widget is not built into your store code. It loads from Elfsight servers, so there is no module whose compatibility you need to check after Magento 2.4.x updates. The code goes in with standard Magento Admin tools: the HTML Code element in Page Builder, a CMS block or Design Configuration.
One CMS block with the widget, added through Content → Widgets, can show on all product pages, in categories or on all pages without editing templates. When you change the widget in the Elfsight editor, the storefront updates without any change to the code in Magento, and the same code works on all store views (Global scope in Design Configuration).